HR Lite
| Step | Action |
|---|---|
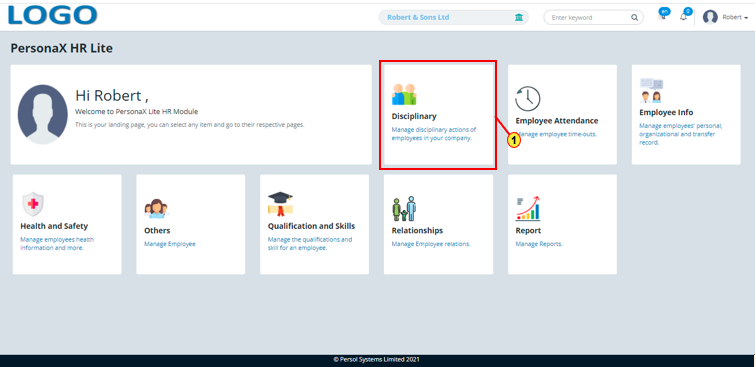
| (1) | On the Personax HR Lite homepage, select the 'Disciplinary' tile |
| Step | Action |
|---|---|
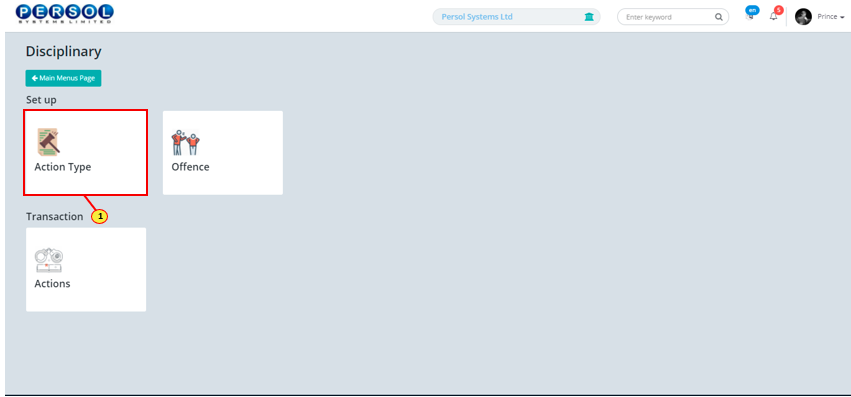
| The ‘Disciplinary’ submenus page opens | |
| (1) | Select the ‘Action Type’ tile |
| Step | Action |
|---|---|
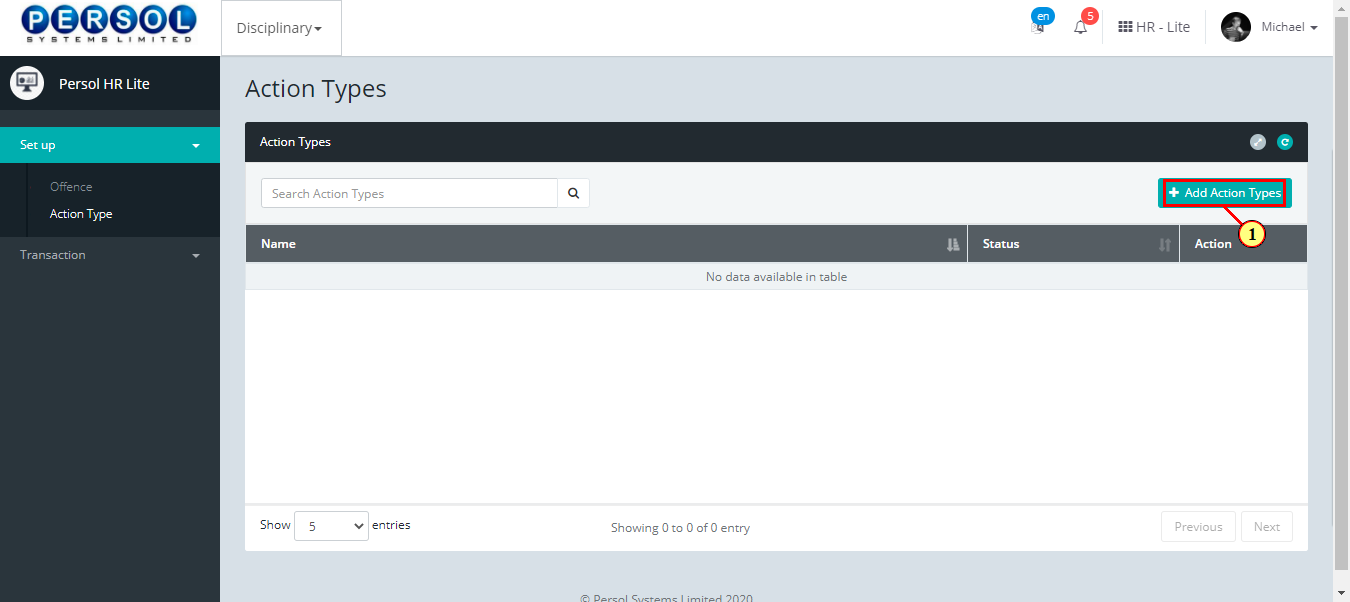
| The ‘Action Type’ page opens | |
| (1) |
To setup a disciplinary action type, click on the  button button
|
| Step | Action |
|---|---|
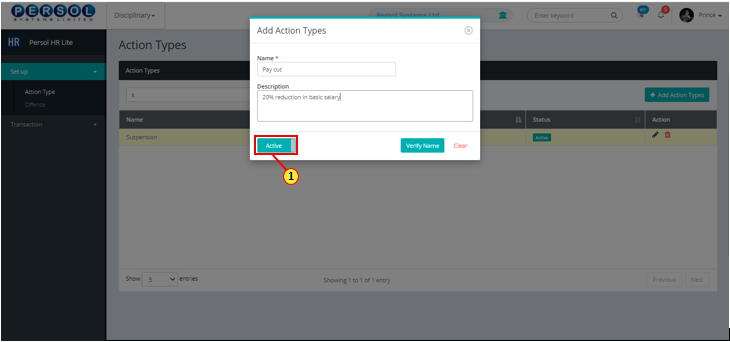
| The ‘Add Action Type’ modal opens | |
| (1) | Enter name of the disciplinary action type |
 |
This field is required * |

| Step | Action |
|---|---|
| (1) | Add a description to provide more information on the action type |

| Step | Action |
|---|---|
| (1) |
You may click on the  button to change status of the disciplinary action type to inactive button to change status of the disciplinary action type to inactive
|
|
- An active status means the action type can be used in transactions on other pages - An inactive status means the action type cannot be used in transactions on other pages |
| Step | Action |
|---|---|
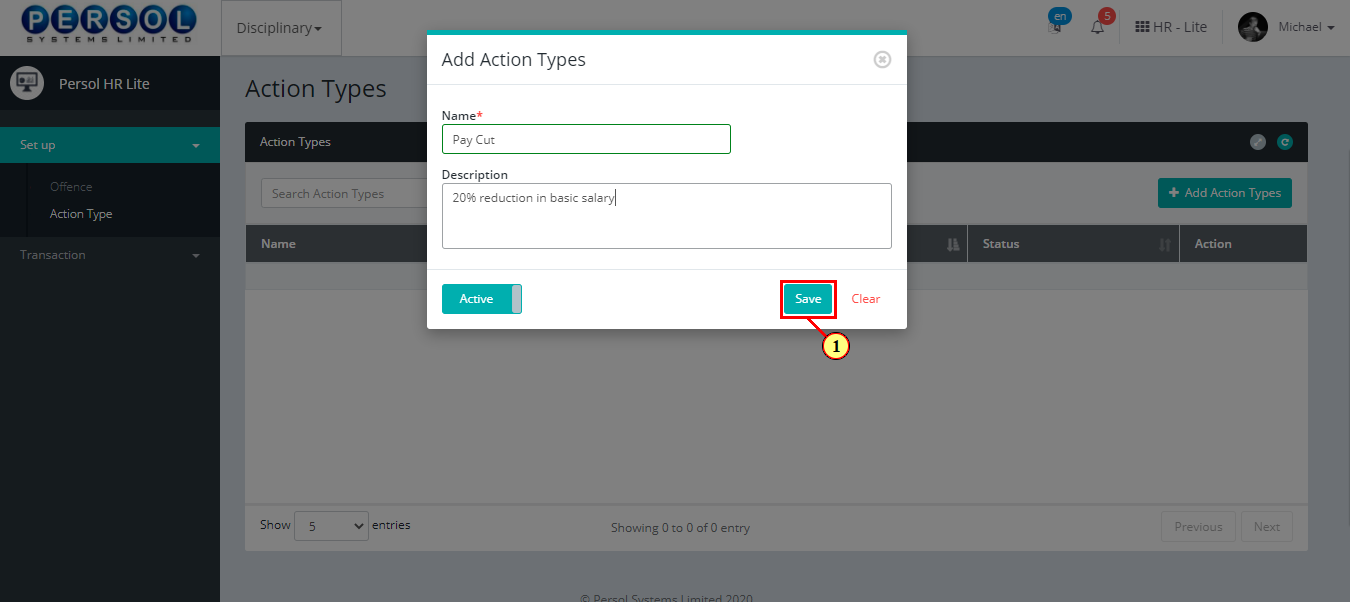
|
You may click on the |
| (1) |
Click on the  button to save the details of the action type button to save the details of the action type
|
| Step | Action |
|---|---|
| (1) | A notification displays to indicate that the action type setup has been saved successfully |

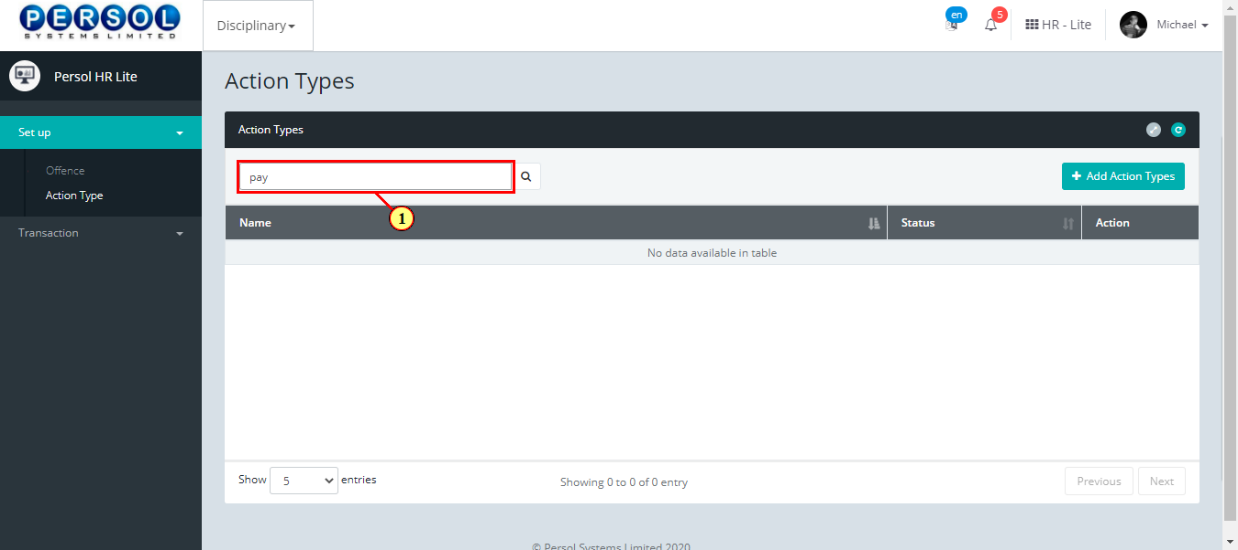
| Step | Action |
|---|---|
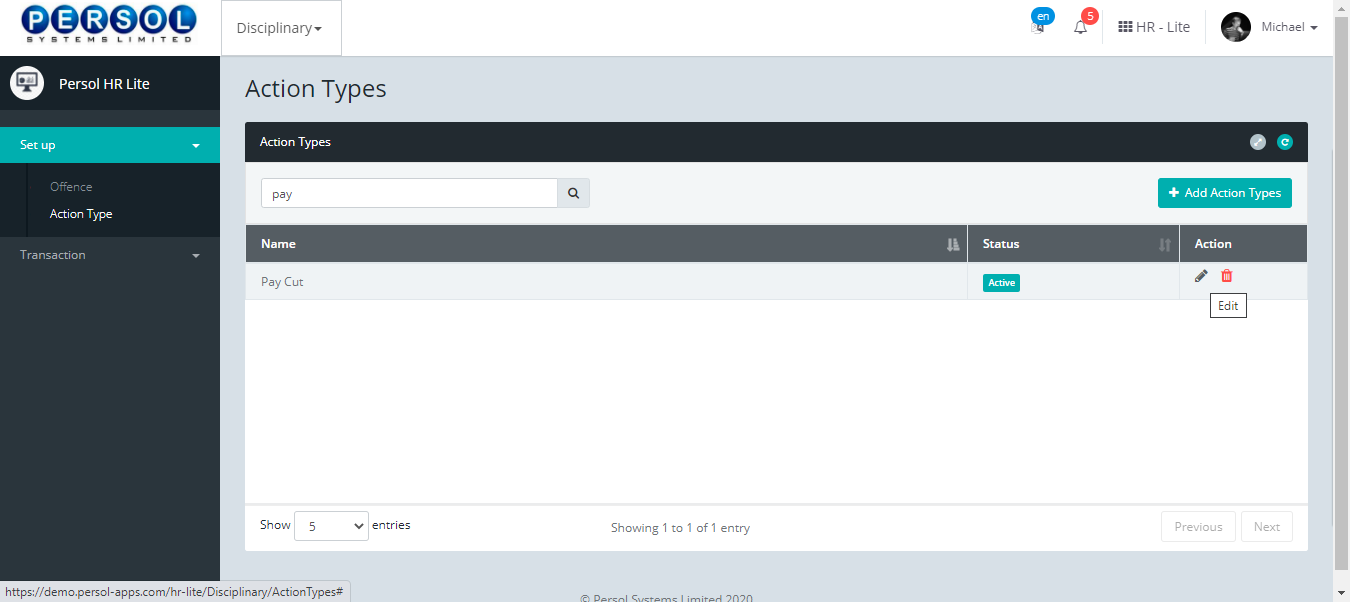
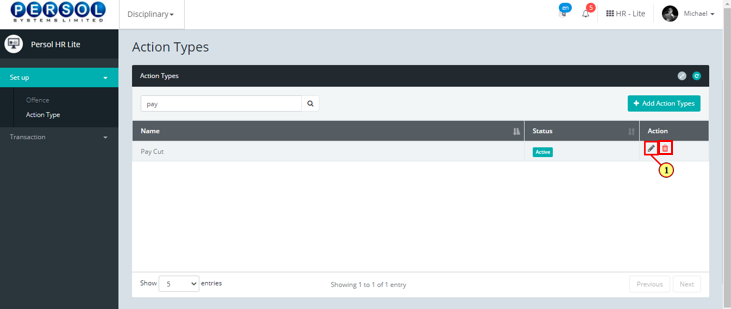
| (1) |
To edit an action type, enter the action type name in the search box and click on the  icon to search icon to search
|
| Step | Action |
|---|---|
| The search result details display in the grid | |
|
The Action column consists of the Delete  and Edit and Edit  action icons action icons
|
| Step | Action |
|---|---|
|
You may click on the delete icon to delete the action type
|
| (1) |
Click on the edit icon to edit the details of the action type
|
| Step | Action |
|---|---|
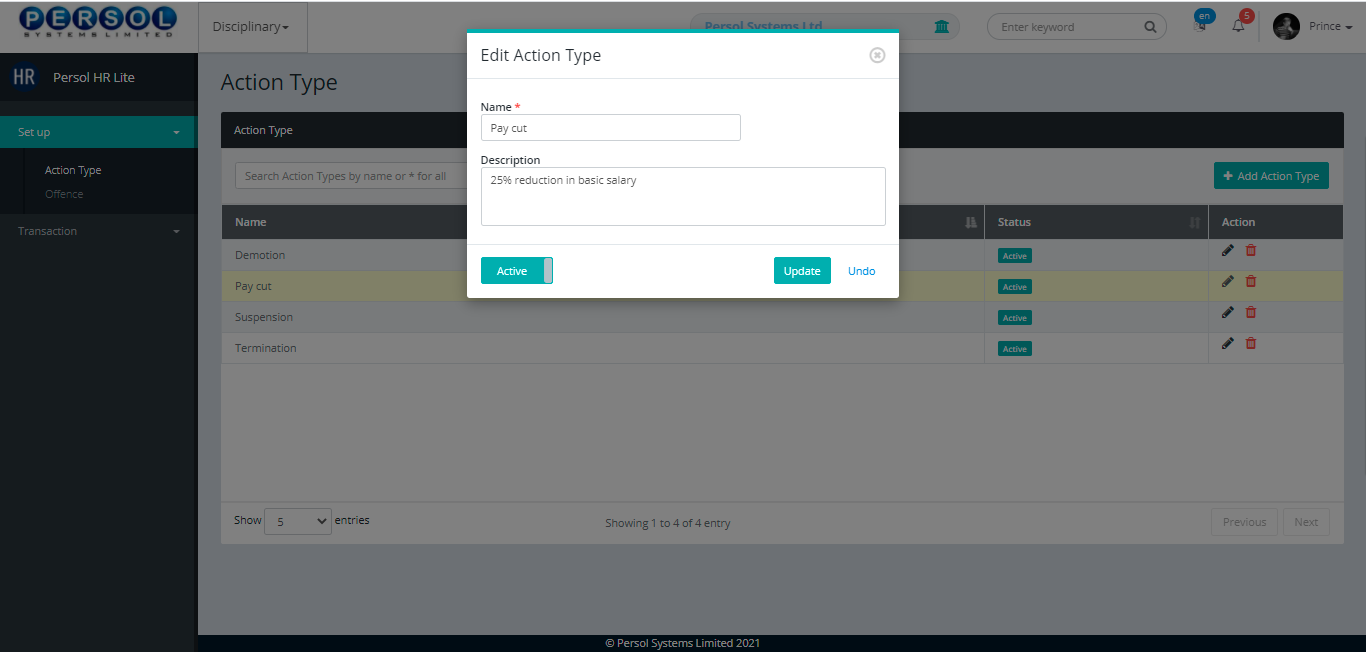
| The ‘Edit Action Type’ modal opens | |
| Edit the name, description or status of the disciplinary action type |
| Step | Action |
|---|---|
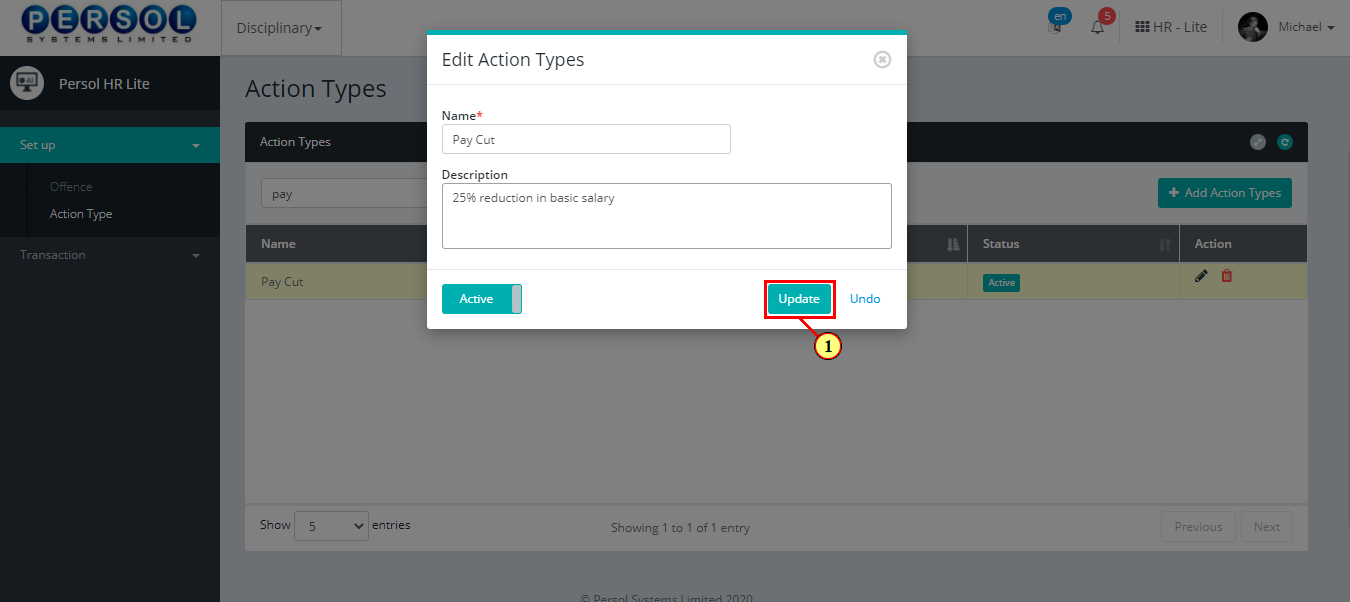
|
You may click on the  button to revert changes made button to revert changes made
|
| (1) |
Click on the update  button to save the changes made button to save the changes made
|
| Step | Action |
|---|---|
| (1) | A notification displays to indicate that the update has been saved successfully |

| Step | Action |
|---|---|
| (1) | On the HCM HR Lite homepage, select the ‘Disciplinary’ tile |

| Step | Action |
|---|---|
| The ‘Disciplinary’ submenus page opens | |
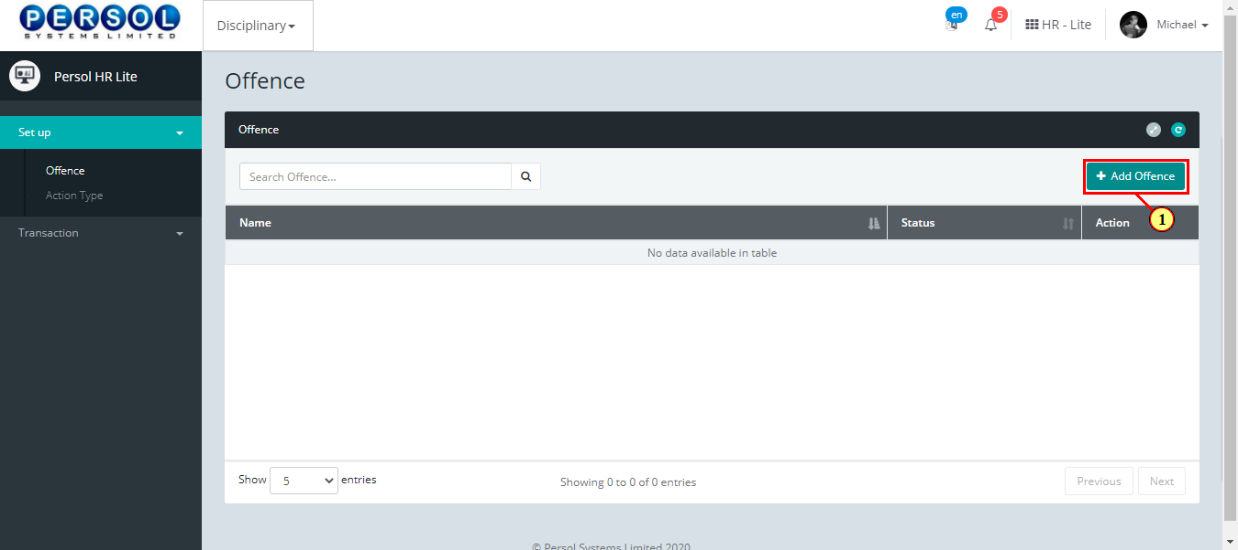
| (1) | Select the ‘Offence’ Setup tile |

| Step | Action |
|---|---|
| The ‘Offence’ page opens | |
| (1) |
To setup an offence, click on the  button button
|
| Step | Action |
|---|---|
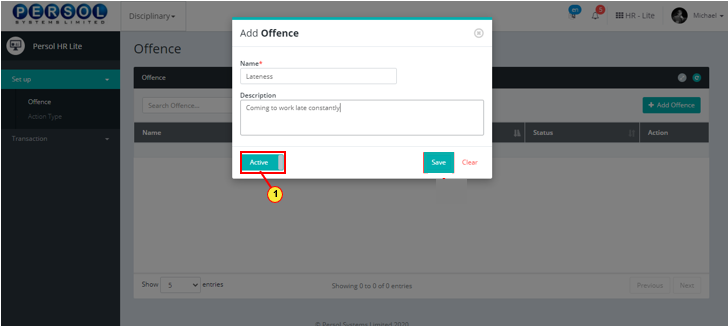
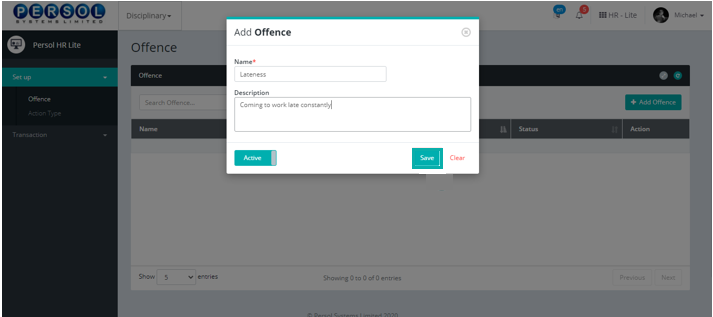
| The ‘Add Offence’ modal opens | |
| (1) | Enter name of the offence |
|
This field is required * |

| Step | Action |
|---|---|
| (1) | Add a description to provide more information on the offence |

| Step | Action |
|---|---|
| (1) |
You may click on the  button to change status of the offence to inactive button to change status of the offence to inactive
|
|
- An active status means the offence can be used in transactions on other pages - An inactive status means the offence cannot be used in transactions on other pages |
| Step | Action |
|---|---|
|
You may click on the  button to clear all details entered button to clear all details entered
|
| (1) |
Click on the  button to save details of the newly added offence button to save details of the newly added offence
|
| Step | Action |
|---|---|
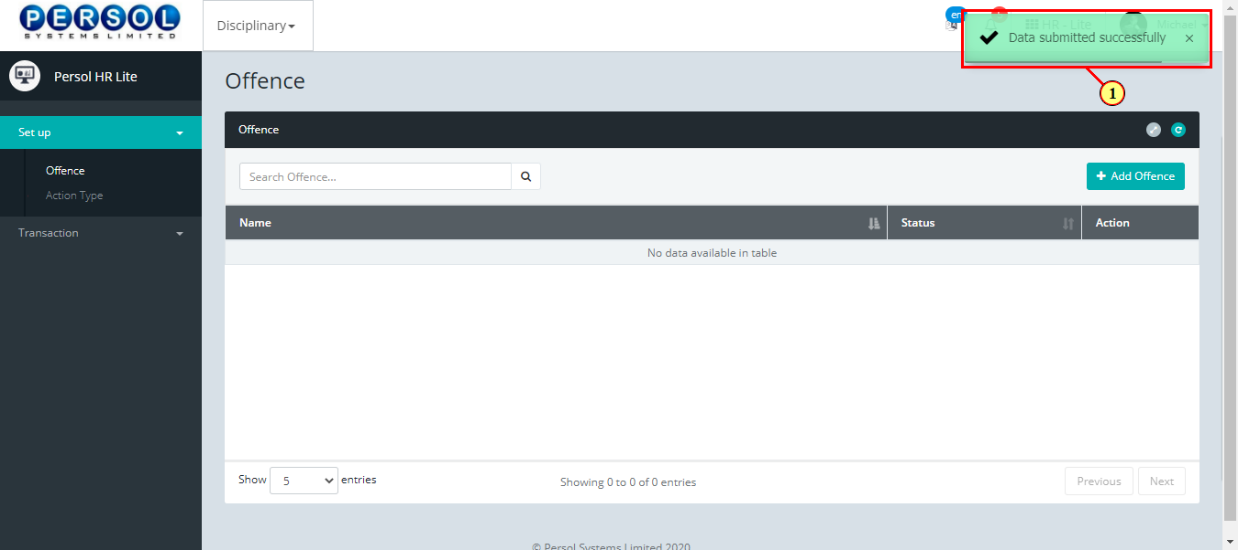
| (1) | A notification displays to indicate that the offence setup has been saved successfully |
| Step | Action |
|---|---|
| (1) |
To edit an offence setup, enter the offence name in the search box and click on the  icon to search icon to search
|

| Step | Action |
|---|---|
| The search result details display in the grid | |
|
The Action column consists of the Delete  and Edit and Edit  action icons action icons
|
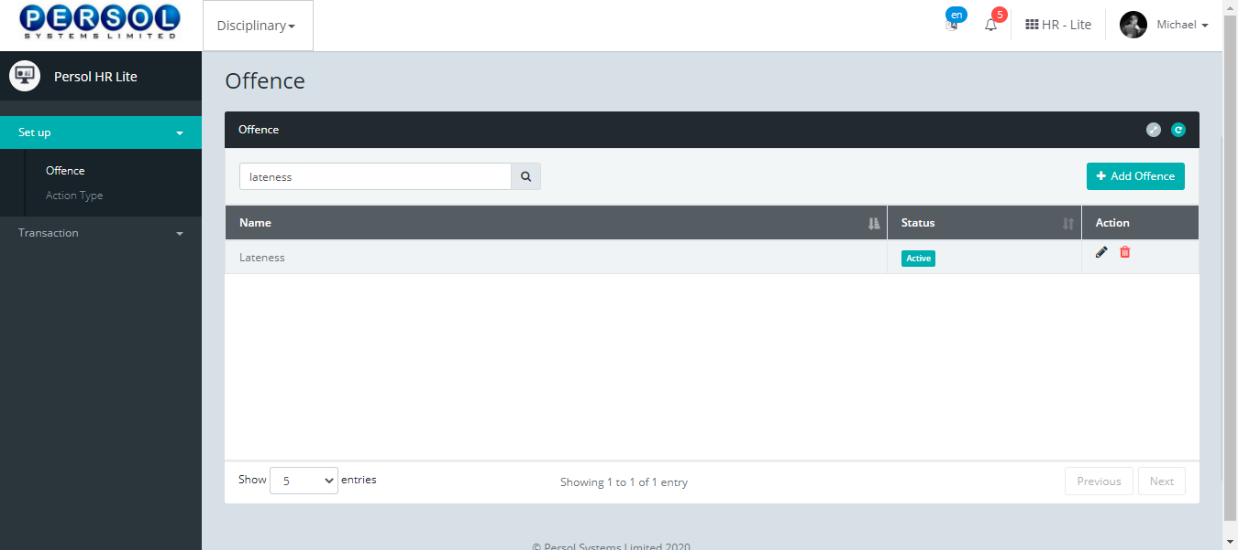
| Step | Action |
|---|---|
|
You may click on the delete icon to delete the offence
|
| (1) |
Click on the edit icon to edit the details of the offence
|
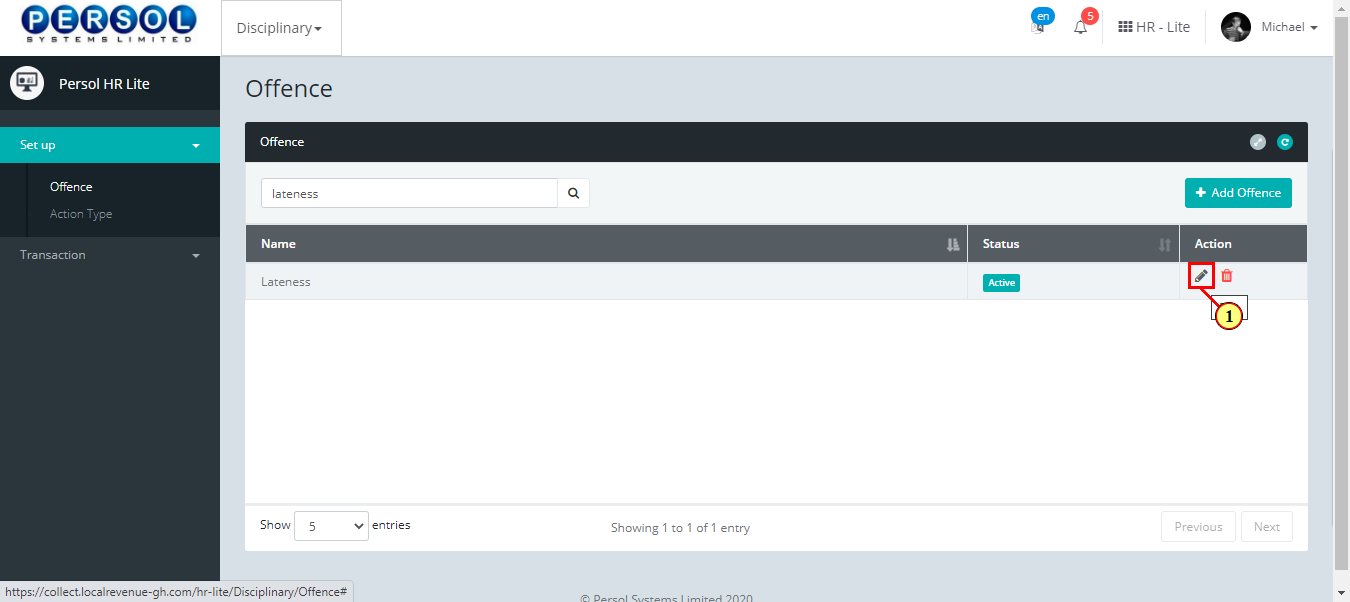
| Step | Action |
|---|---|
| The ‘Edit Offence’ modal opens | |
| Edit the name, description or status of the offence setup |
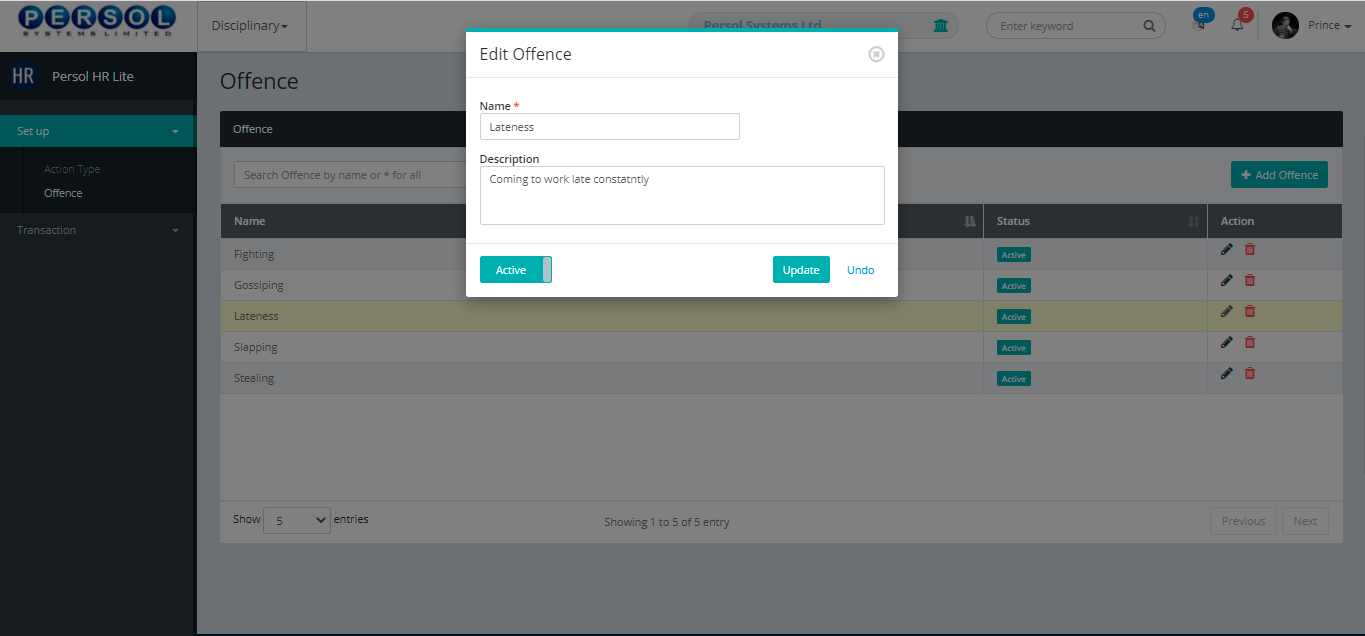
| Step | Action |
|---|---|
|
You may click on the  button to revert changes made button to revert changes made
|
| (1) |
Click on the update  button to save the changes made button to save the changes made
|
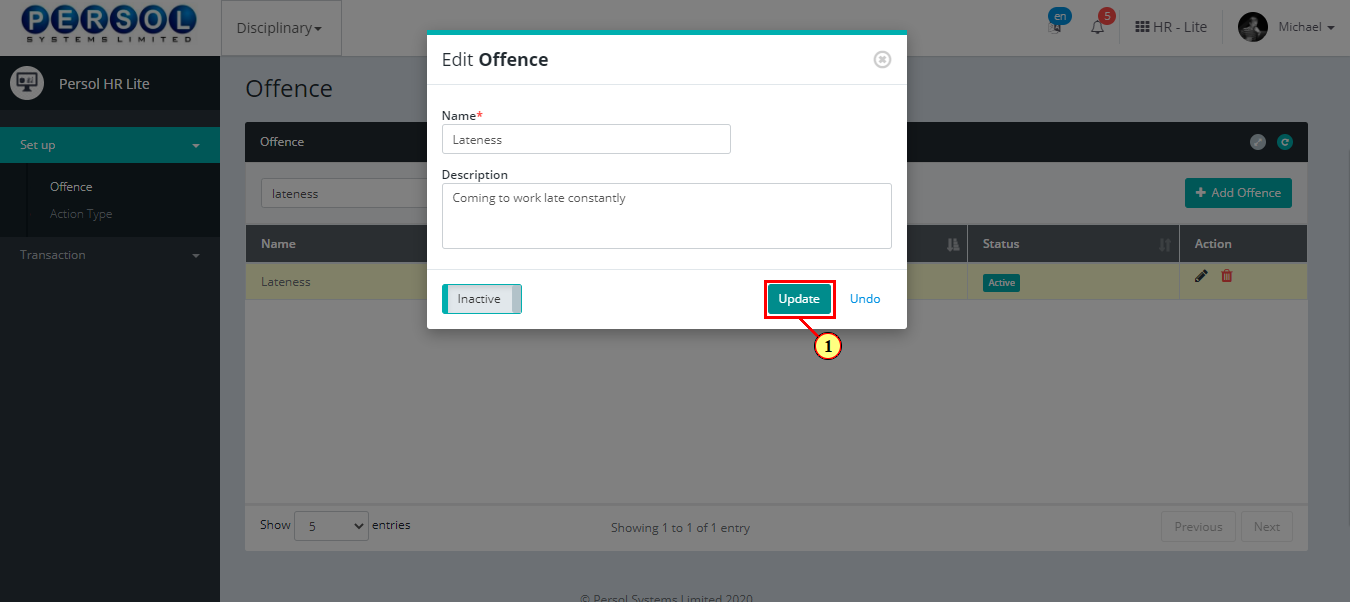
| Step | Action |
|---|---|
| (1) | A notification displays to indicate that the update has been saved successfully |

| Step | Action |
|---|---|
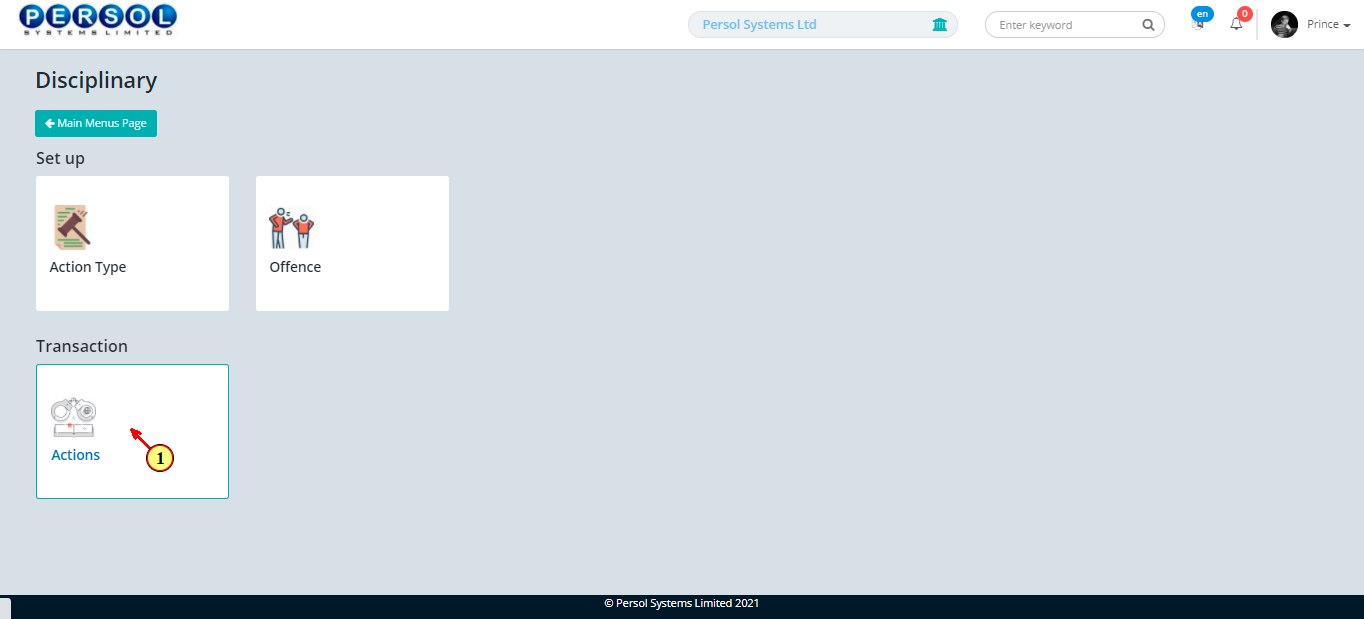
| (1) | On the HCM HR Lite homepage, select the ‘Disciplinary’ tile |

| Step | Action |
|---|---|
| The 'Disciplinary' sub menus page opens | |
| (1) | Click on the 'Actions' transaction tile |
| Step | Action |
|---|---|
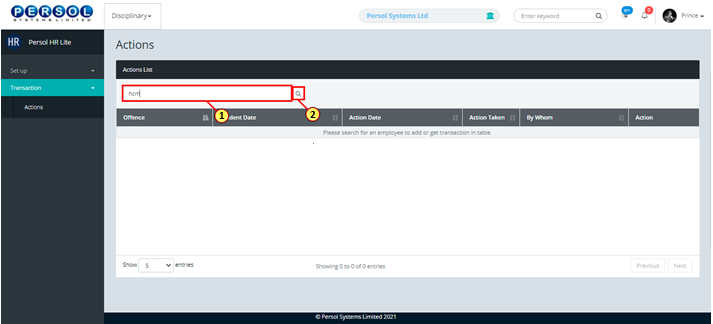
| The Disciplinary Actions page opens | |
| (1) | To record a disciplinary action for an employee, enter the employee's name or ID in the search box |
| (2) |
Click on the icon  to search to search
|
| Step | Action |
|---|---|
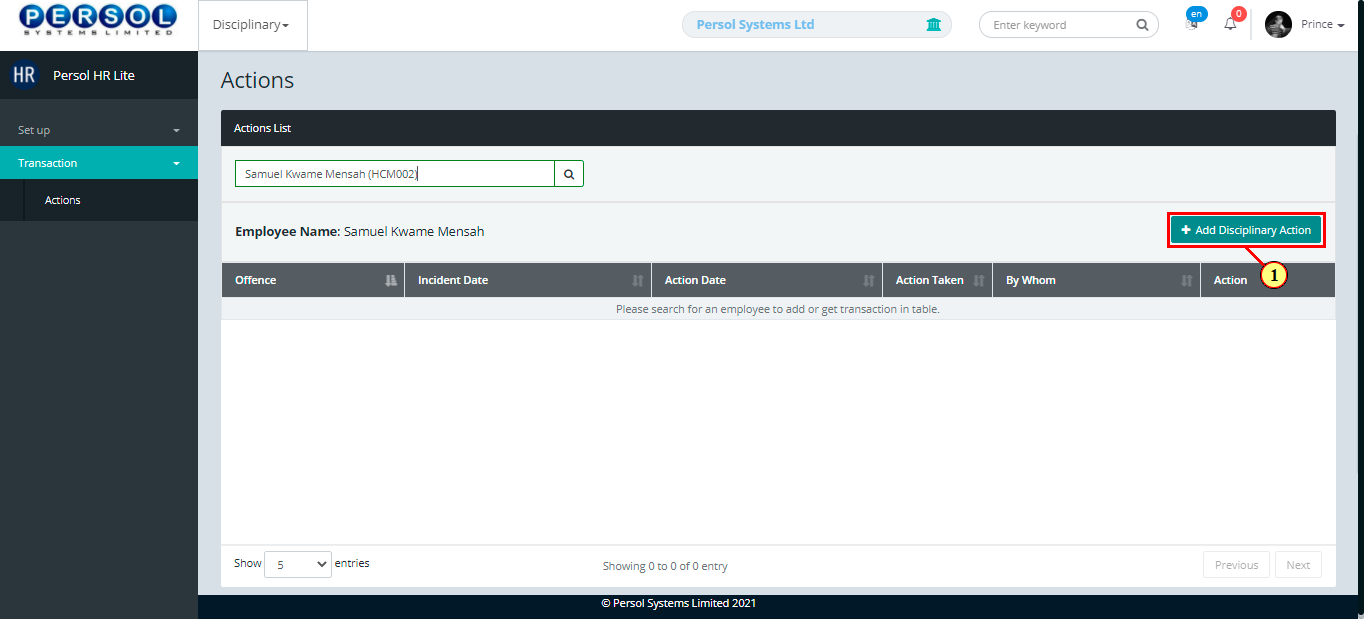
|
The employee's name and any previous disciplinary action record display in the grid |
| (1) |
Click on the  button to add a disciplinary action for the employee button to add a disciplinary action for the employee
|
| Step | Action |
|---|---|
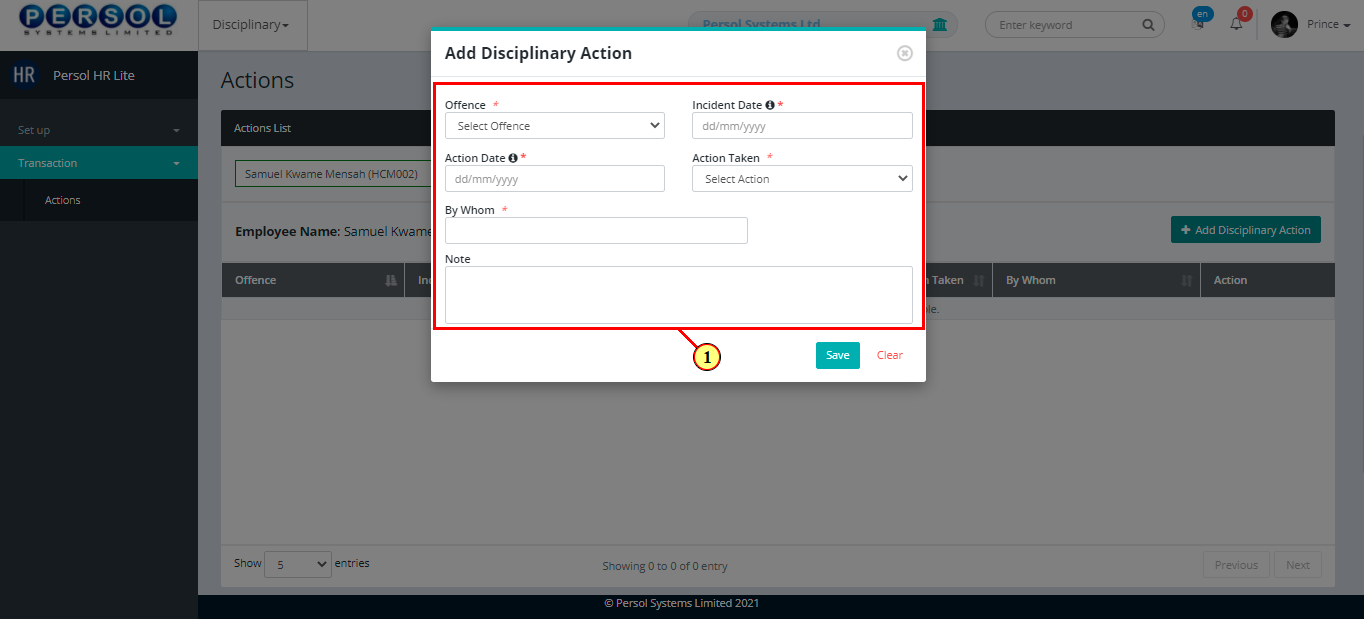
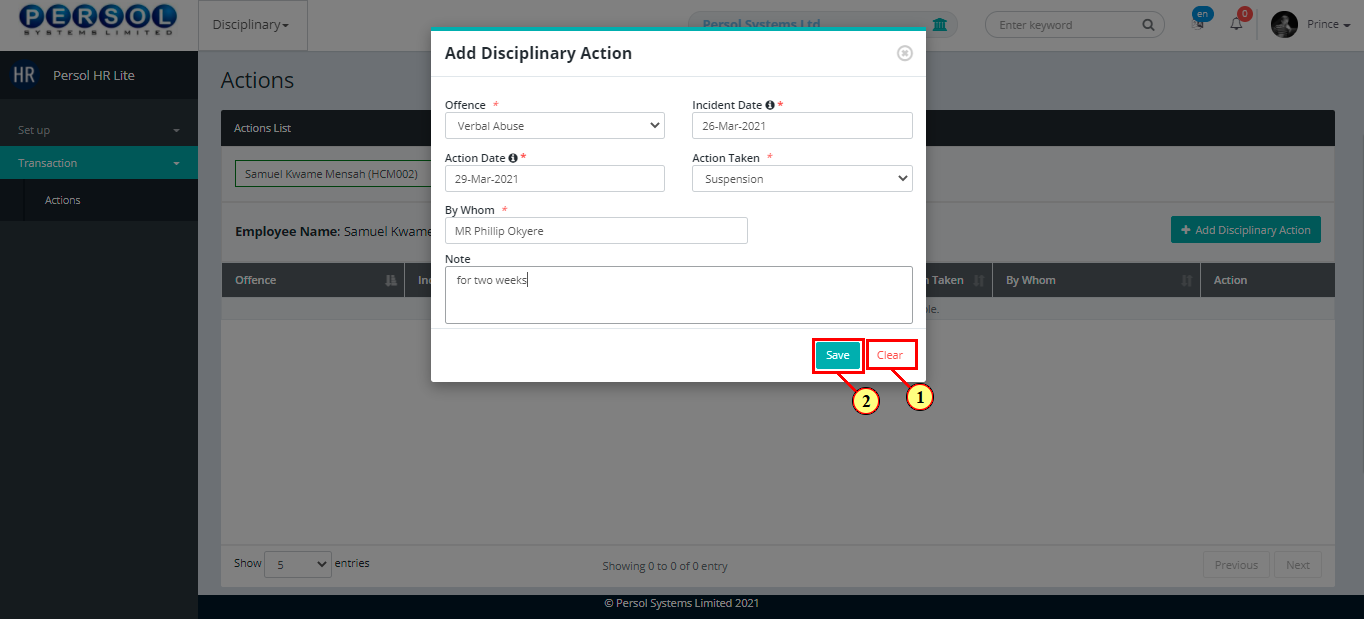
| The 'Add Disciplinary Action' modal opens | |
| (1) |
Provide the following details of the disciplinary action:
|
|
All mandatory fields are marked with an asterisk * |
| Step | Action |
|---|---|
|
You may click on the |
| (1) |
Click on the  button to save the disciplinary action details button to save the disciplinary action details
|
| Step | Action |
|---|---|
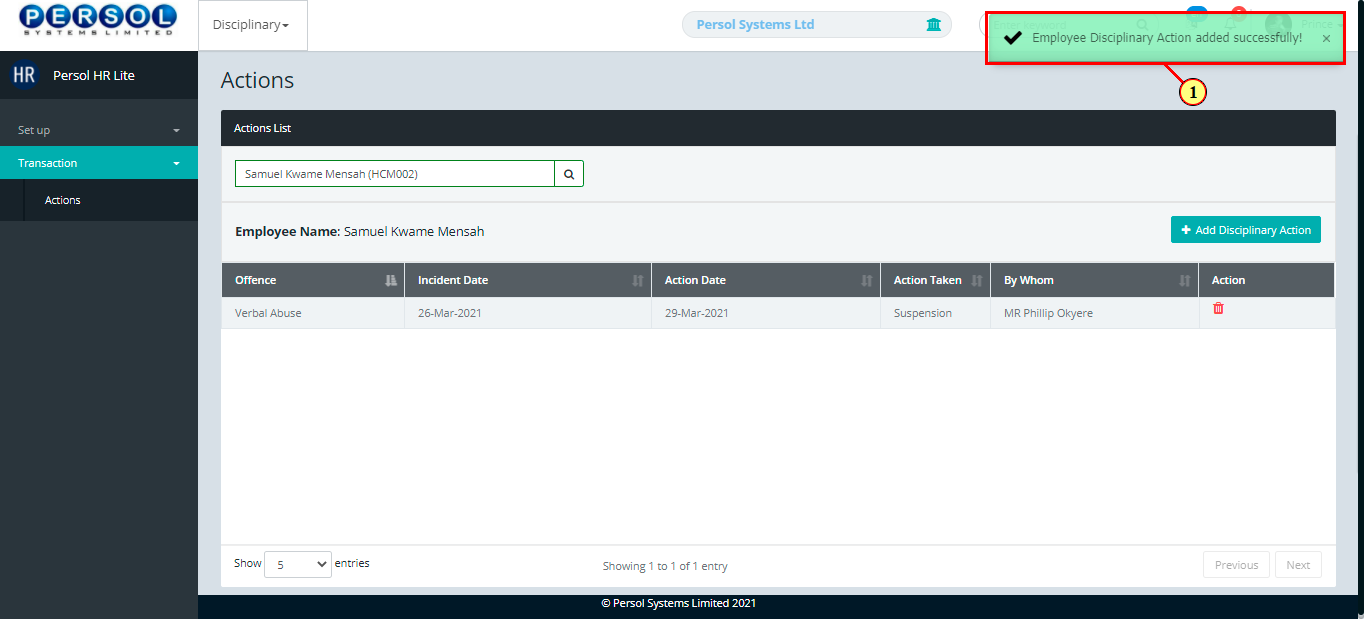
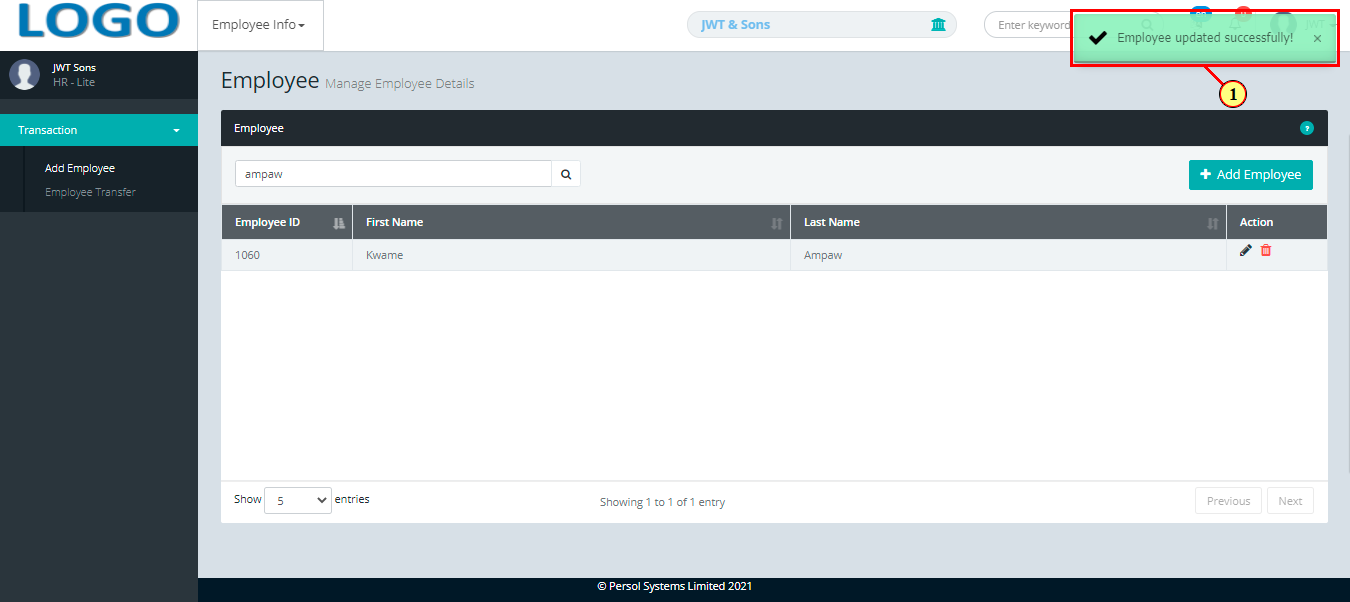
| (1) | A notification displays to indicate that the employee’s disciplinary action has been saved successfully |
| Step | Action |
|---|---|
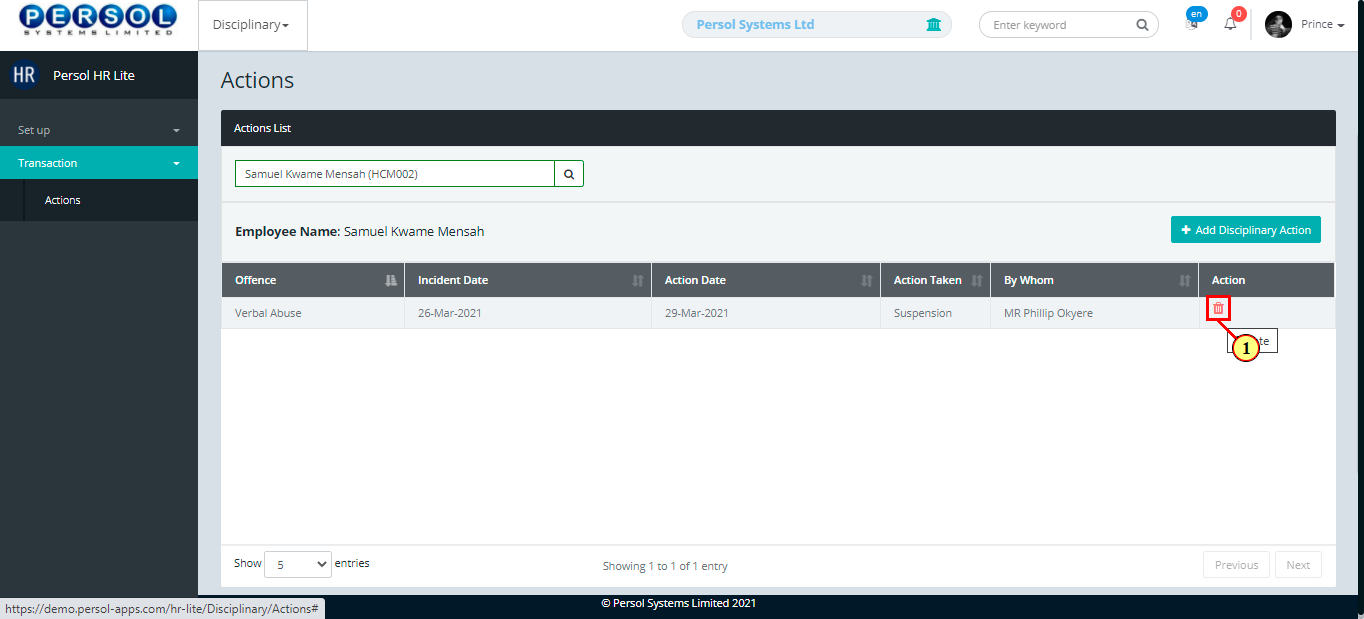
| (1) |
You may click on the delete icon  to delete the disciplinary action record to delete the disciplinary action record
|
| Step | Action |
|---|---|
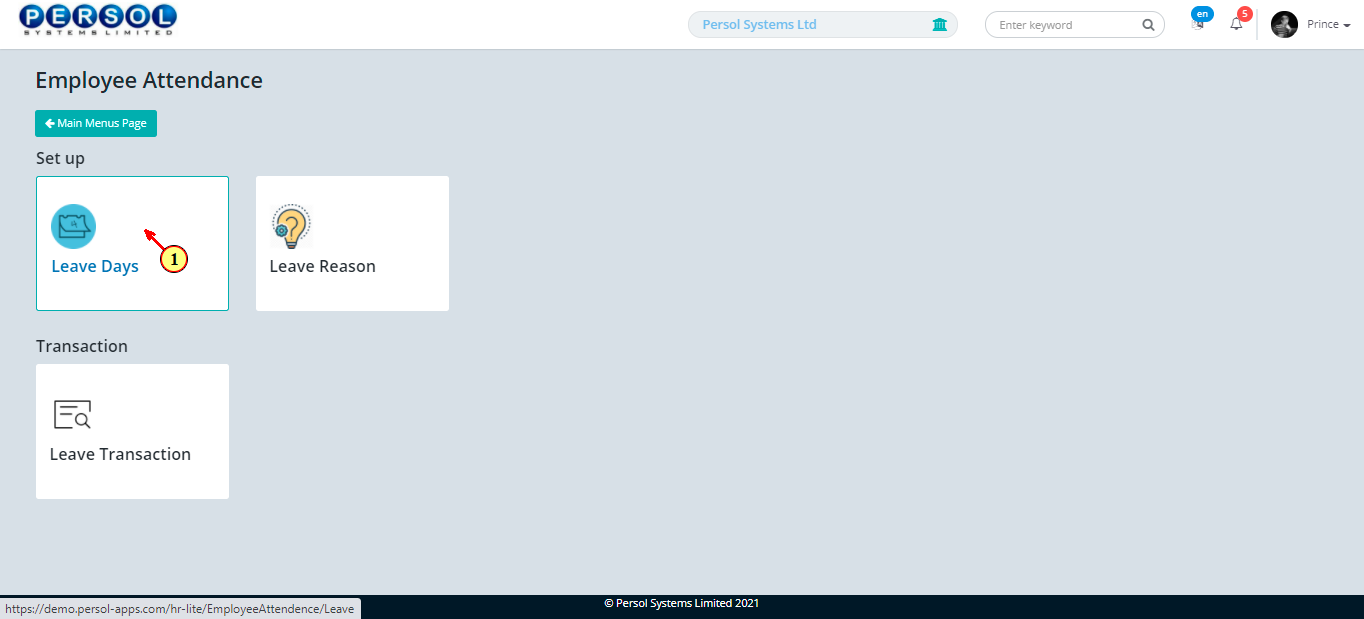
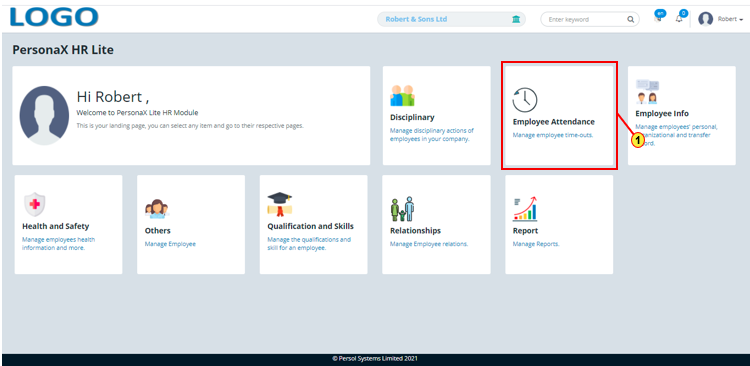
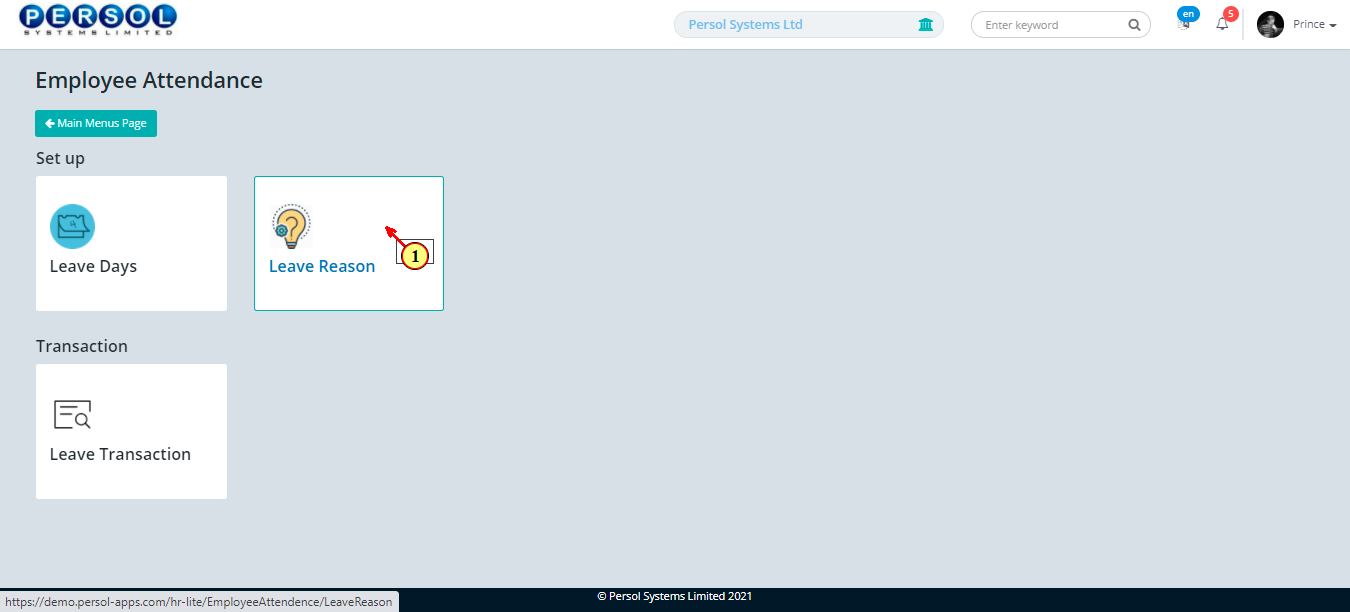
| (1) | On the Personax HR Lite homepage, select the 'Employee Attendance' tile |

| Step | Action |
|---|---|
| The ‘Employee Attendance’ submenus page opens | |
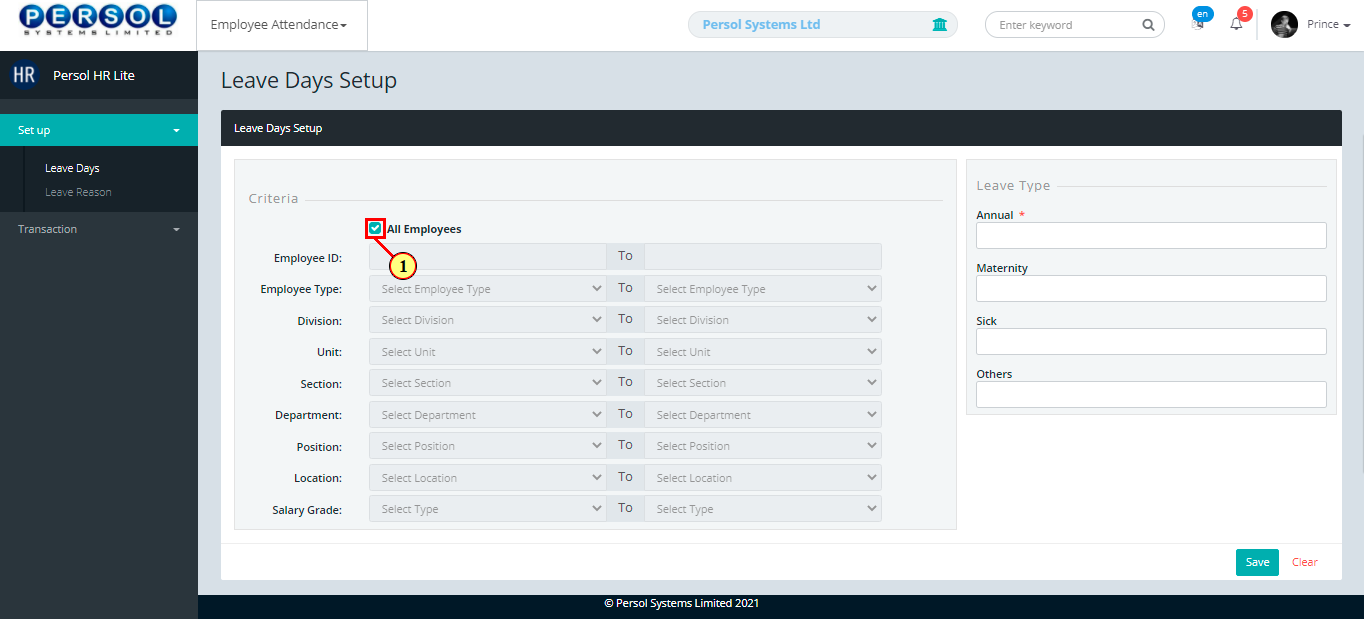
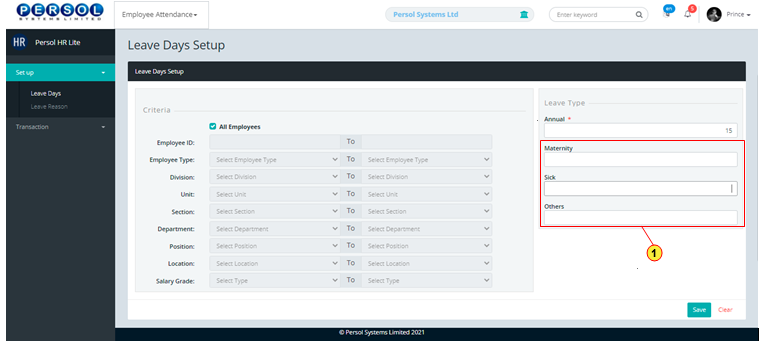
| (1) | Select the ‘Leave Days' setup tile |
| Step | Action |
|---|---|
| The ‘Leave Days Setup' page opens | |
| (1) |
 ‘All Employees’ is checked by default to indicate that the leave days setup applies for all employees ‘All Employees’ is checked by default to indicate that the leave days setup applies for all employees
|
|
Click here to view how to setup leave days for specific employee groups |
|
Click here to continue steps |
| Step | Action |
|---|---|
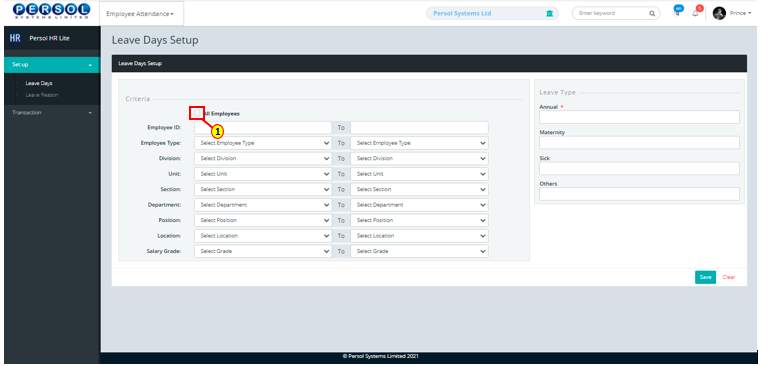
| (1) | To setup leave days for specific employee groups, uncheck the ‘All Employees’ box |
|
The employee group fields are enabled for selection |
| Step | Action |
|---|---|
|
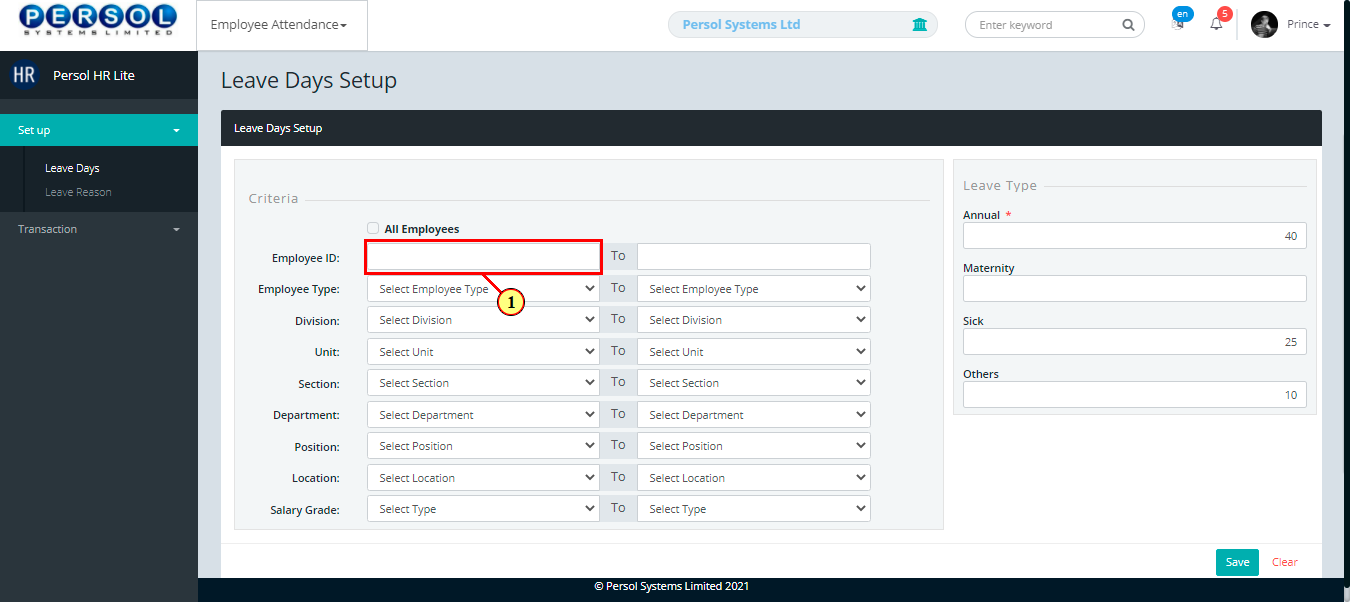
Provide the range for the employee groups (one or more) that you want to setup leave days for |
| (1) | Example: To setup leave days using the Employee ID group, enter the ID range (eg. from hcm001 to hcm005) |
| Step | Action |
|---|---|
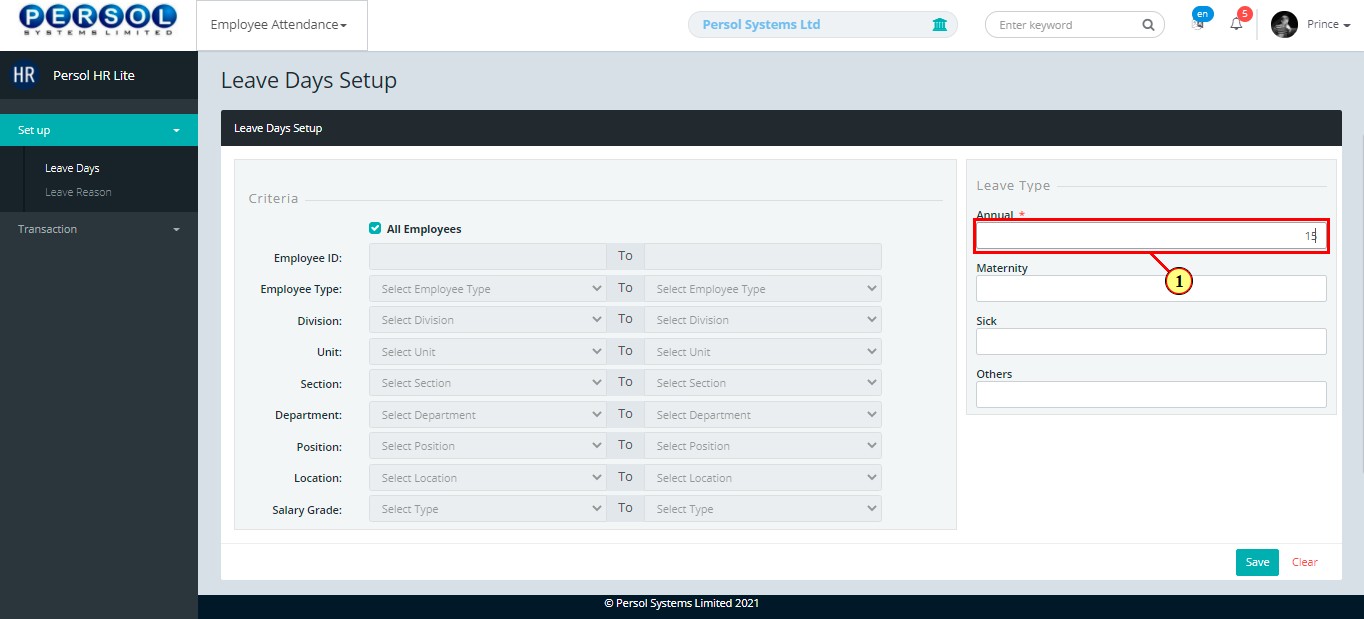
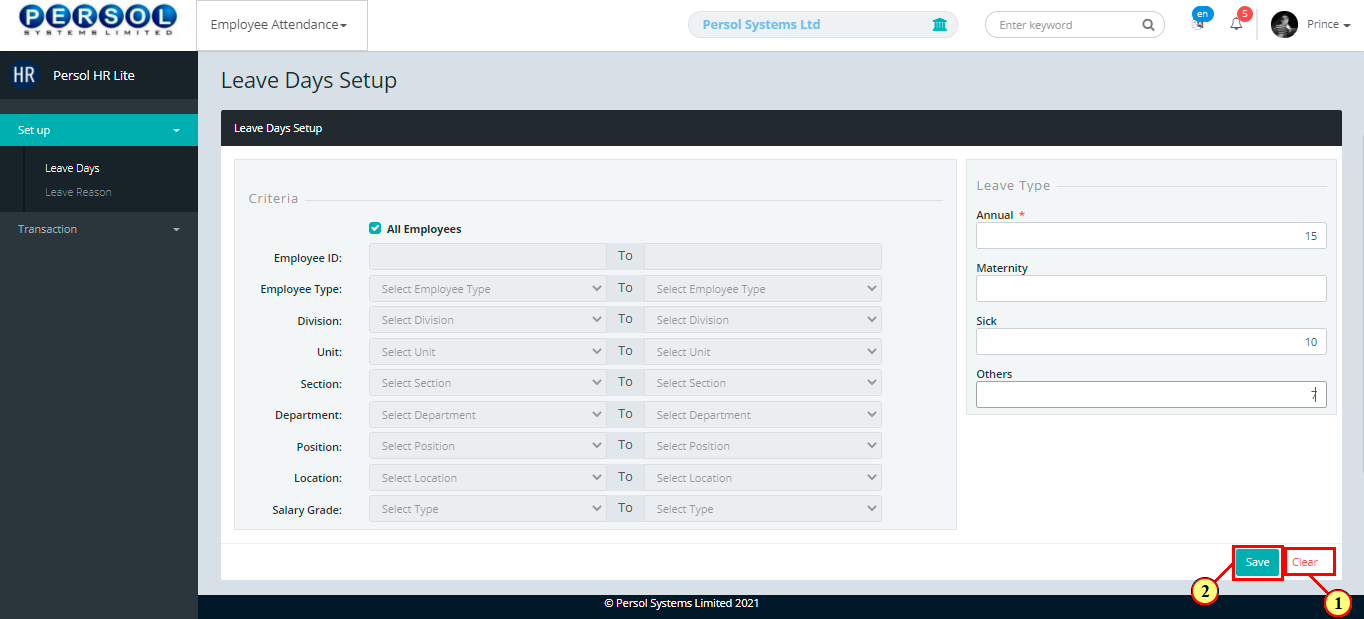
| (1) | Enter the Annual leave days to be assigned to employees |
|
This field is required * |
| Step | Action |
|---|---|
|
Enter leave days to be assigned to employees for Maternity, Sick and Other leave types if applicable |
| Step | Action |
|---|---|
|
You may click on the  button to clear all details entered button to clear all details entered
|
| (1) |
Click on the  button to save the leave days setup button to save the leave days setup
|
| Step | Action |
|---|---|
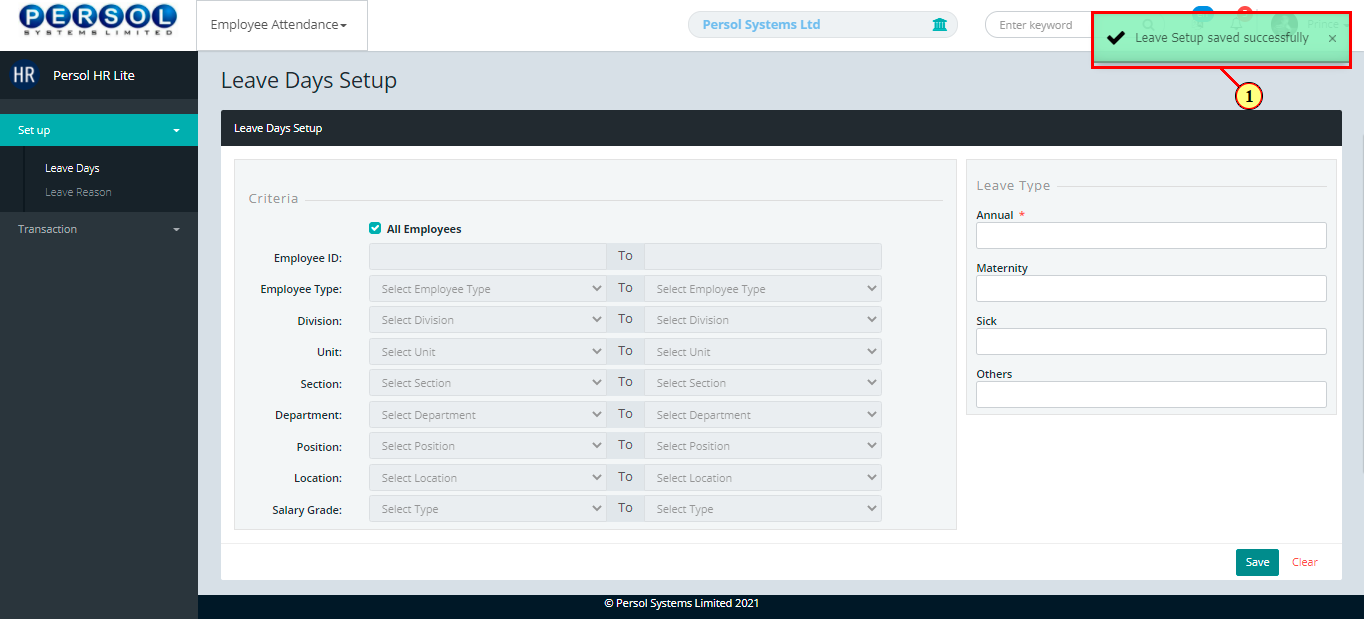
| (1) | A notification displays to indicate that the leave days setup has been saved successfully |
| Step | Action |
|---|---|
| (1) | On the Personax HR Litehomepage, select the 'Employee Attendance' tile |
| Step | Action |
|---|---|
| The ‘Employee Attendance’ submenus page opens | |
| (1) | Select the 'Leave Reason' setup tile |
| Step | Action |
|---|---|
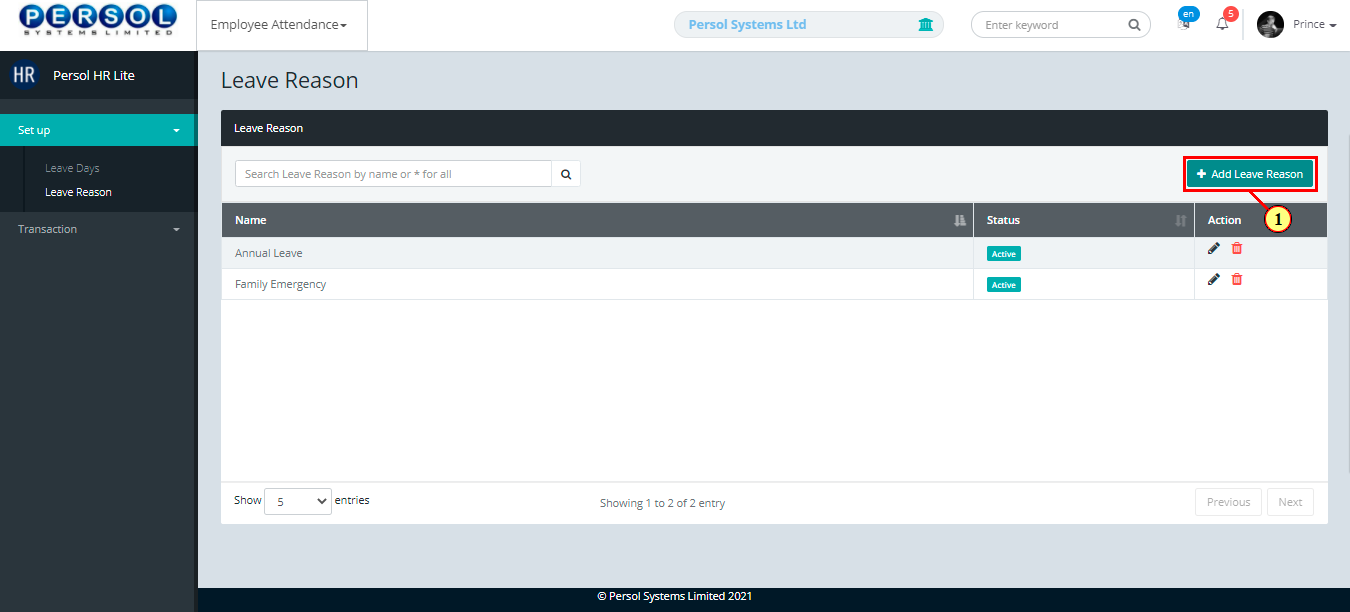
| The 'Leave Reason' page opens | |
| (1) |
To setup a leave reason, click on the 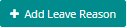 button button
|
| Step | Action |
|---|---|
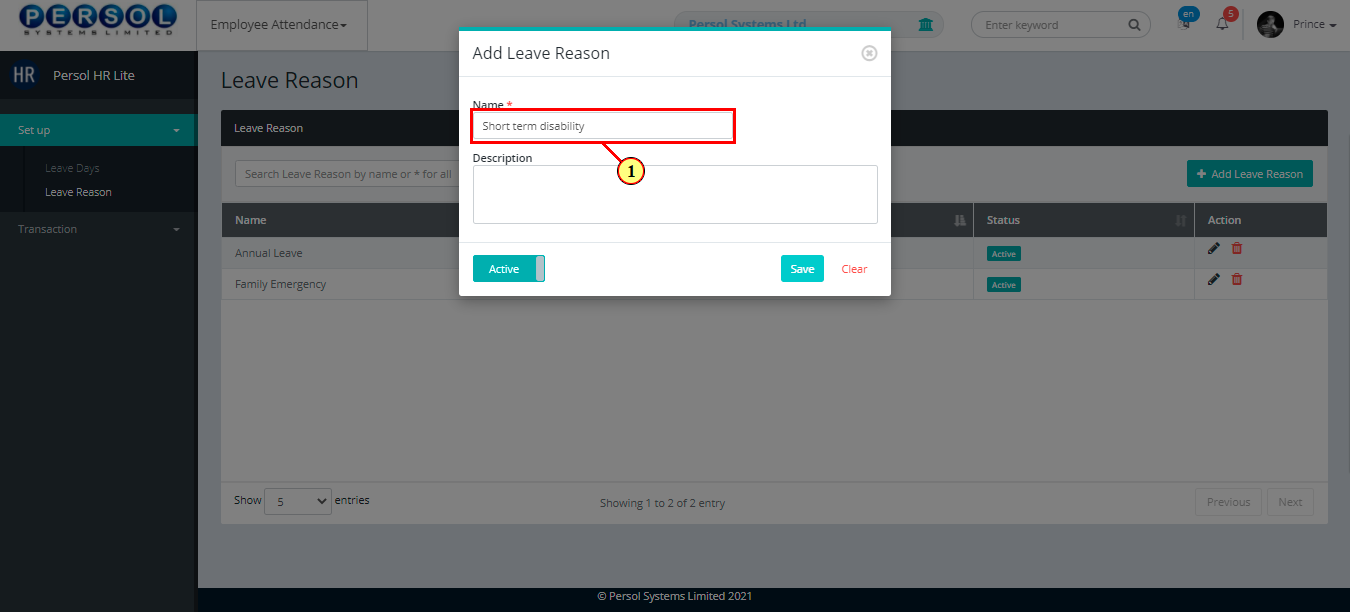
| The 'Add Leave Reason' modal opens | |
| (1) | Enter name for the leave reason |
|
This field is required * |
| Step | Action |
|---|---|
| (1) | Add description to provide more details on the leave reason |
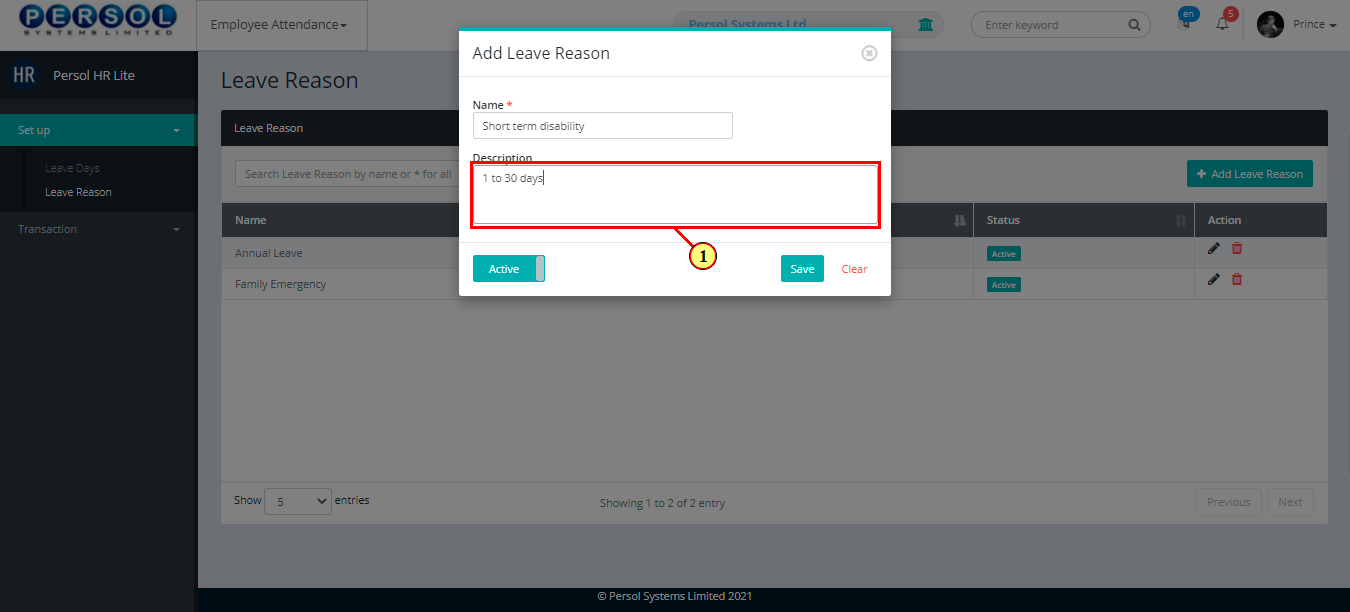
| Step | Action |
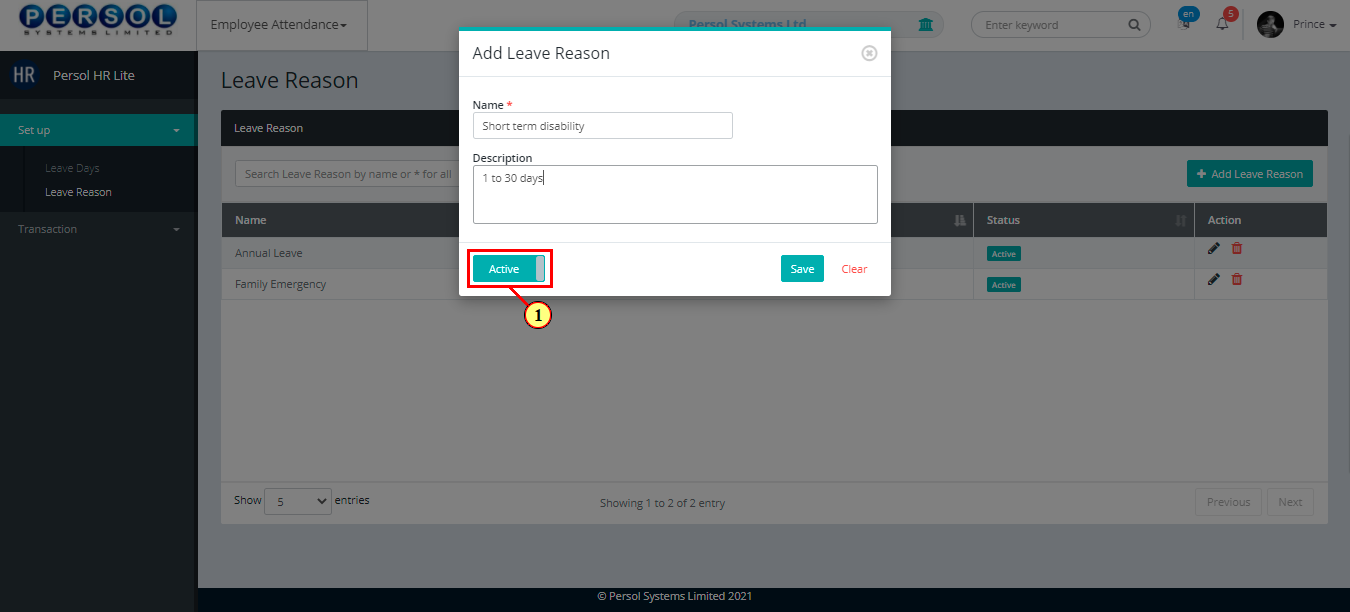
|---|---|
| (1) |
You may click on the  button to change status of the leave reason setup to inactive button to change status of the leave reason setup to inactive
|
|
- An active status means the leave reason can be used in transactions on other pages - An inactive status means the leave reason cannot be used in transactions on other pages |
| Step | Action |
|---|---|
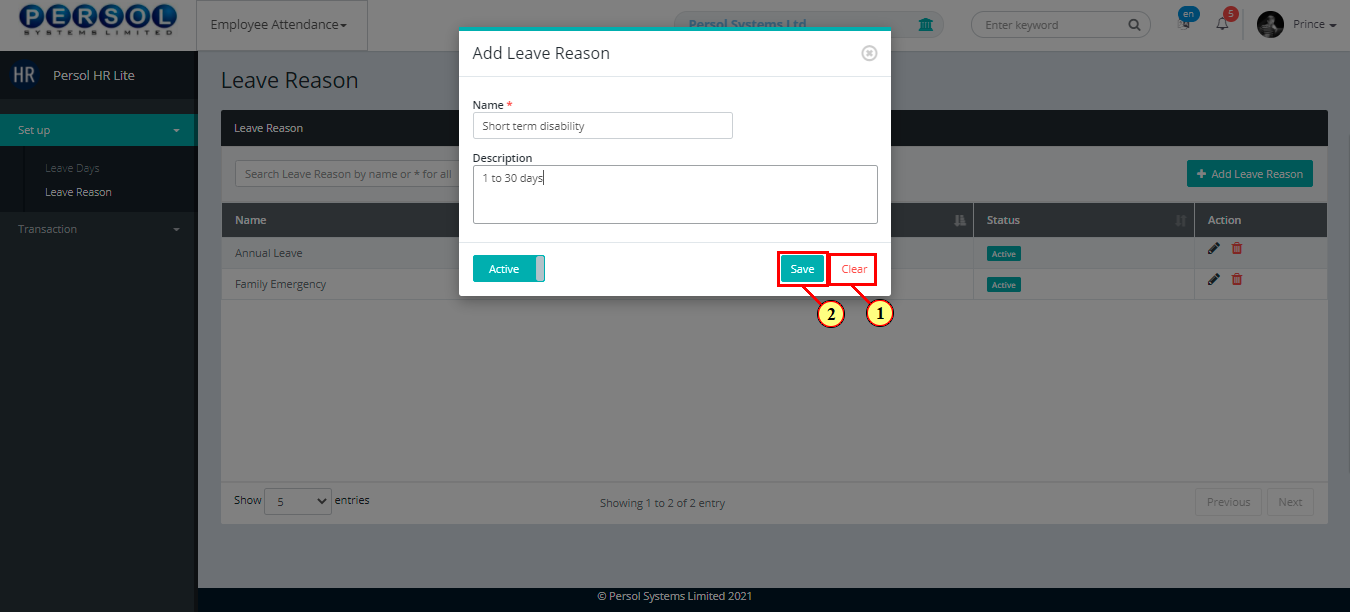
|
You may click on the |
| (1) |
Click on the button to save details of the newly added leave reason setup
|
| Step | Action |
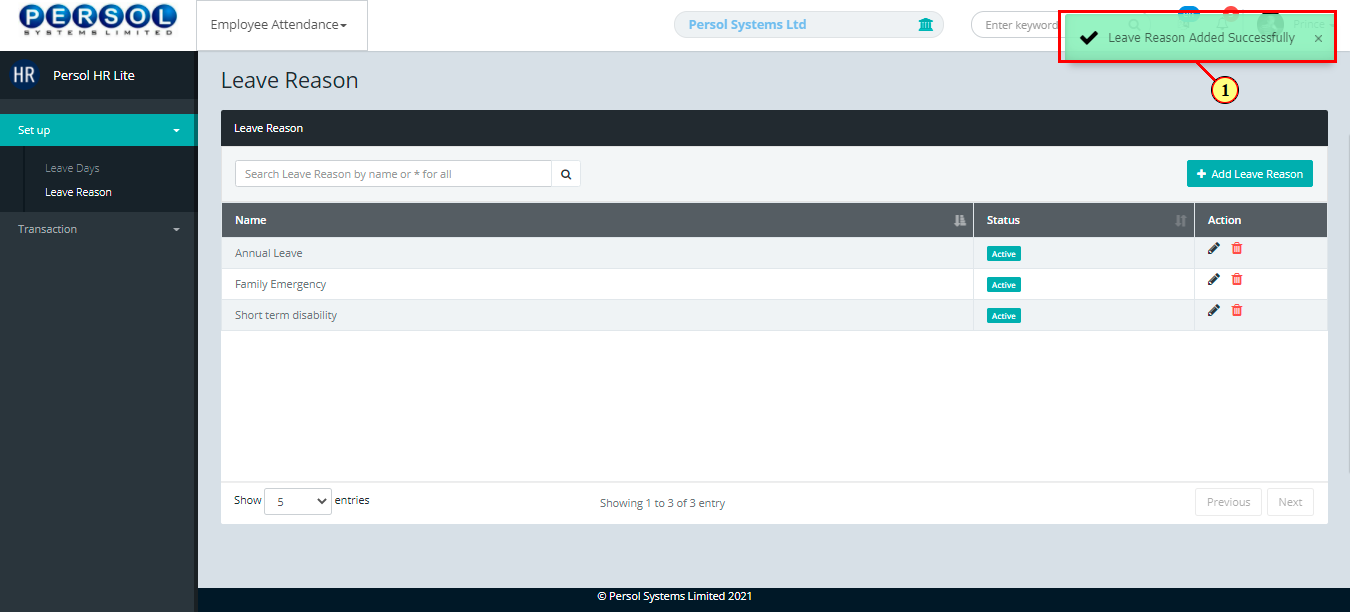
|---|---|
| (1) | A notification displays to indicate that the leave reason setup has been saved successfully |
| Step | Action |
|---|---|
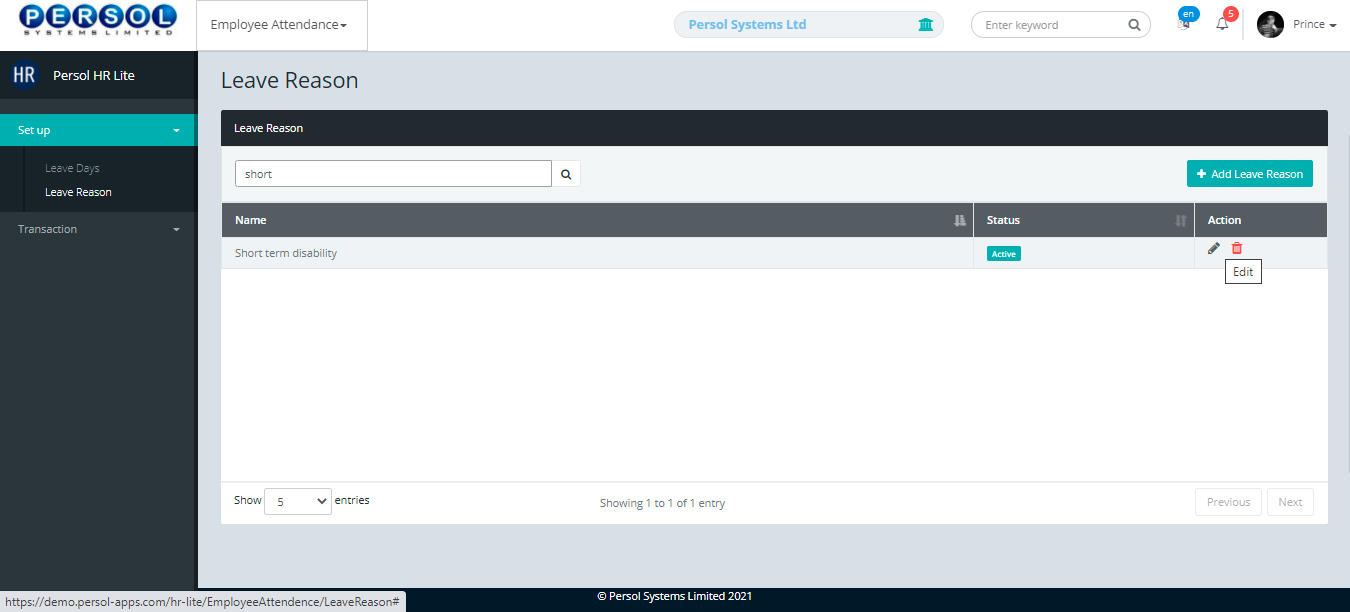
| (1) | To edit a leave reason setup, search for leave reason by name in the search box |
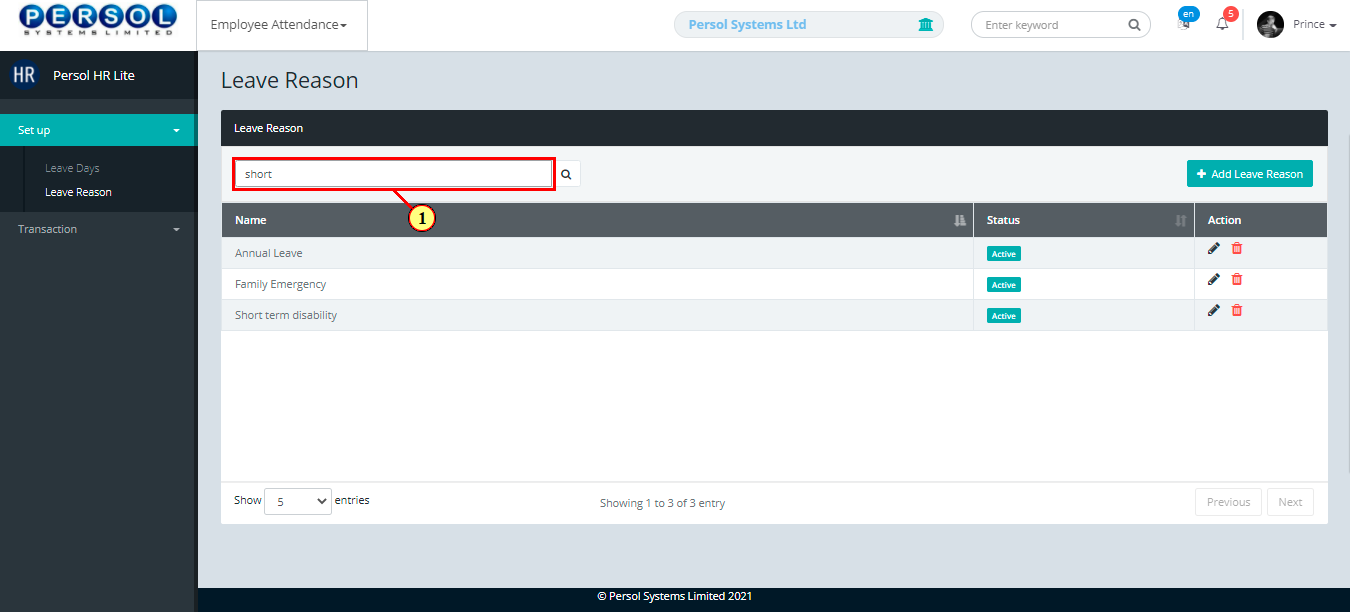
| Step | Action |
|---|---|
| The search result details display in the grid | |
|
The Action column consists of the Edit  and Delete and Delete  action icons action icons
|
| Step | Action |
|---|---|
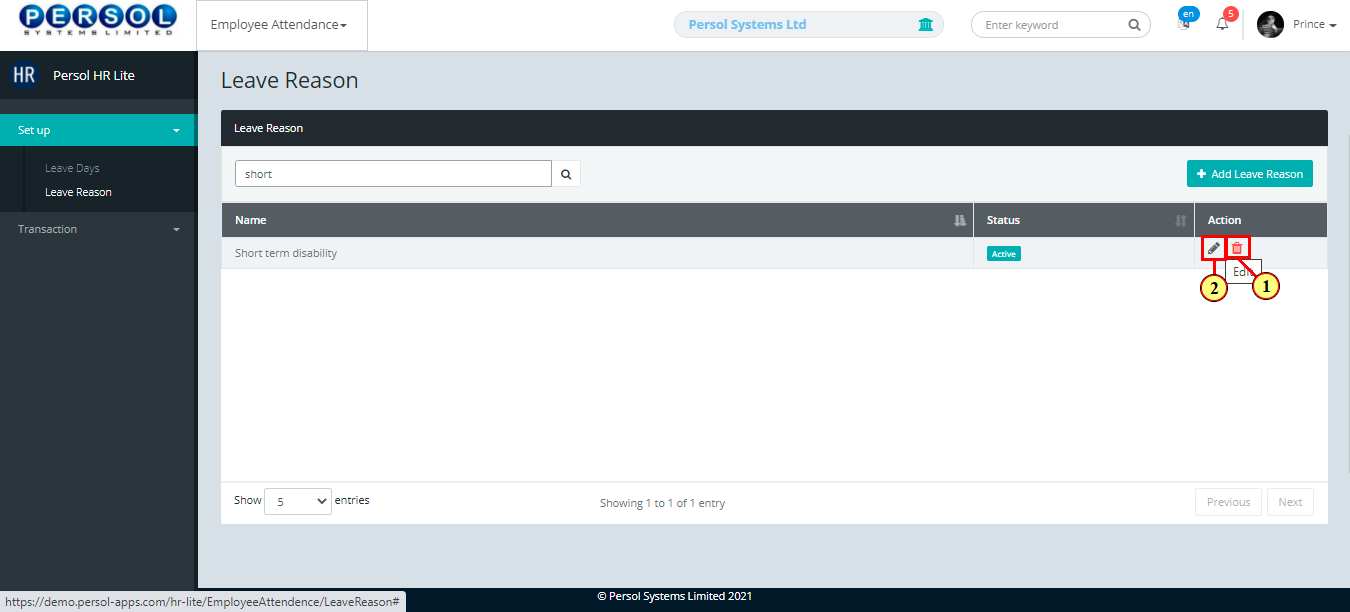
|
You may click on the delete icon to delete the leave reason
|
| (1) |
Click on the edit icon to modify the leave reason details
|
| Step | Action |
|---|---|
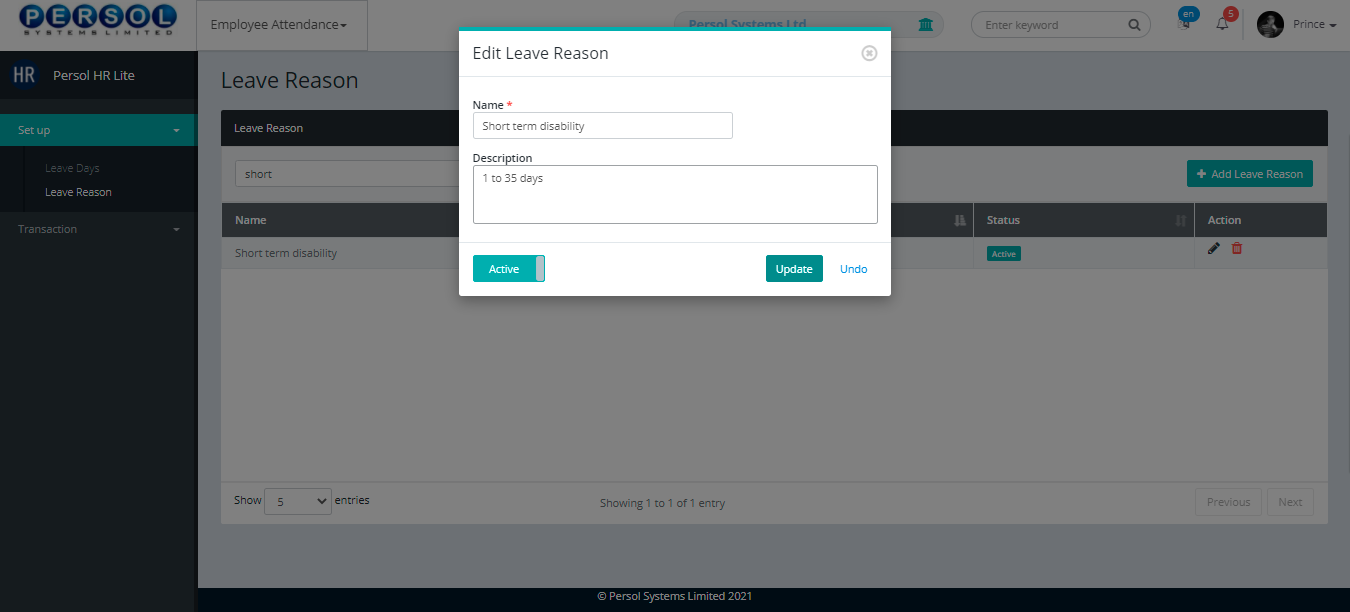
| The 'Edit Leave Reason' modal opens | |
| Edit the name, description or status of the leave reason |
| Step | Action |
|---|---|
|
You may click on the  button to revert changes made button to revert changes made
|
| (1) |
Click on the  button to save the changes made button to save the changes made
|
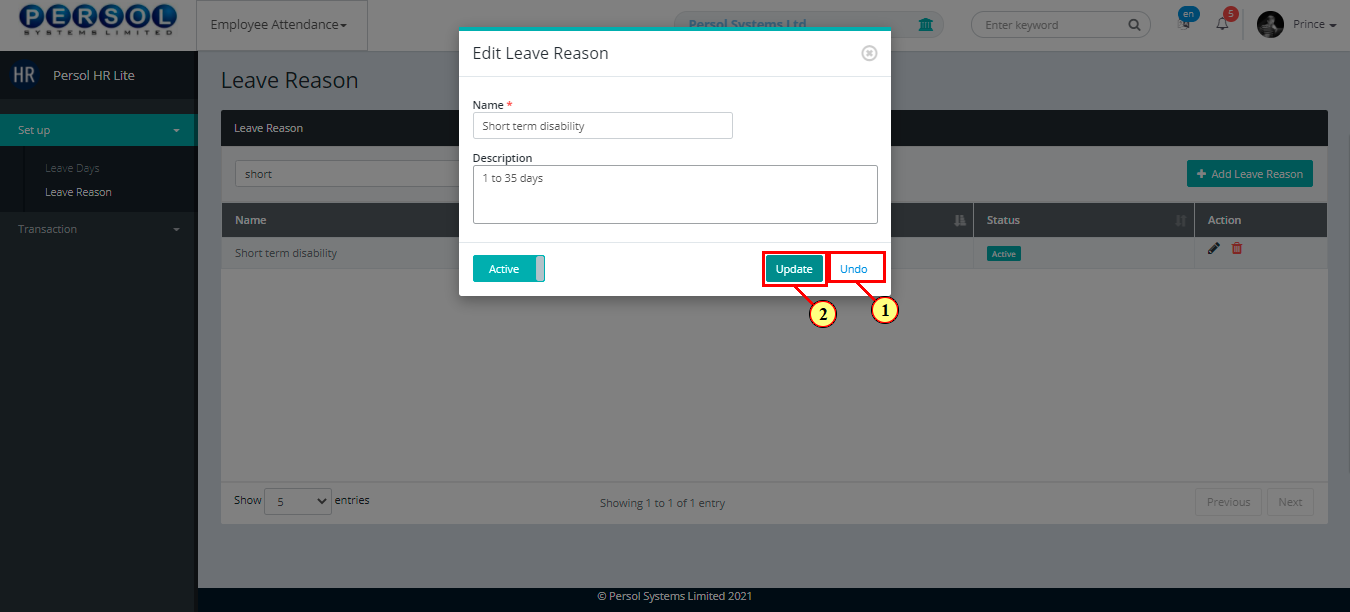
| Step | Action |
|---|---|
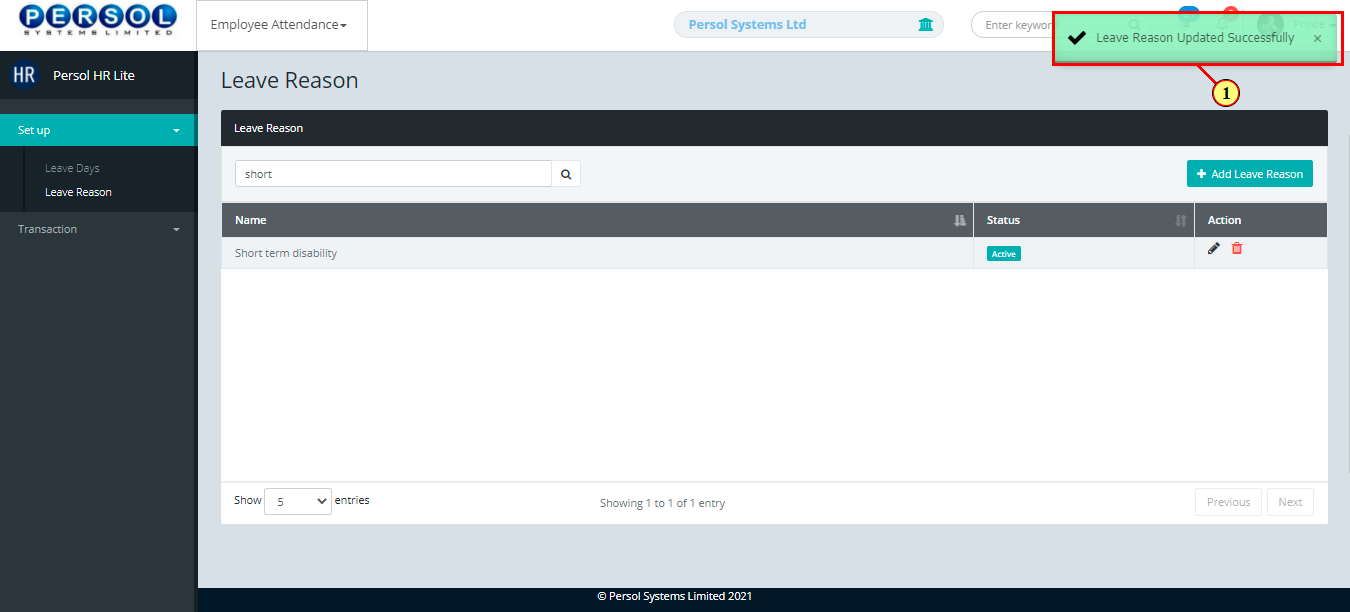
| (1) | A notification displays to indicate the update has been saved successfully |
| Step | Action |
|---|---|
| (1) | On the Personax HR Lite homepage, select the 'Employee Attendance' tile |

| Step | Action |
|---|---|
| The ‘Employee Attendance' submenus page opens | |
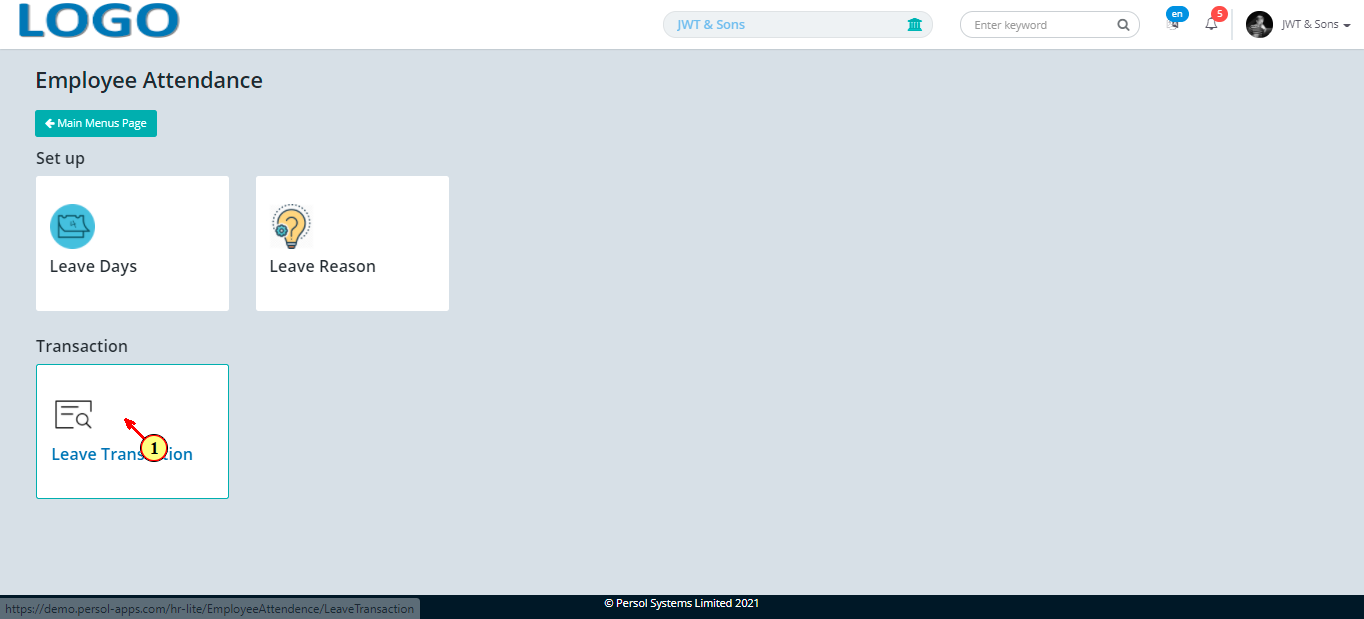
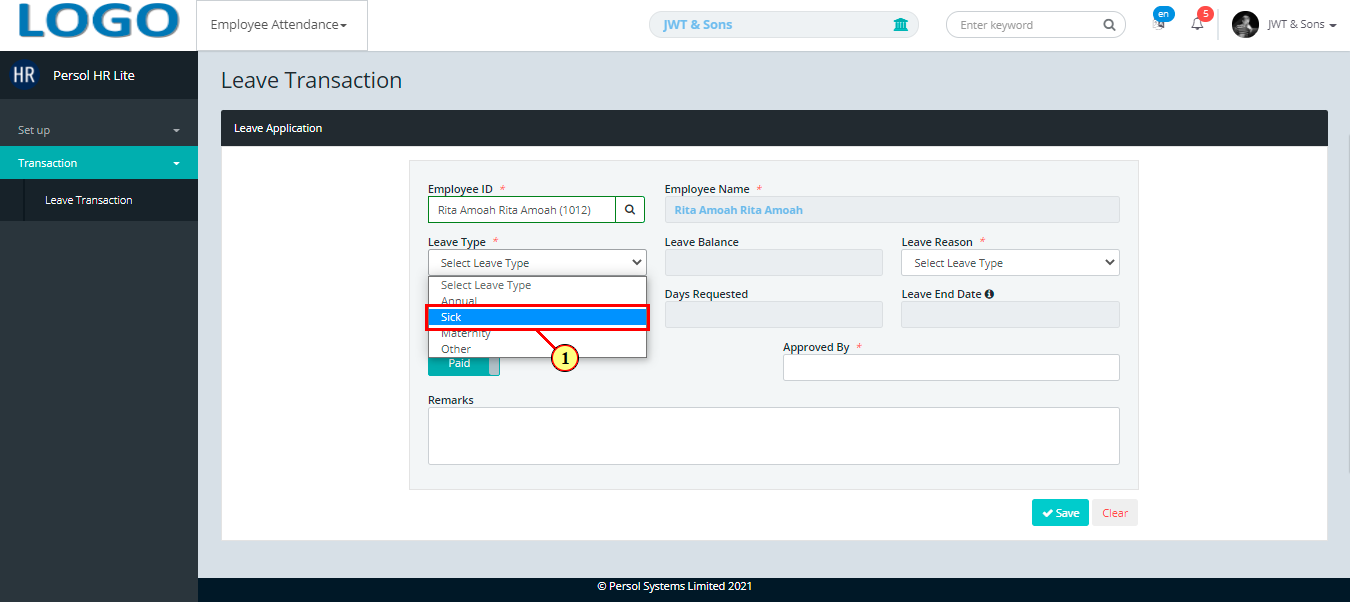
| (1) | Select the ‘Leave Transaction' setup tile |
| Step | Action |
|---|---|
| The 'Leave Transaction' page opens | |
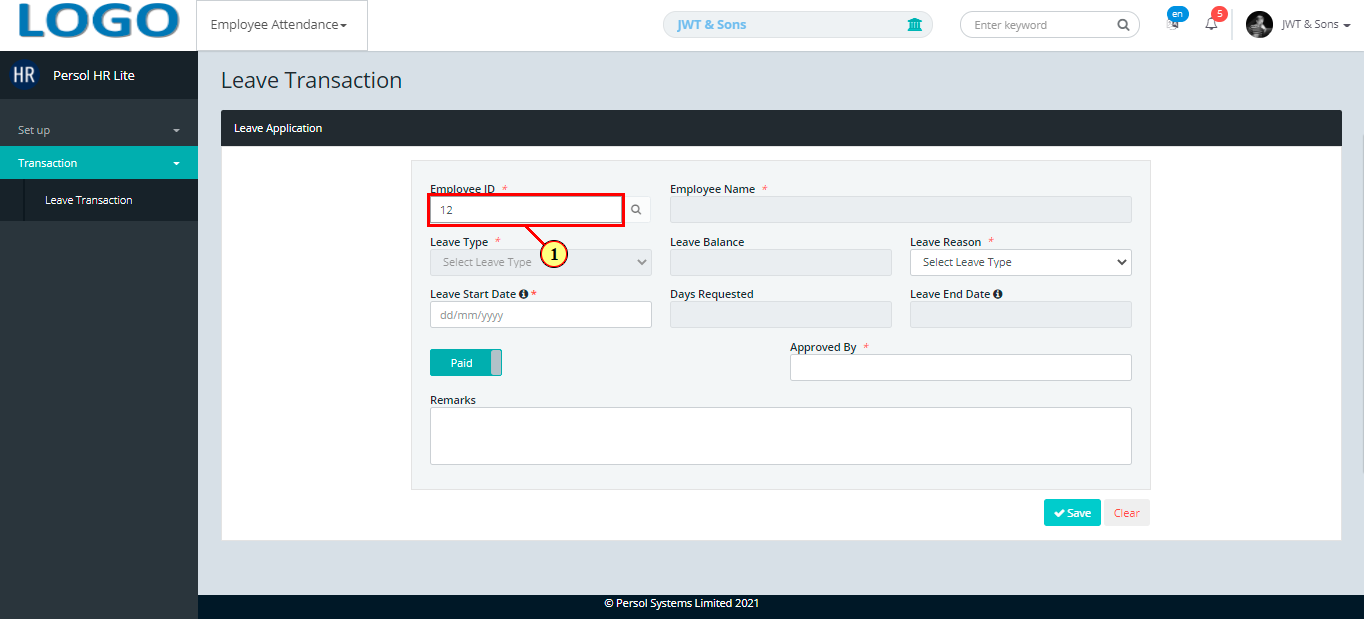
| (1) | To record a leave for an employee, search for employee by name or ID |
|
This field is required * |
| Step | Action |
|---|---|
|
The employee’s name displays in the ‘Employee Name’ field |
| (1) | Select a leave type from the dropdown options |
|
This field is required * |
| Step | Action |
|---|---|
|
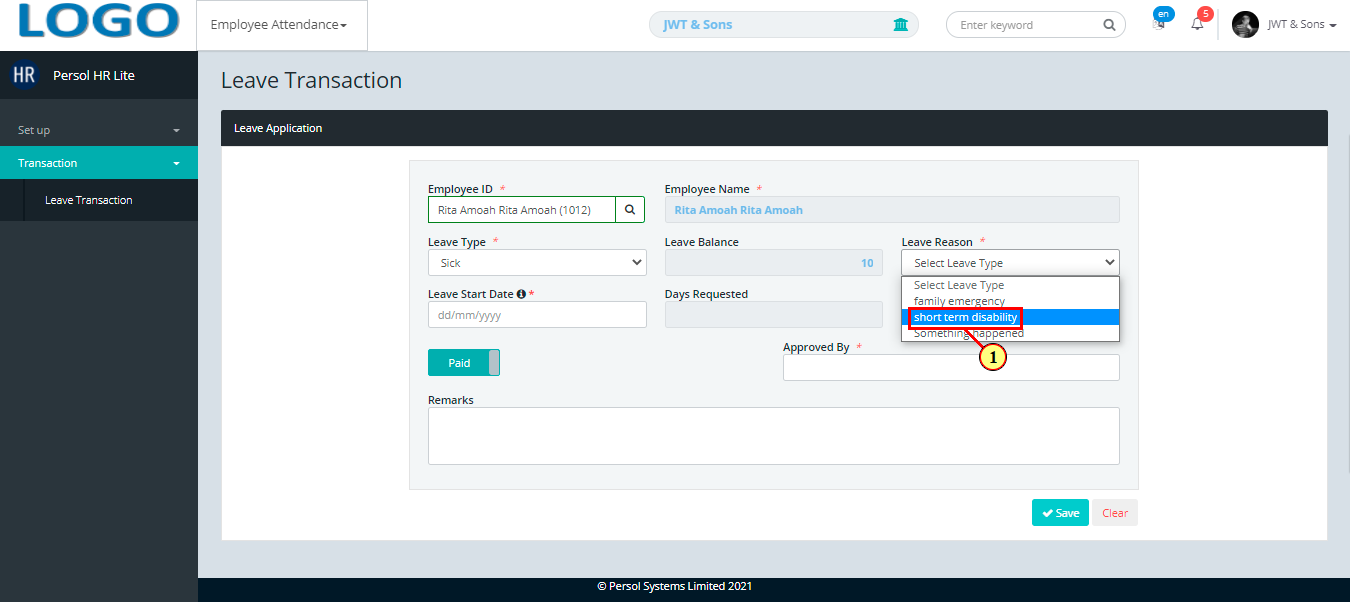
The number of leave days left for the selected leave type displays in the ‘Leave Balance’ field |
| (1) | Select the reason for the leave application |
|
This field is required * |
| Step | Action |
|---|---|
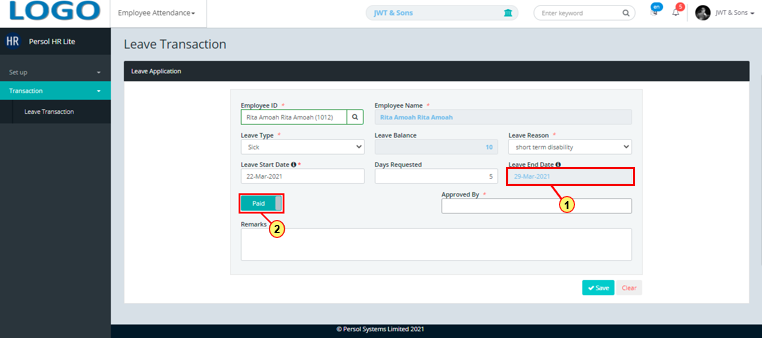
| (1) | Select the leave start date from the pop-up calendar |
|
This field is required * |

| Step | Action |
|---|---|
| (1) | Enter the number of days being requested for |
|
This field is required * |

| Step | Action |
|---|---|
| (1) | The leave end date calculates and displays based on the number of days requested for |
|
The leave end date calculation excludes weekends and holidays |
| (2) |
You may click on the  button to change the leave pay status to ‘Unpaid’ button to change the leave pay status to ‘Unpaid’
|
| Step | Action |
|---|---|
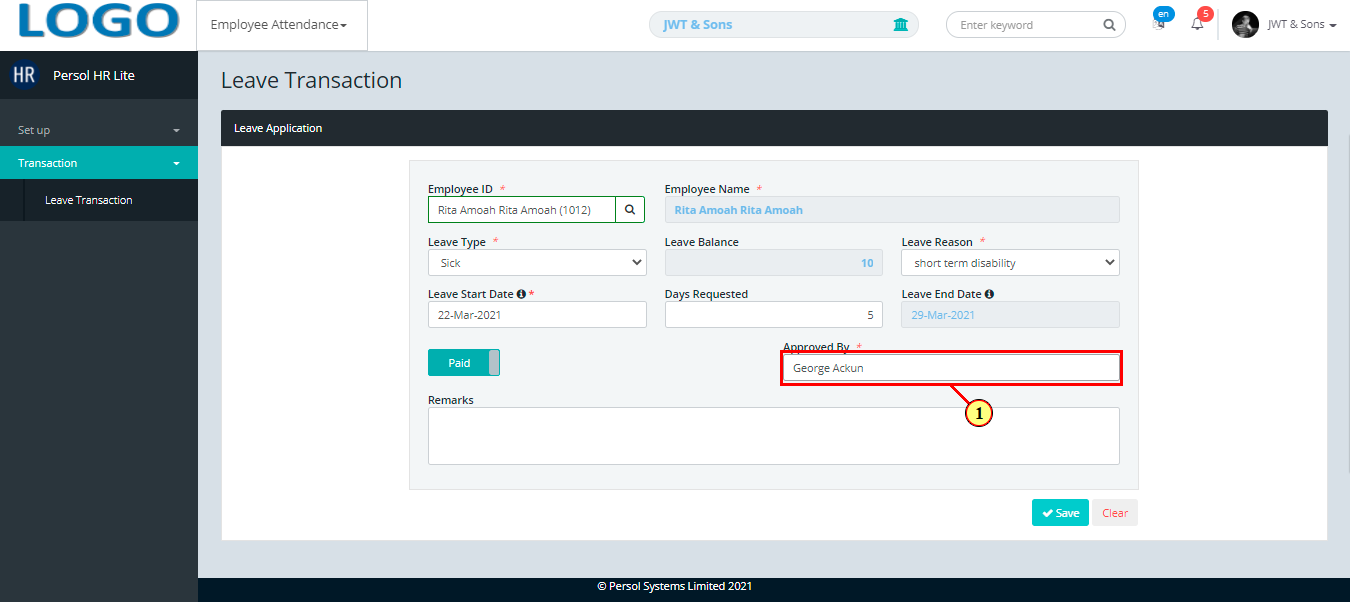
| (1) | Enter the leave approver's name |
|
This field is required * |
| Step | Action |
|---|---|
| (1) | Enter remarks if any |
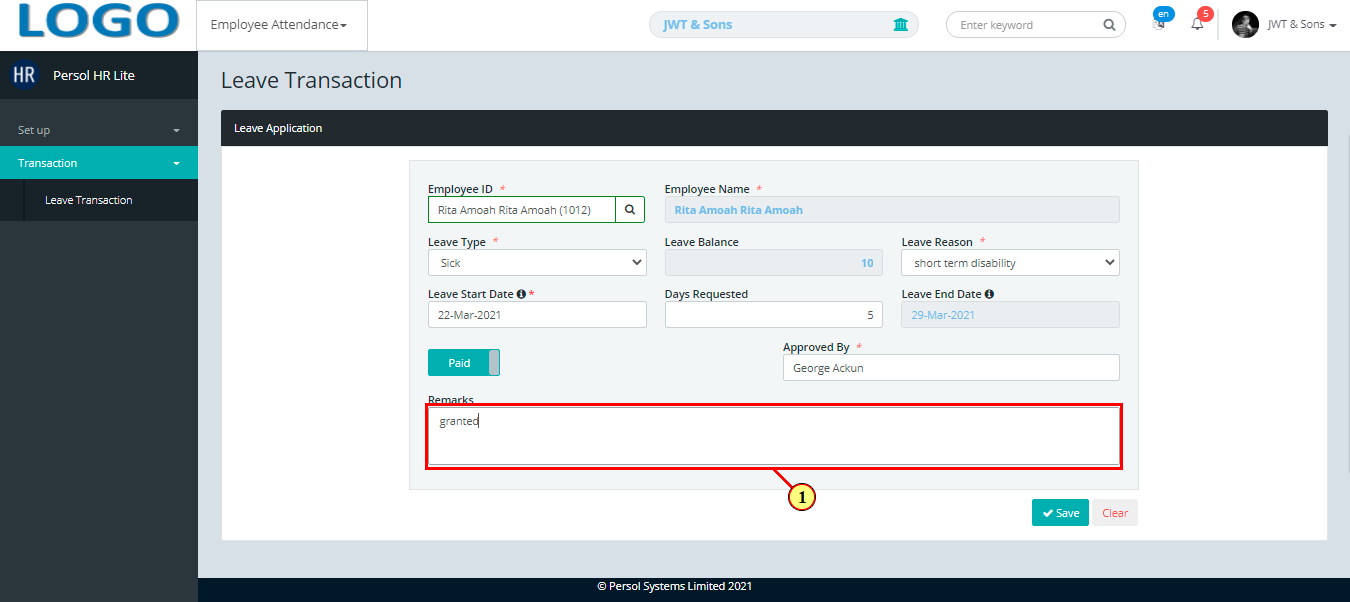
| Step | Action |
|---|---|
|
You may click on the  button to clear all details entered button to clear all details entered
|
| (1) |
Click on the  button to save the employee's leave application details button to save the employee's leave application details
|
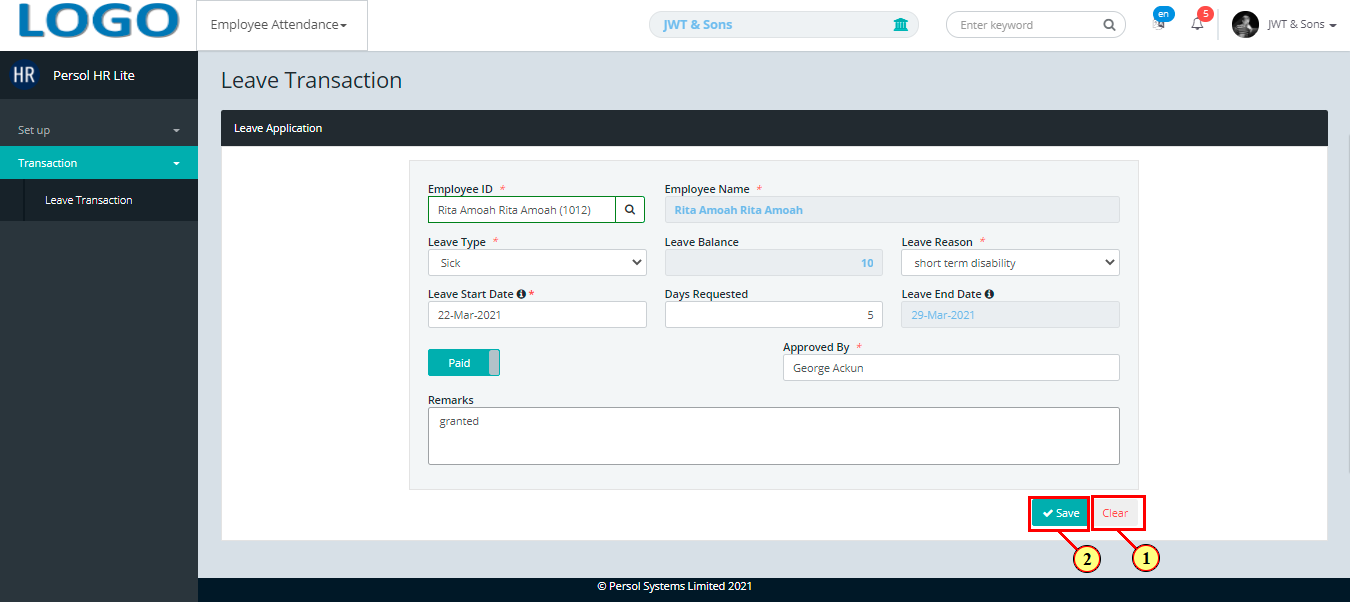
| Step | Action |
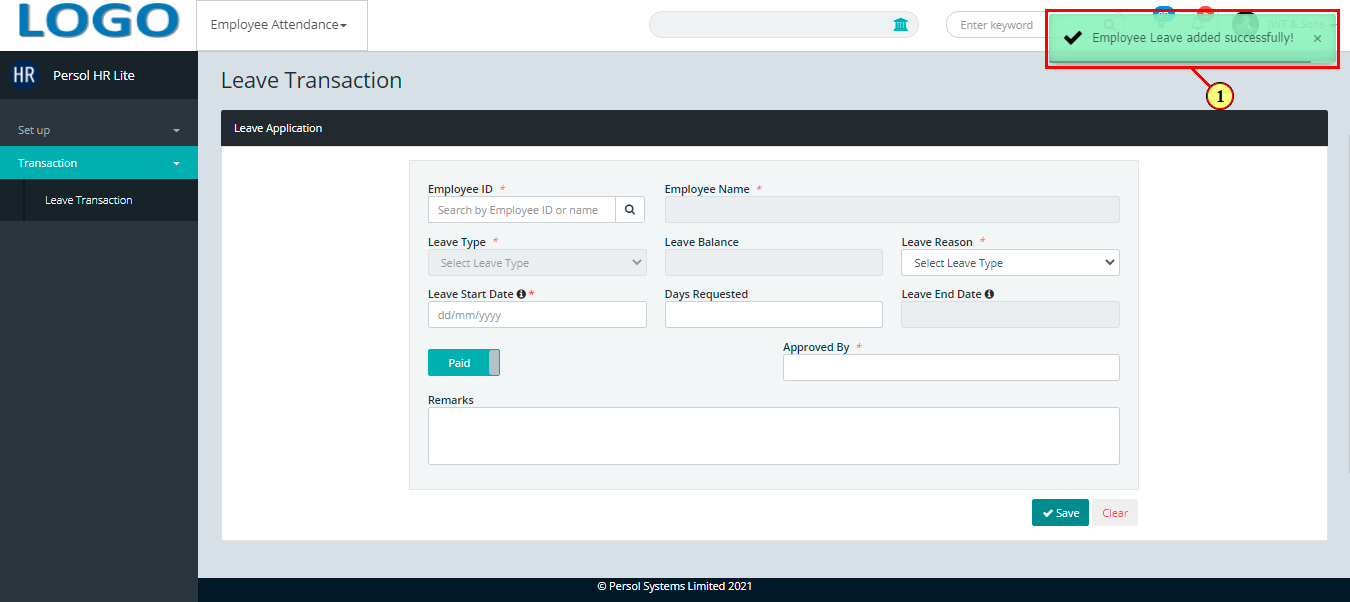
|---|---|
| (1) | A notification displays to indicate that the leave application details have been saved successfully |
| Step | Action |
|---|---|
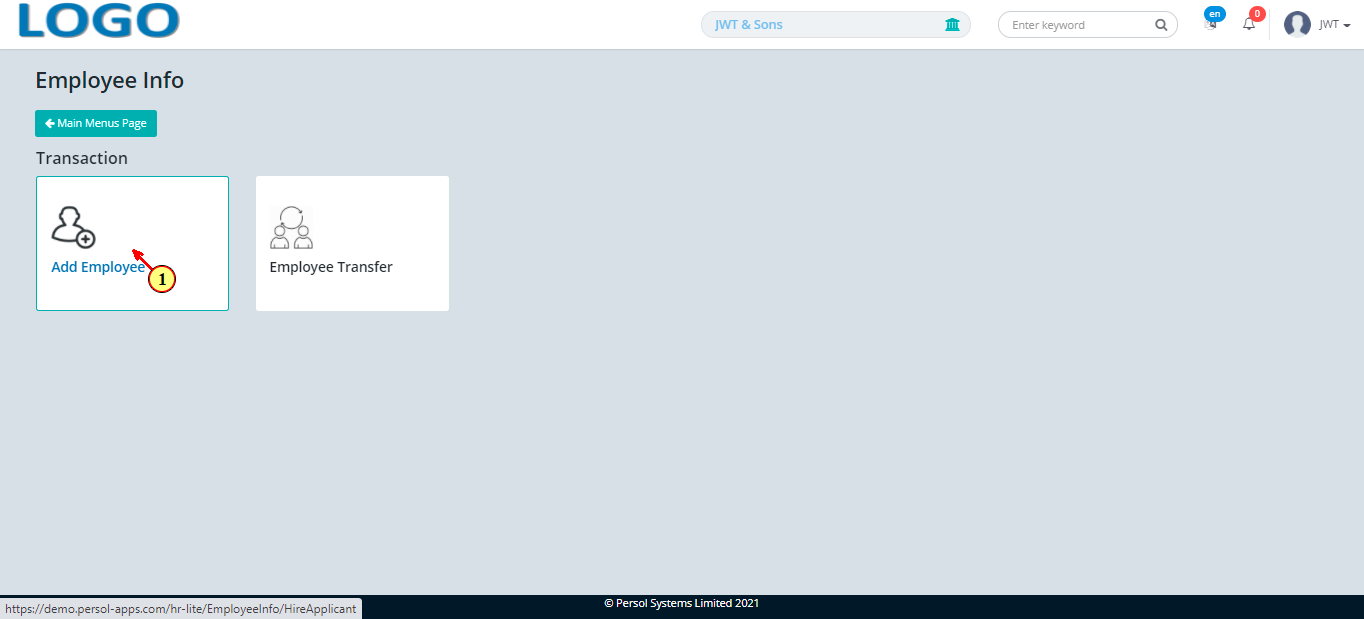
| (1) | On the Personax HR Lite homepage, select the ‘Employee Info’ tile |
| Step | Action |
|---|---|
| The ‘Employee Info’ submenus page opens | |
| (1) | Select the 'Add Employee’ tile |
| Step | Action |
|---|---|
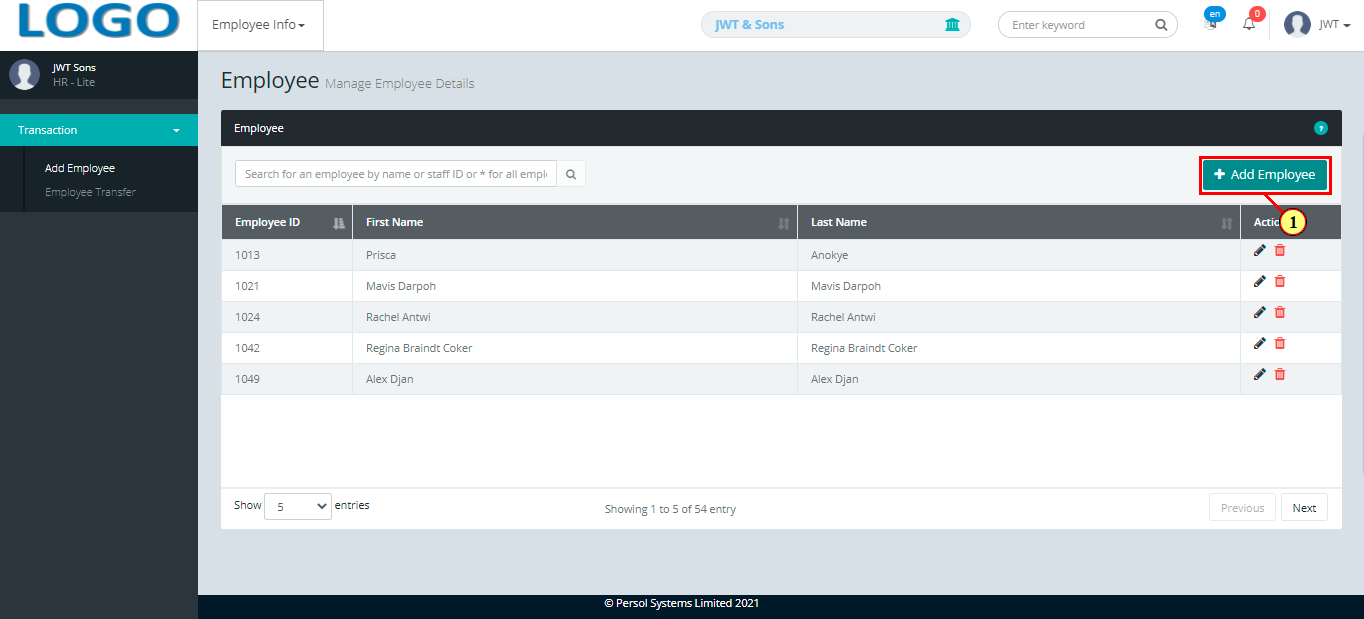
| The ‘Employee’ page opens | |
| (1) |
To setup the details of an employee, click on the  button button
|
| Step | Action |
|---|---|
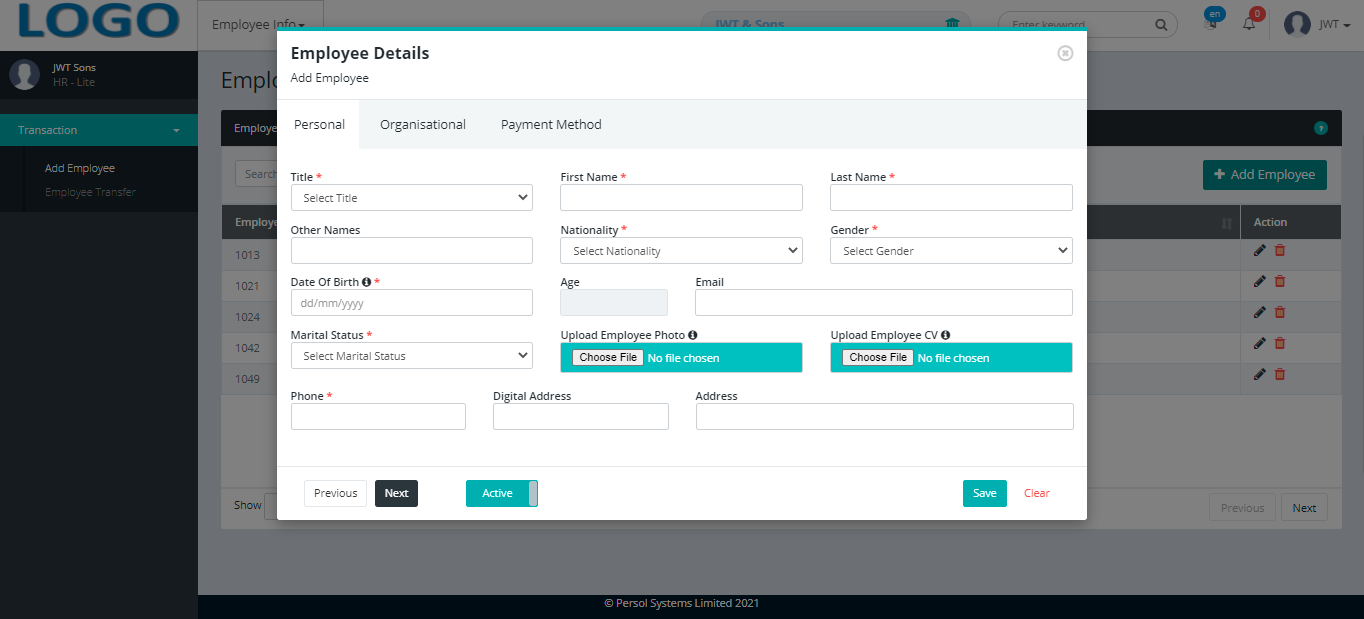
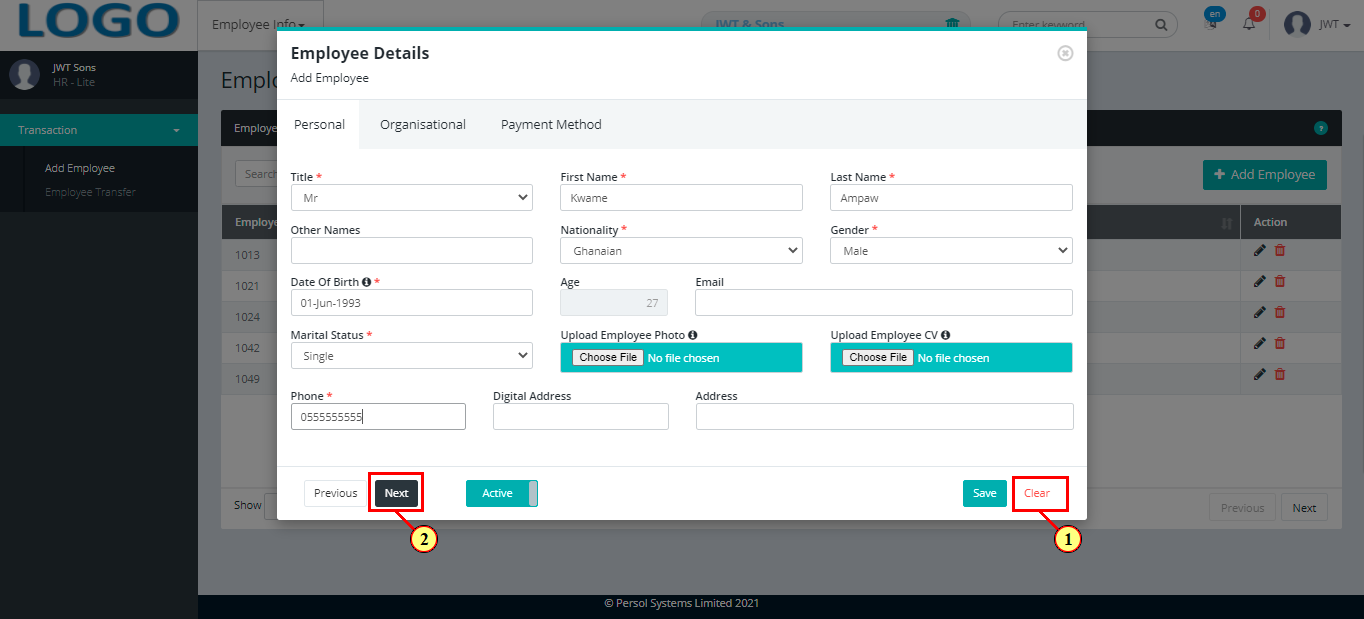
| The 'Employee Details' modal opens |
| Step | Action |
|---|---|
| (1) |
Provide the following personal details of the employee
|
|
All required fields are marked with an asterisk * |

| Step | Action |
|---|---|
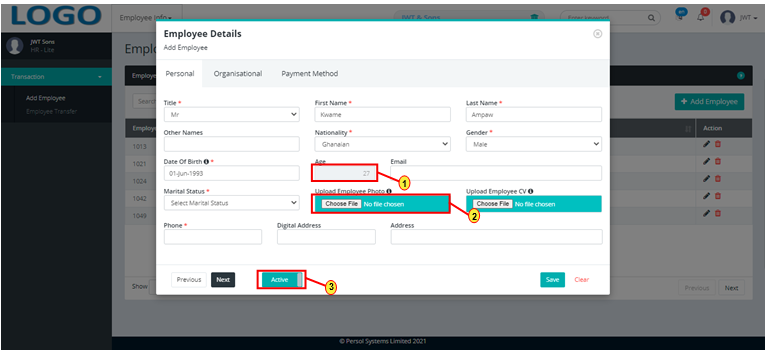
|
The employee’s age cannot be below the minimum legal working age for the country. Dates of birth below the legal working age have been greyed out and cannot be selected |
| (1) | The age of the employee automatically displays after entering the date of birth |
| (2) | A face must be detected in the uploaded employee photo |
| (3) |
You may click on the  button to change employee's status to Inactive button to change employee's status to Inactive
|
| Step | Action |
|---|---|
|
You may click on the  button to clear all details entered button to clear all details entered
|
| (1) |
Click on the  button to move to the next tab button to move to the next tab
|
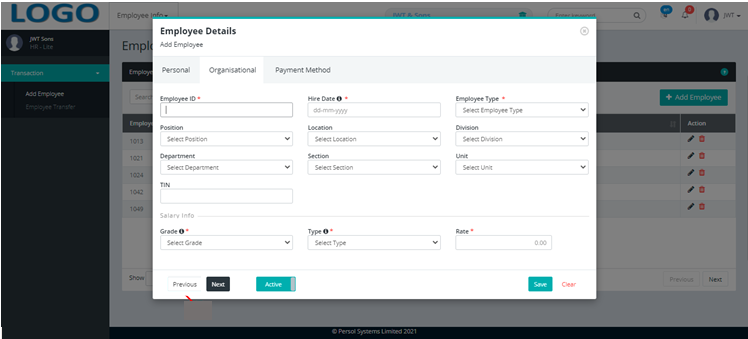
| Step | Action |
|---|---|
| (1) |
Provide the following personal details of the employee
|
|
i. Fields marked with an asterisk * are required ii. You may click on the  button to move to the previous tab button to move to the previous tab
|
| Step | Action |
|---|---|
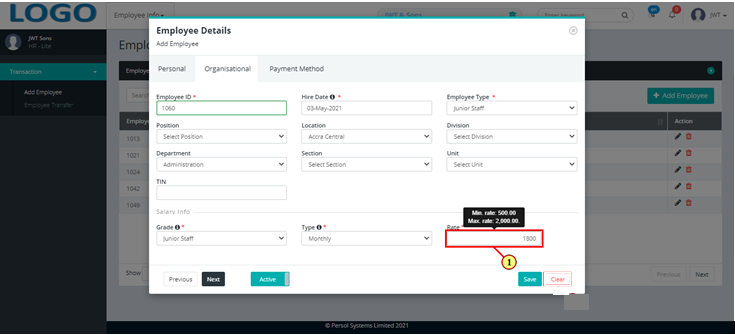
| (1) | The salary rate entered must fall within the set minimum and maximum amount for the selected salary grade & type |
|
You may click on the button to clear all details entered
|
| Step | Action |
|---|---|
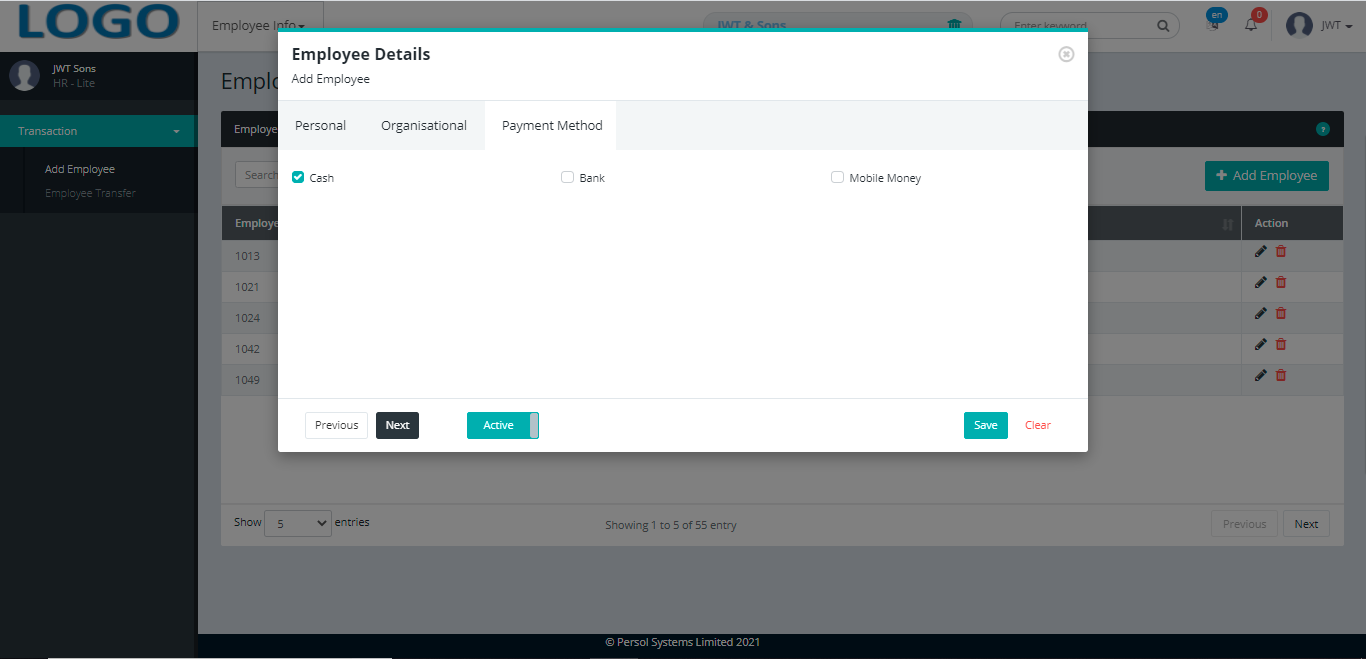
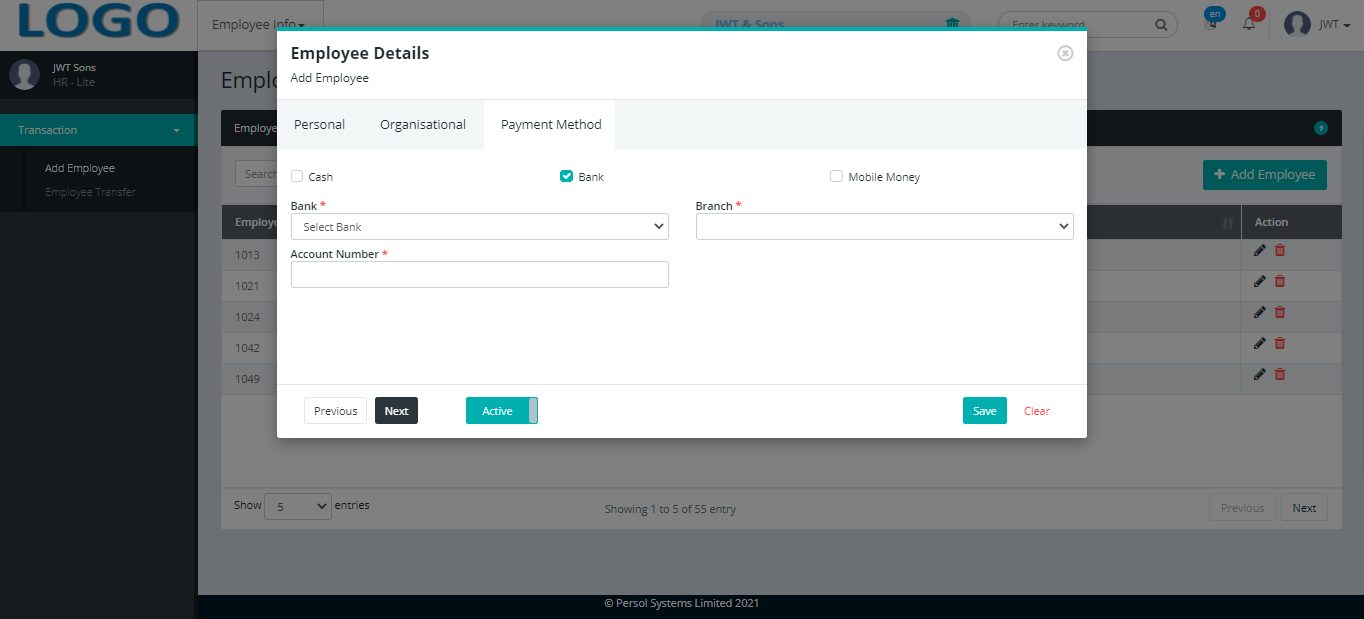
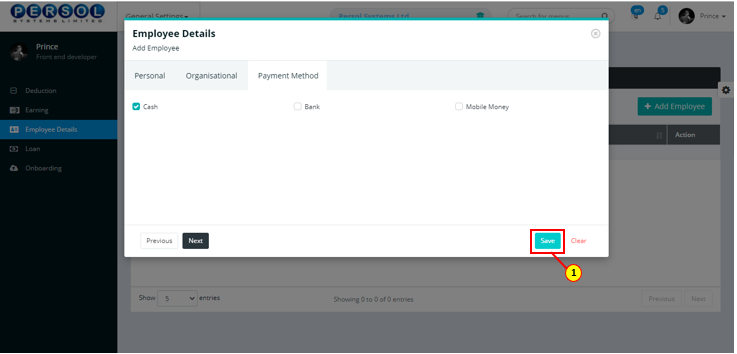
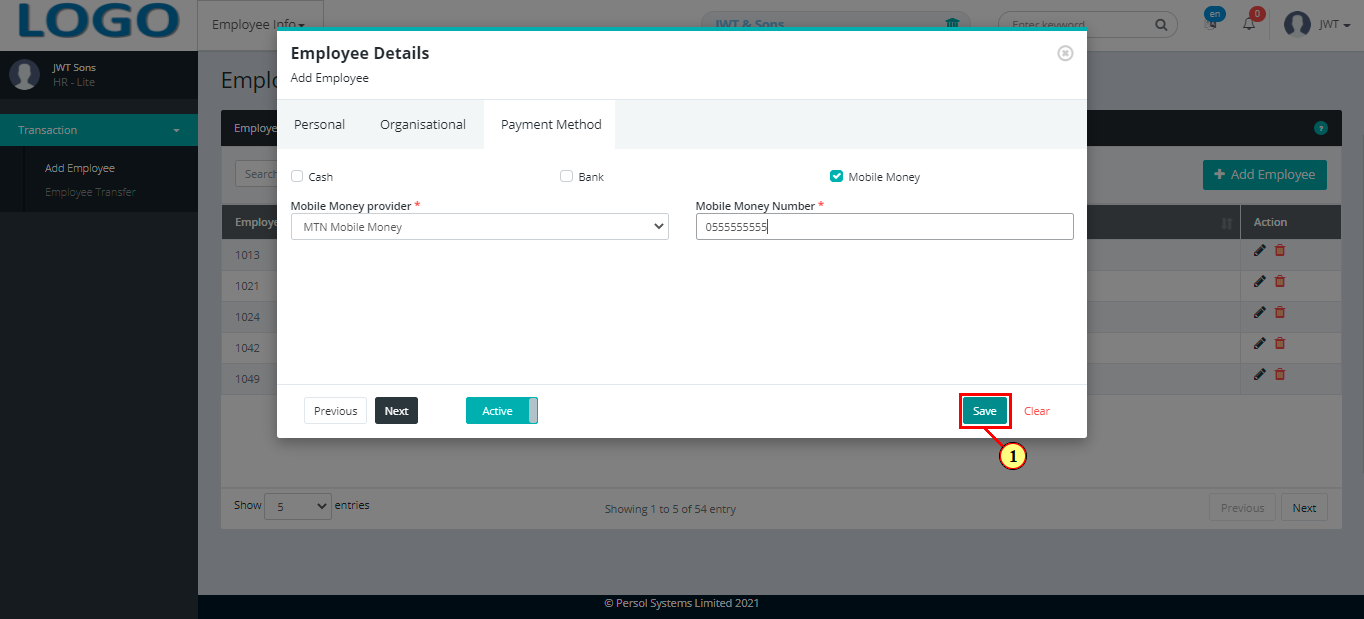
| Select the payment method that applies to the employee by checking a box | |
| |
|
| Step | Action |
|---|---|
If Bank is selected, provide the following bank details of the employee
|
|
|
Click here to continue steps |
| Step | Action |
|---|---|
If Mobile Money is selected, provide the following mobile money details of the employee
|
|
|
Click here to continue steps |
| Step | Action |
|---|---|
| (1) |
Click on the  button to save the employee details button to save the employee details
|
| Step | Action |
|---|---|
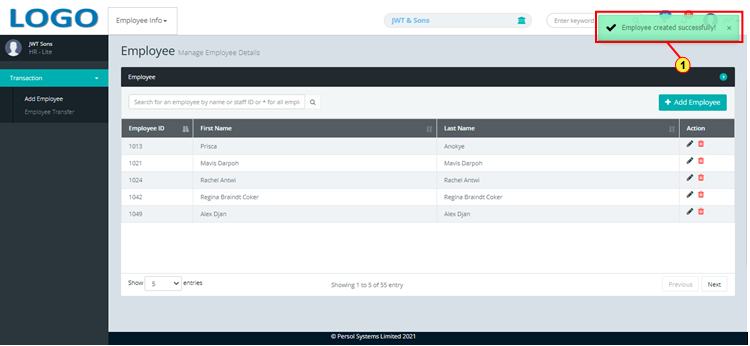
| A notification displays to indicate that the employee’s details have been saved successfully |
| Step | Action |
|---|---|
| (1) | To edit an employee’s details, enter the employee’s name or staff ID in the search box |
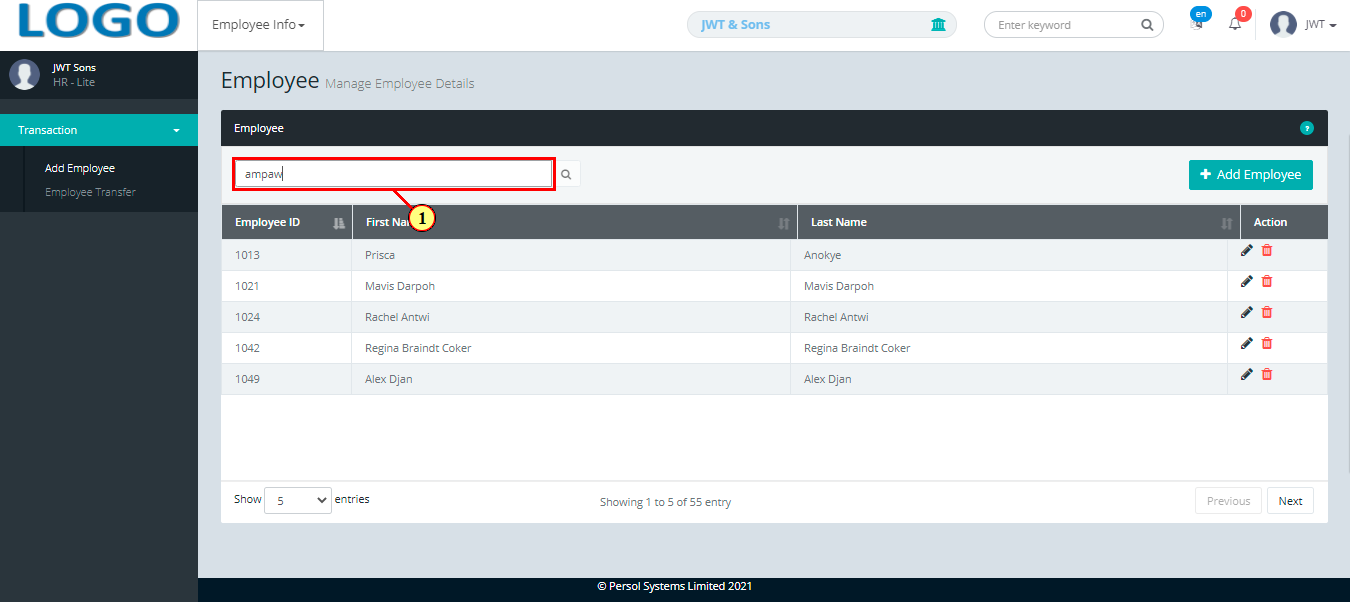
| Step | Action |
|---|---|
| (1) |
Click on the icon  to search for the employee to search for the employee
|

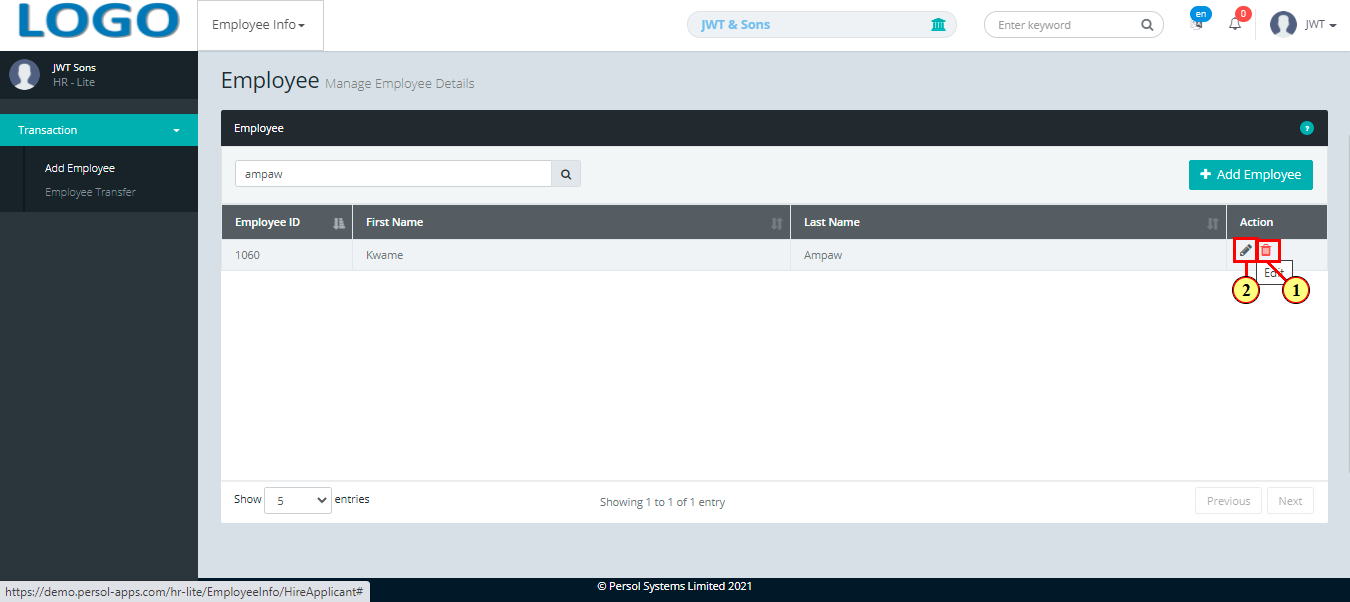
| Step | Action |
|---|---|
| The search result details display in the grid | |
|
You may click on the delete icon  to delete an employee’s details to delete an employee’s details
|
| (1) |
Click on the edit icon to edit an employee’s details
|
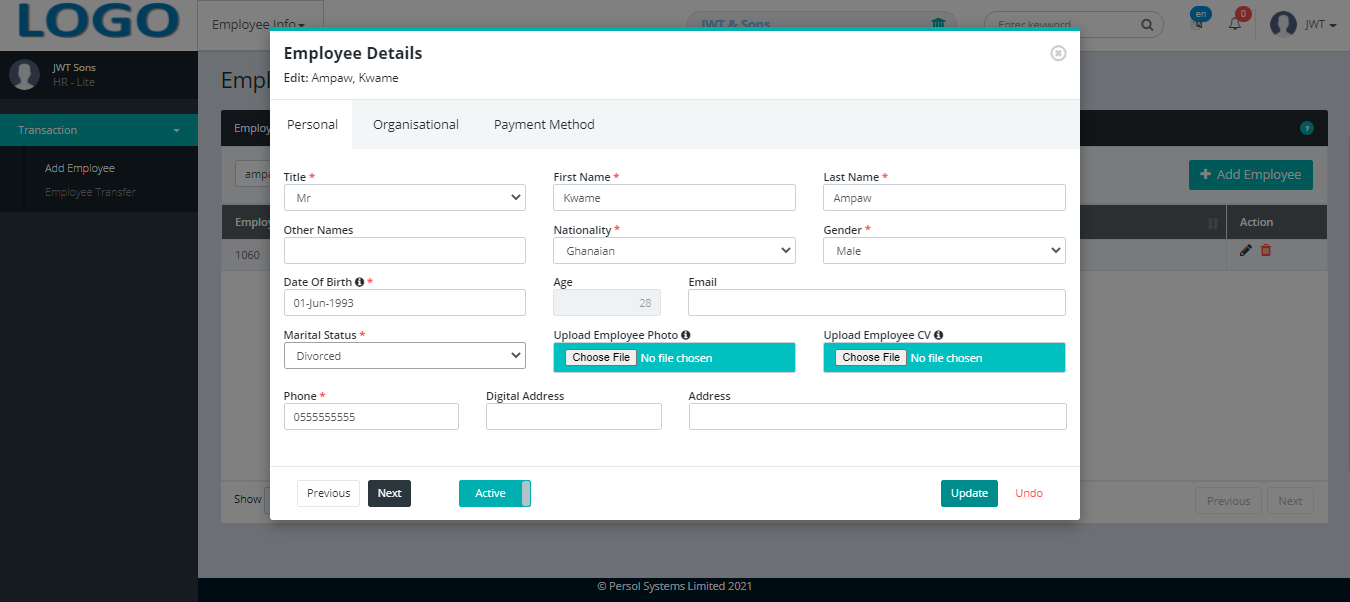
| Step | Action |
|---|---|
| A modal opens showing the employee's details | |
| Edit the employee's 'Personal', Organizational' and/or 'Payment Method' details |
| Step | Action |
|---|---|
|
You may click on the  button to revert changes made button to revert changes made
|
| (1) |
Click on the  button to save the changes made button to save the changes made
|
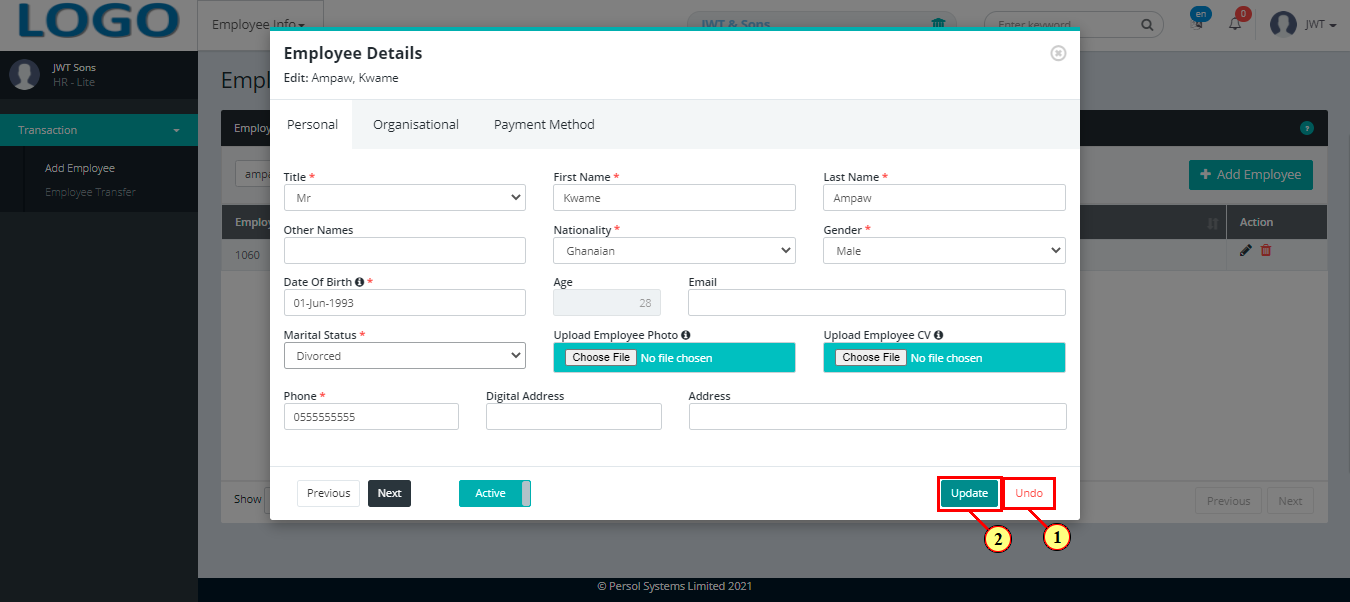
| Step | Action |
|---|---|
| (1) | A notification displays to indicate that the update has been saved successfully |
| Step | Action |
|---|---|
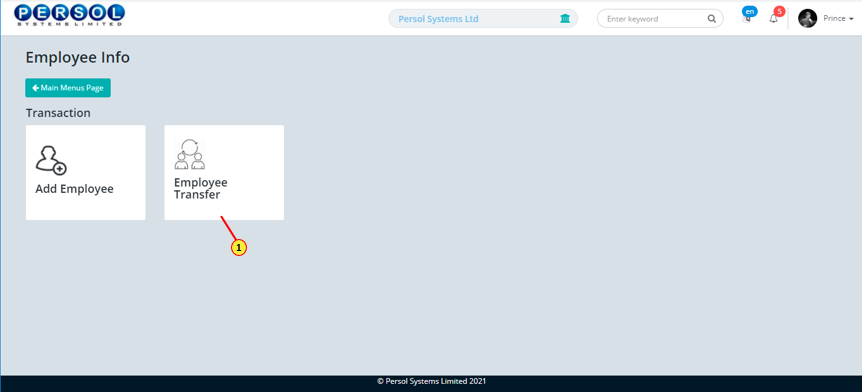
| (1) | On the Personax HR Lite homepage, select the ‘Employee Info’ tile |

| Step | Action |
|---|---|
| The ‘Employee Info’ submenus page opens | |
| (1) | Select the 'Employee Transfer’ tile |
| Step | Action |
|---|---|
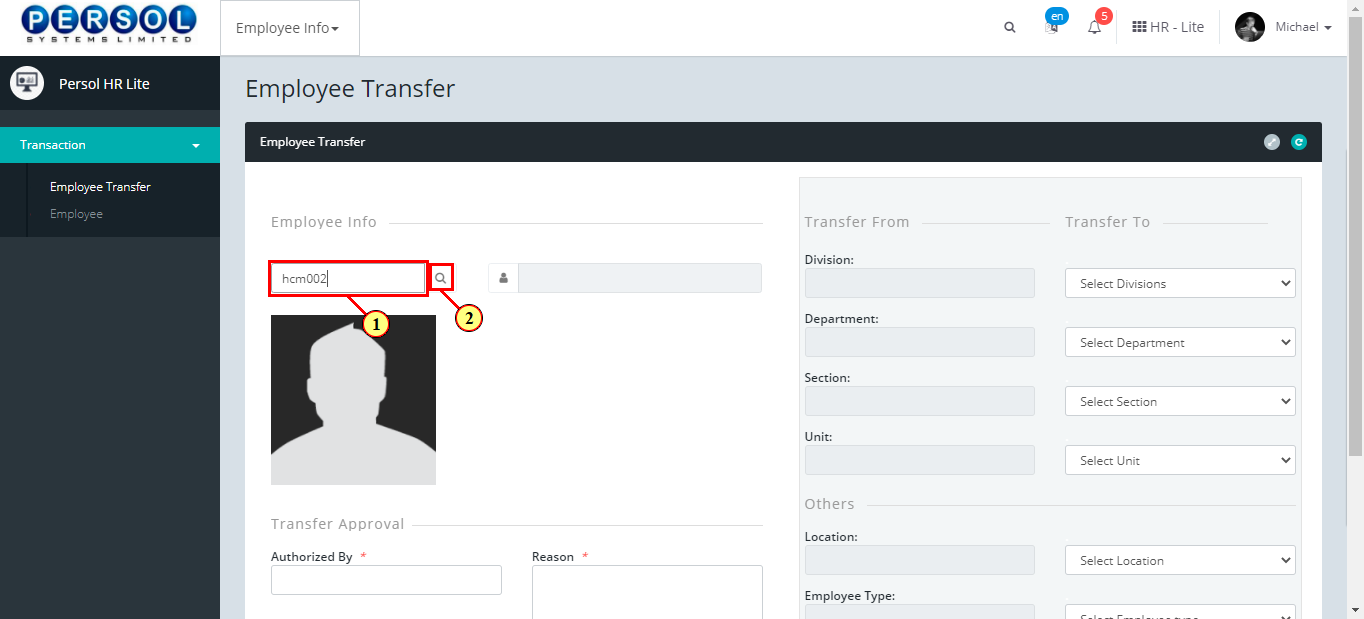
| The ‘Employee Transfer’ page opens | |
| (1) | To access an employee’s current organizational details, enter the employee name or ID in the search box |
| (2) |
Click on the  icon to search icon to search
|
| Step | Action |
|---|---|
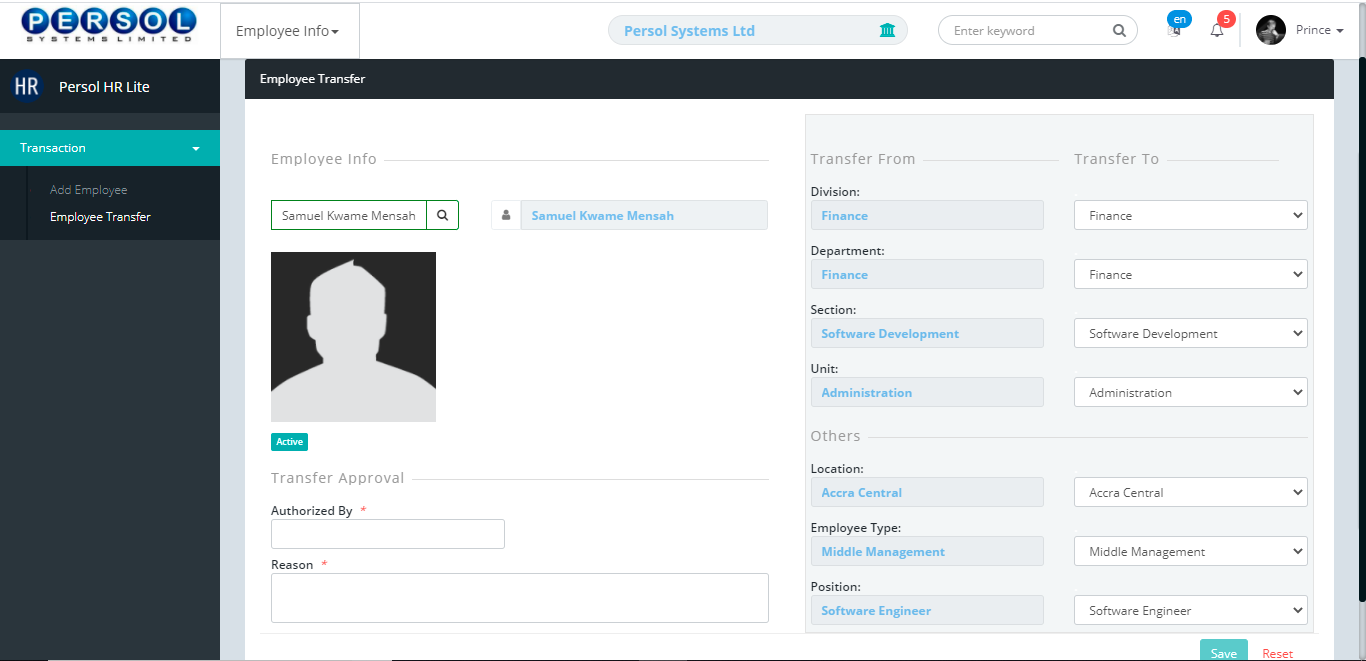
| The employee's name and current organizational details display in the transfer (from and to) columns |
| Step | Action |
|---|---|
| Select the new transfer details from the dropdown options for fields under the ‘Transfer To’ column | |
| (1) | Eg. to transfer an employee from one location to another, select a new location from the drop down options of Location in the ‘Tranfer To’ column |
| Step | Action |
|---|---|
| (1) | Provide the transfer authorizer’s name |
|
This field is required * |
| Step | Action |
|---|---|
| (1) | State the reason for the transfer |
|
This field is required * |

| Step | Action |
|---|---|
| (1) |
You may click on the  button to revert the changes made button to revert the changes made
|
| (2) |
Click on the button to save the transfer details
|
|
The ‘Save’ button is only enabled after at least one transfer change has been made and all required fields entered |
| Step | Action |
|---|---|
| (1) | A notification displays to indicate that the employee transfer details have been saved successfully |
| Step | Action |
|---|---|
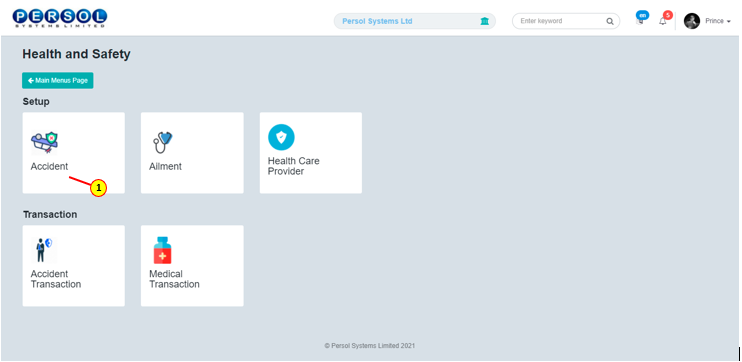
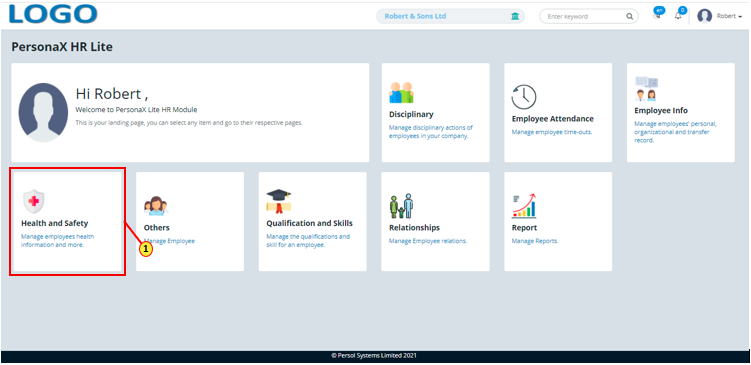
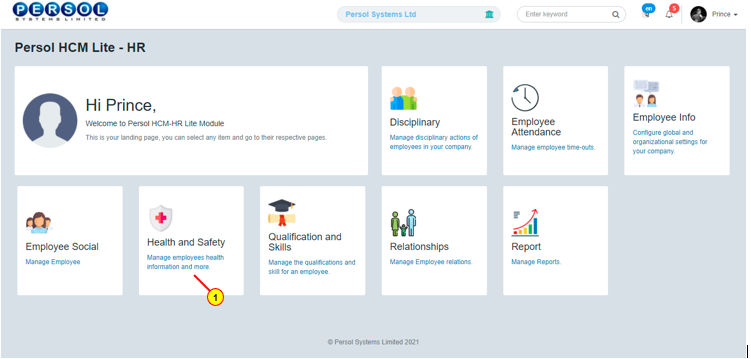
| (1) | On the PersonaX HR Lite homepage, select the 'Health & Safety' tile |

| Step | Action |
|---|---|
| The ‘Generic Parameters’ submenus page opens | |
| (1) | Select the ‘Accident’ tile |
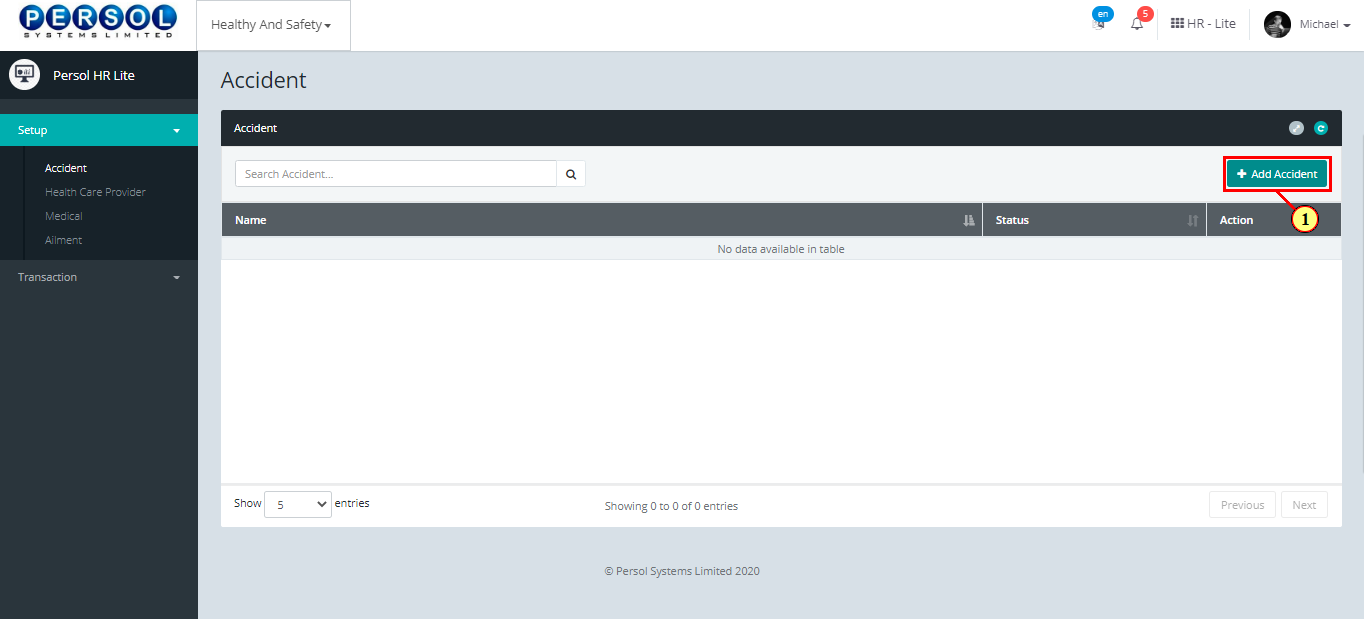
| Step | Action |
|---|---|
| The ‘Accident’ page opens | |
| (1) |
To setup an accident, click on the 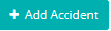 button button
|
| Step | Action |
|---|---|
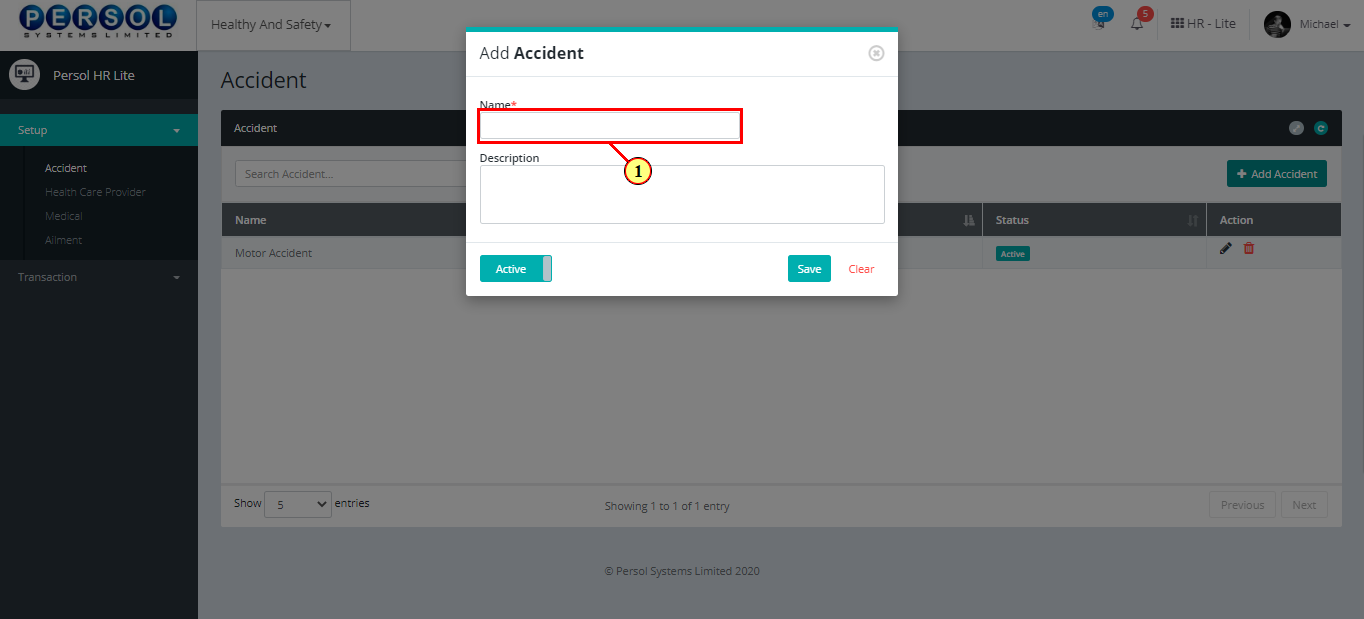
| The ‘Add Accident’ modal opens | |
| (1) | Enter name of the new accident |
|
This field is required * |
| Step | Action |
|---|---|
| (1) | Add a description to provide more details on the accident |
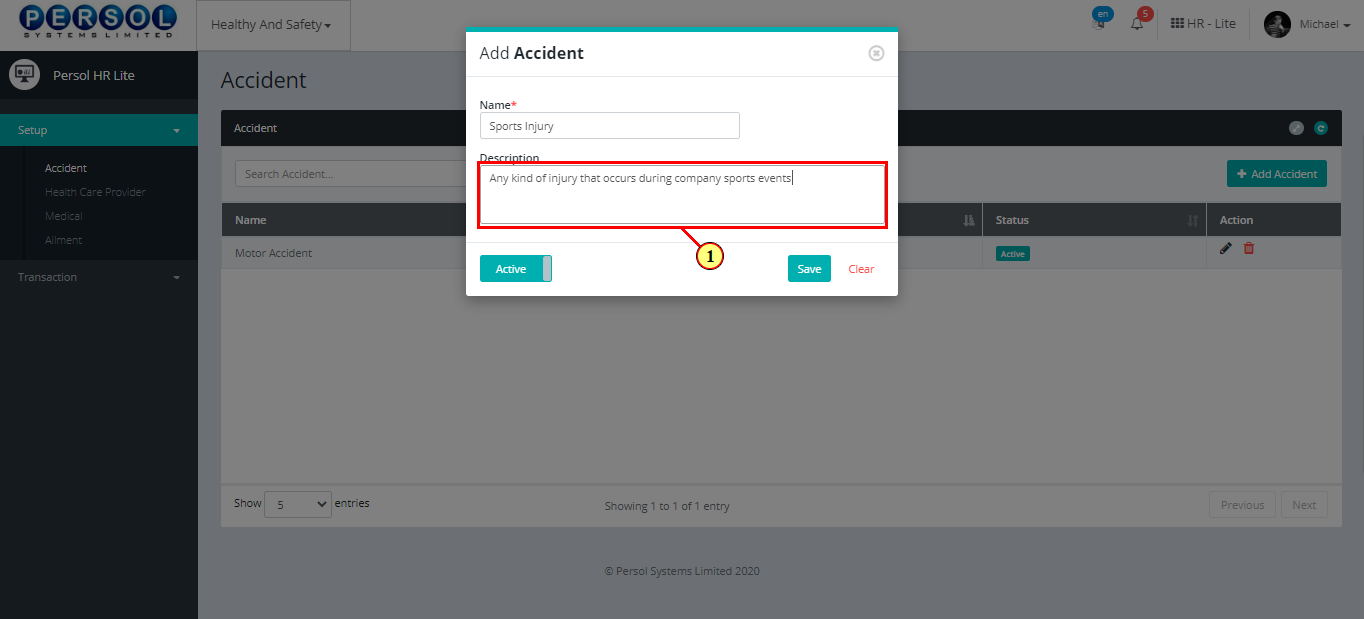
| Step | Action |
|---|---|
| (1) |
You may click on the  button to change status of the accident to inactive button to change status of the accident to inactive
|
|
- An active status means the accident can be used in transactions on other pages - An inactive status means the accident cannot be used in transactions on other pages |
| Step | Action |
|---|---|
|
You may click on the  button to clear all details entered button to clear all details entered
|
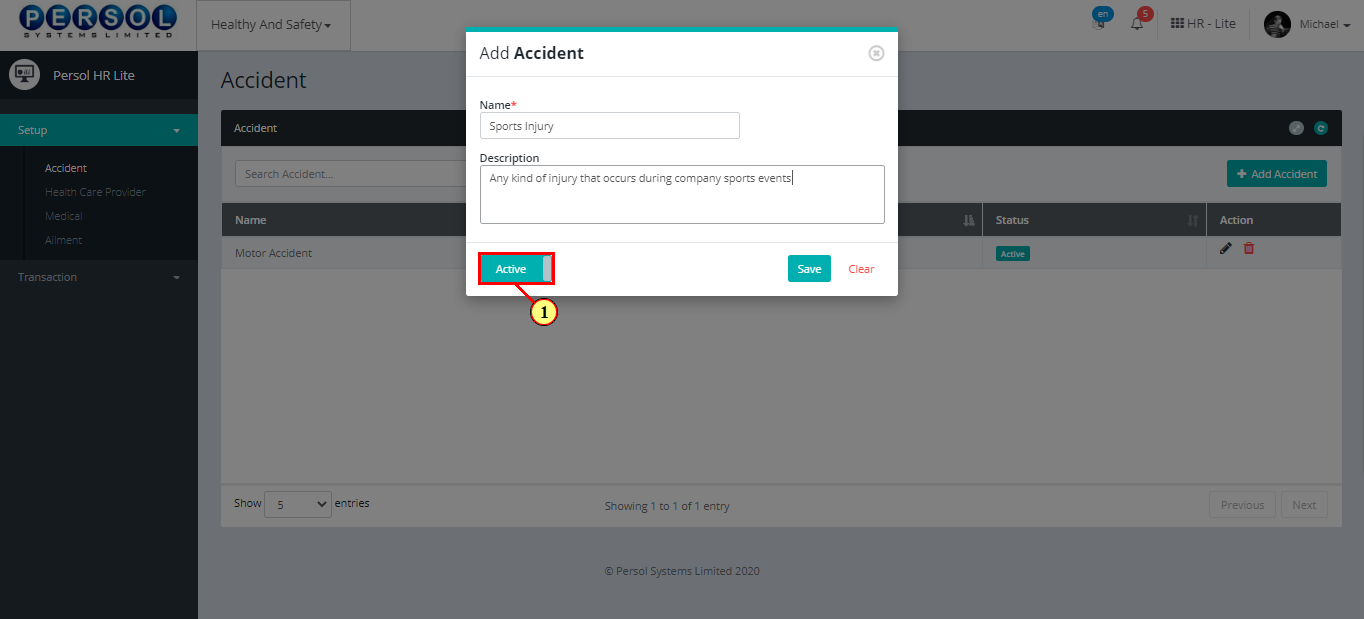
| (1) |
Click on the  button to save details of the newly added accident button to save details of the newly added accident
|

| Step | Action |
|---|---|
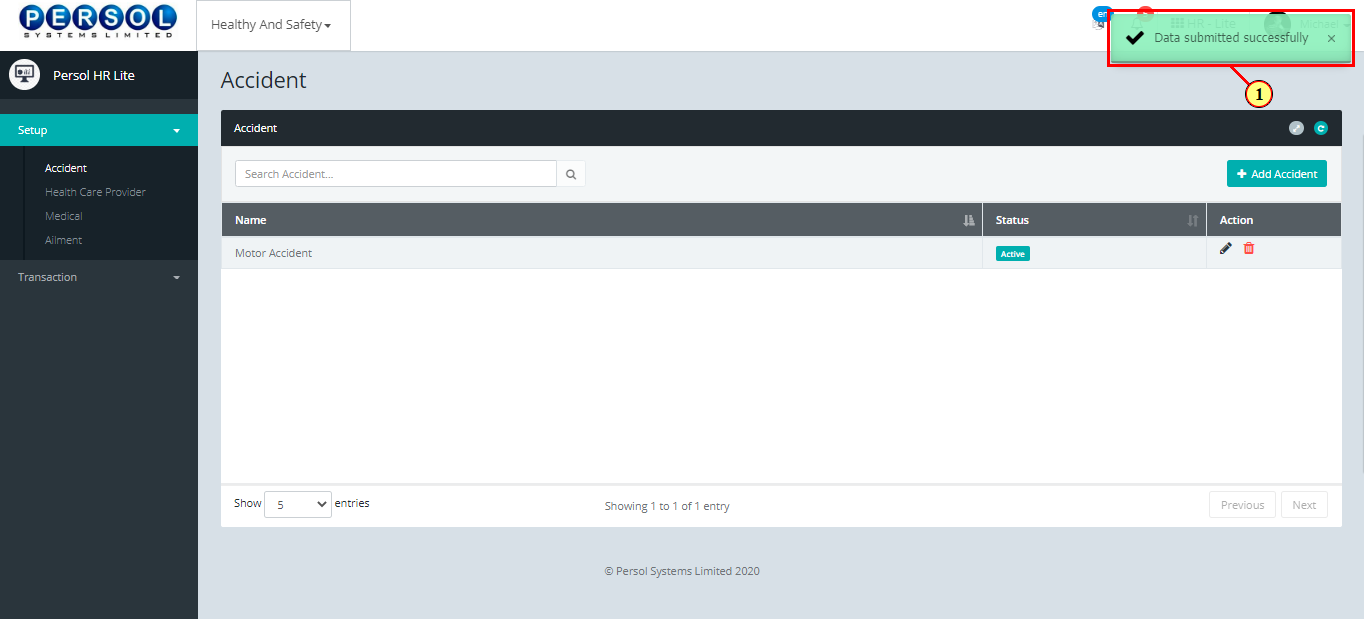
| (1) | A notification displays to indicate that the accident setup has been saved successfully |
| Step | Action |
|---|---|
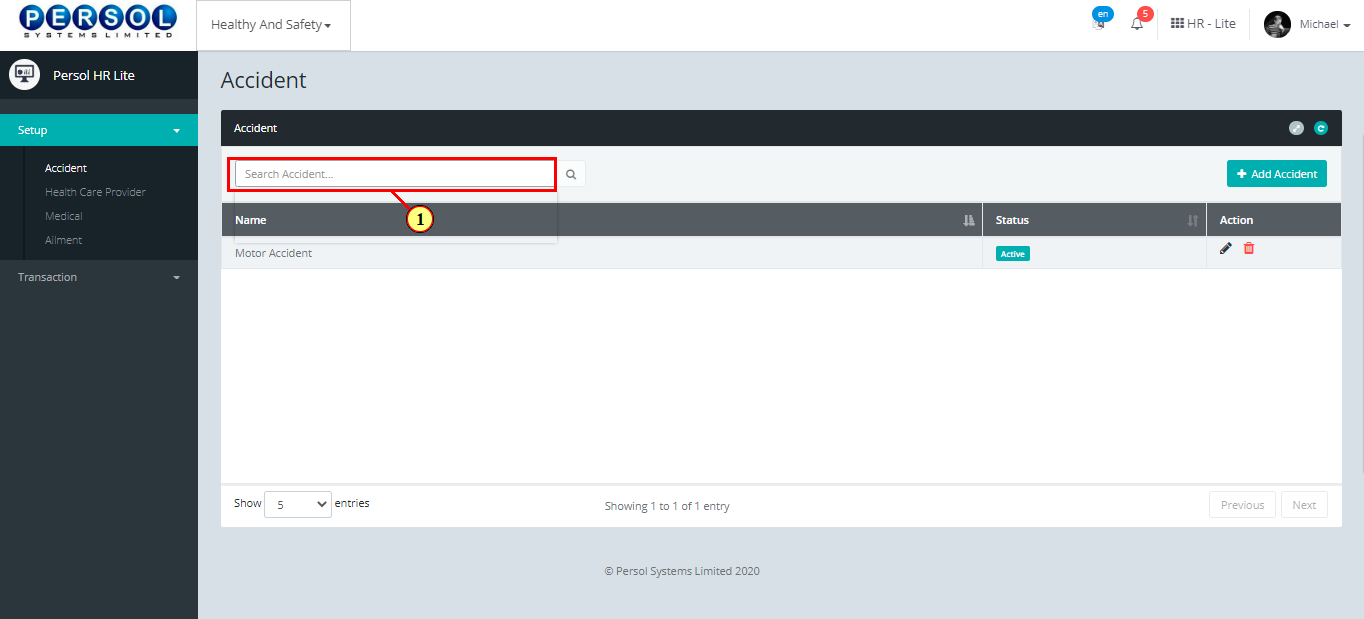
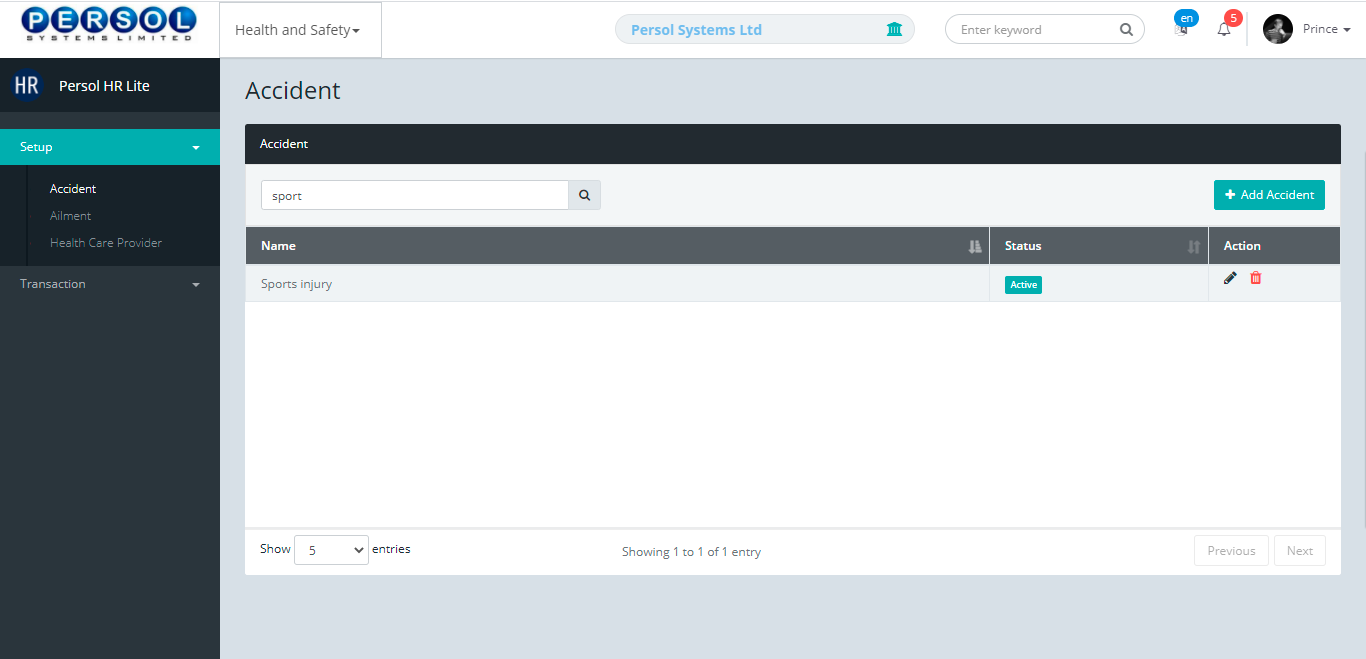
| (1) | To edit an accident, enter name in the search box |
| Step | Action |
|---|---|
| (1) |
Click on the  icon to search icon to search
|
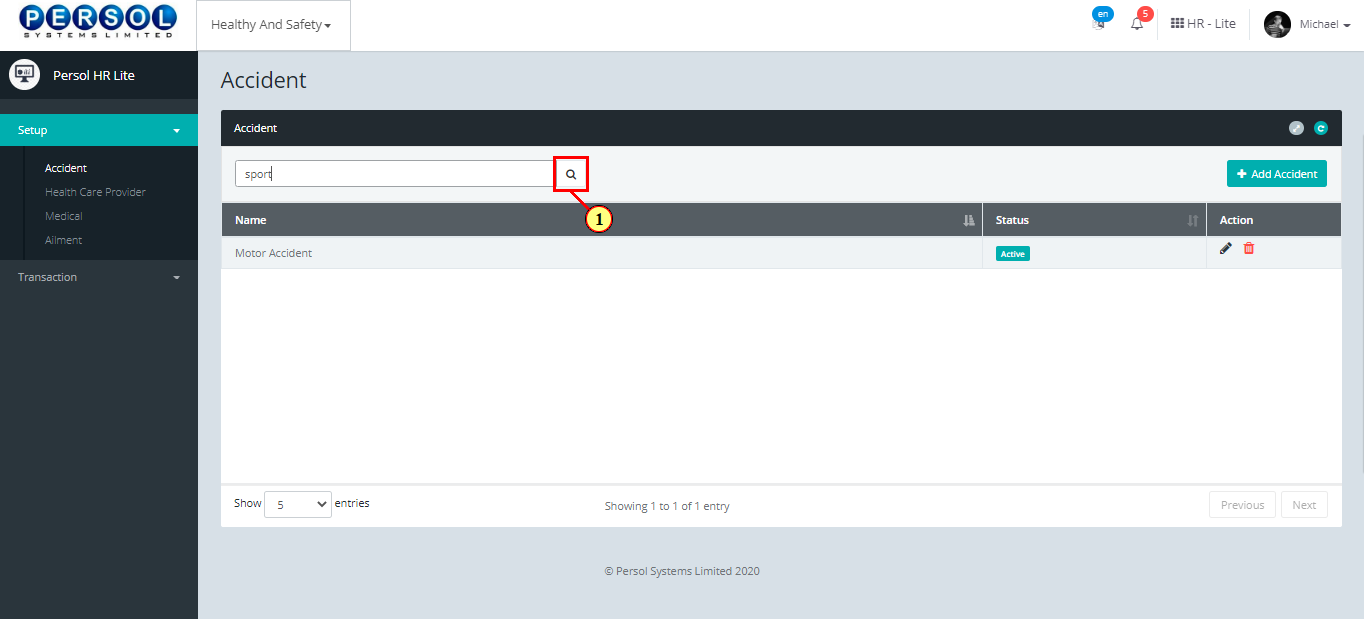
| Step | Action |
|---|---|
| The search result details display in the grid | |
|
The Action column consists of the delete  and the Edit and the Edit  actions icons actions icons
|
| Step | Action |
|---|---|
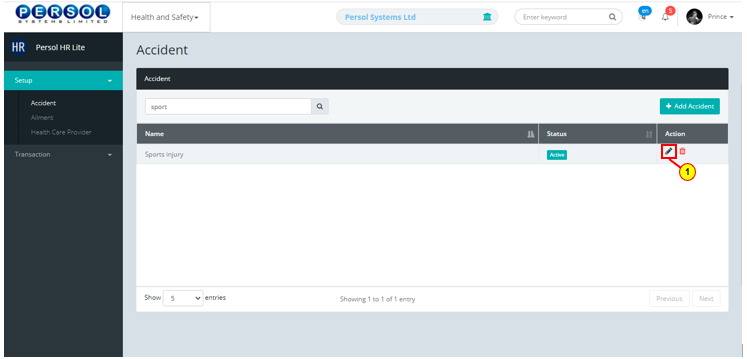
| (1) |
Click on the edit icon to edit the accident
|
|
You may click on the delete icon to delete the accident
|
| Step | Action |
|---|---|
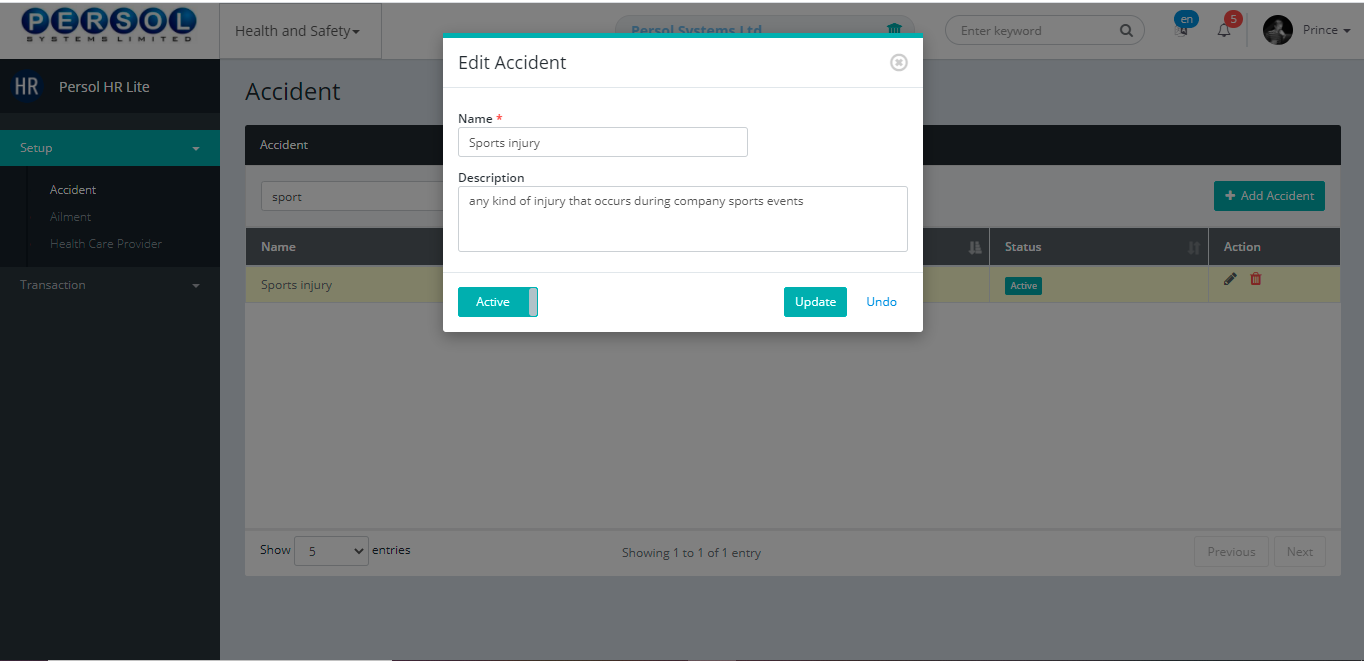
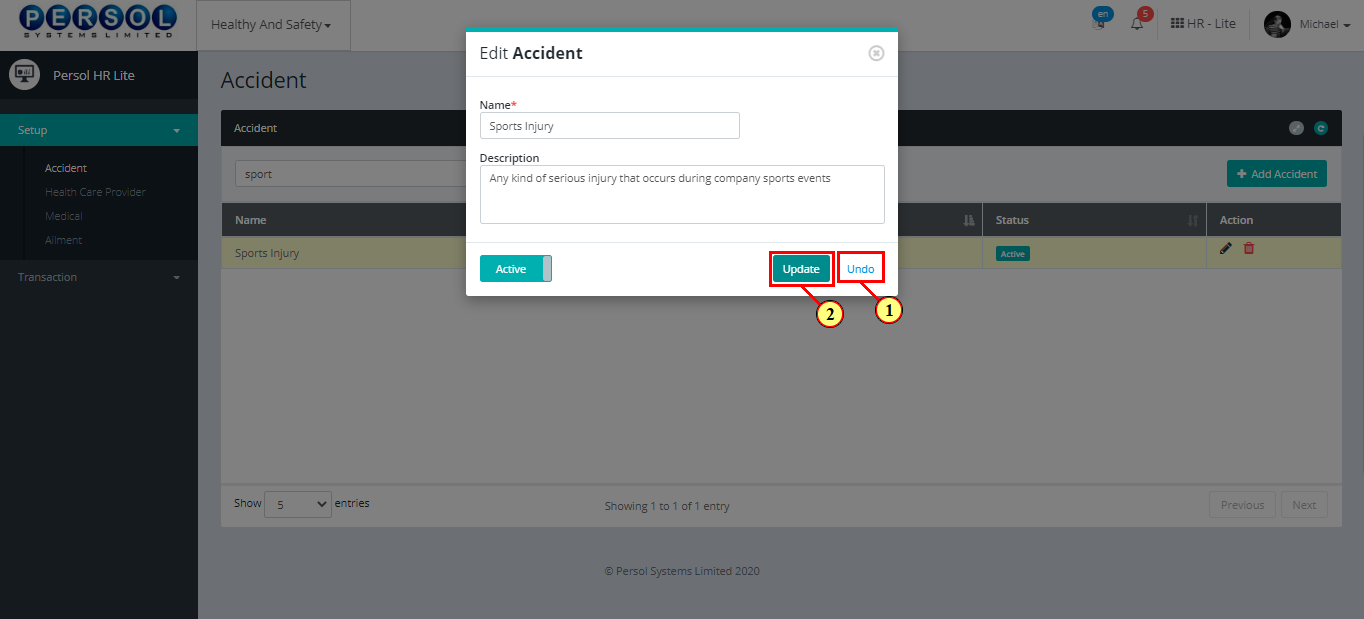
| The 'Edit Accident' modal opens | |
| Edit the name, description or status of the accident |
| Step | Action |
|---|---|
| (1) |
You may click on the  button to revert changes made button to revert changes made
|
| (2) |
click on the  button to save the changes made button to save the changes made
|
| Step | Action |
|---|---|
| (1) | A notification displays to indicate that the accident setup has been saved successfully |

| Step | Action |
|---|---|
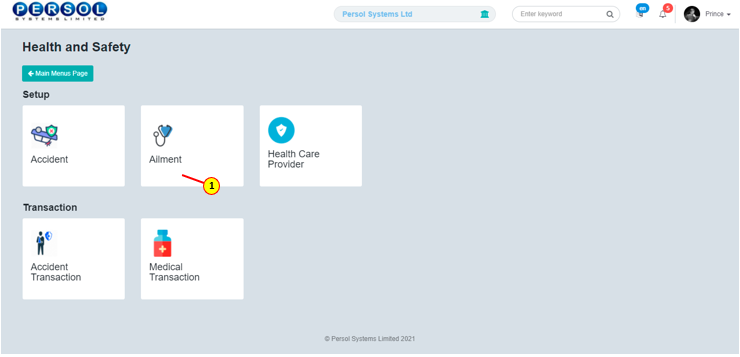
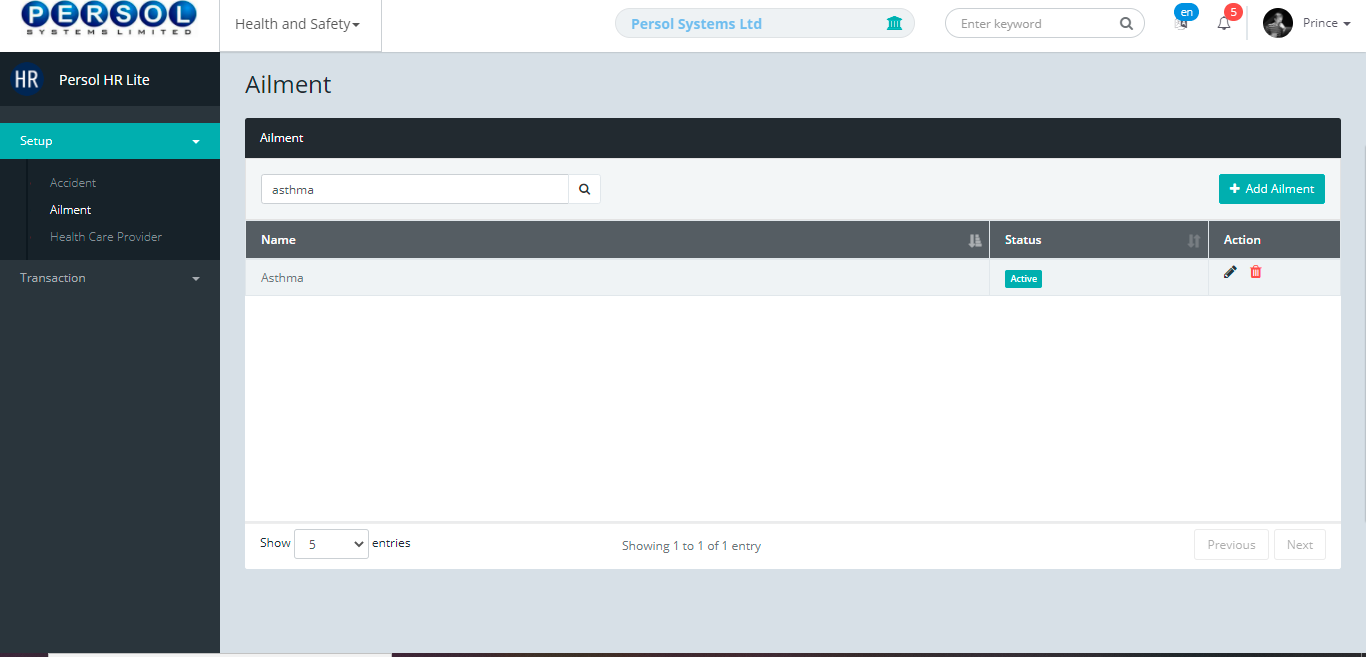
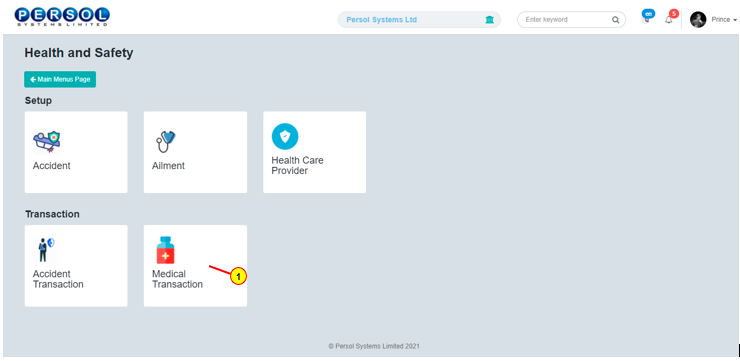
| (1) | On the Personax HR Lite homepage, select the ‘Health & Safety’ tile |

| Step | Action |
|---|---|
| The ‘Health And Safety’ submenus page opens | |
| (1) | Select the ‘Ailment’ tile |
| Step | Action |
|---|---|
| The ‘Ailment’ page opens | |
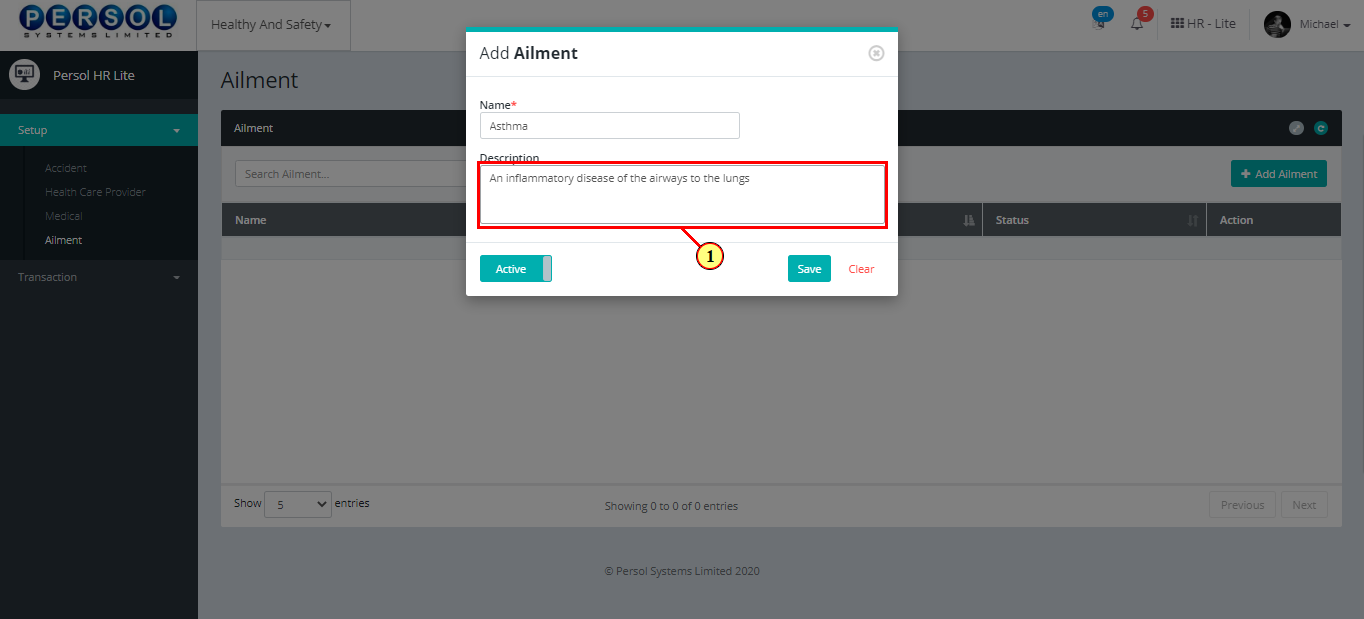
| (1) |
To setup an ailment, click on the  button button
|

| Step | Action |
|---|---|
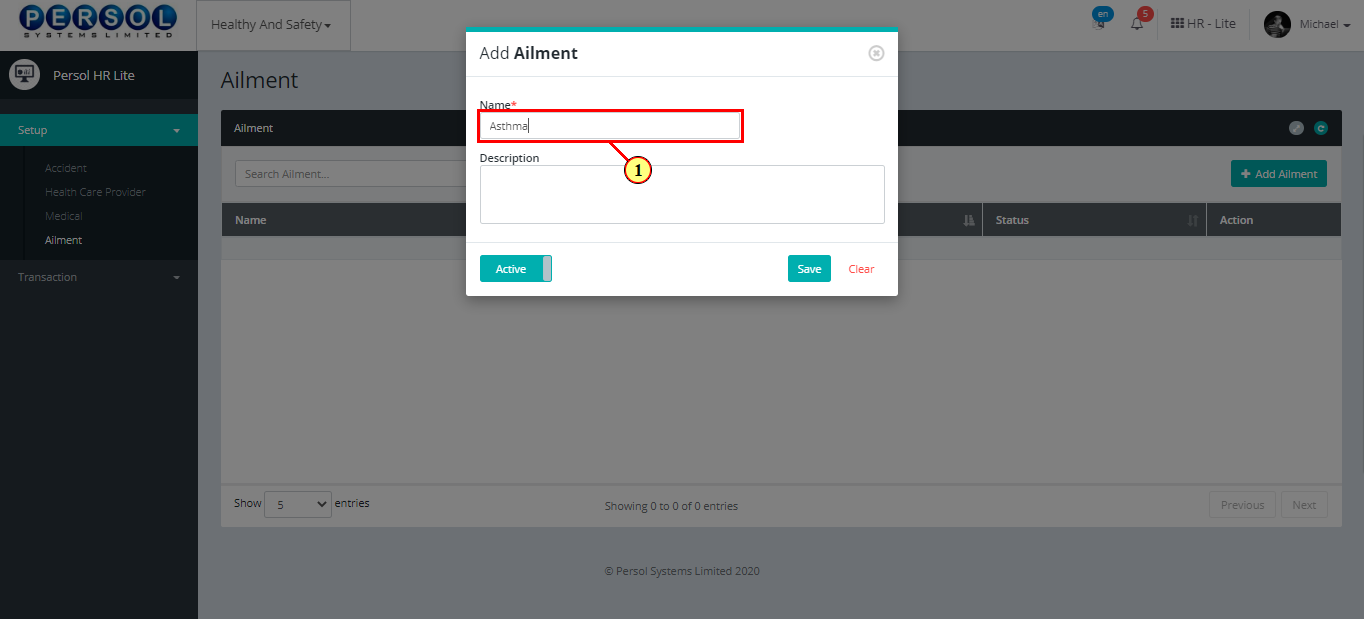
| The ‘Add Ailment’ modal opens | |
| (1) | Enter name of ailment |
|
This field is required * |
| Step | Action |
|---|---|
| (1) | Add a description to provide more details on the ailment |
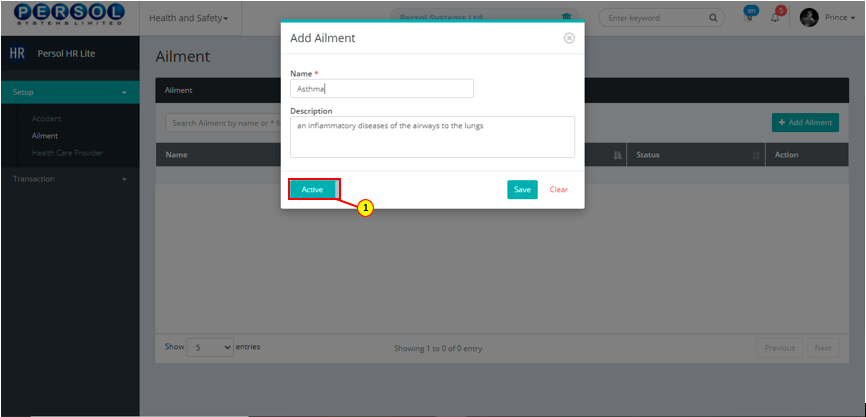
| Step | Action |
|---|---|
| (1) |
You may click on the button to change status of the ailment to inactive
|
|
- An active status means the ailment can be used in transactions on other pages - An inactive status means the ailment cannot be used in transactions on other pages |
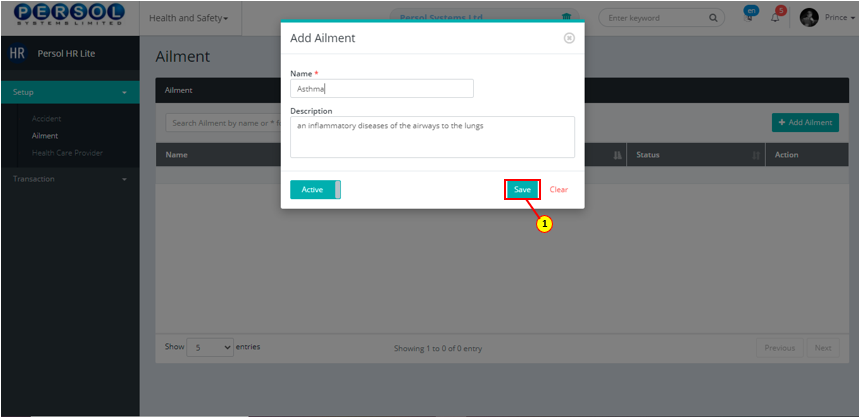
| Step | Action |
|---|---|
|
You may click on the  button to clear all details entered button to clear all details entered
|
| (1) |
Click on the  button to save details of the newly added ailment button to save details of the newly added ailment
|
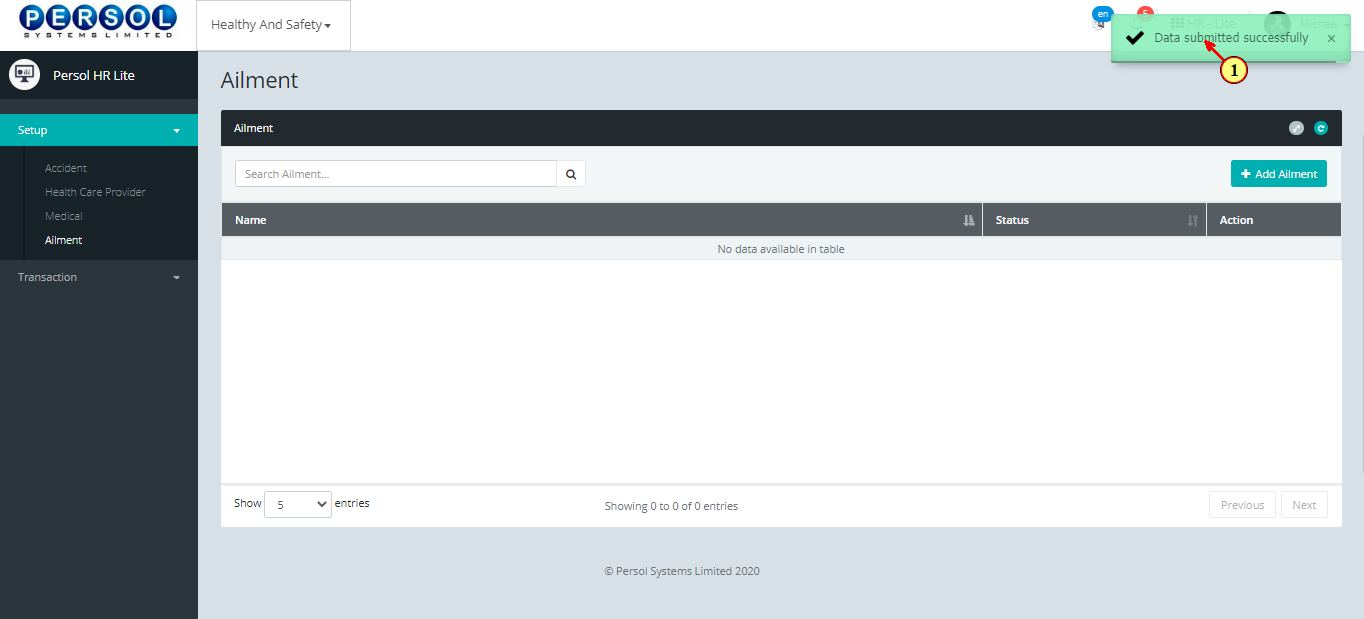
| Step | Action |
|---|---|
| (1) | A notification displays to indicate that the ailment setup has been saved successfully |
| Step | Action |
|---|---|
| (1) | To edit an ailment, enter name in the search box |
| (2) |
Click on the  icon to search icon to search
|

| Step | Action |
|---|---|
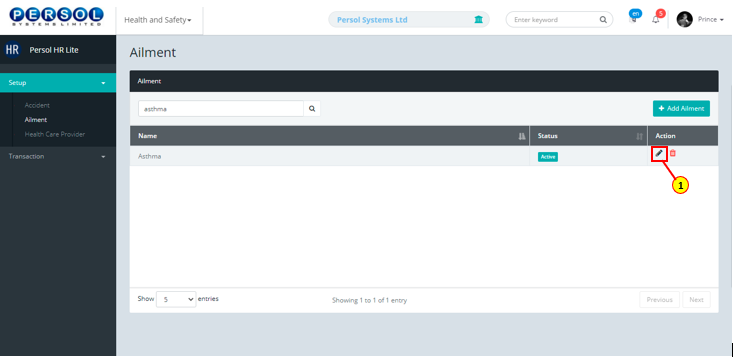
| (1) | The search result details display in the grid |
|
The Action column consists of the Edit and Delete action icons
|
| Step | Action |
|---|---|
| (1) |
Click on the edit icon to edit the aliment
|
|
You may click on the delete icon to delete ailment
|
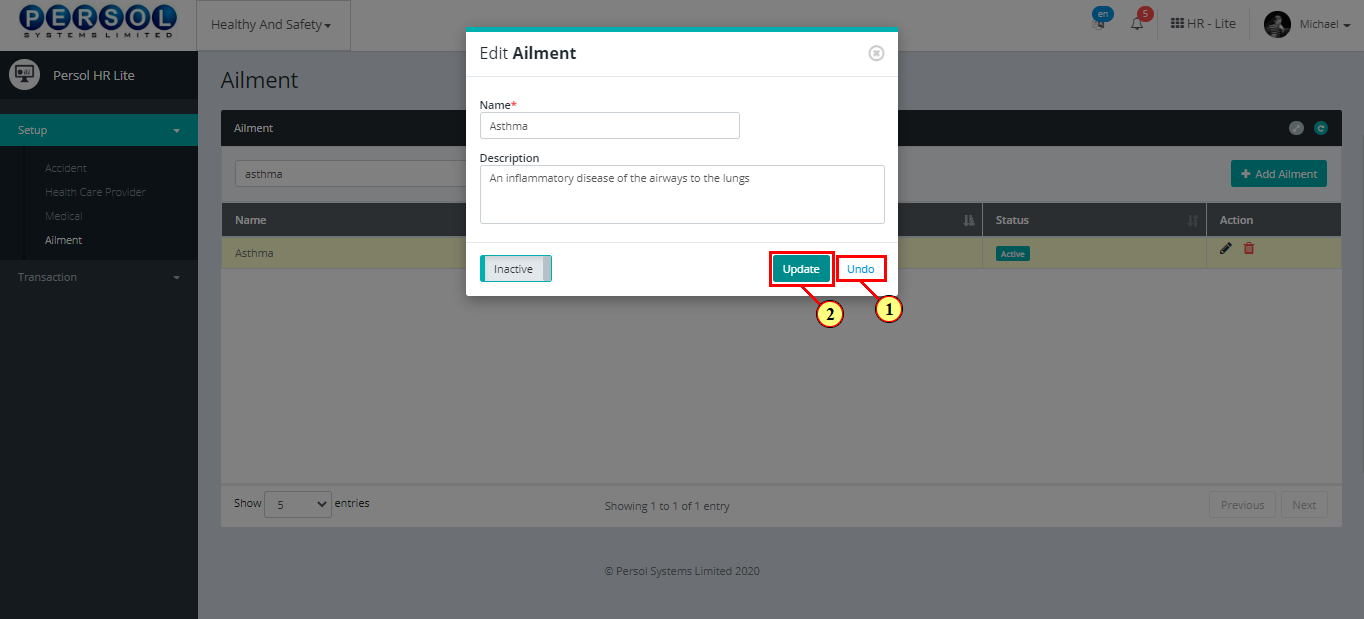
| Step | Action |
|---|---|
| The ‘Edit Ailment’ modal opens | |
| Edit the name, description or status of the ailment |

| Step | Action |
|---|---|
|
You may click on the button to revert changes made
|
| (1) |
Click on the button to save the changes made
|
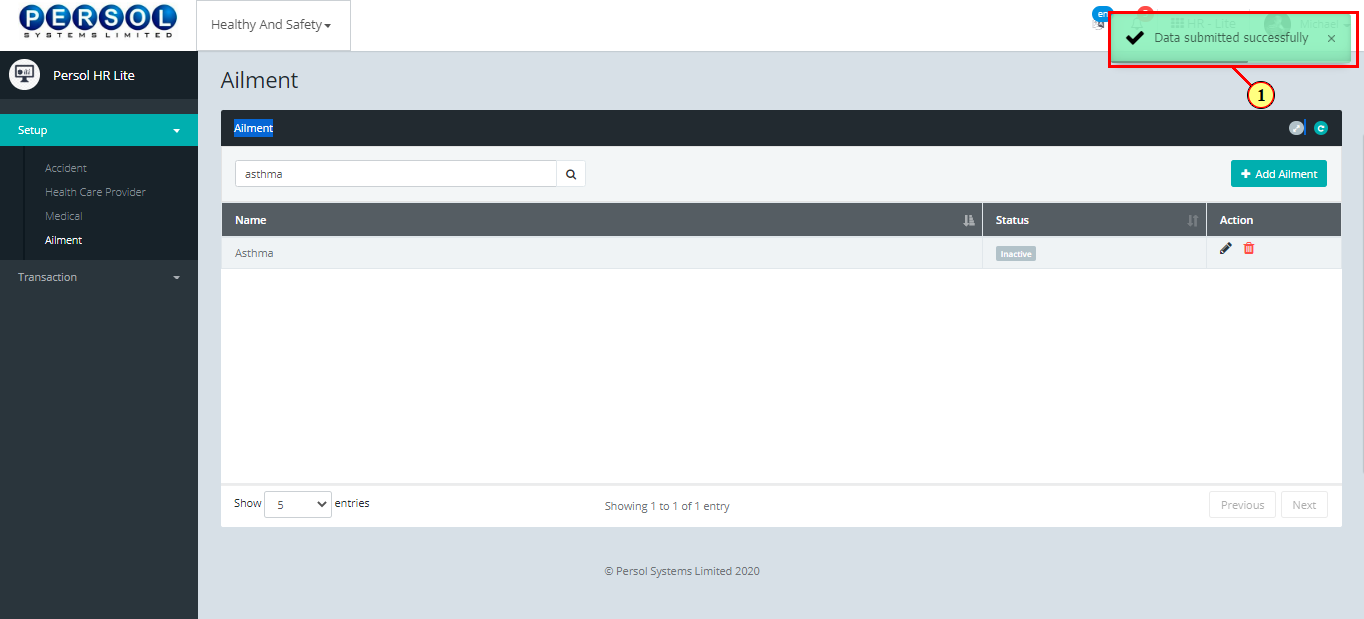
| Step | Action |
|---|---|
| (1) | A notification displays to indicate that the update has been saved successfully |
| Step | Action |
|---|---|
| (1) | On the Personax HR Lite homepage, select the 'Health & Safety' tile |
| Step | Action |
|---|---|
| The ‘Health & Safety’ submenus page opens | |
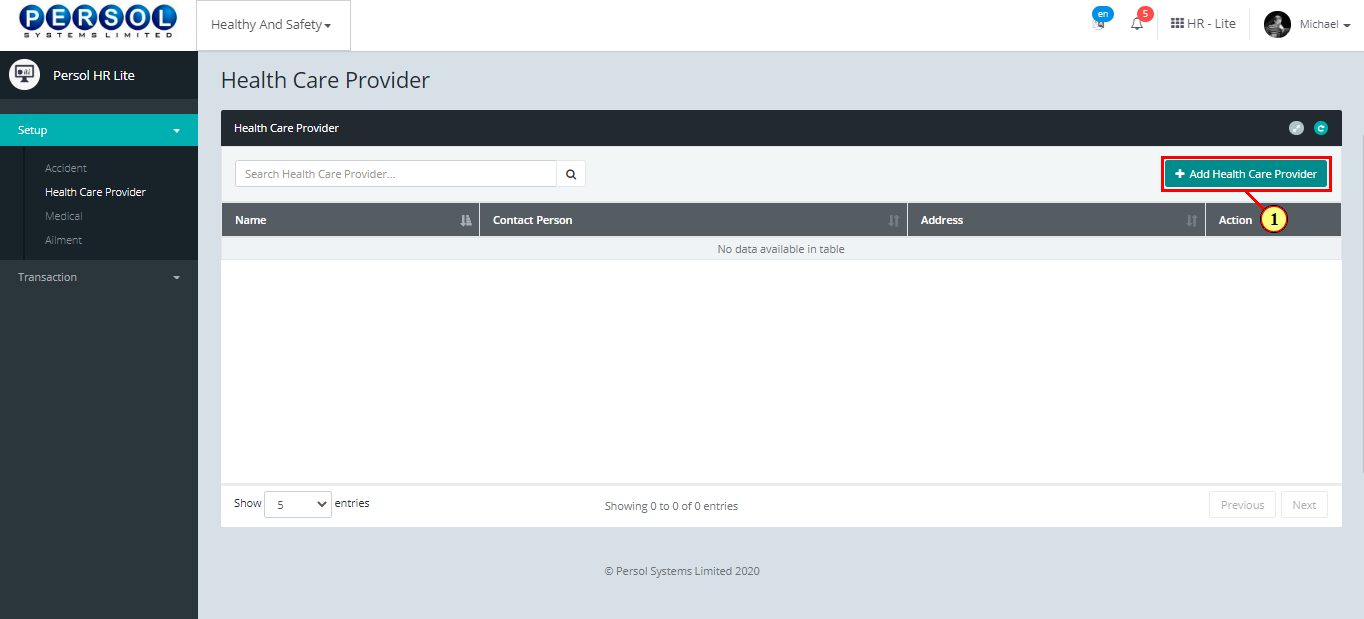
| (1) | Select the ‘Health Care Provider’ tile |

| Step | Action |
|---|---|
| The ‘Health Care Provider’ page opens | |
| (1) |
To setup a new health care provider, click on the  button button
|
| Step | Action |
|---|---|
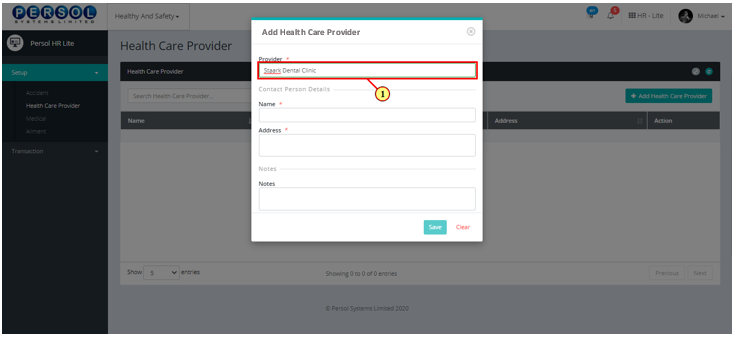
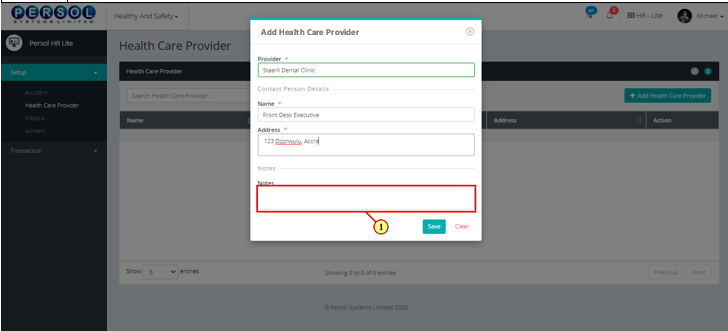
| The 'Add Health Care Provider' modal opens | |
| (1) | Enter name of health care provider |
|
This field is required * |
| Step | Action |
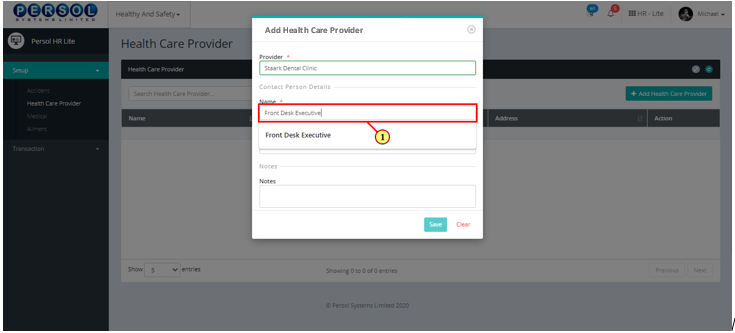
|---|---|
| (1) | Enter name of contact person for the health care provider |
|
This field is required * |
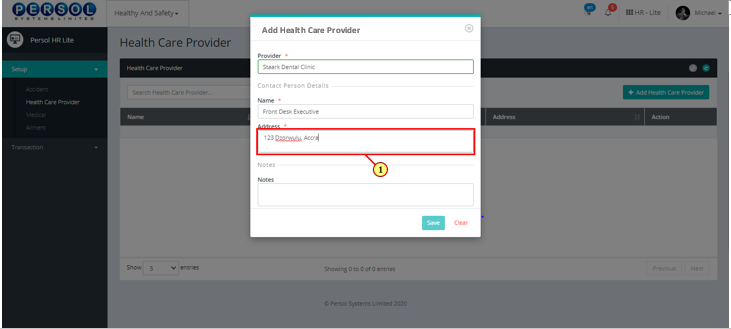
| Step | Action |
|---|---|
| (1) | Enter address of contact person for the health care provider |
|
This field is required * |
| Step | Action |
|---|---|
| (1) | Add any additional info in the Notes section |
| Step | Action |
|---|---|
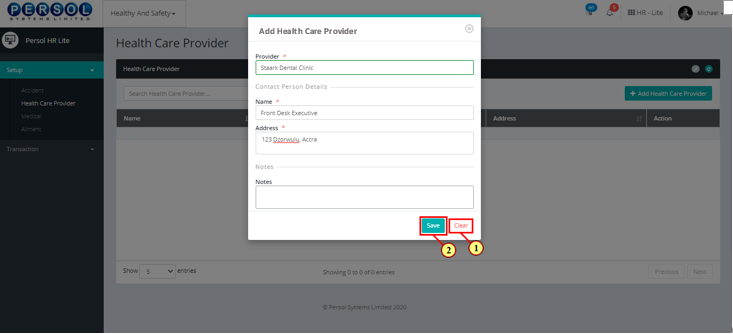
|
You may click on the button to clear all details entered
|
| (1) |
Click on the button to save details of the newly added health care provider
|
| Step | Action |
|---|---|
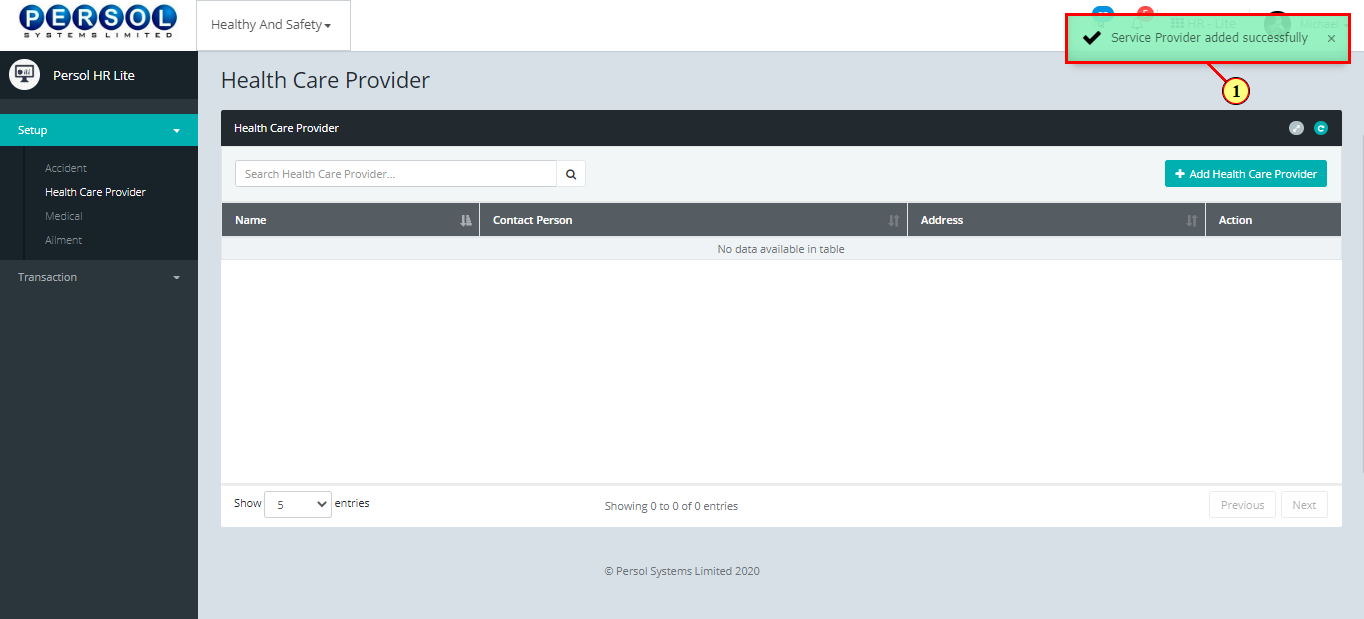
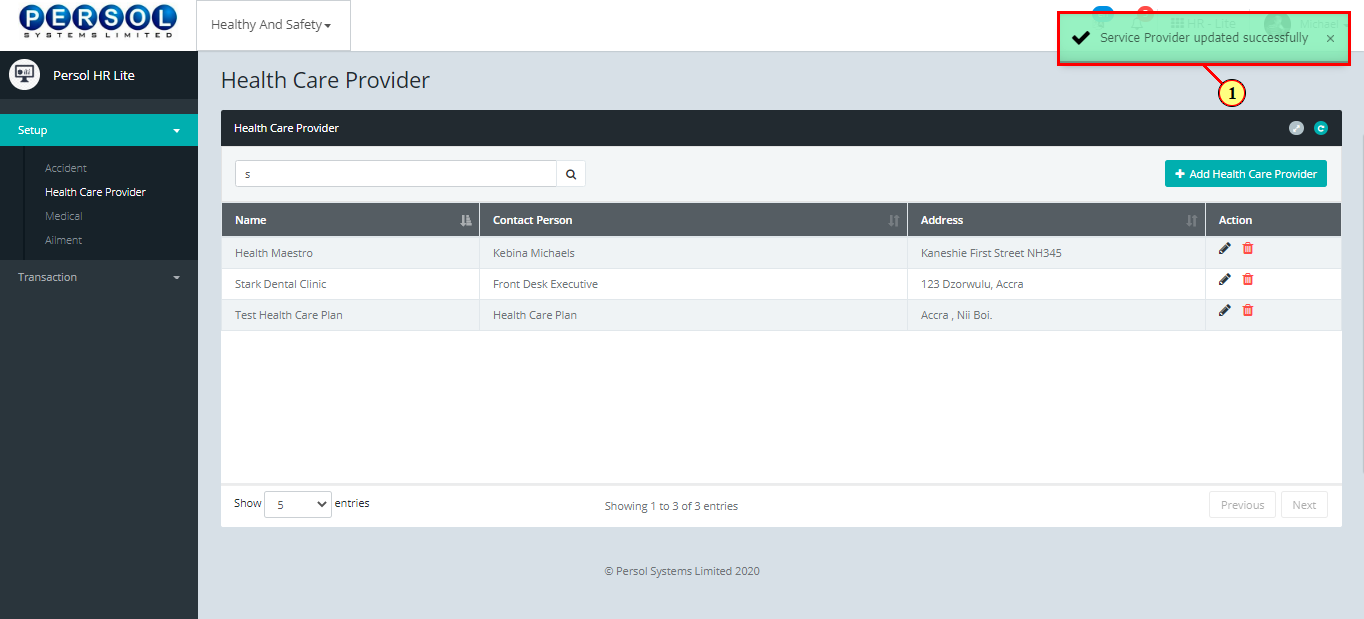
| (1) | A notification displays to indicate that the health care provider setup has been saved successfully |
| Step | Action |
|---|---|
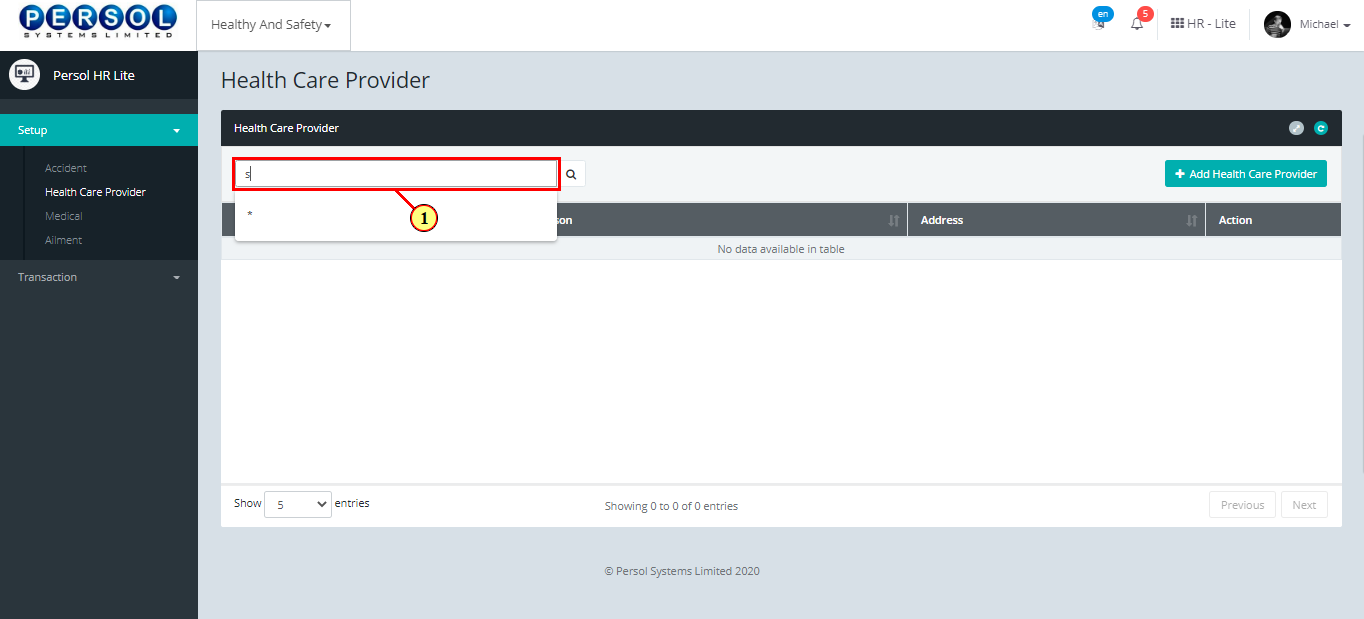
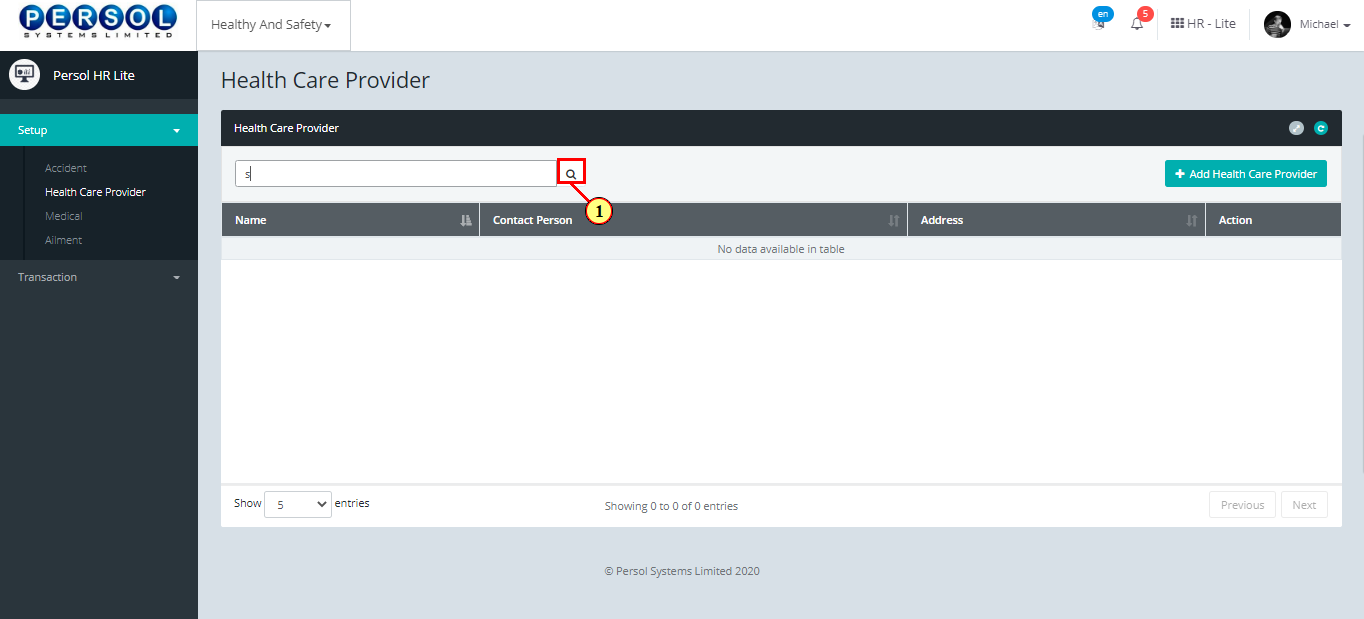
| (1) | To edit a health care provider, enter the name in the search box |
| Step | Action |
|---|---|
| (1) |
Click on the icon to search for provider
|
| Step | Action |
|---|---|
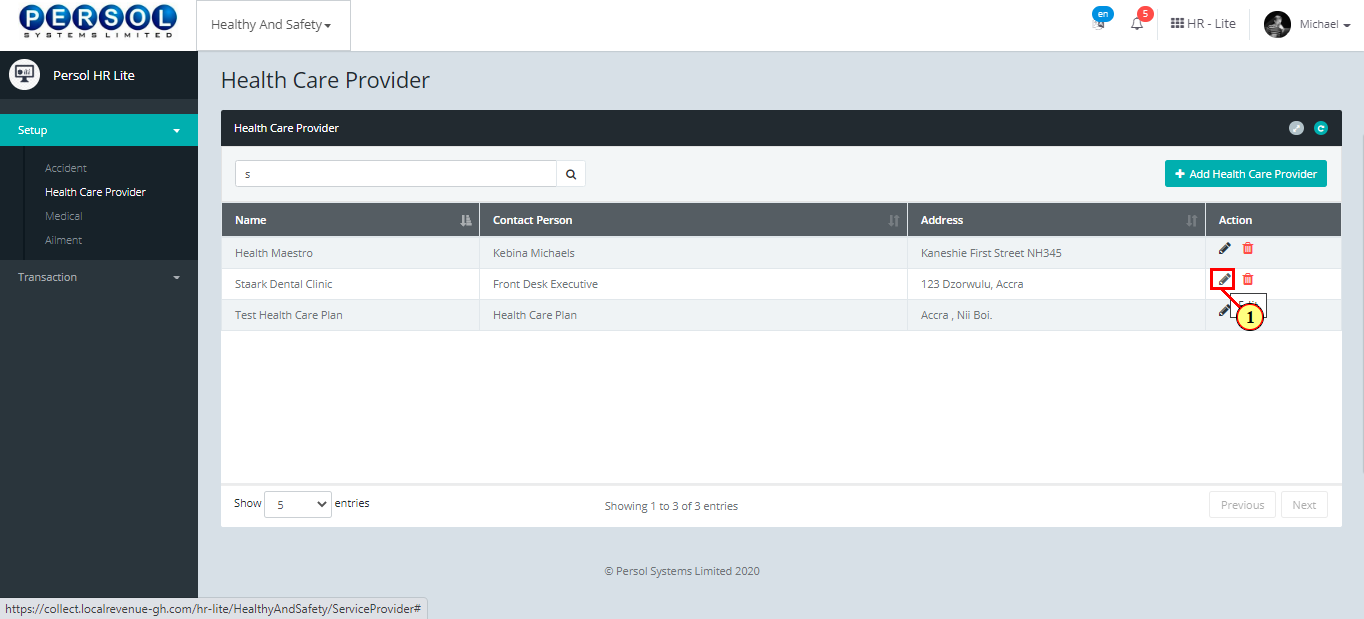
| (1) | The search result details display in the grid |
|
The Action column consists of the Edit and Delete action icons
|

| Step | Action |
|---|---|
| (1) |
Click on the edit icon to edit the health care provider
|
|
You may click on the delete icon to delete the provider
|
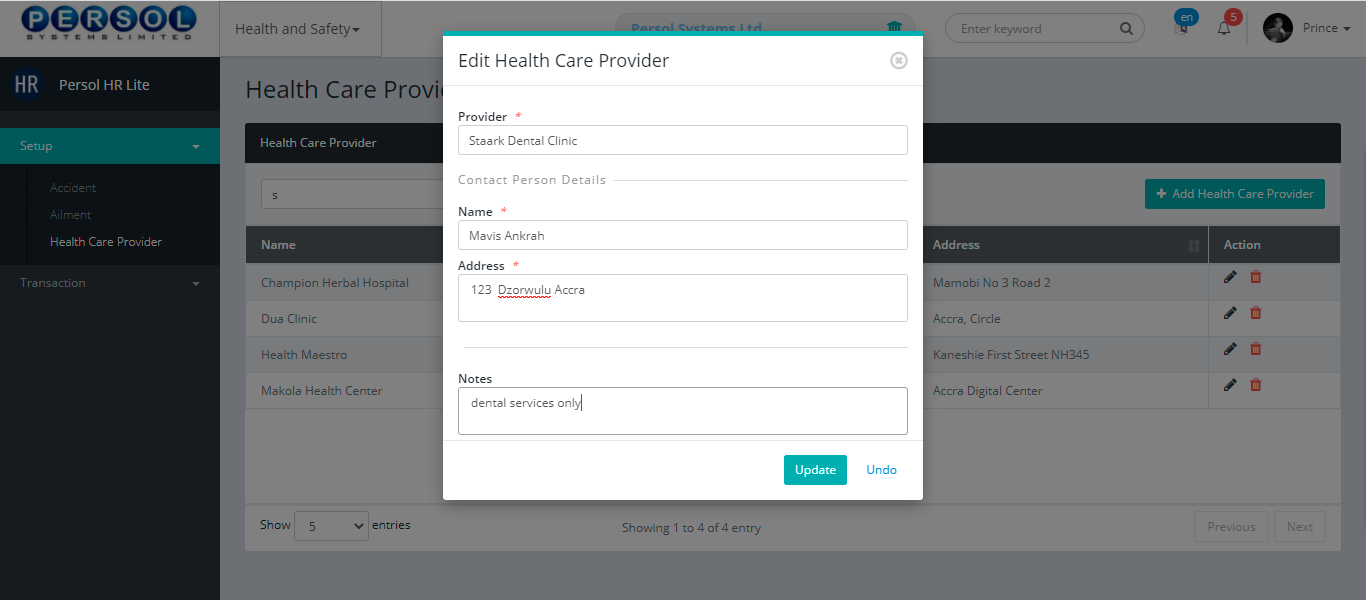
| Step | Action |
|---|---|
| The ‘Edit Health Care Provider’ modal opens | |
| Edit the details of the health care provider |
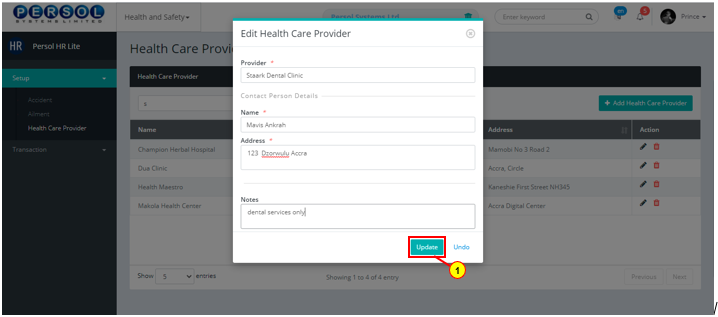
| Step | Action |
|---|---|
|
You may click on the button to revert changes made
|
| (1) |
Click on the button to save the changes made
|
| Step | Action |
|---|---|
| (1) | A notification displays to indicate the update has been saved successfully |
| Step | Action |
|---|---|
| (1) | On the Personax HR Lite homepage, select the 'Health & Safety' tile |
| Step | Action |
|---|---|
| The ‘Health And Safety’ submenus page opens | |
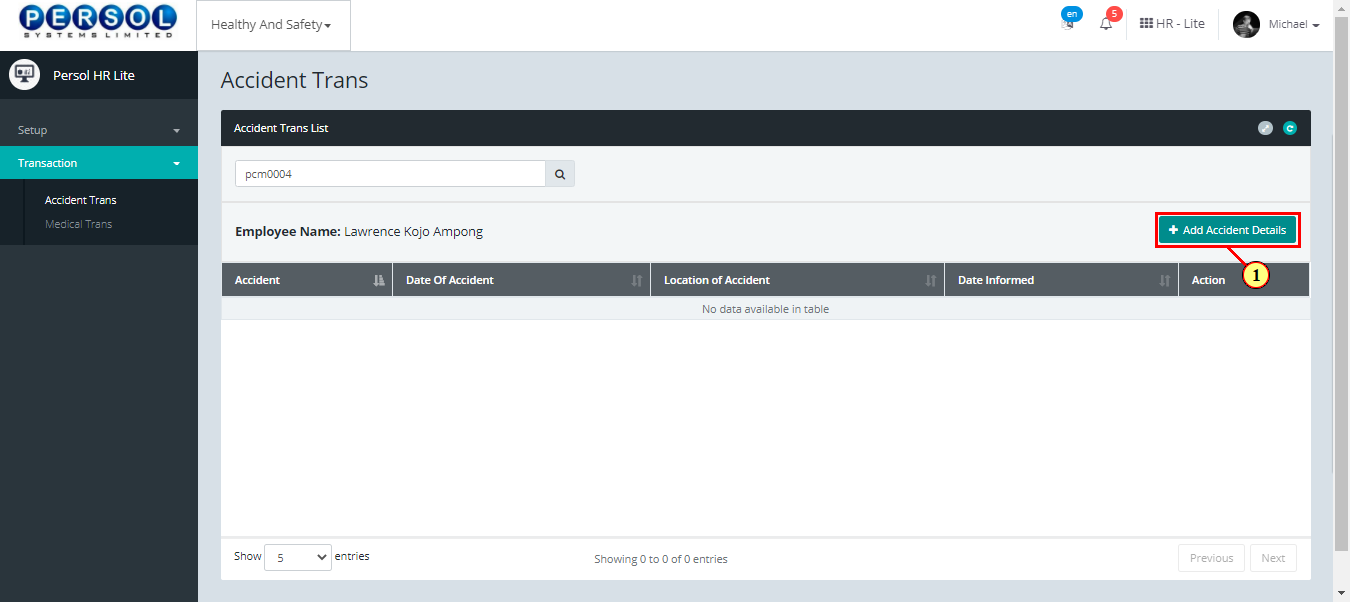
| (1) | Select the ‘Accident Transaction’ tile |
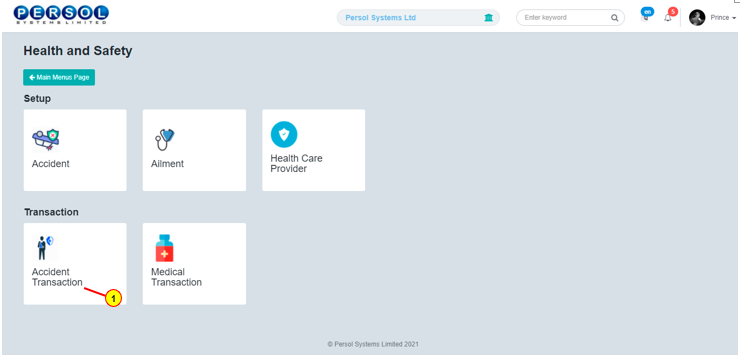
| Step | Action |
|---|---|
| The ‘Accident Transaction’ page opens | |
| (1) | To add an accident record for an employee, enter employee name or ID in the search box |
| (2) |
Click on the icon to search for employee
|
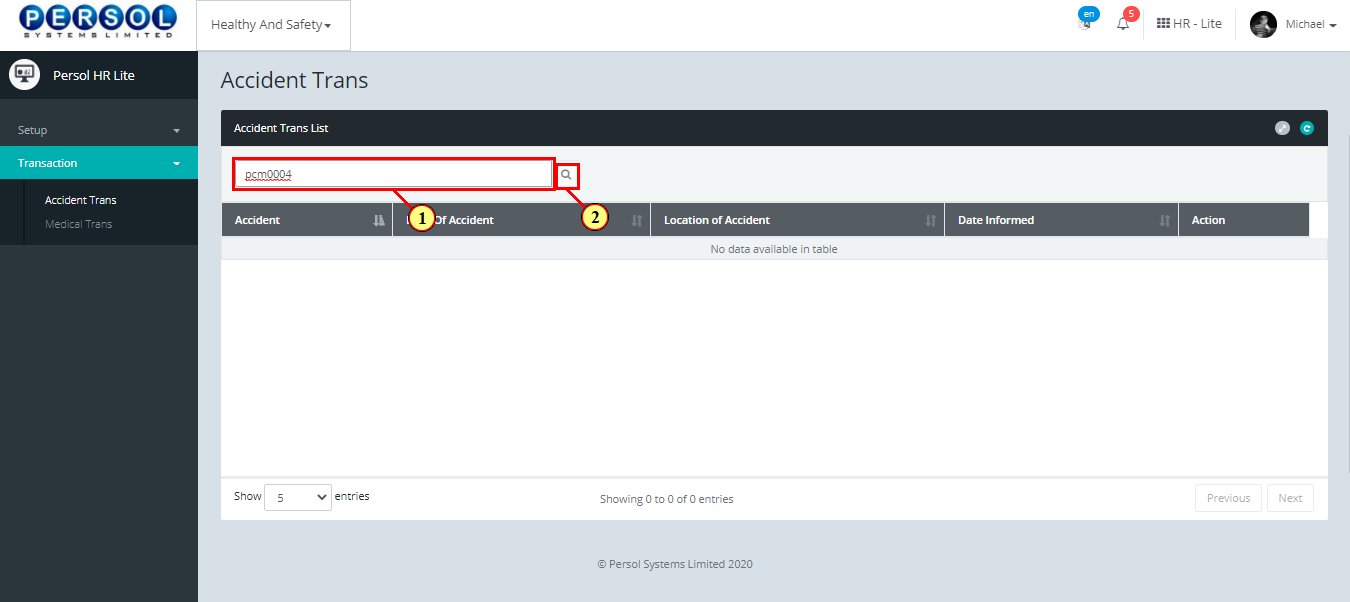
| Step | Action |
|---|---|
| The employee's name and previous accident record (if any) display in the grid | |
| (1) |
Click on  button to add a new medical record for the employee button to add a new medical record for the employee
|
| Step | Action |
|---|---|
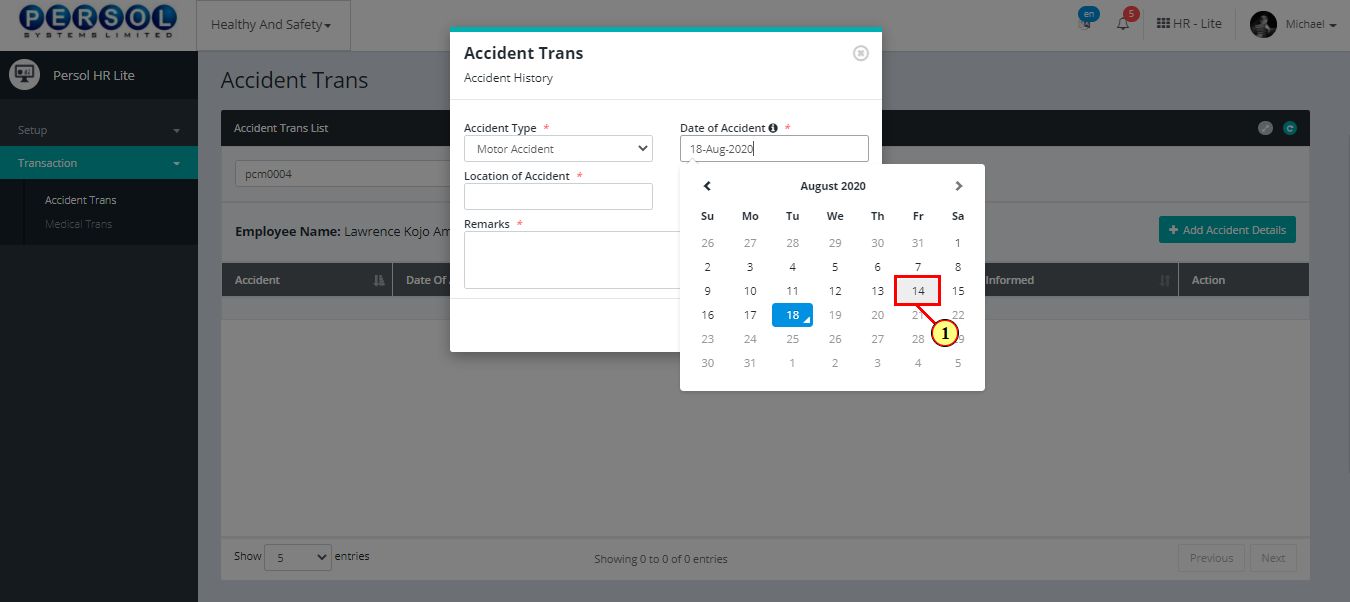
| The ‘Add Accident Transaction’ modal opens | |
| (1) | Select the type of accident from the dropdown options |
|
This field is required * |

| Step | Action |
|---|---|
| (1) | Select the date of accident |
| Step | Action |
|---|---|
| (1) | Enter location the accident occurred |
|
This field is required * |
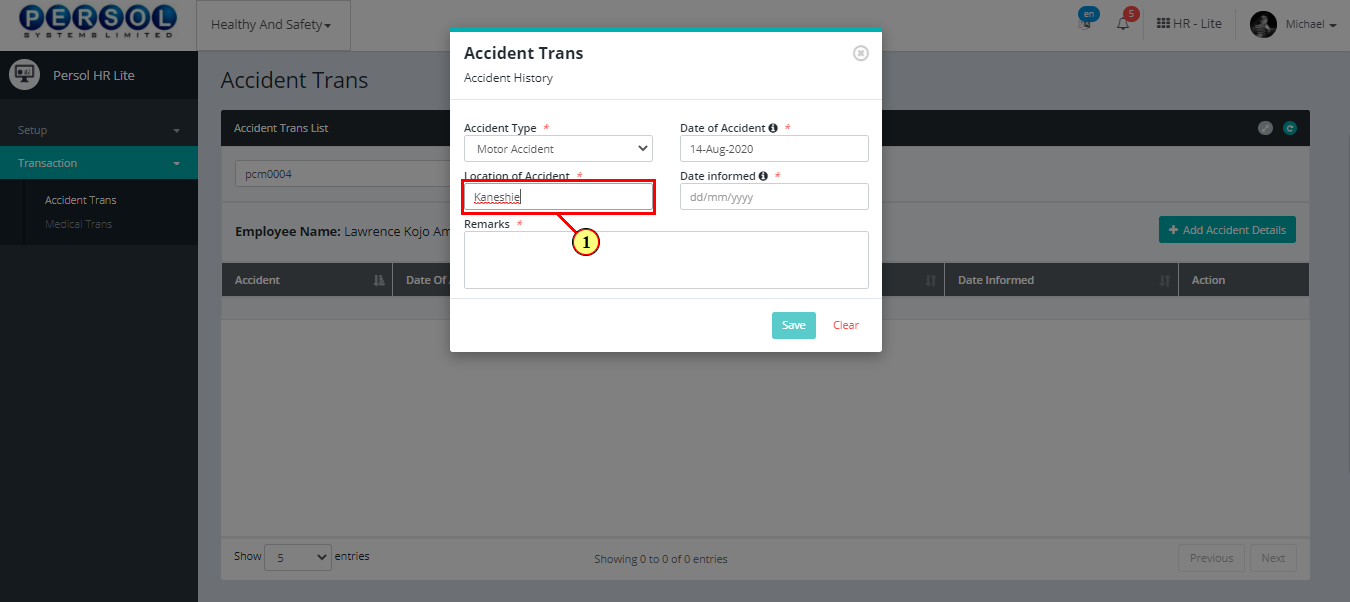
| Step | Action |
|---|---|
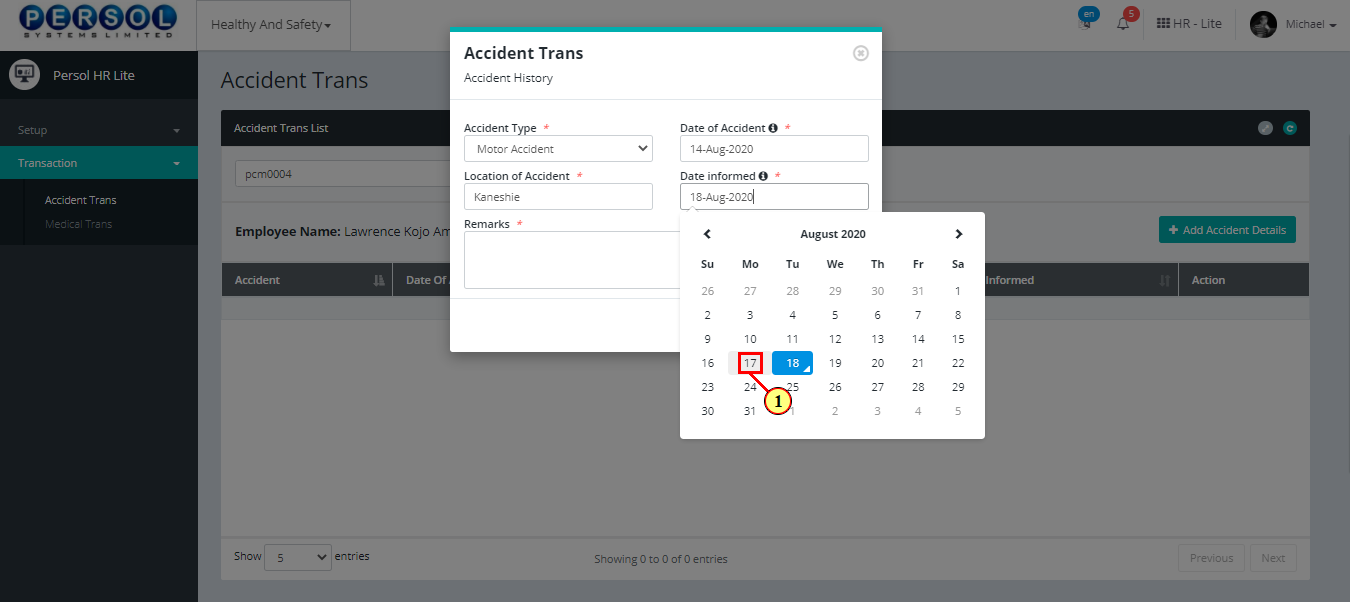
| (1) | Select the date the accident was reported |
|
This field is required * |
| Step | Action |
|---|---|
| (1) | Enter any additional info in the remarks section |
|
This field is required * |
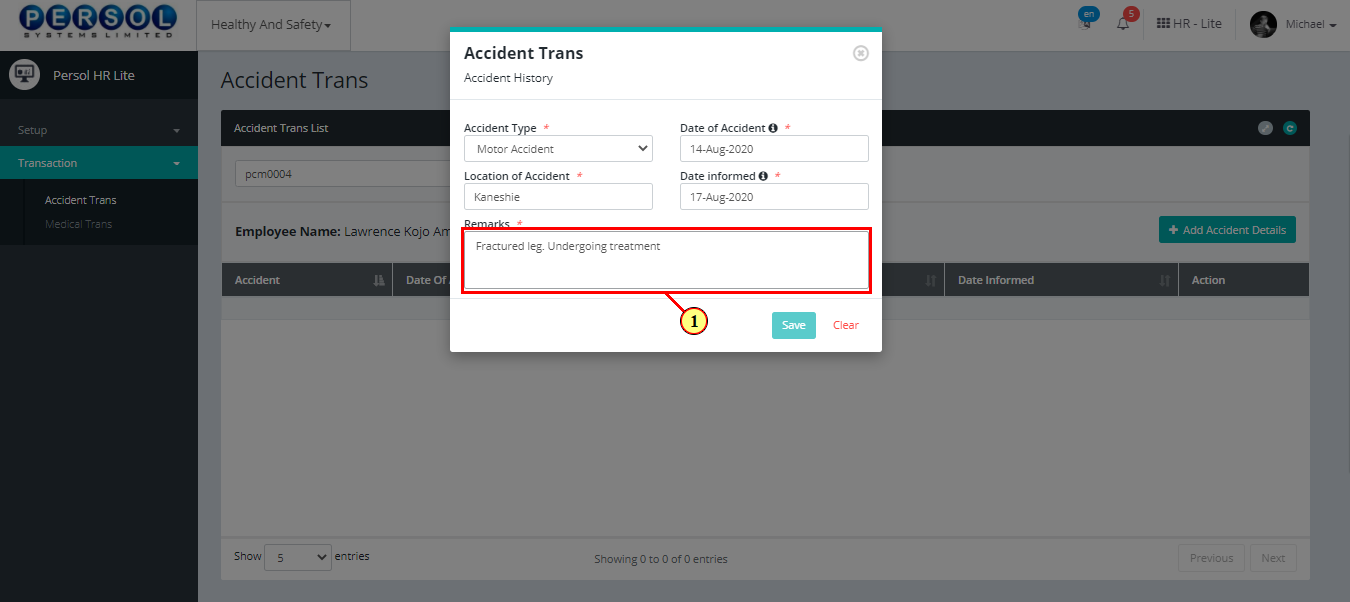
| Step | Action |
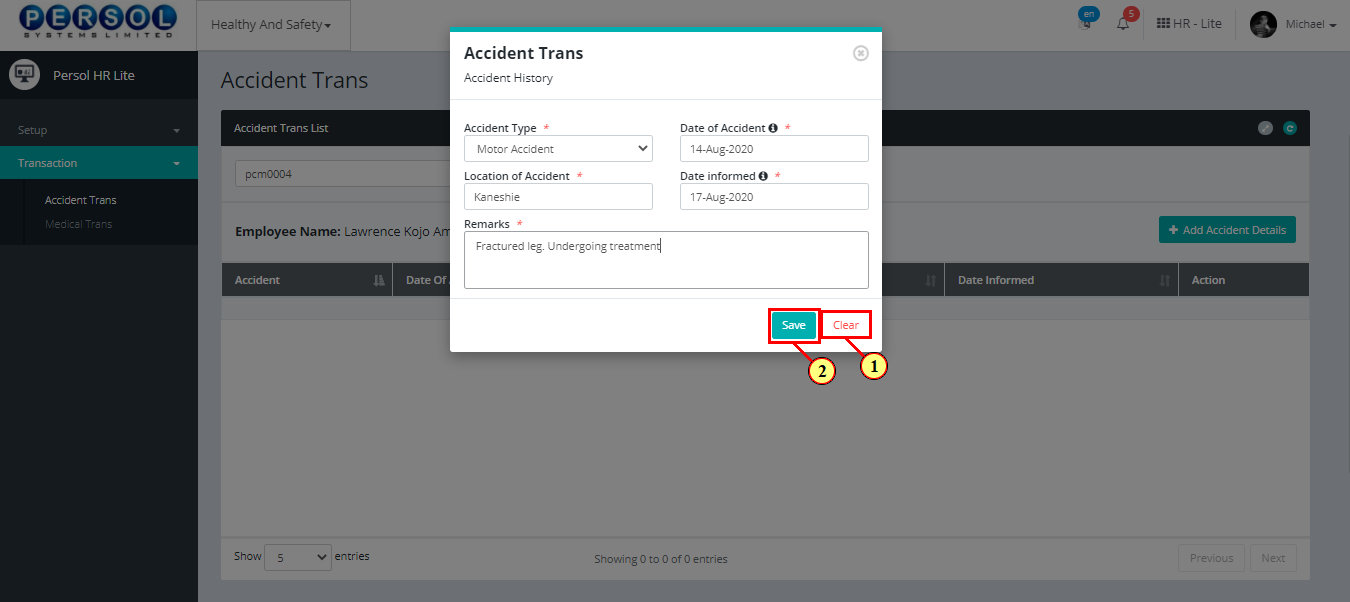
|---|---|
|
You may click on the button to clear all details entered
|
| (1) |
Click on the button to save the newly added accident record for the employee
|
| Step | Action |
|---|---|
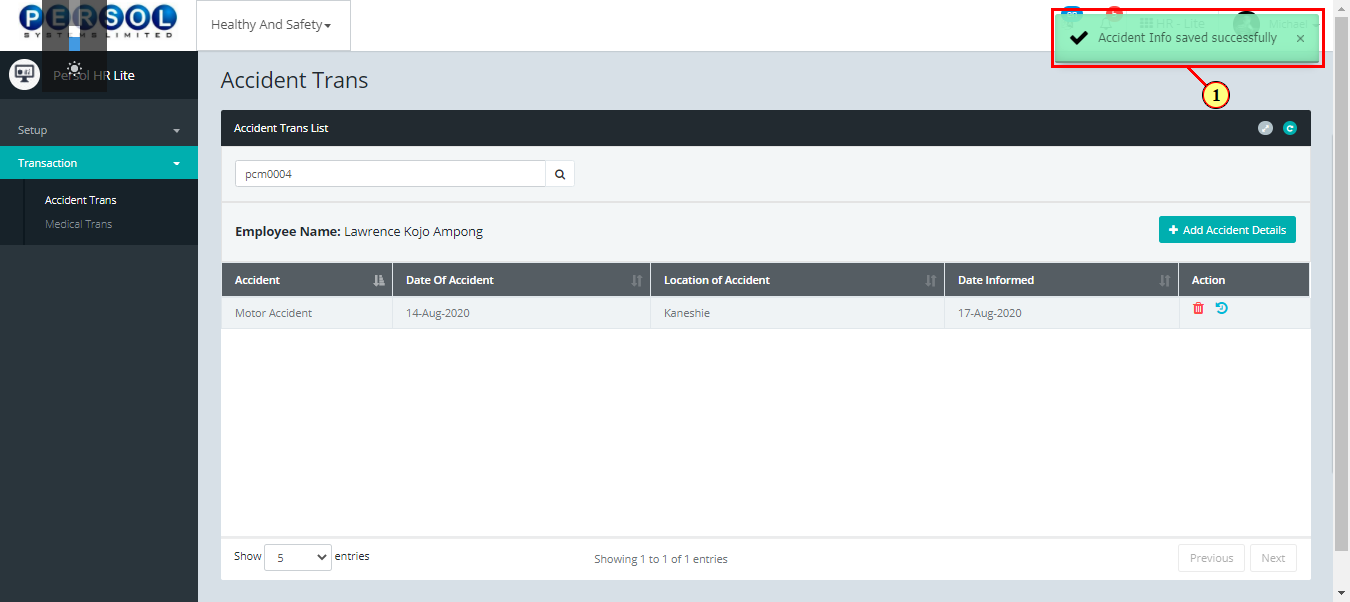
| (1) | A notification displays to indicate that the Accident transaction has been saved successfully |
|
The newly added Accident transaction info displays in the grid |
| Step | Action |
|---|---|
| (1) | On the PersonaX HR Lite e homepage, select the 'Health & Safety' tile |
| Step | Action |
|---|---|
| The ‘Health And Safety’ submenus page opens | |
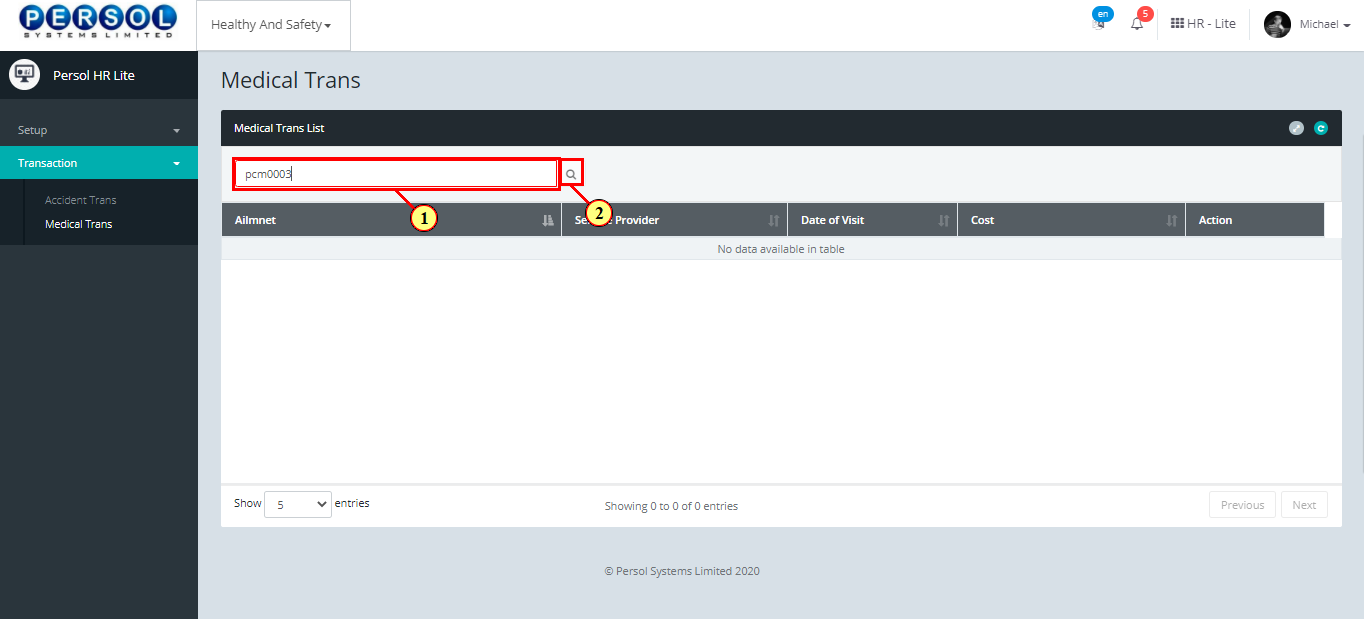
| (1) | Select the ‘Medical Transaction’ tile |
| Step | Action |
|---|---|
| The ‘Medical Transaction’ page opens | |
| (1) | To add a medical record for an employee, enter employee name or ID in the search box |
| (2) |
Click on the  icon to search for employee icon to search for employee
|
| Step | Action |
|---|---|
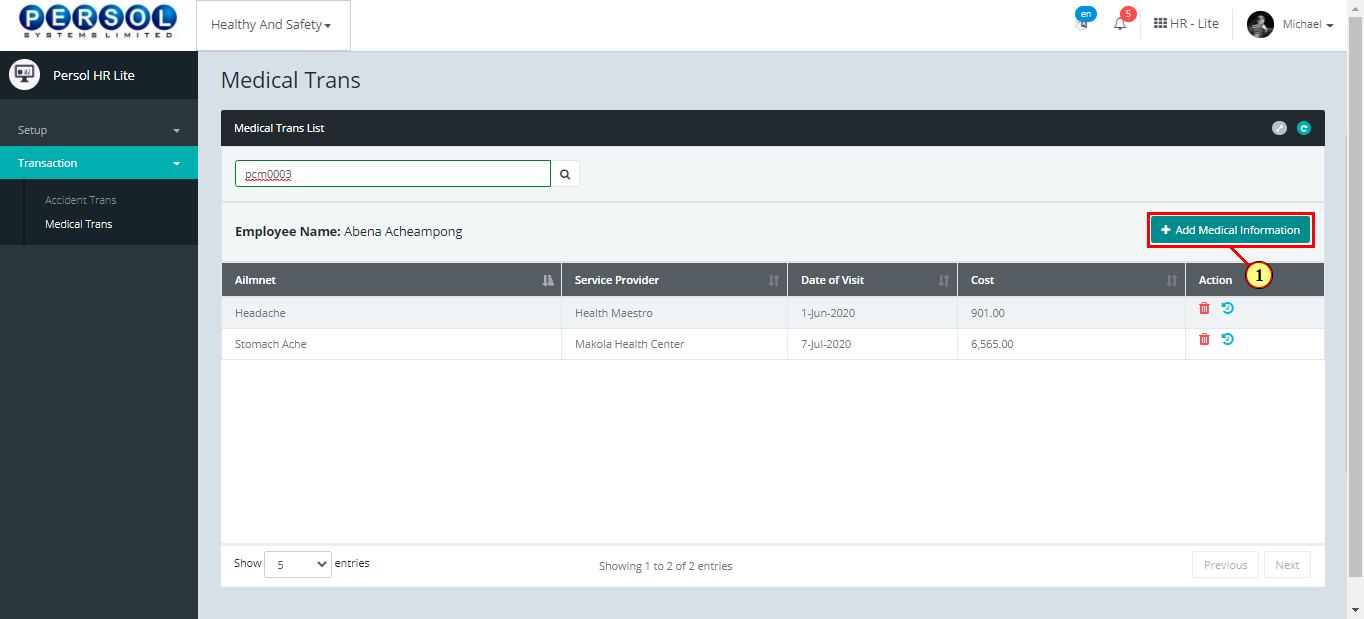
| The employee's name and previous medical record (if any) display in the grid | |
| (1) |
Click on  button to add a new medical record for the employee button to add a new medical record for the employee
|
| Step | Action |
|---|---|
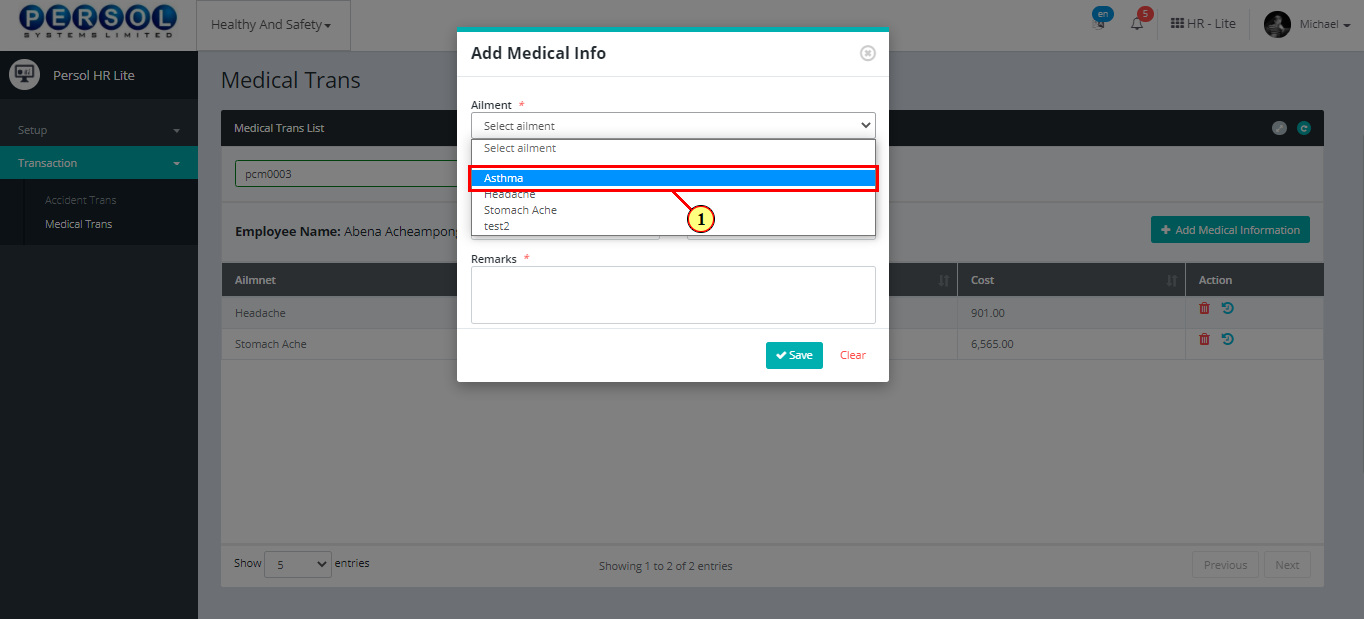
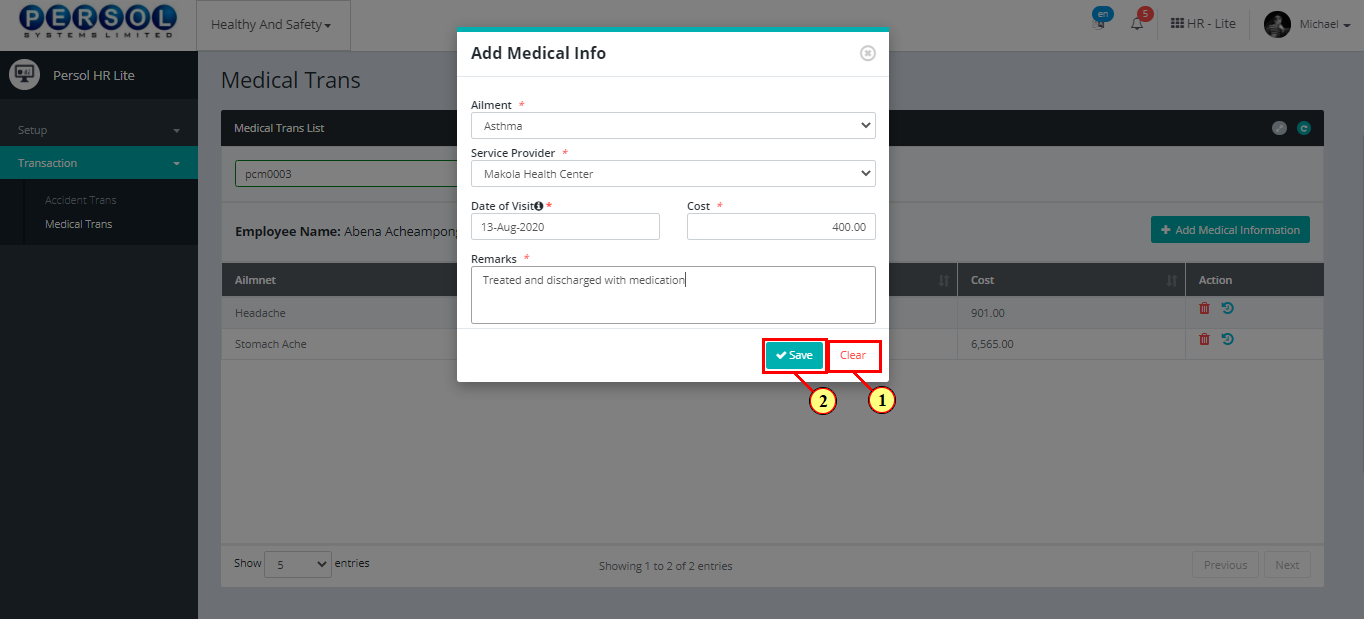
| The ‘Add Medical Info’ modal opens | |
| (1) | Select an ailment from the dropdown options |
|
This field is required * |
| Step | Action |
|---|---|
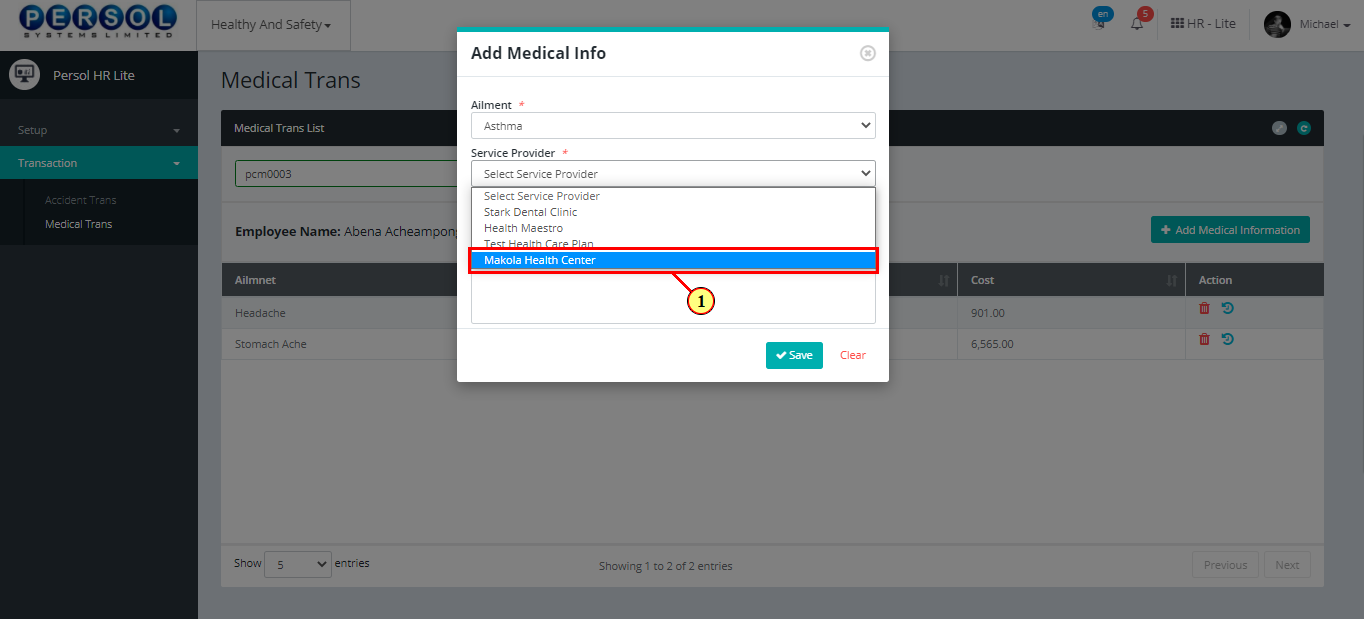
| (1) | Select a healthcare provider |
|
This field is required * |
| Step | Action |
|---|---|
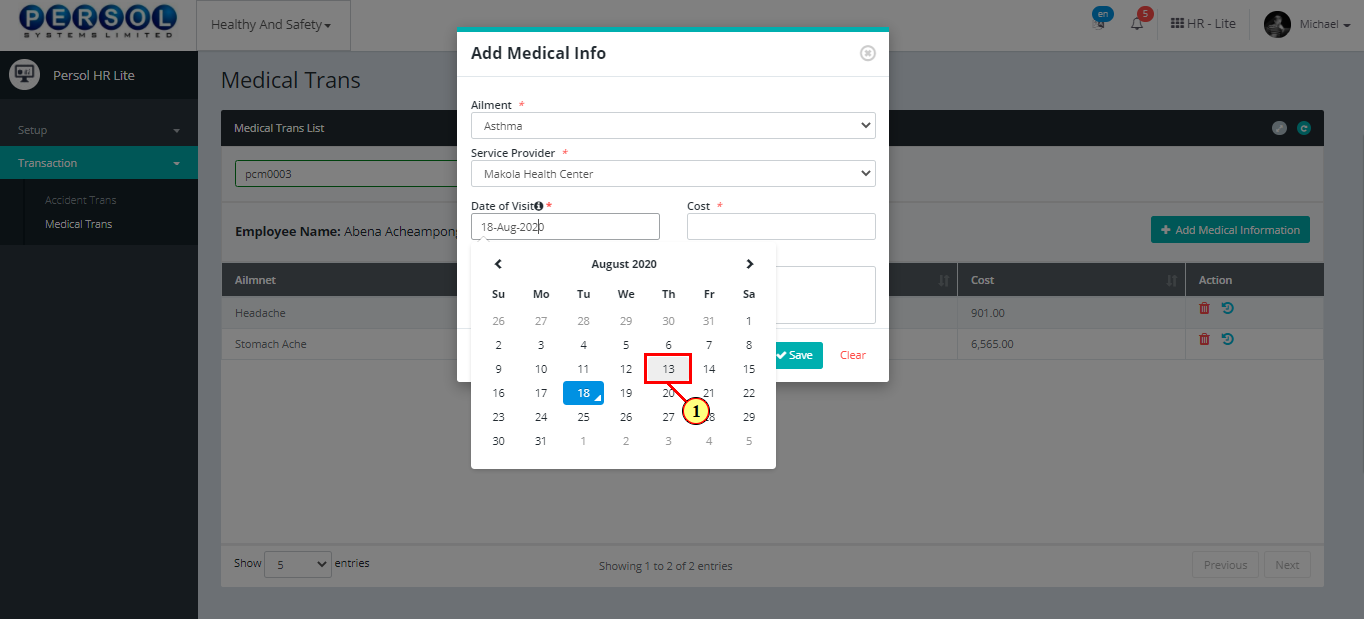
| (1) | Select the date of the visit to healthcare facility |
|
This field is required * |
| Step | Action |
|---|---|
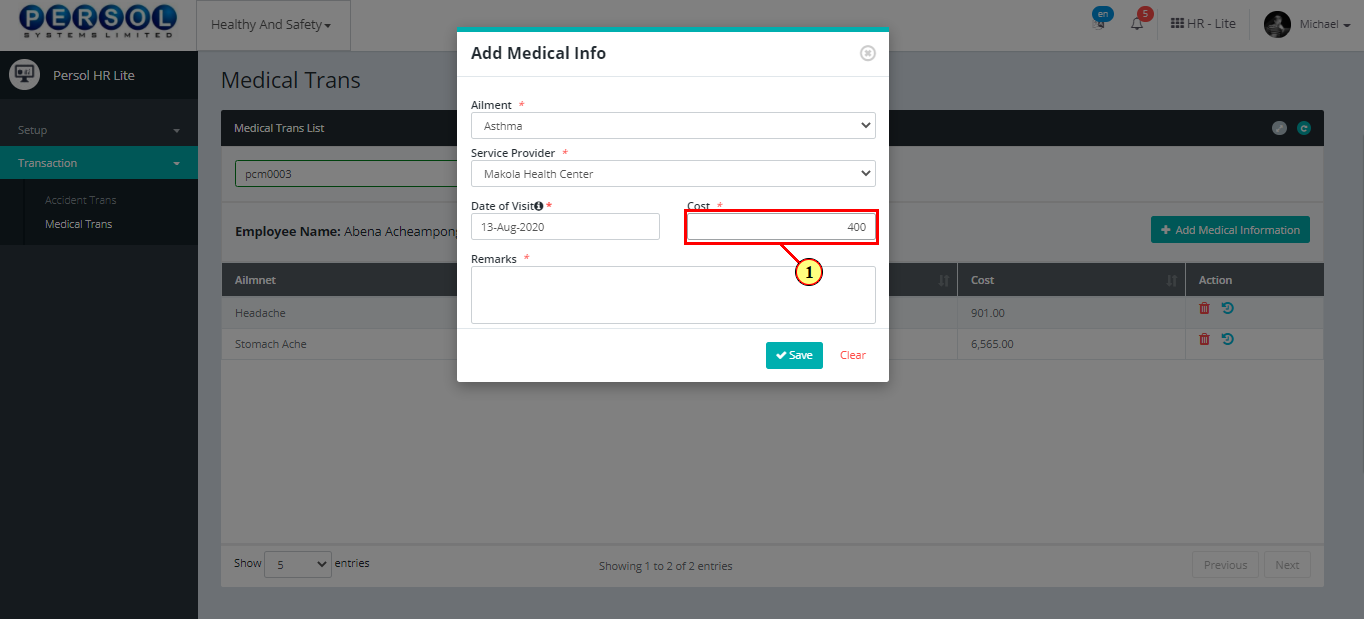
| (1) | Enter cost amount incurred |
|
This field is required * |
| Step | Action |
|---|---|
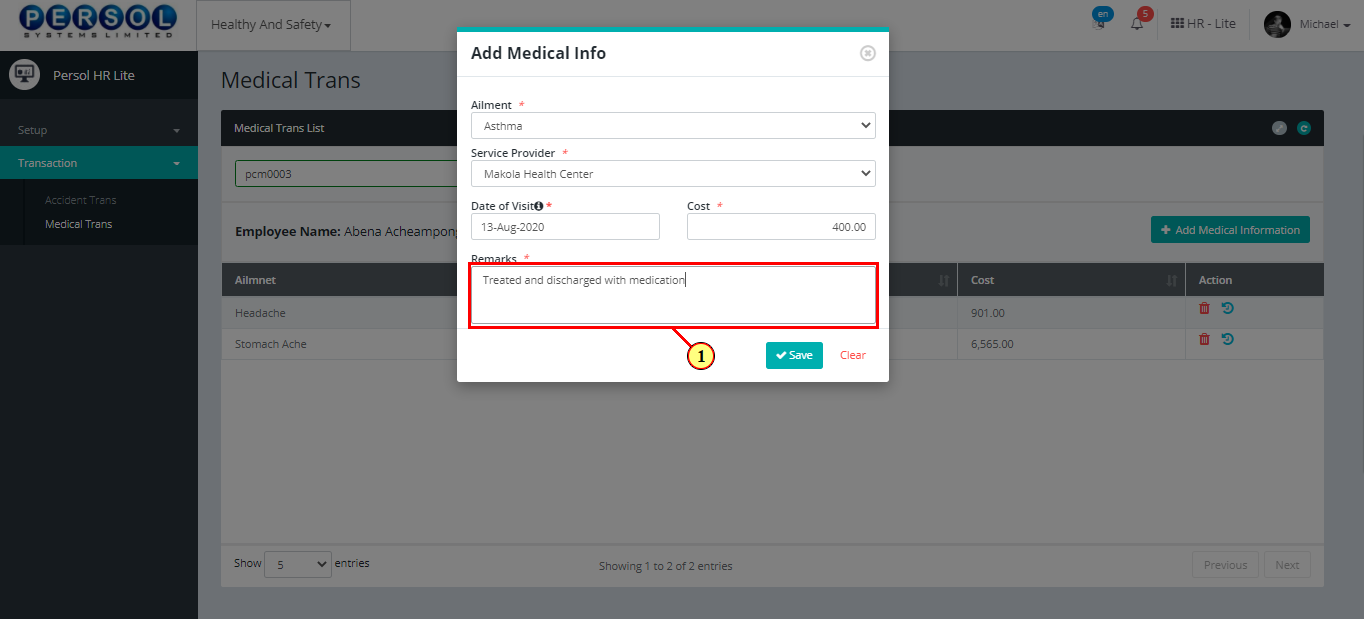
| (1) | Enter any additional info in the remarks section |
|
This field is required * |
| Step | Action |
|---|---|
|
You may click on the  button to clear all details entered button to clear all details entered
|
| (1) |
Click on the  button to save the newly added medical info for the employee button to save the newly added medical info for the employee
|
| Step | Action |
|---|---|
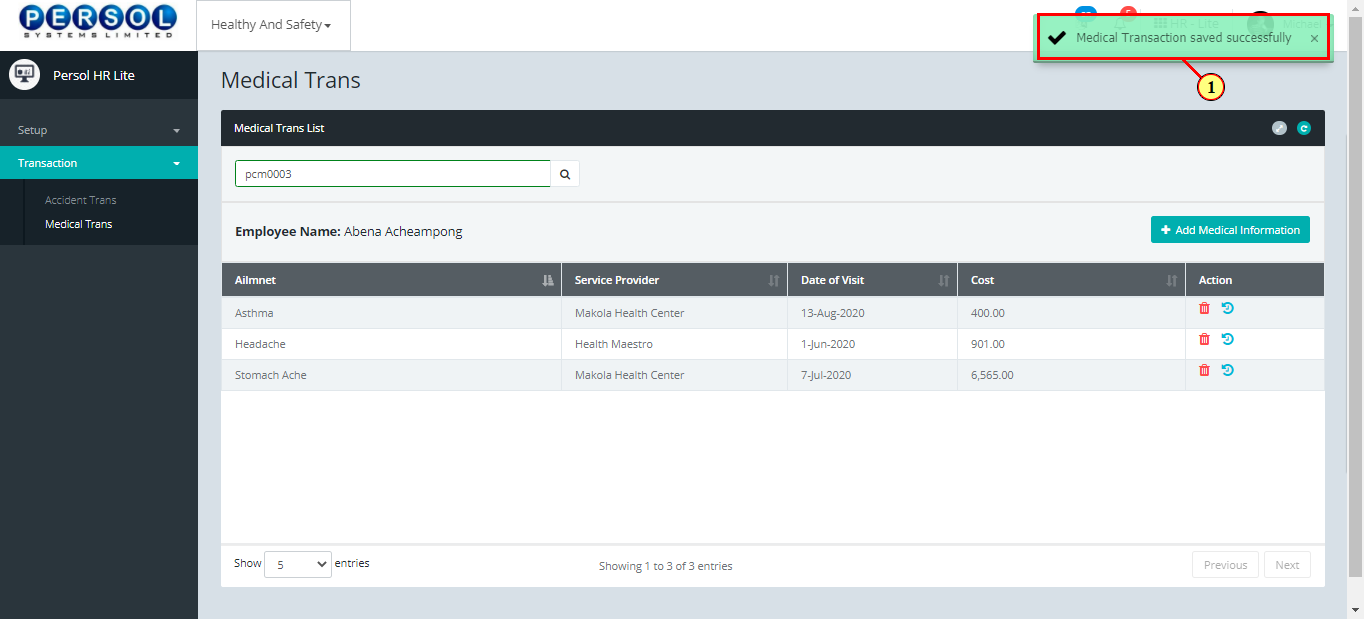
| (1) | A notification displays to indicate that the medical transaction has been saved successfully |
|
The newly added medical transaction info displays in the grid |
| Step | Action |
|---|---|
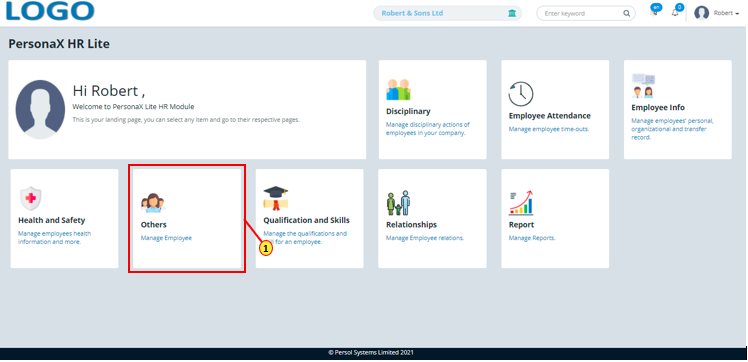
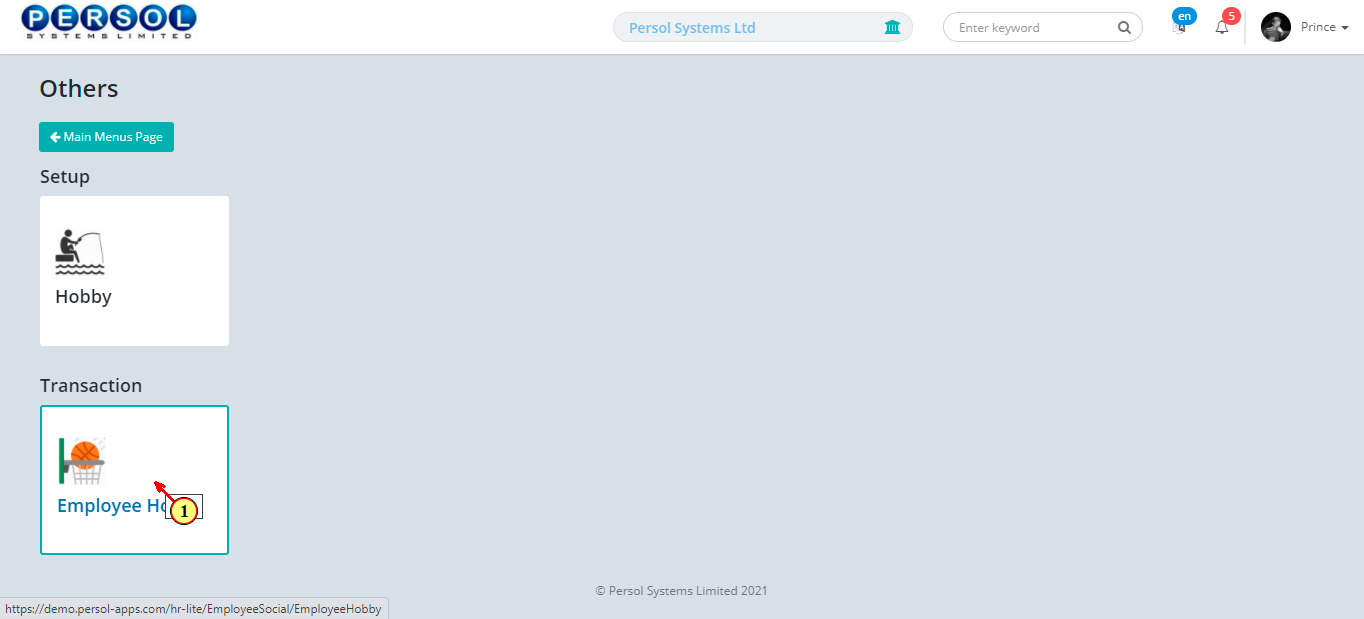
| (1) | On the Personax HR Lite homepage, select the 'Others' tile |
| Step | Action |
|---|---|
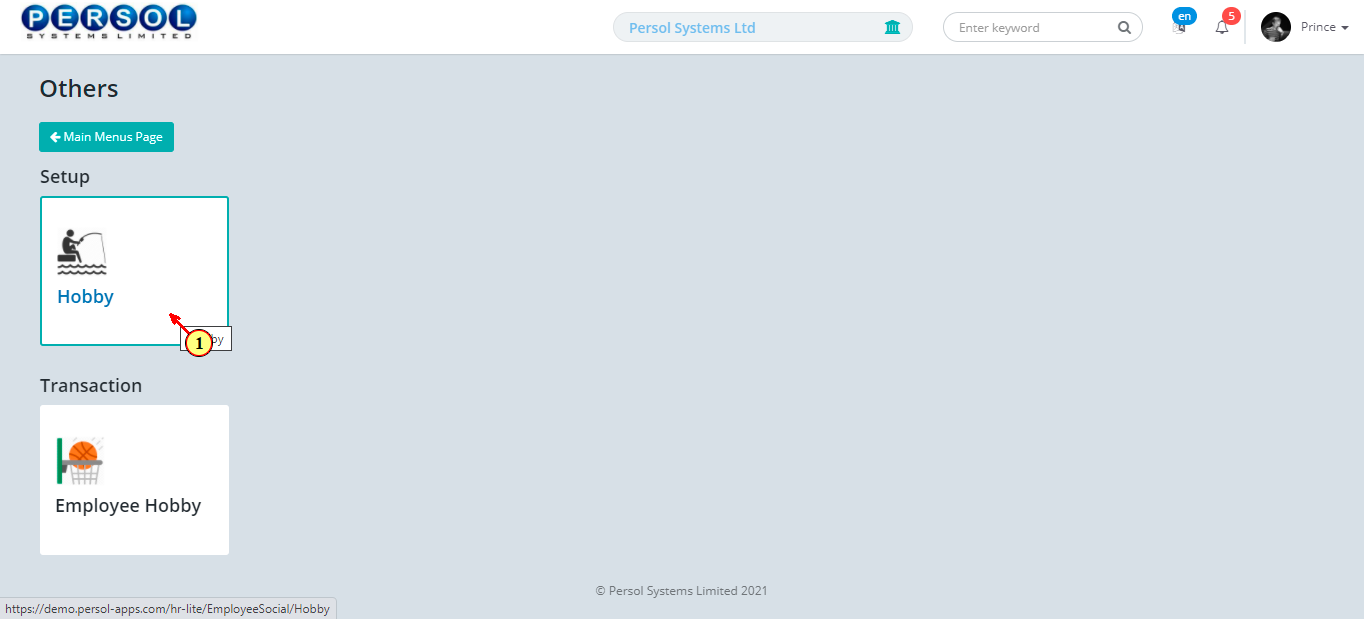
| The ‘Others’ submenus page opens | |
| (1) | Select the ‘Hobby’ setup tile |
| Step | Action |
|---|---|
| The 'Hobby' page opens | |
| (1) |
To setup a hobby, click on the  button button
|

| Step | Action |
|---|---|
| The ‘Add Hobby’ modal opens | |
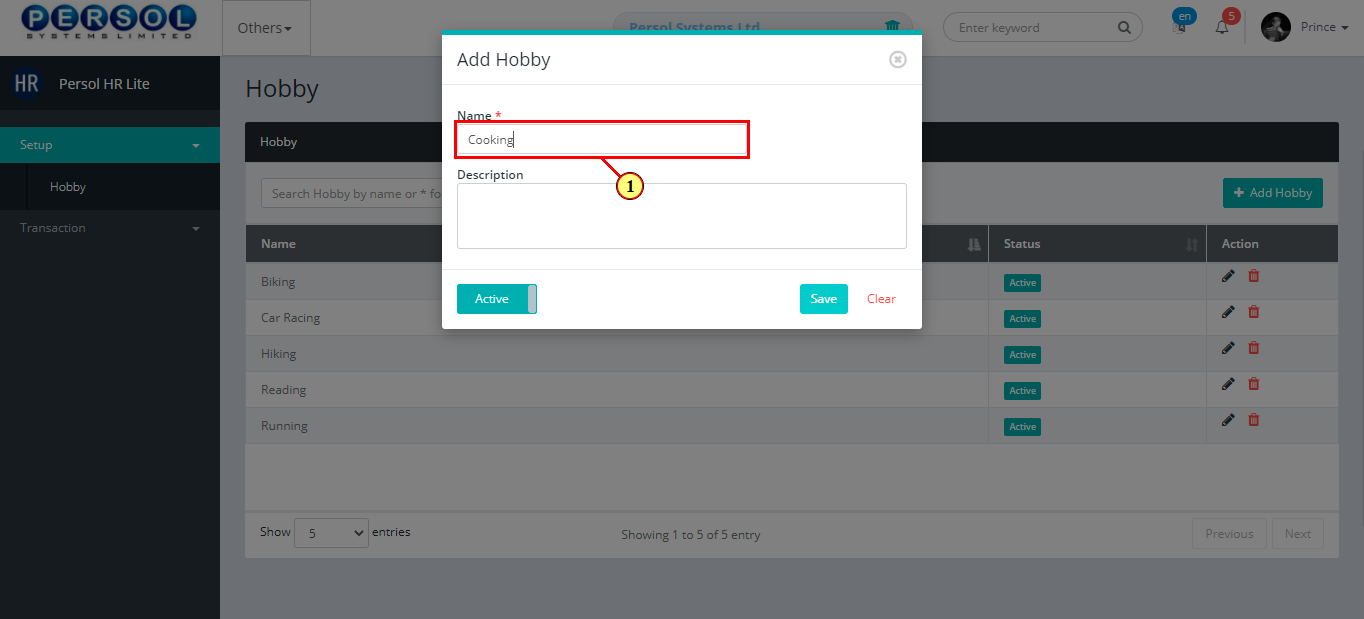
| (1) | Enter the name of the hobby |
|
This field is required * |
| Step | Action |
|---|---|
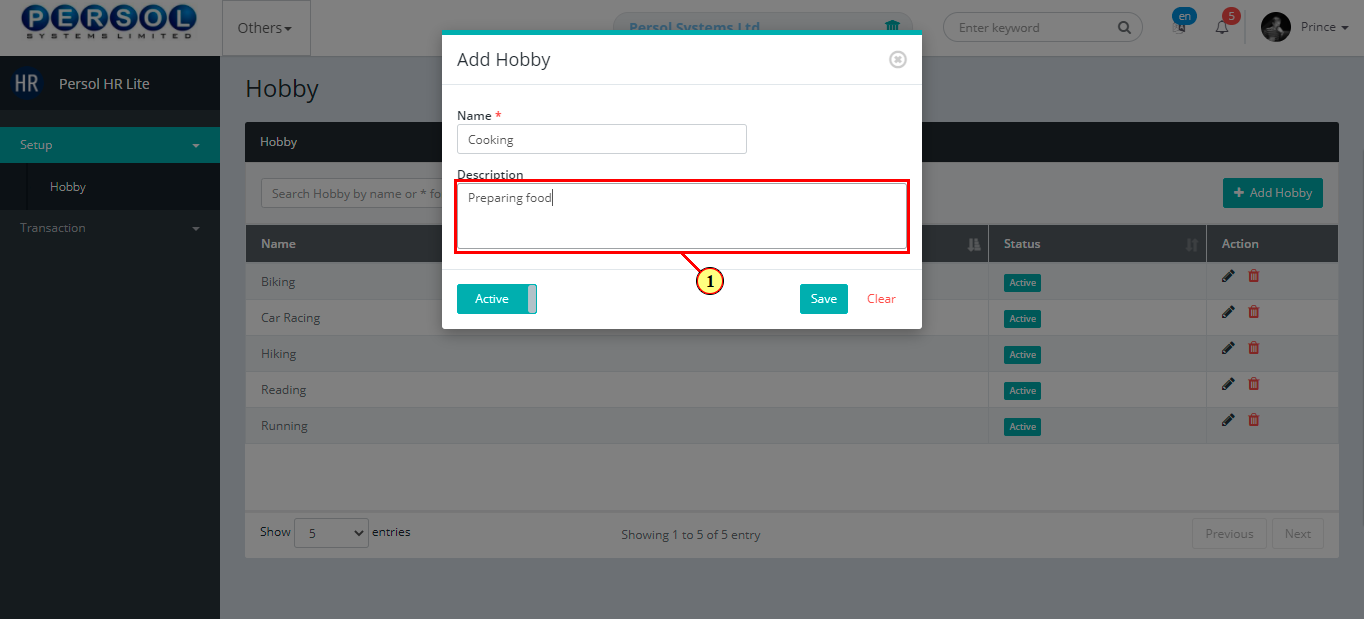
| (1) | Add description to provide more details on the hobby |
| Step | Action |
|---|---|
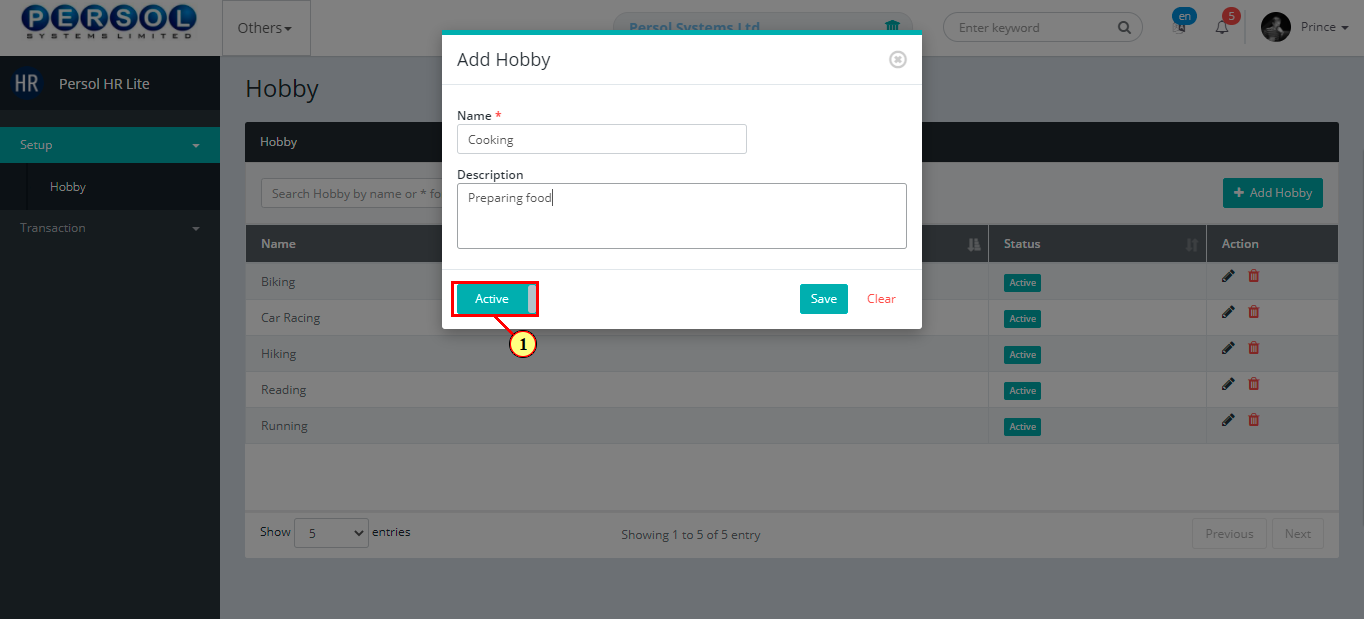
| (1) |
You may click on the button to change status of the earning to inactive
|
|
- An active status means the hobby can be used in transactions on other pages - An inactive status means the hobby cannot be used in transactions on other pages |
| Step | Action |
|---|---|
|
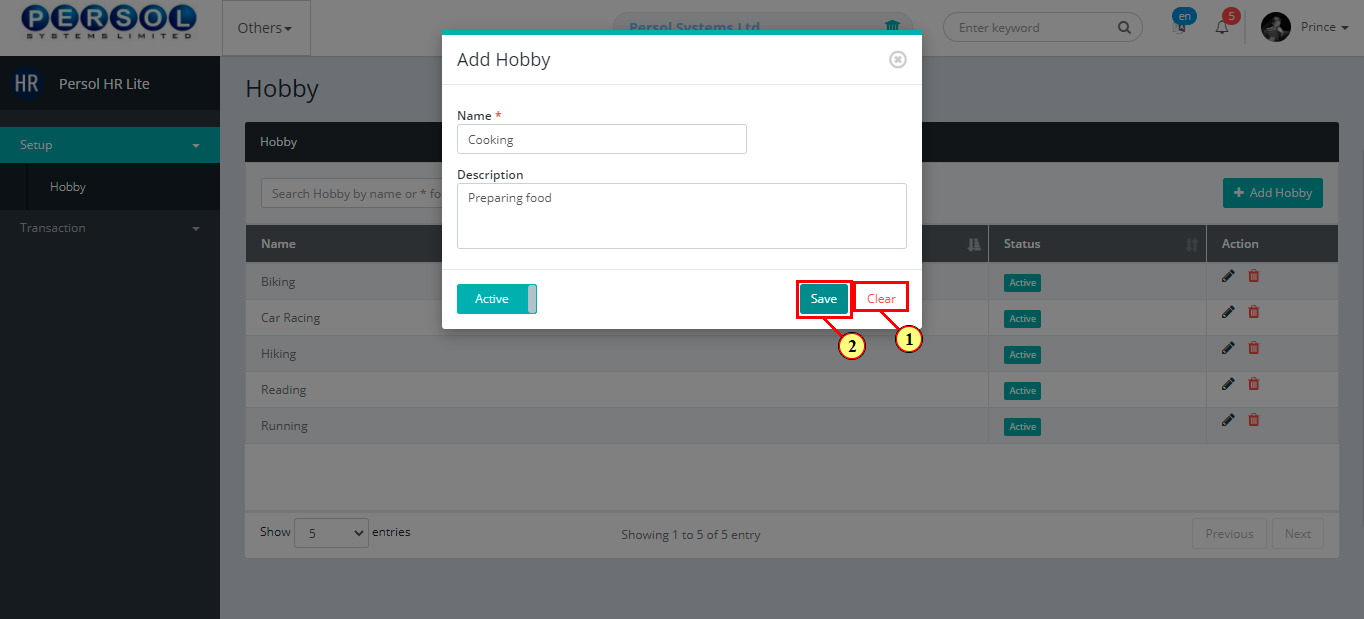
You may click on the button to save details of the newly added hobby
|
| (1) |
Click on the  button to save details of the newly added hobby button to save details of the newly added hobby
|
| Step | Action |
|---|---|
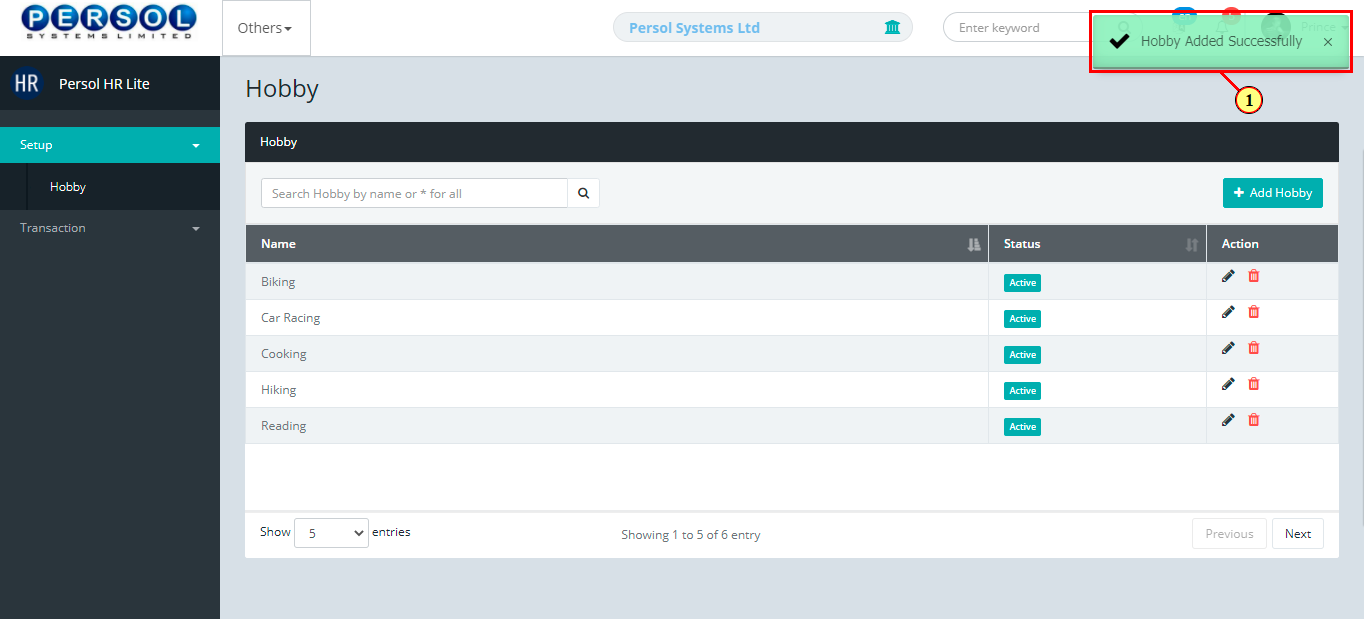
| (1) | A notification displays to indicate that the hobby setup has been saved successfully |
| Step | Action |
|---|---|
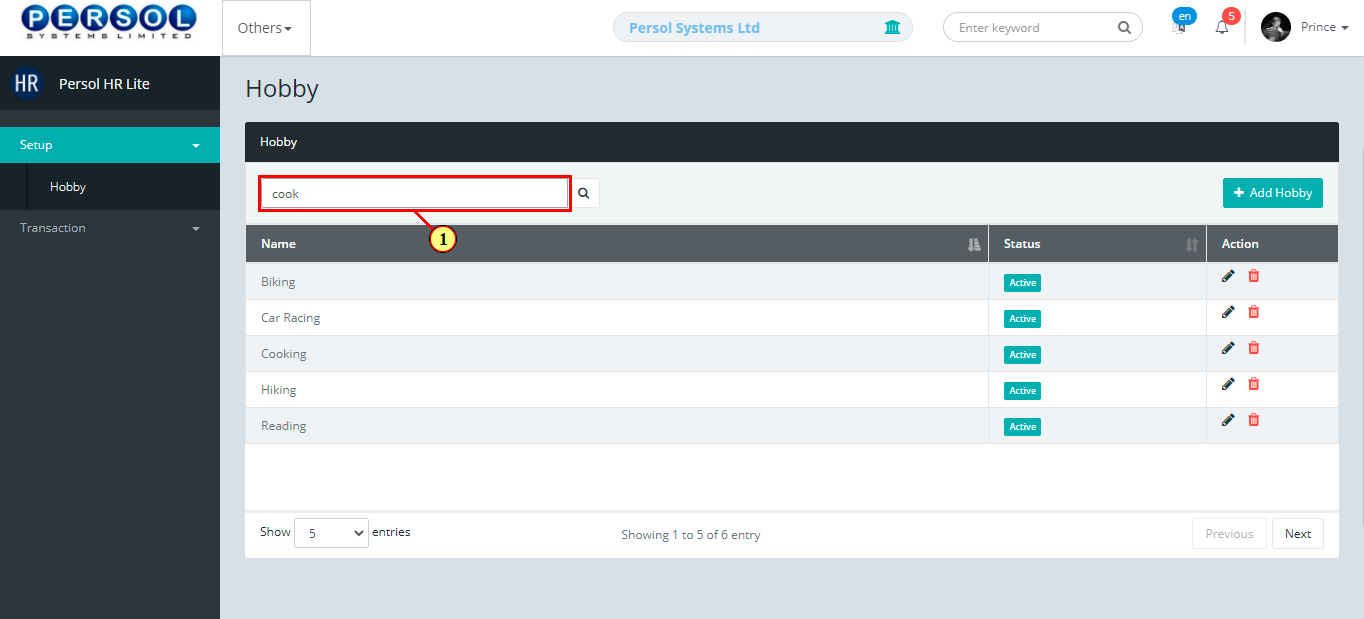
| (1) | To edit a hobby, enter the name in the search box |
Click on the  icon to search icon to search
|
| Step | Action |
|---|---|
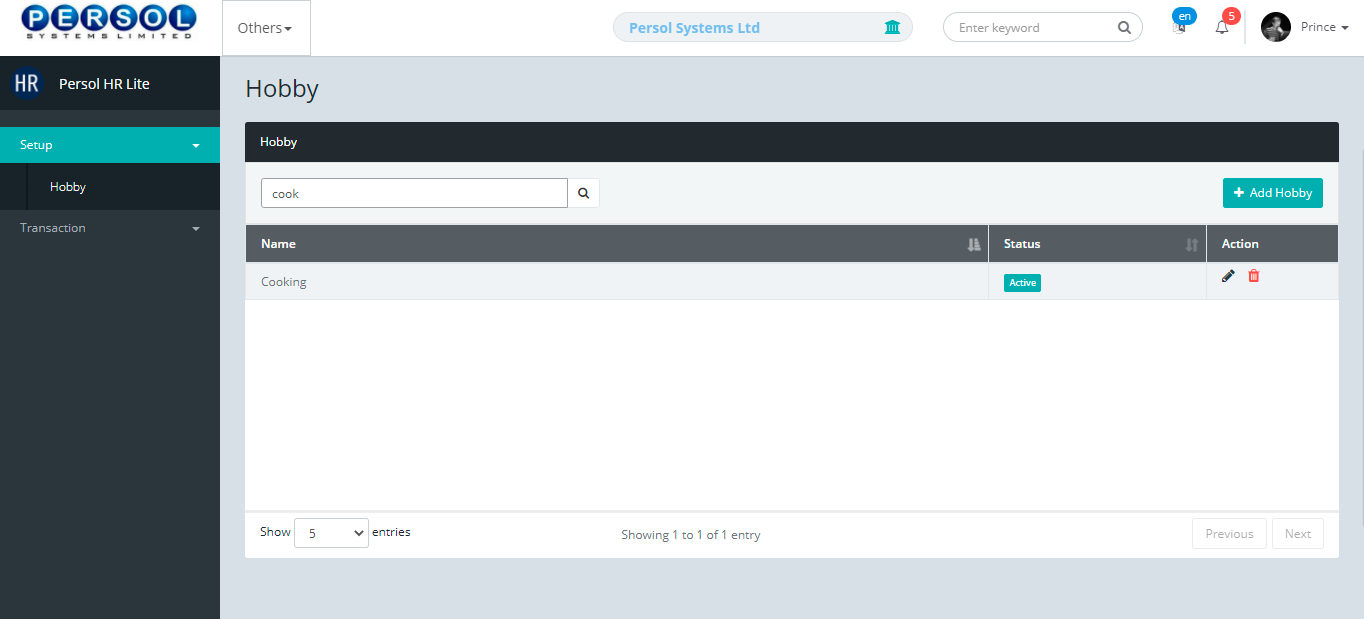
| The search result details display in the grid | |
|
The Action column consists of the Edit and Delete action icons
|
| Step | Action |
|---|---|
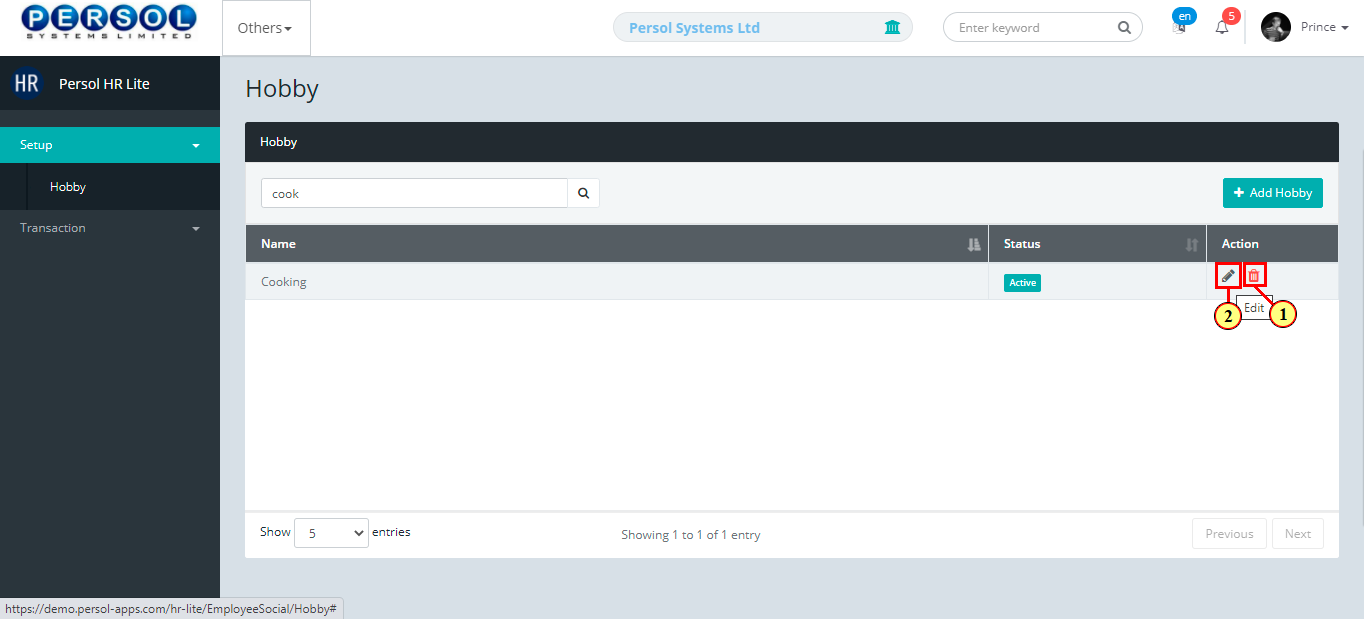
|
You may click on the delete icon to delete the hobby
|
| (1) |
Click on the edit icon to edit the hobby
|
| Step | Action |
|---|---|
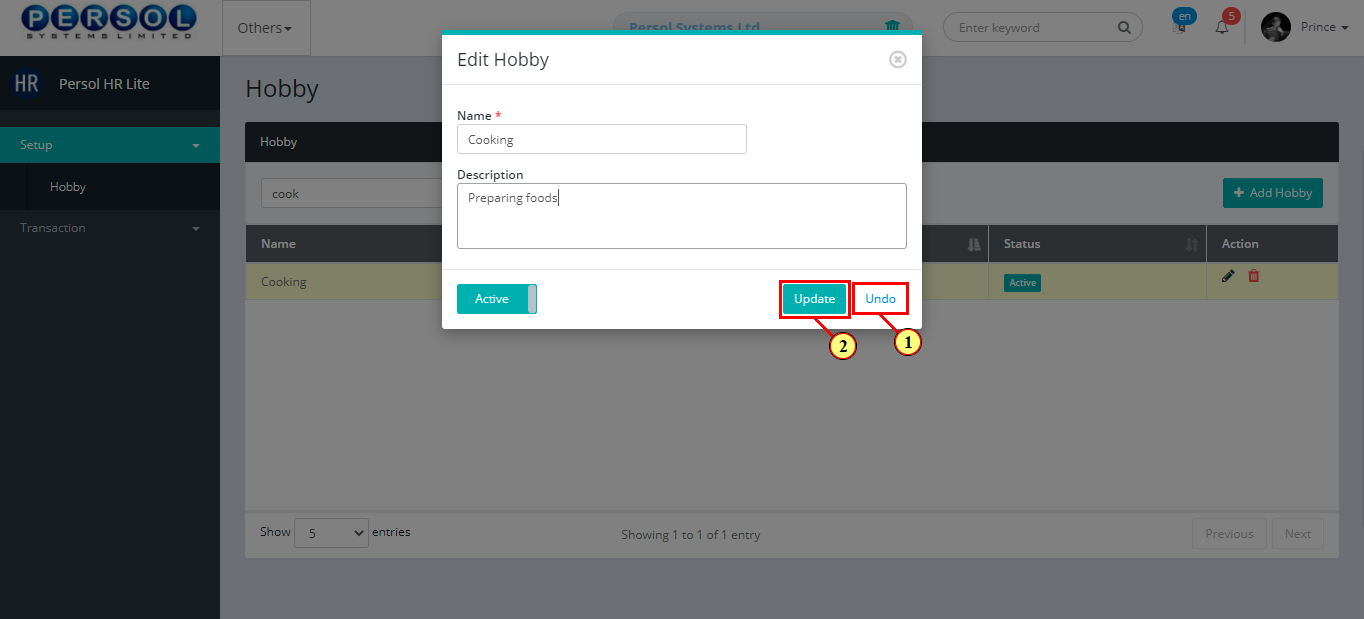
| The ‘Edit Hobby’ modal opens | |
| Edit the name, description or status of the hobby |
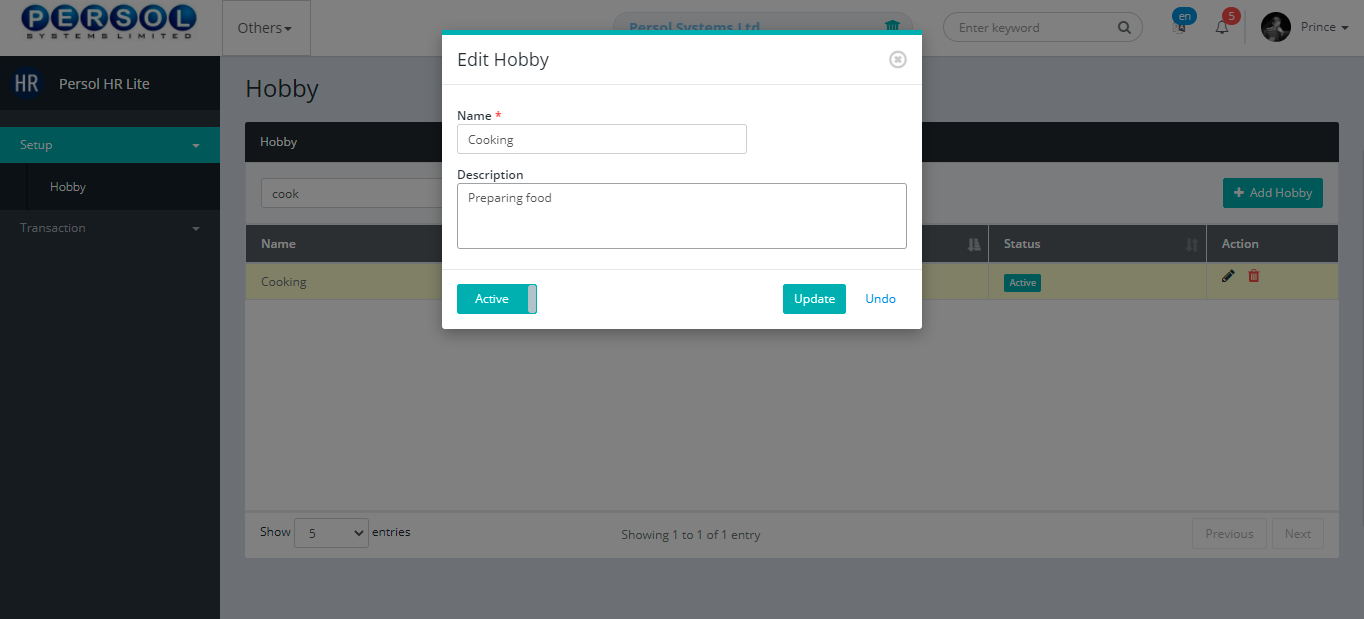
| Step | Action |
|---|---|
|
You may click on the button to revert changes made
|
| (1) |
Click on the button to save the changes made
|
| Step | Action |
|---|---|
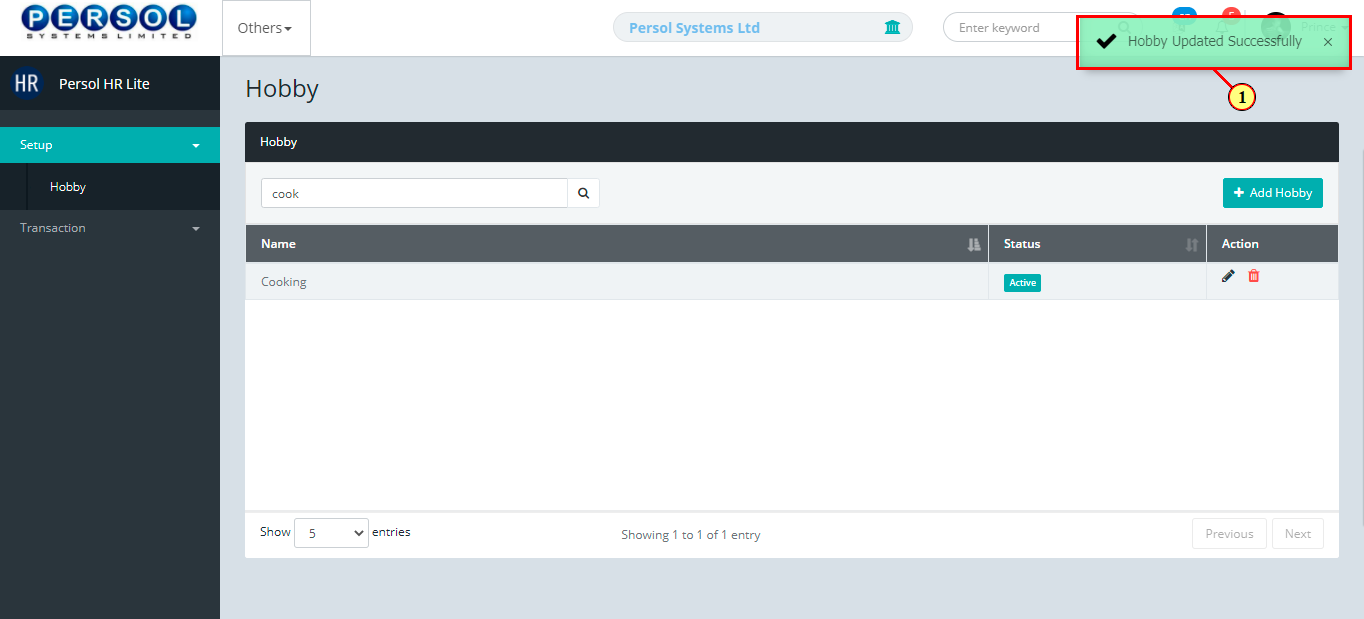
| (1) | A notification displays to indicate that the update has been saved successfully |
| Step | Action |
|---|---|
| (1) | On the Personax HR Lite homepage, select the 'Others' tile |
| Step | Action |
|---|---|
| The ‘Others’ submenus page opens | |
| (1) | Select the ‘Employee Hobby’ transaction tile |
| Step | Action |
|---|---|
| The ‘Employee Hobby' page opens | |
| (1) | To add a hobby to an employee's record, search for employee by name or employee ID |
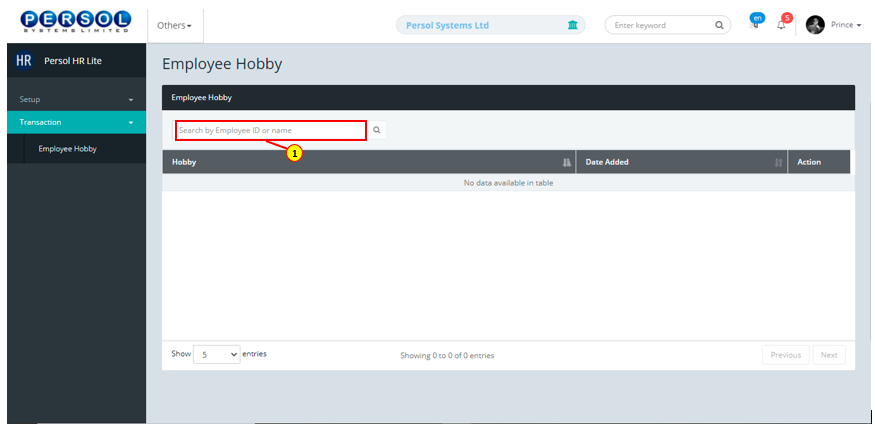
| Step | Action |
|---|---|
|
The employee's name and previous hobby record (if any) display in the grid |
| (1) |
Click on the 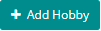 button to add a hobby to the employee’s record button to add a hobby to the employee’s record
|
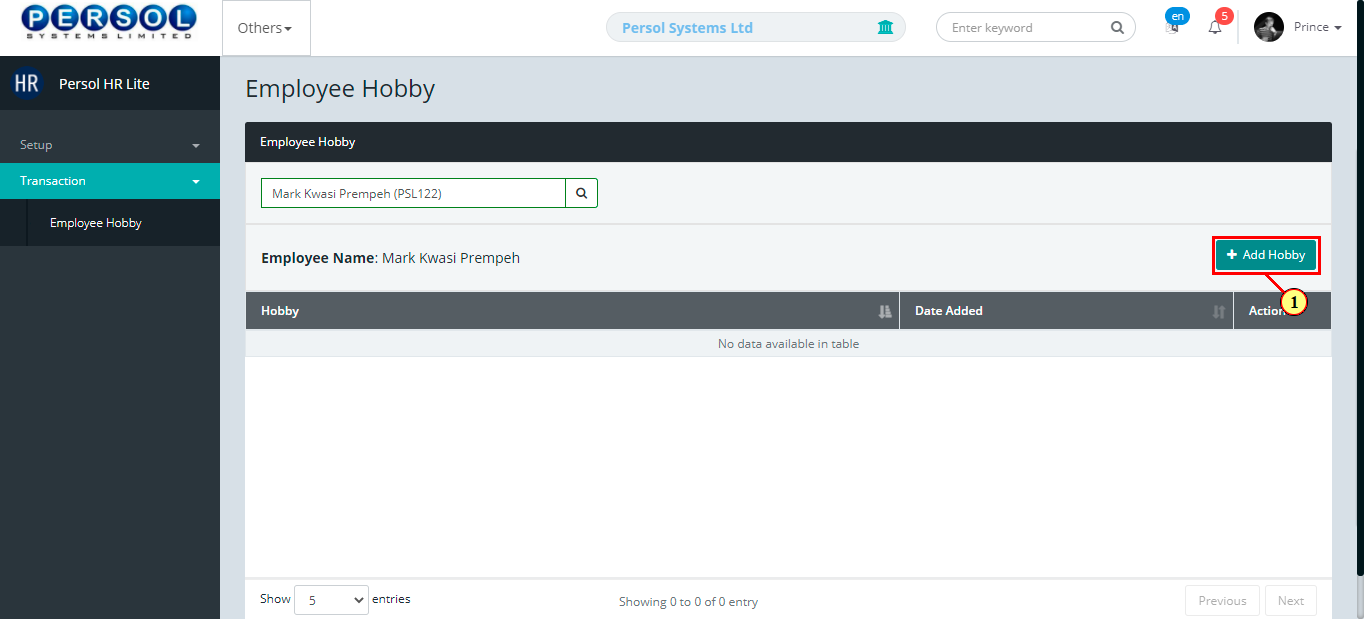
| Step | Action |
|---|---|
| The 'Add Hobby' modal opens | |
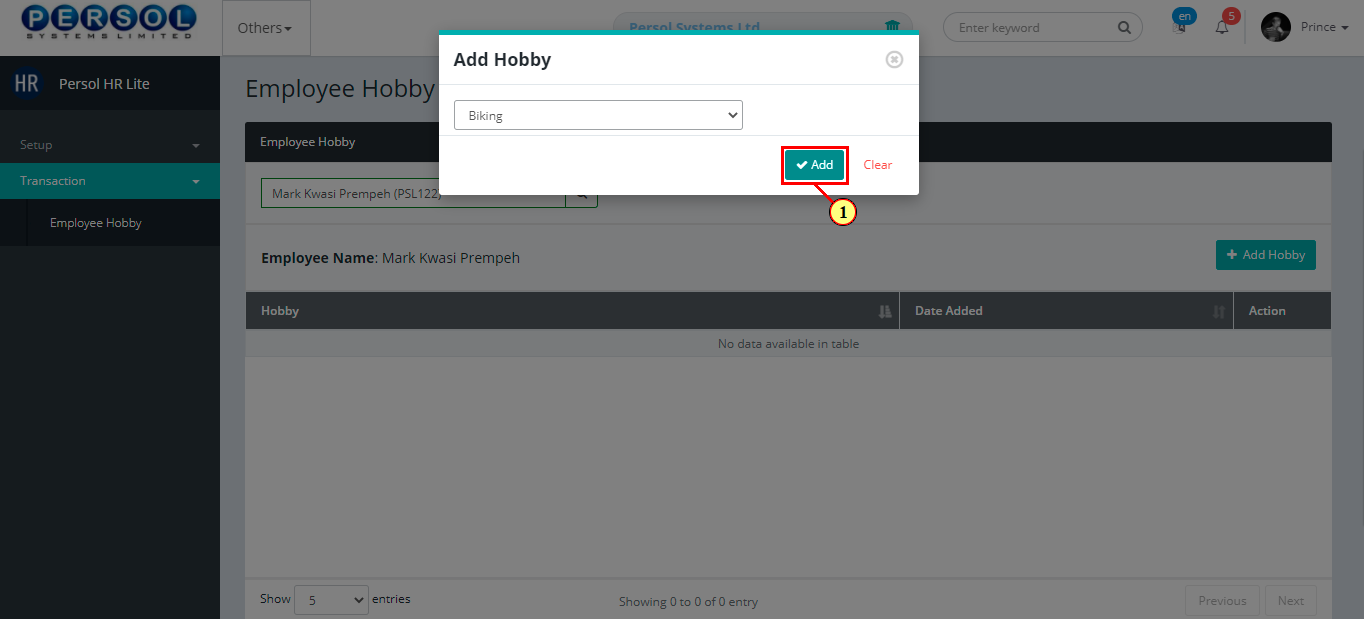
| (1) | Select a hobby from the dropdown list |
| Step | Action |
|---|---|
|
You may click on the button to clear all details entered
|
| (1) |
Click on the  button to save the newly added hobby of the employee button to save the newly added hobby of the employee
|
| Step | Action |
|---|---|
| (1) | A notification displays to indicate that the employee hobby has been saved successfully |
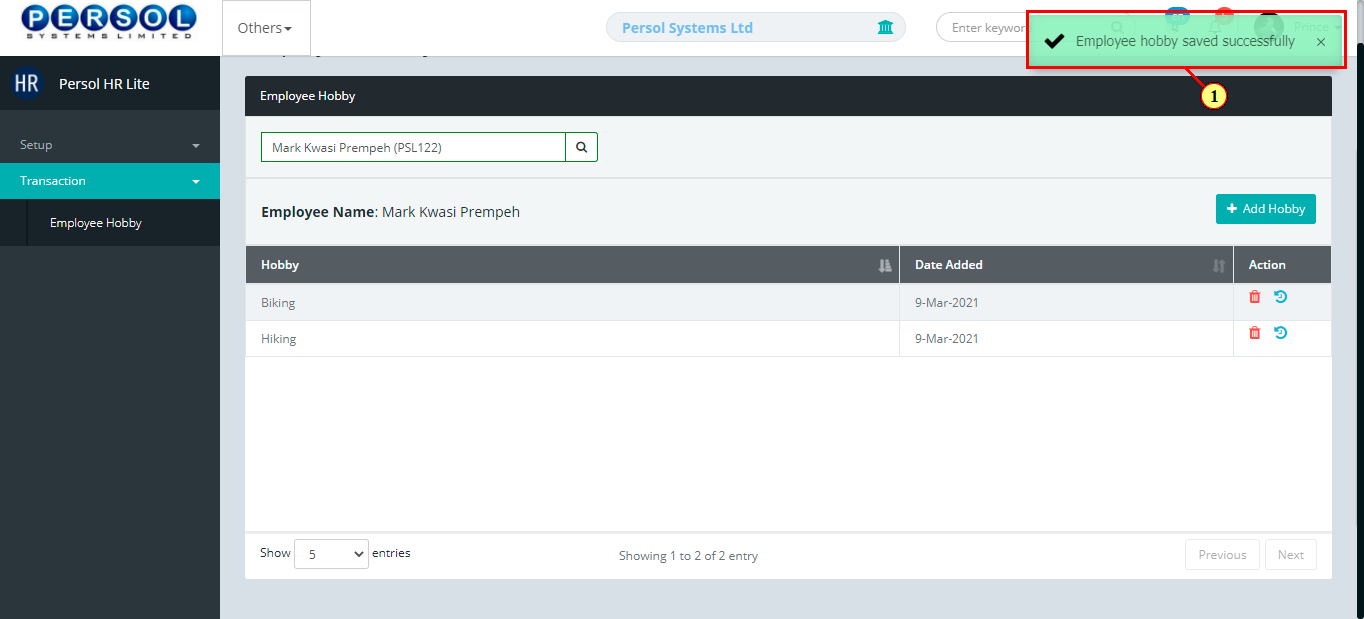
| Step | Action |
|---|---|
|
The newly added hobby displays in the grid |
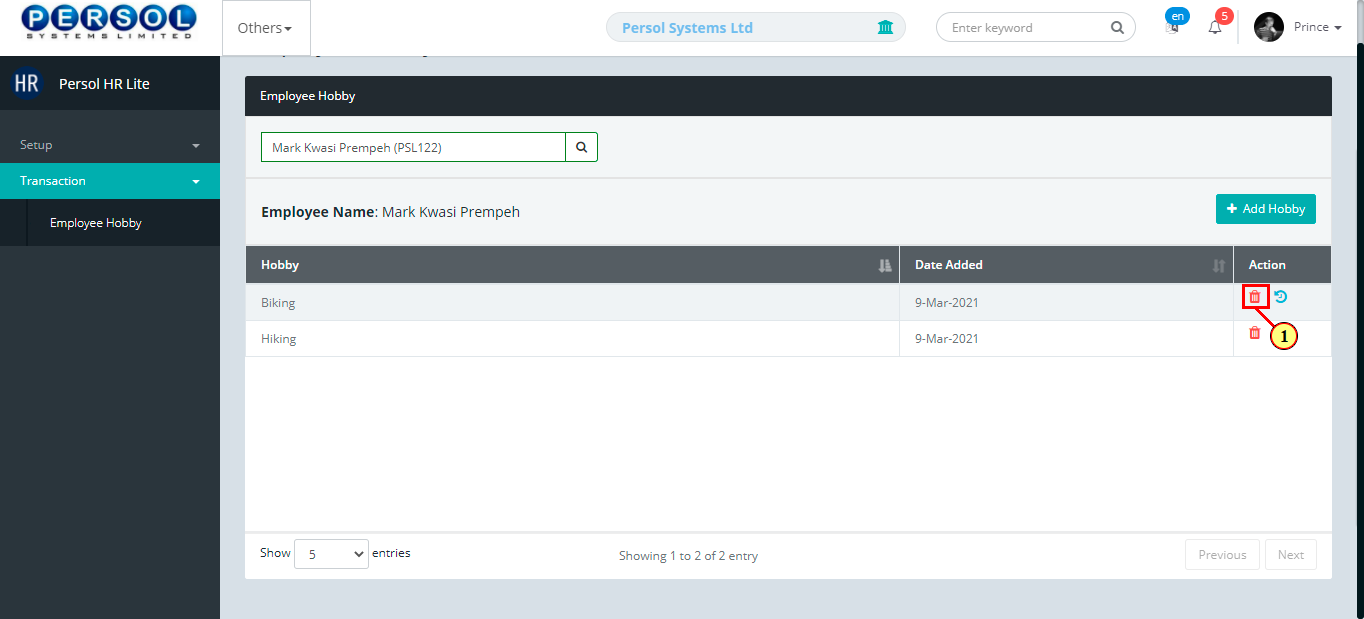
You may click on the delete icon  to delete a hobby from an employee’s record to delete a hobby from an employee’s record
|
| Step | Action |
|---|---|
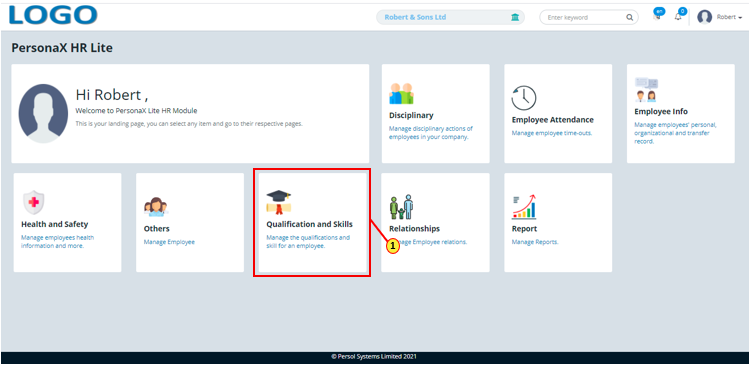
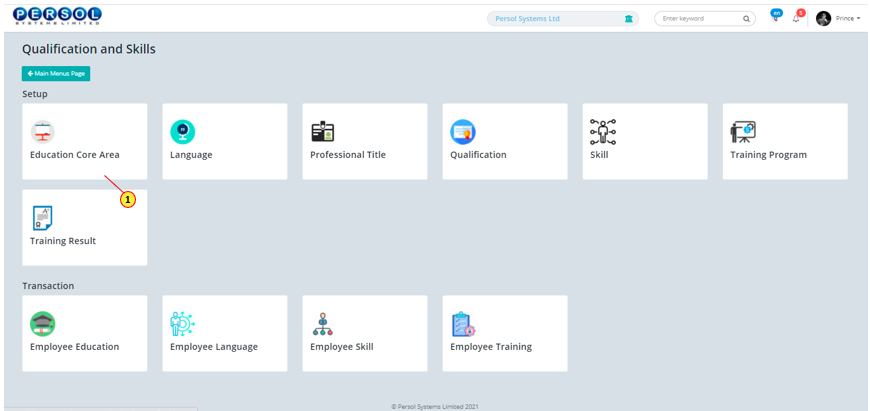
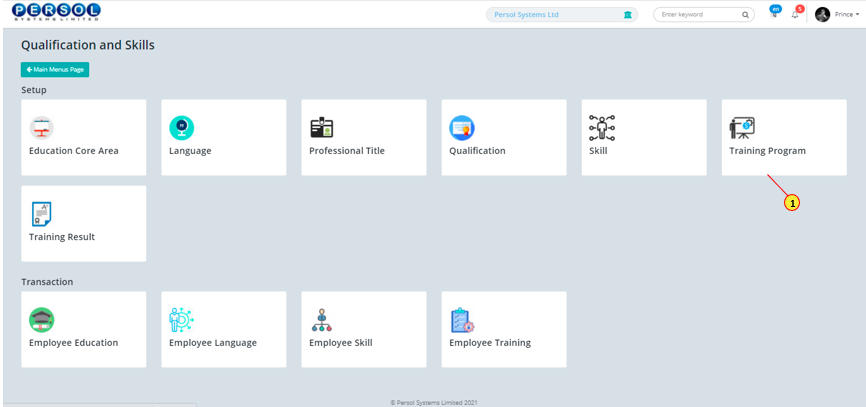
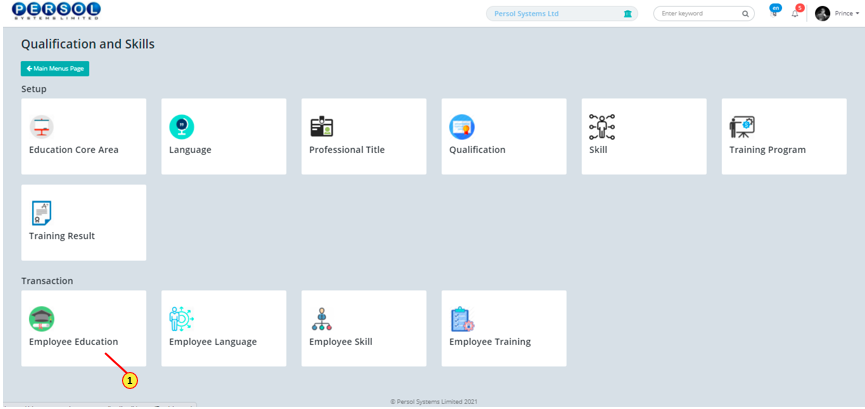
| (1) | On the Personax HR Lite homepage, select the 'Qualification and Skills' tile |
| Step | Action |
|---|---|
| The ‘Education’ submenus page opens | |
| (1) | Select the ‘Education’ tile |
| Step | Action |
|---|---|
| The ‘Education Core Area’ page opens | |
| (1) |
To setup a education core area, click on the  button button
|

| Step | Action |
|---|---|
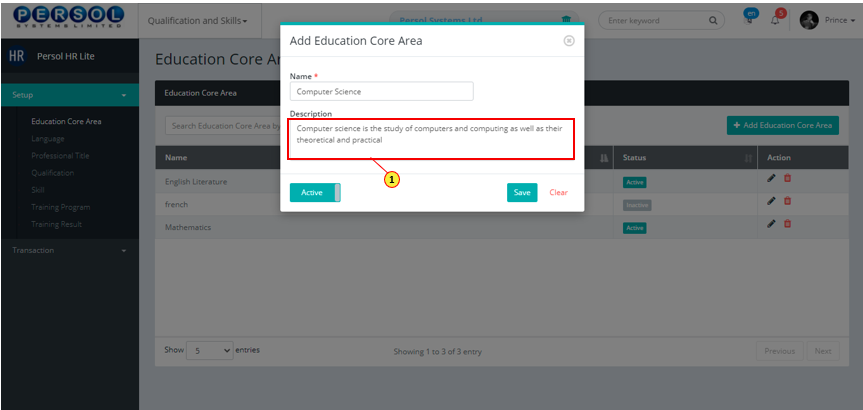
| The ‘Add Education Core Area’ modal opens | |
| (1) | Enter name of the education core area |
|
This field is required * |

| Step | Action |
|---|---|
| (1) | Add description to provide more details on the education core area |
| Step | Action |
|---|---|
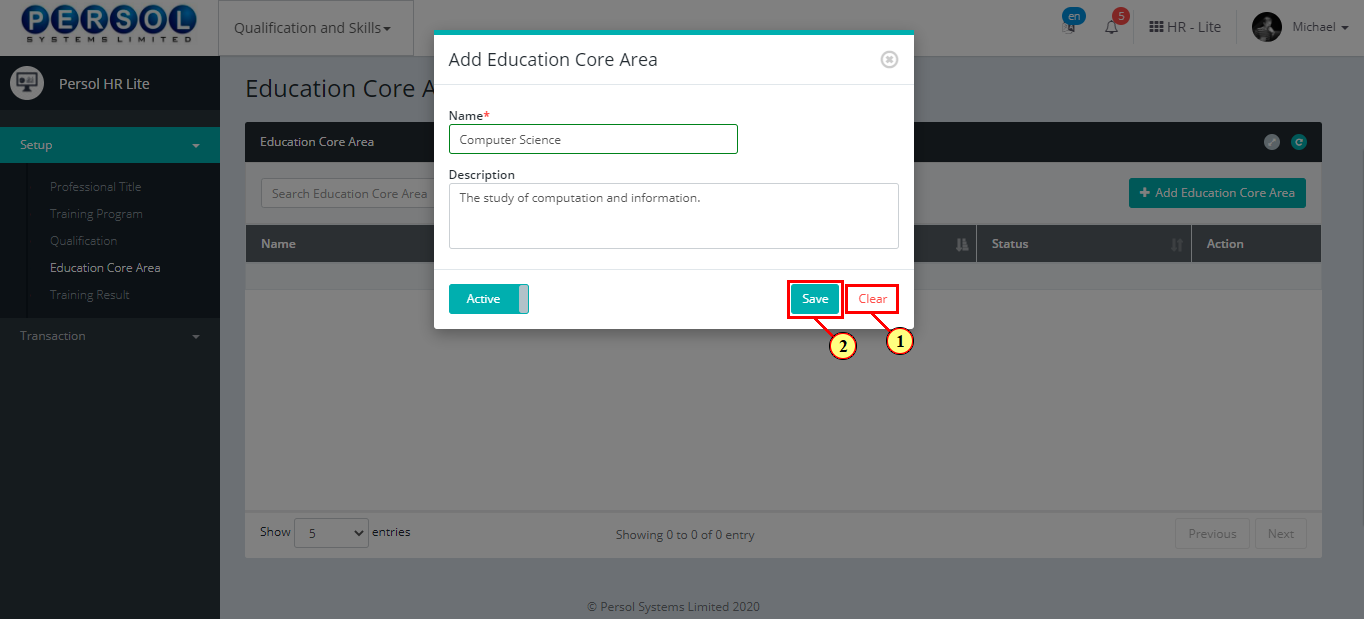
| (1) |
You may click on the  button to change status of the education core areato inactive button to change status of the education core areato inactive
|
|
- An active status means the education core area can be used in transactions on other pages - An inactive status means the education core area cannot be used in transactions on other pages |

| Step | Action |
|---|---|
|
You may click on the  button to clear all details entered button to clear all details entered
|
| (1) |
Click on the  button to save the newly added education core area button to save the newly added education core area
|
| Step | Action |
|---|---|
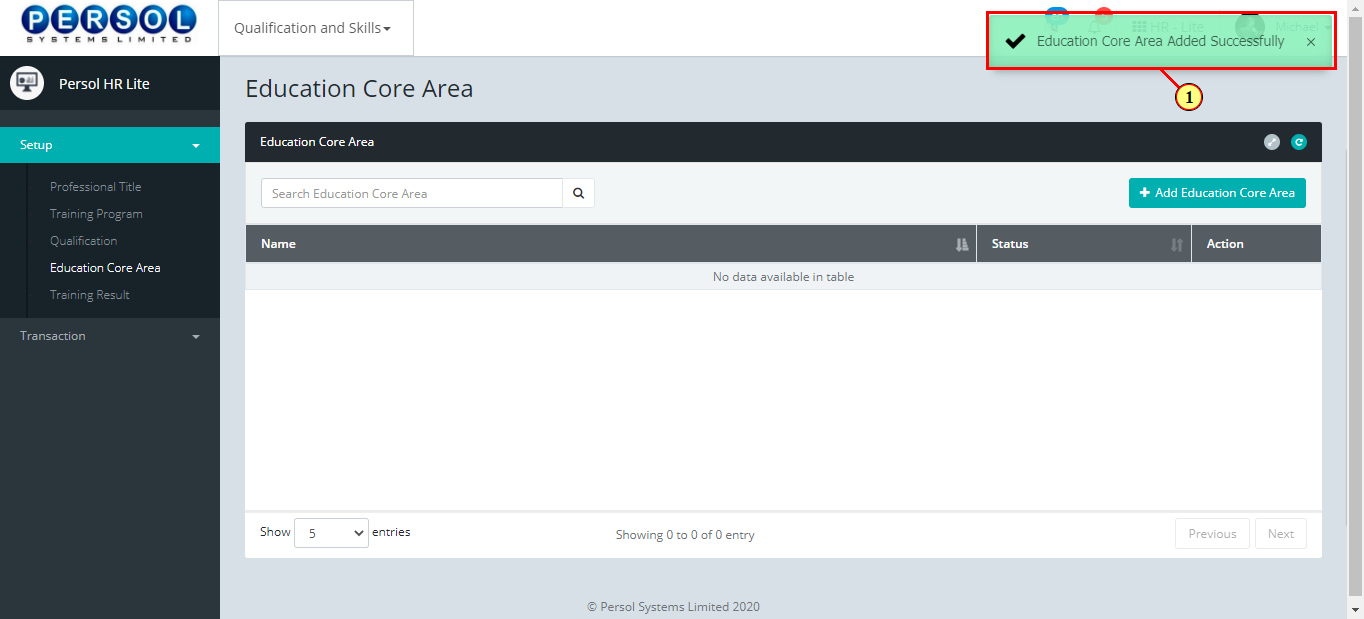
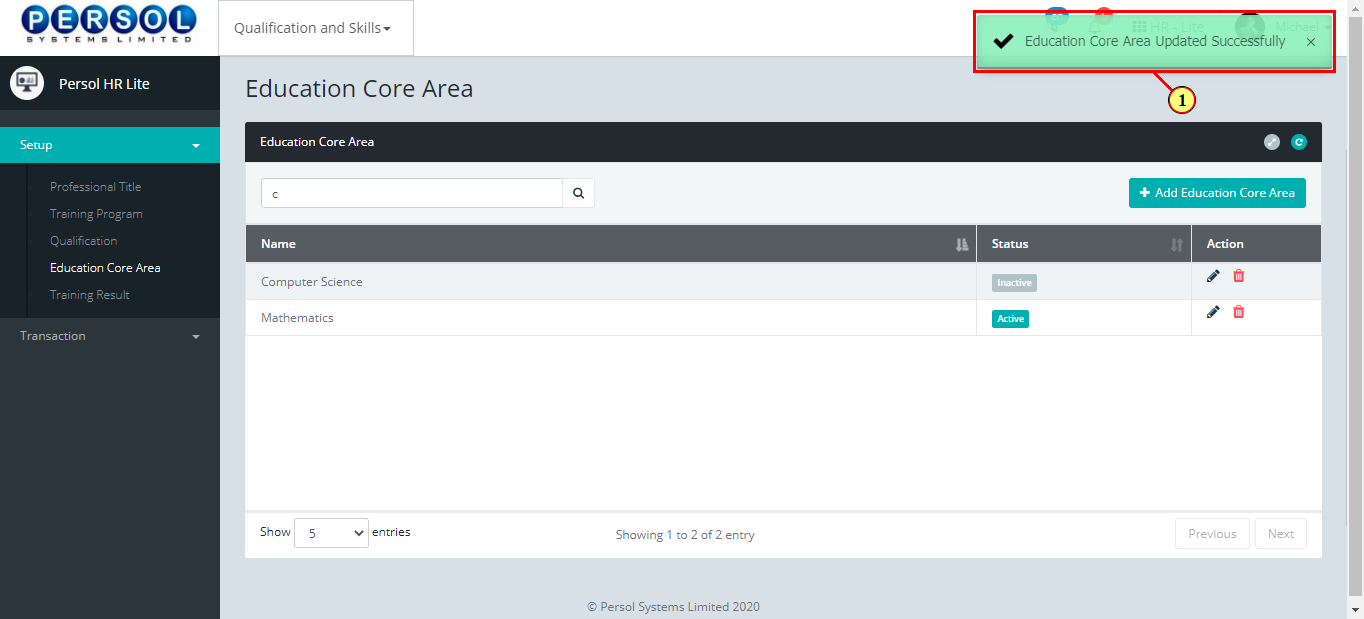
| (1) | A notification displays to indicate that the education core area setup has been saved successfully |
| Step | Action |
|---|---|
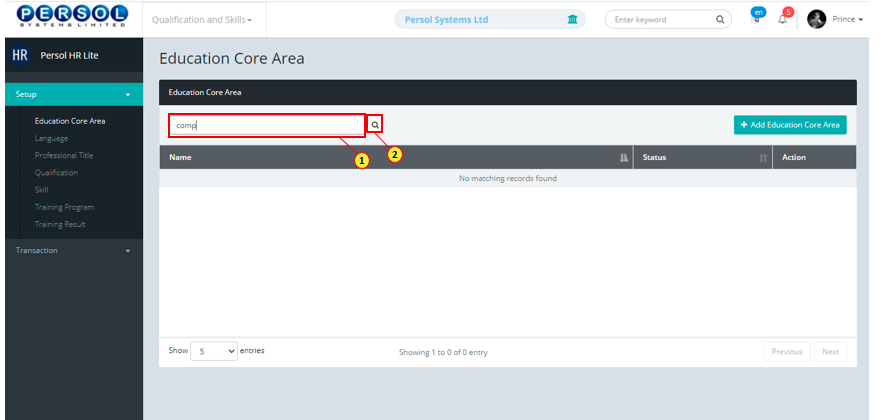
| (1) | To edit an education core area, enter name in the search box |
| (2) |
Click on the  icon to search icon to search
|
| Step | Action |
|---|---|
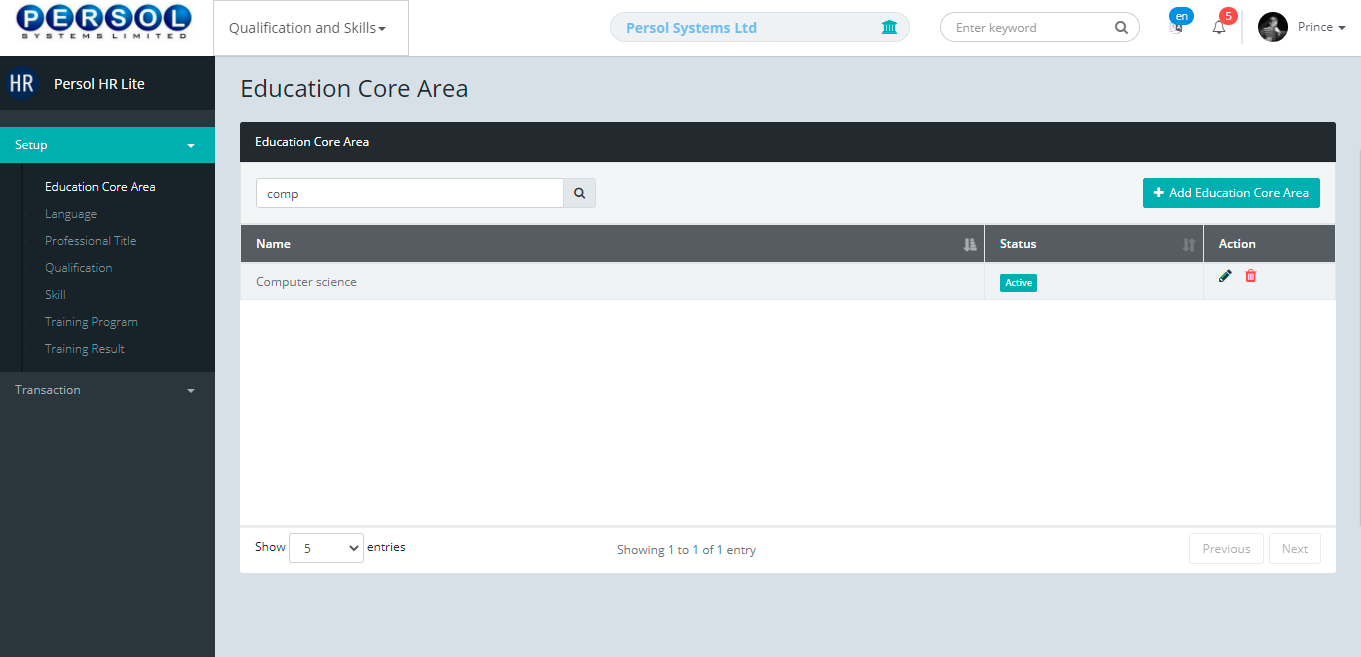
| The search result details display in the grid | |
|
The Action column consists of the Delete  and Edit and Edit  action icons action icons
|
| Step | Action |
|---|---|
|
You may click on the delete icon to delete the education core area
|
| (1) |
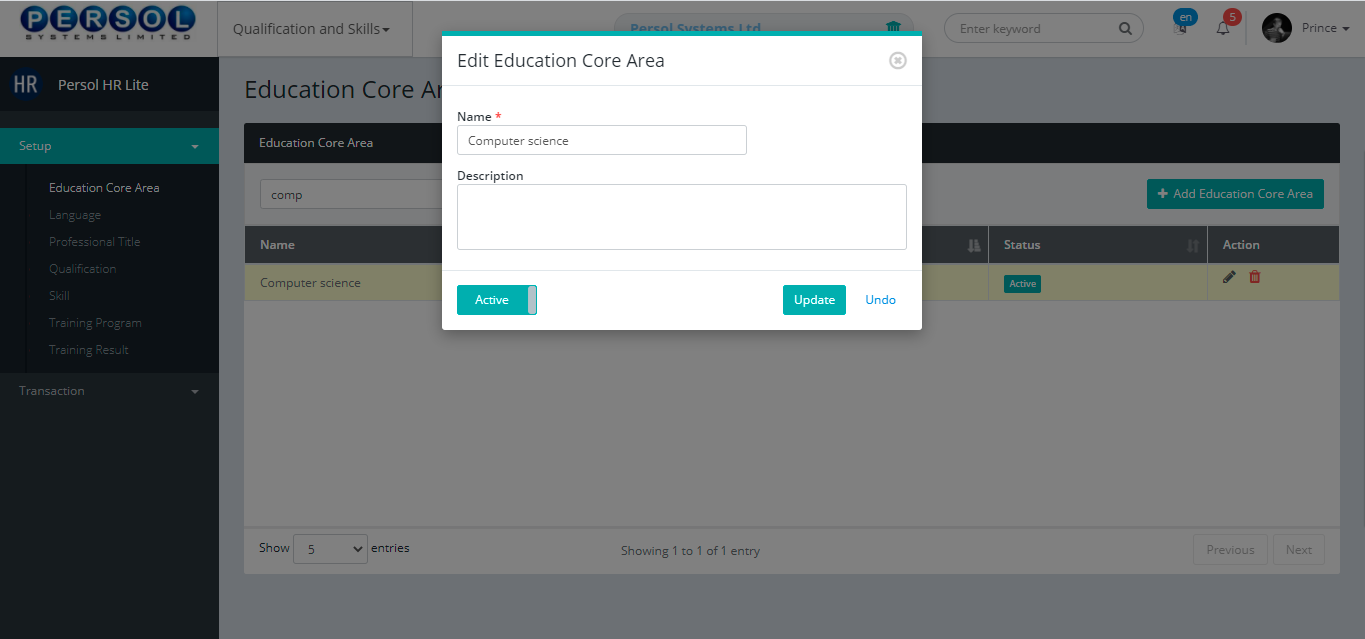
Click on the edit icon to edit the education core area
|

| Step | Action |
|---|---|
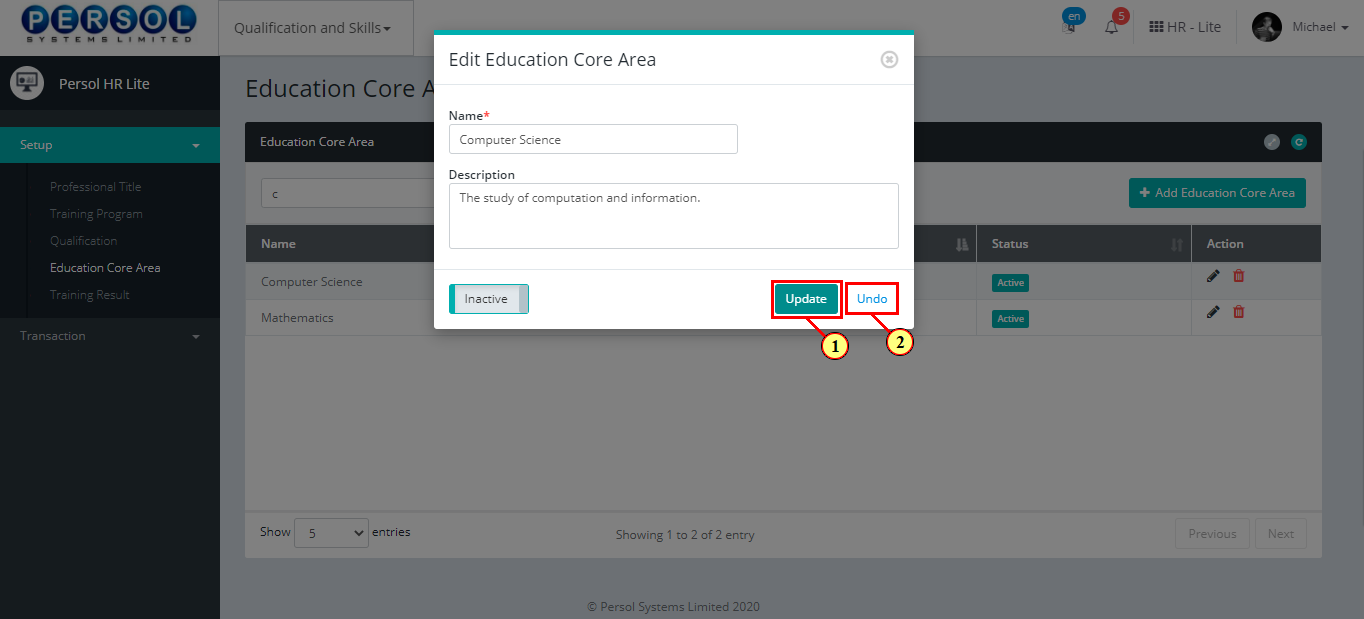
| The ‘Edit Education Core Area’ modal opens | |
| Edit the name, description or status of the education core area |
| Step | Action |
|---|---|
|
You may click on the  button to revert changes made button to revert changes made
|
| (1) |
Click on the update  button to save the changes made button to save the changes made
|
| Step | Action |
|---|---|
| (1) | A notification displays to indicate that the update has been saved successfully |
| Step | Action |
|---|---|
| (1) | On the Personax HR Lite homepage, select the 'Qualification and Skills' tile |

| Step | Action |
|---|---|
| The ‘Qualification & Skills’ submenus page opens | |
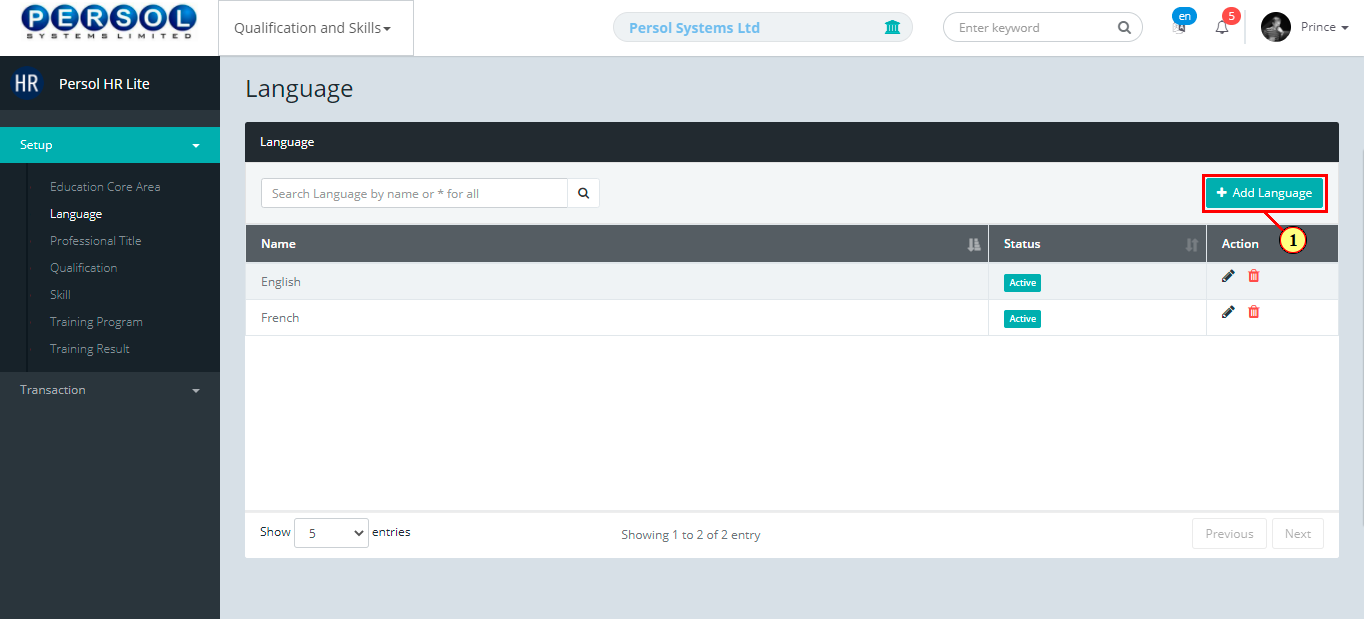
| (1) | Select the ‘Language’ tile |

| Step | Action |
|---|---|
| The ‘Language’ page opens | |
| (1) |
To setup a language, click on the  button button
|
| Step | Action |
|---|---|
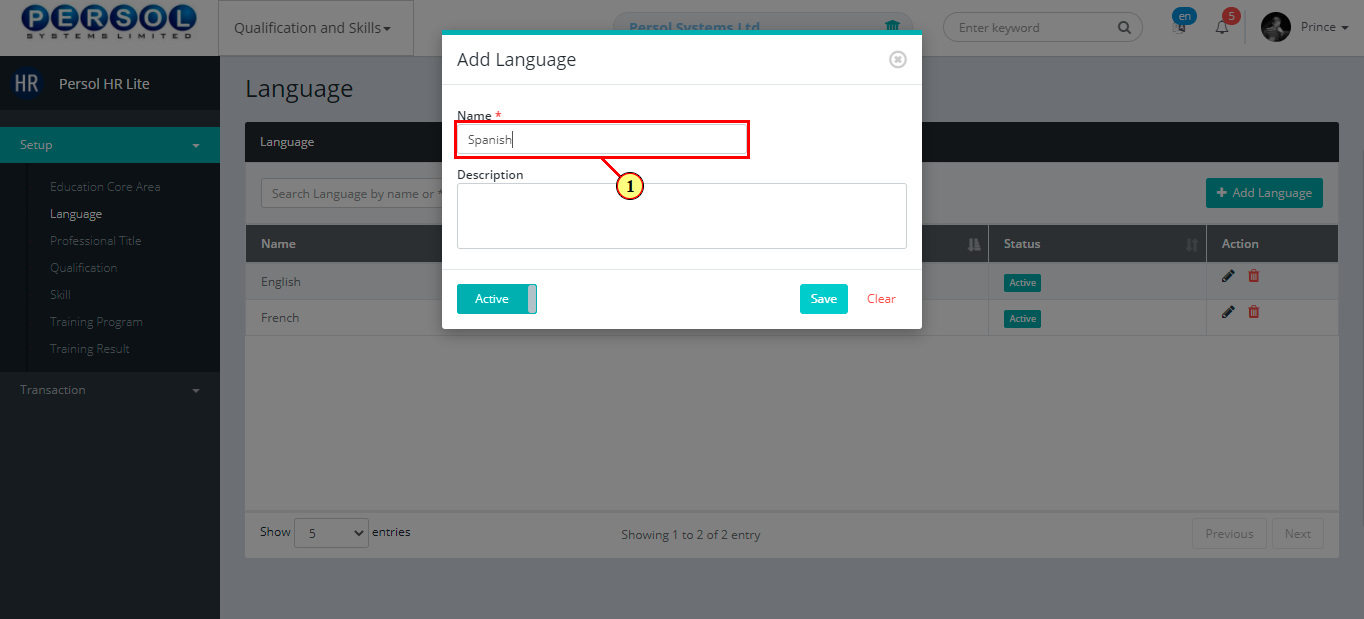
| The ‘Add Language’ modal opens | |
| (1) | Enter name of the language |
|
This field is required * |
| Step | Action |
|---|---|
| (1) | Add description to provide more details on the language |
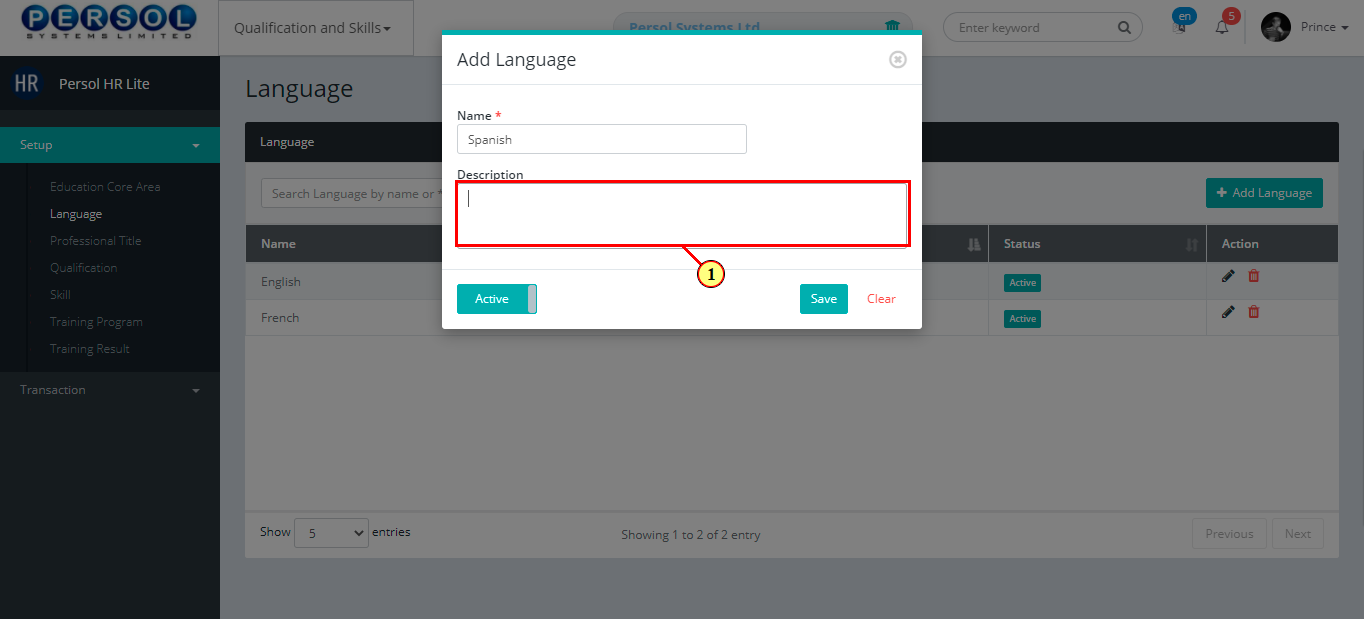
| Step | Action |
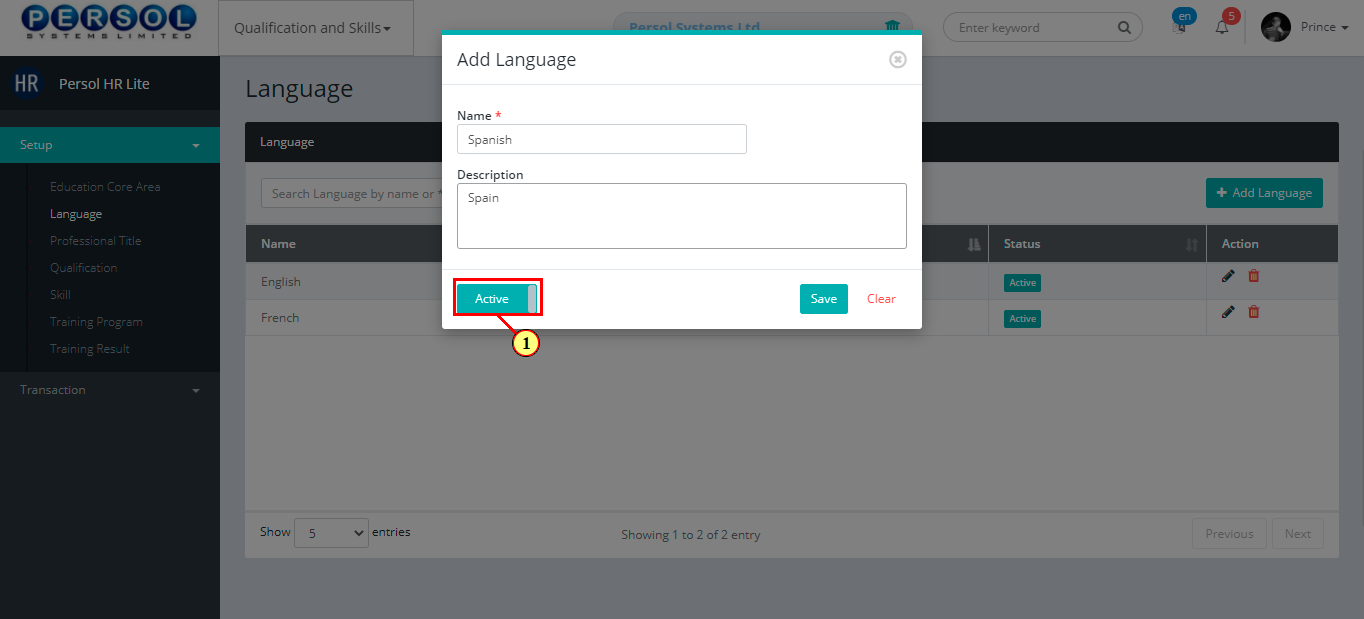
|---|---|
| (1) |
You may click on the  button to change status of the languageto inactive button to change status of the languageto inactive
|
|
- An active status means the language can be used in transactions on other pages - An inactive status means the language cannot be used in transactions on other pages |
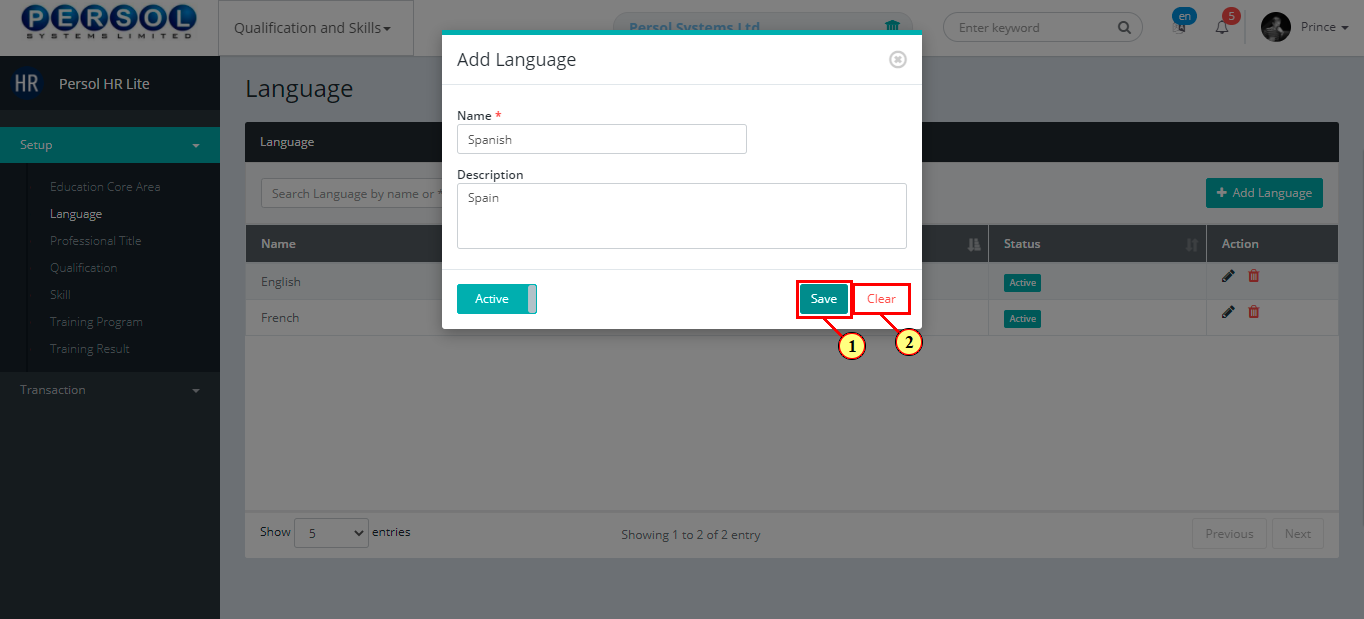
| Step | Action |
|---|---|
|
You may click on the  button to clear all details entered button to clear all details entered
|
| (1) |
Click on the  button to save the newly added language button to save the newly added language
|
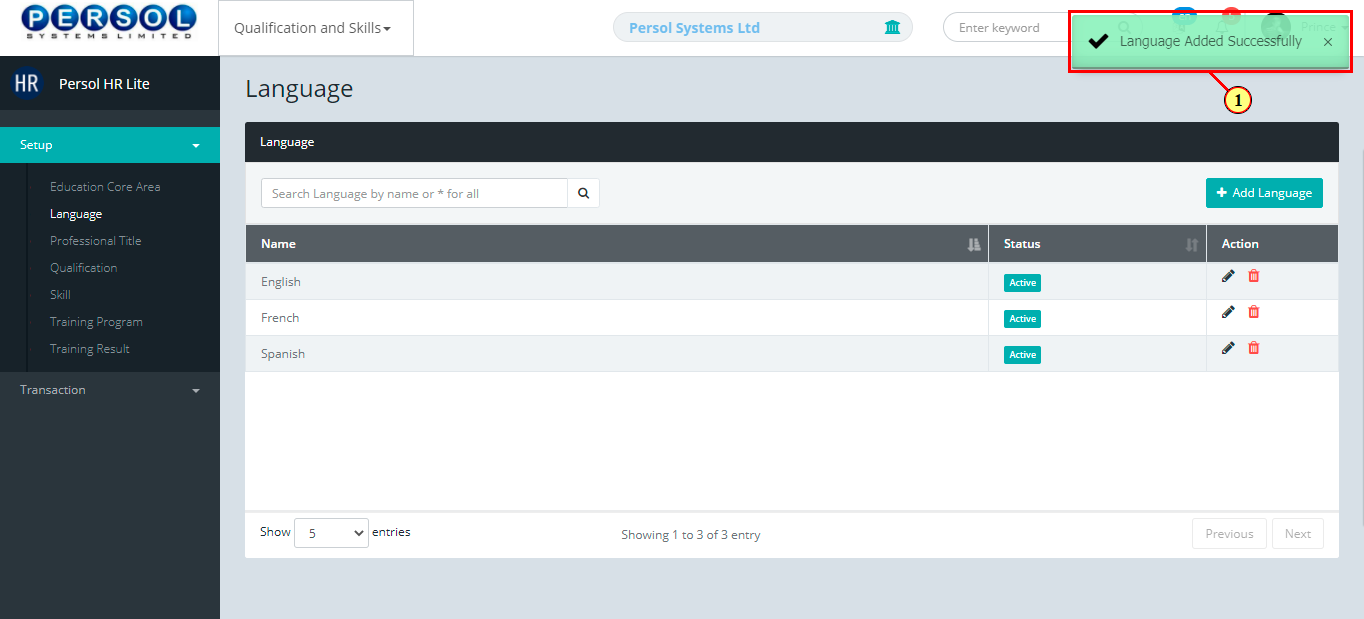
| Step | Action |
|---|---|
| (1) | A notification displays to indicate that the language setup has been saved successfully |
| Step | Action |
|---|---|
| (1) |
To edit a language setup, enter the language in the search box and click on the  icon to search icon to search
|
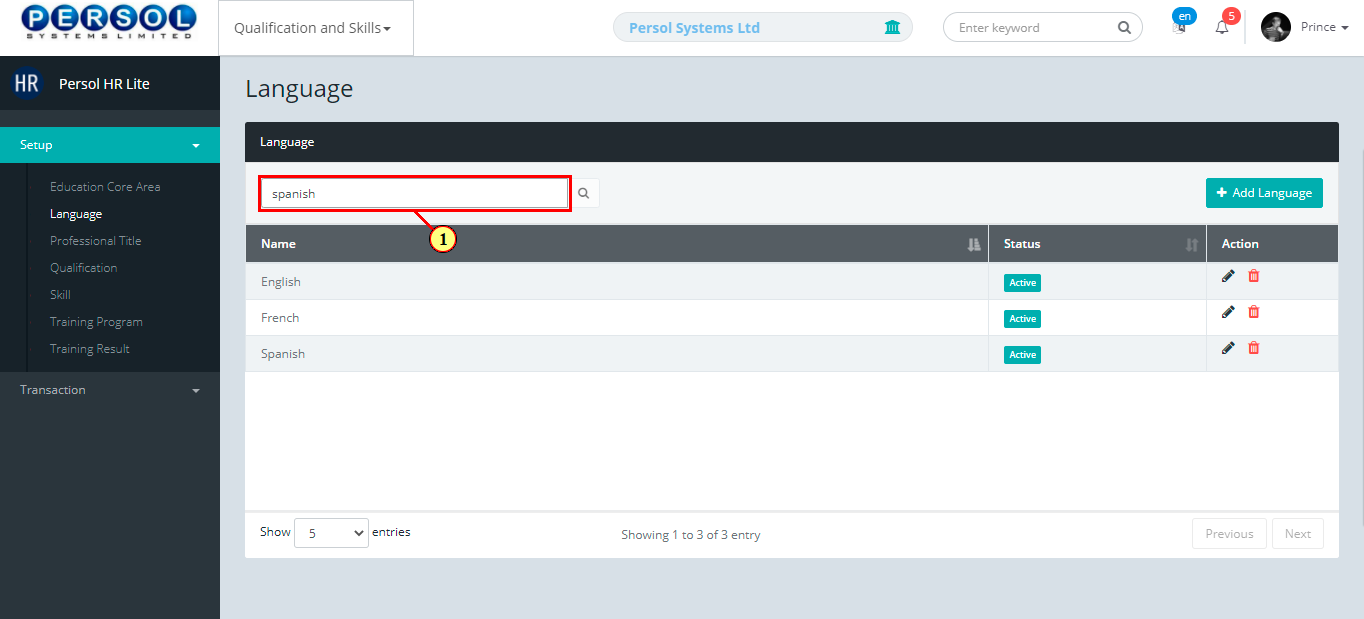
| Step | Action |
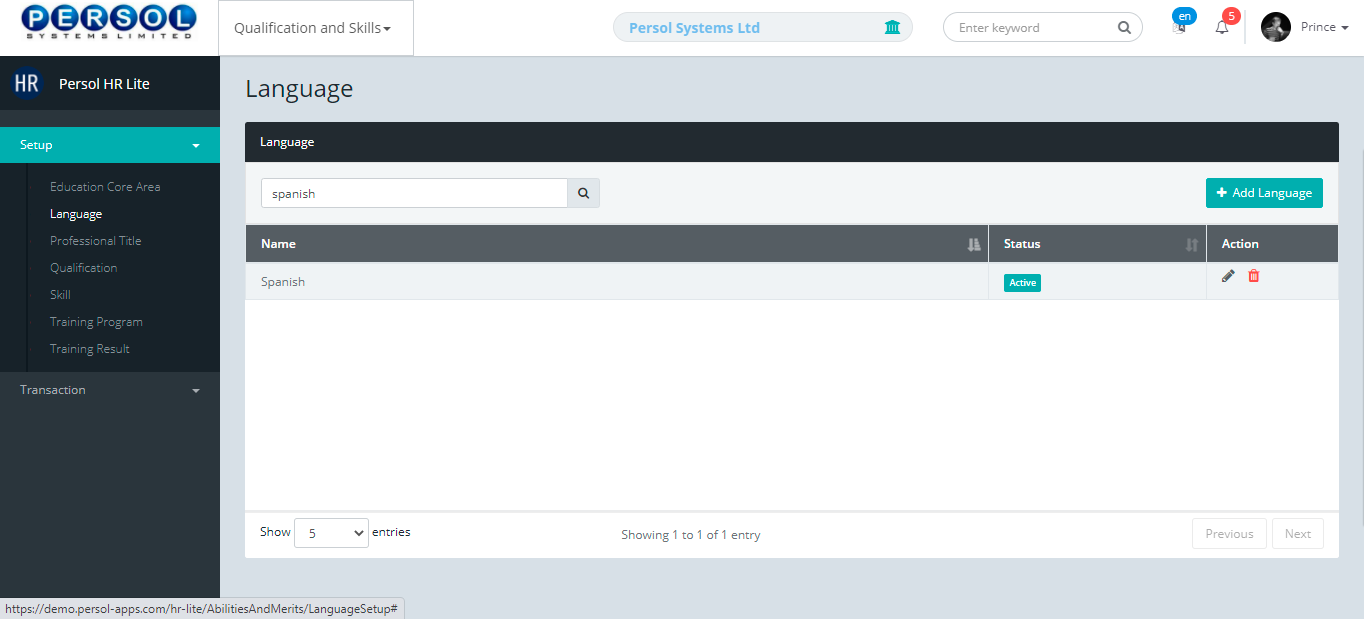
|---|---|
| The search result details display in the grid | |
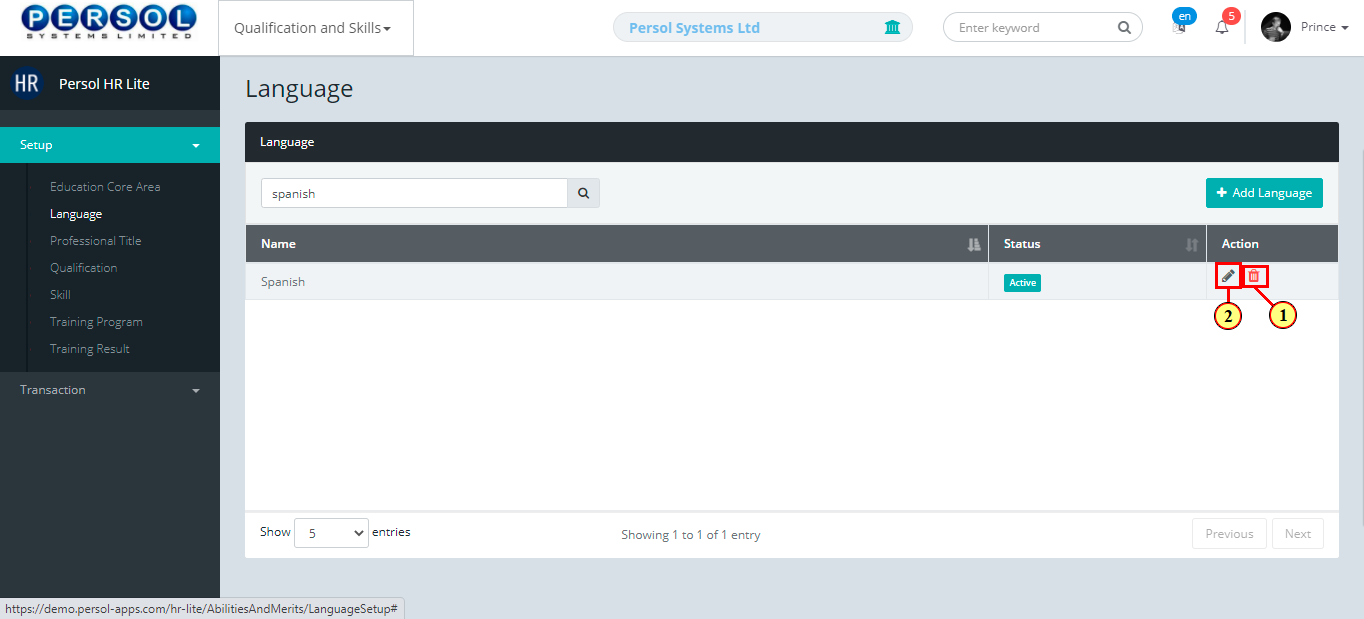
|
The Action column consists of the Delete  and Edit and Edit  action icons action icons
|
| Step | Action |
|---|---|
|
You may click on the delete icon to delete the language
|
| (1) |
Click on the edit icon to edit the language
|
| Step | Action |
|---|---|
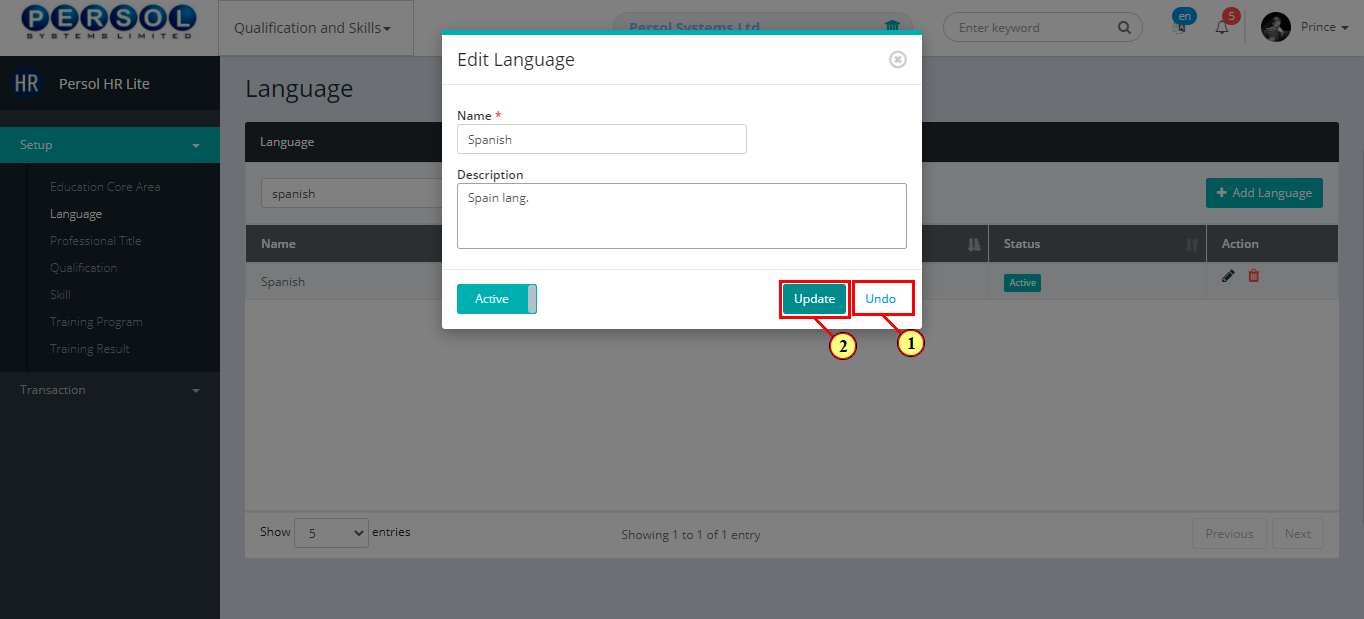
| The ‘Edit Language Setup’ modal opens | |
| Edit the name, description or status of the language setup |
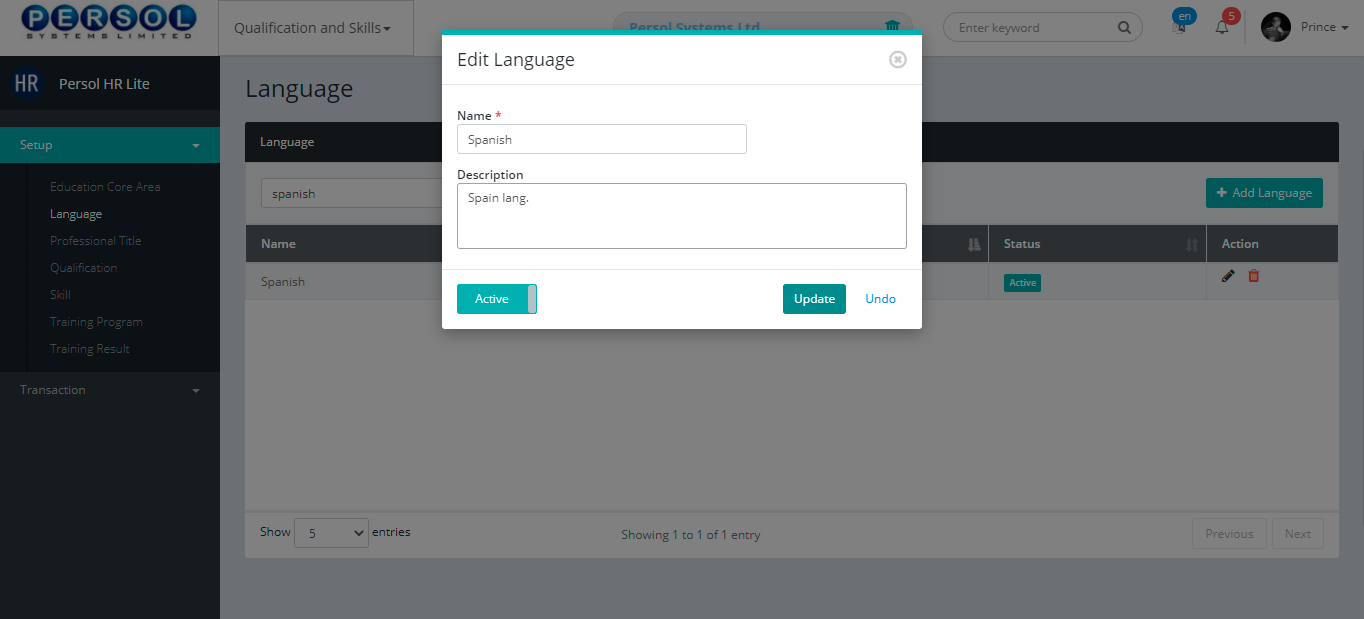
| Step | Action |
|---|---|
|
You may click on the  button to revert changes made button to revert changes made
|
| (1) |
Click on the update  button to save the changes made button to save the changes made
|
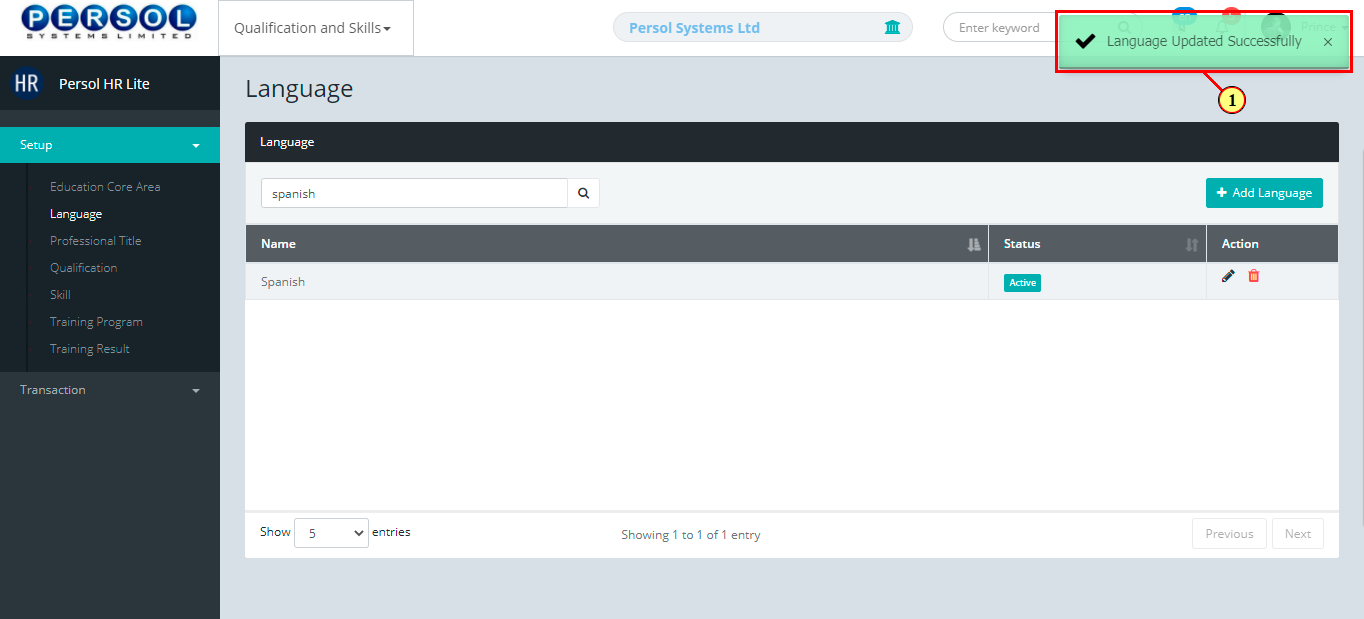
| Step | Action |
|---|---|
| (1) | A notification displays to indicate that the update has been saved successfully |
| Step | Action |
|---|---|
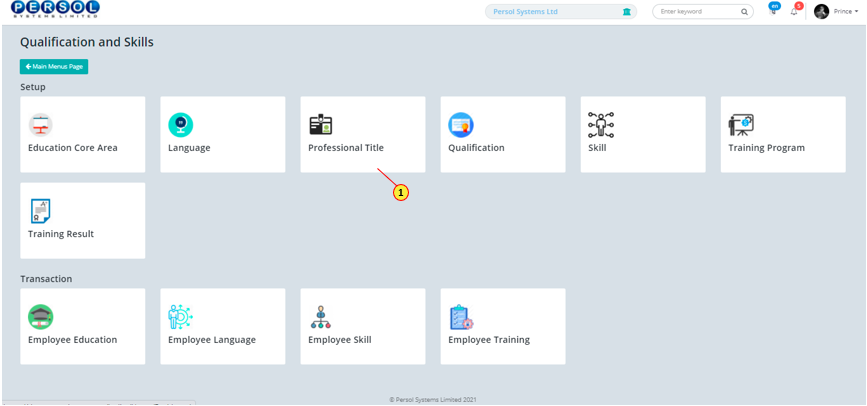
| (1) | On the HCM HR Lite homepage, select the 'Qualification and Skills' tile |

| Step | Action |
|---|---|
| The ‘Qualification and Skills’ submenus page opens | |
| (1) | Select the ‘Professional Title’ tile |
| Step | Action |
|---|---|
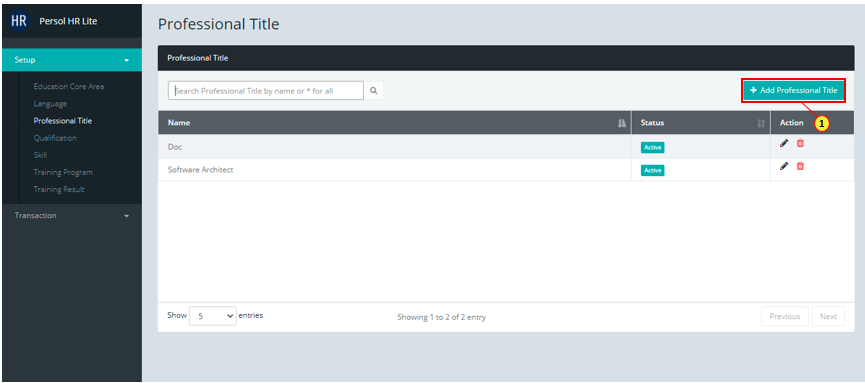
| The ‘Professional Title’ page opens | |
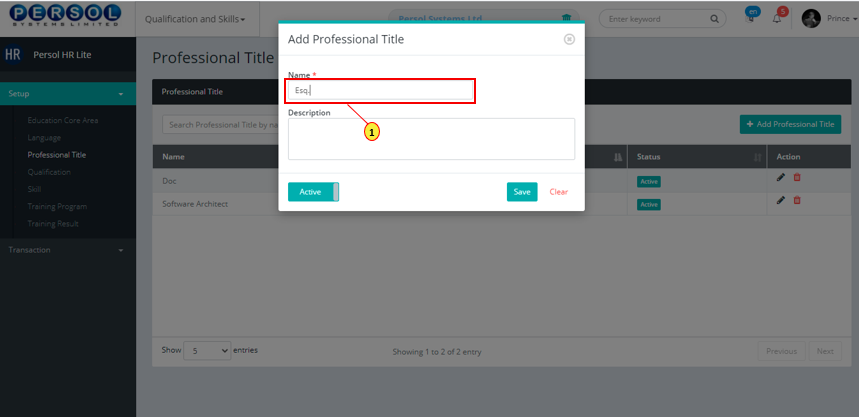
| (1) |
To setup a professional title, click on the  button button
|
| Step | Action |
|---|---|
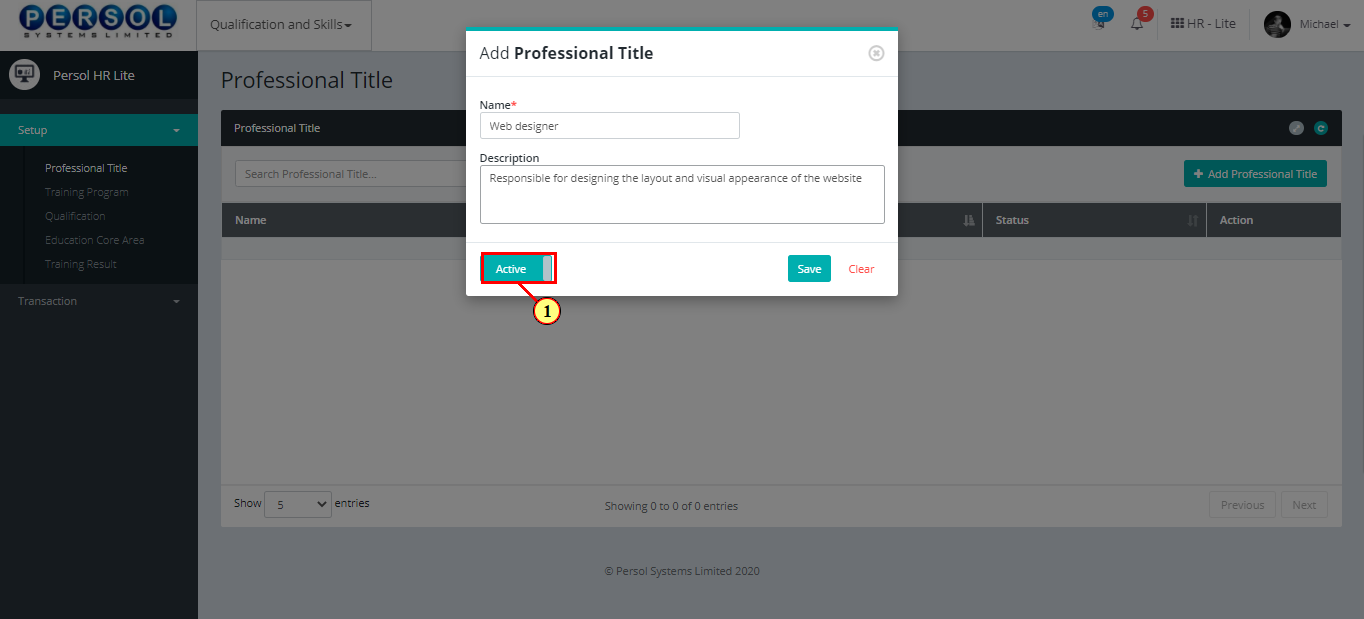
| The ‘Add Professional Title’ modal opens | |
| (1) | Enter name of the professional title |
|
This field is required * |
| Step | Action |
|---|---|
| (1) | Add description to provide more details on the professional title |

| Step | Action |
|---|---|
| (1) |
You may click on the  button to change status of the professional title to inactive button to change status of the professional title to inactive
|
|
- An active status means the professional title can be used in transactions on other pages - An inactive status means the professional title cannot be used in transactions on other pages |
| Step | Action |
|---|---|
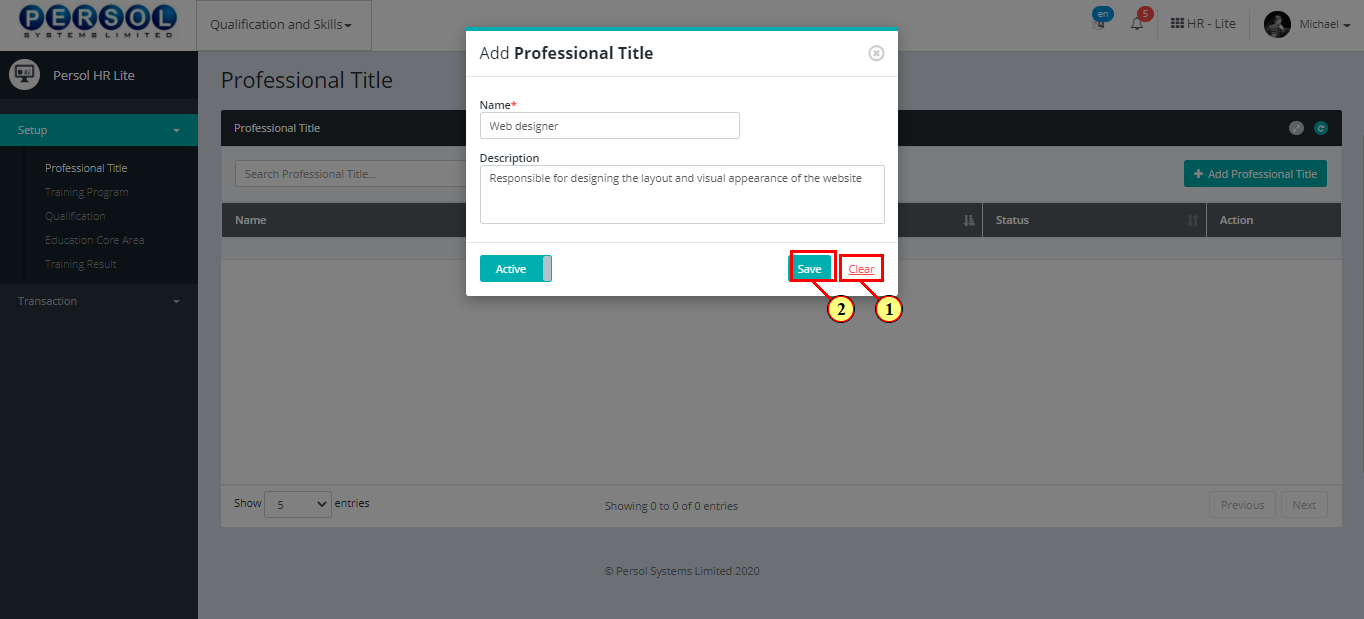
|
You may click on the  button to clear all details entered button to clear all details entered
|
| (1) |
Click on the  button to save the newly added professional title button to save the newly added professional title
|
| Step | Action |
|---|---|
| (1) | A notification displays to indicate that the professional title setup has been saved successfully |

| Step | Action |
|---|---|
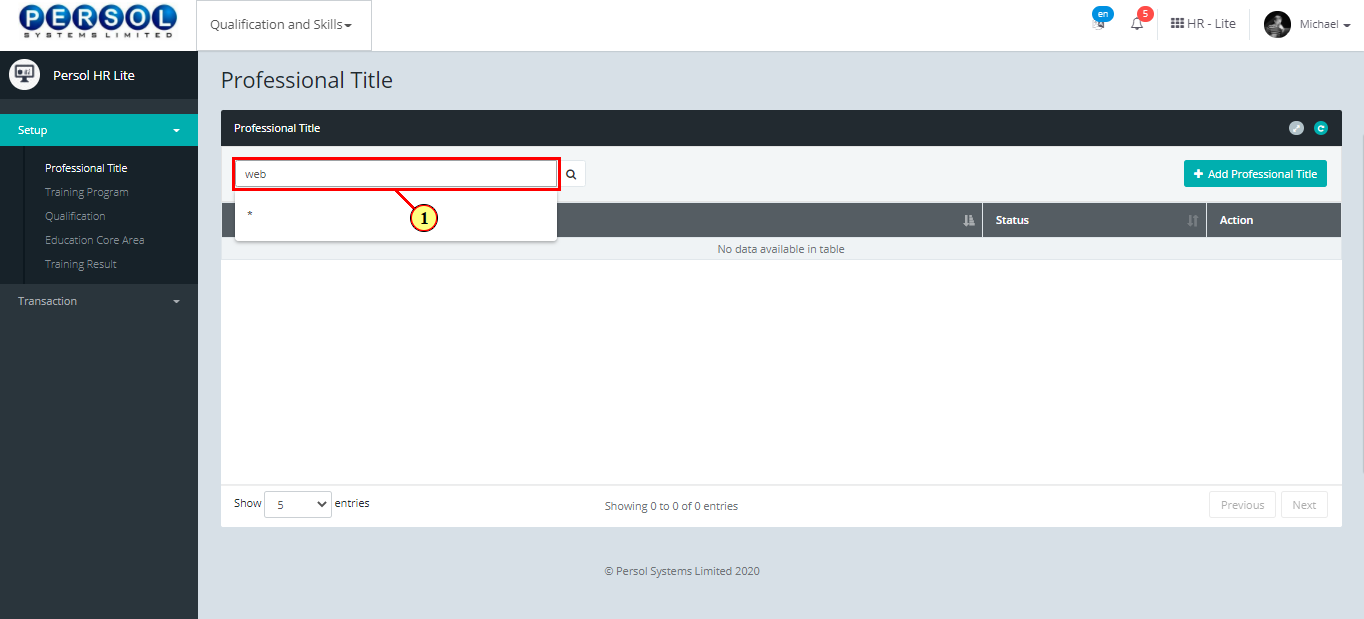
| (1) | To edit a professional title, enter name in the search box |
| (2) |
Click on the  icon to search icon to search
|
| Step | Action |
|---|---|
| The search result details display in the grid | |
|
The Action column consists of the Delete  and Edit and Edit  action icons action icons
|

| Step | Action |
|---|---|
| The ‘Edit Professional Title’ modal opens | |
| Edit the name, description or status of the professional title |
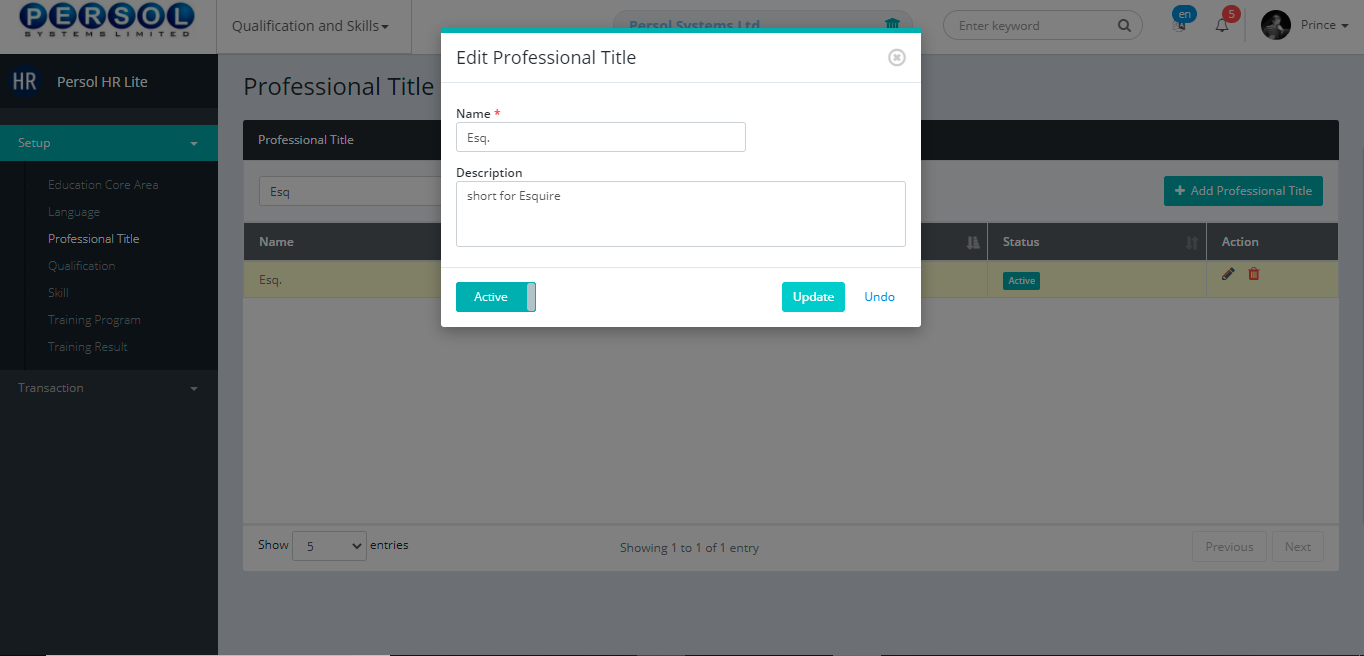
| Step | Action |
|---|---|
|
You may click on the  button to revert changes made button to revert changes made
|
| (1) |
Click on the  button to save the changes made button to save the changes made
|
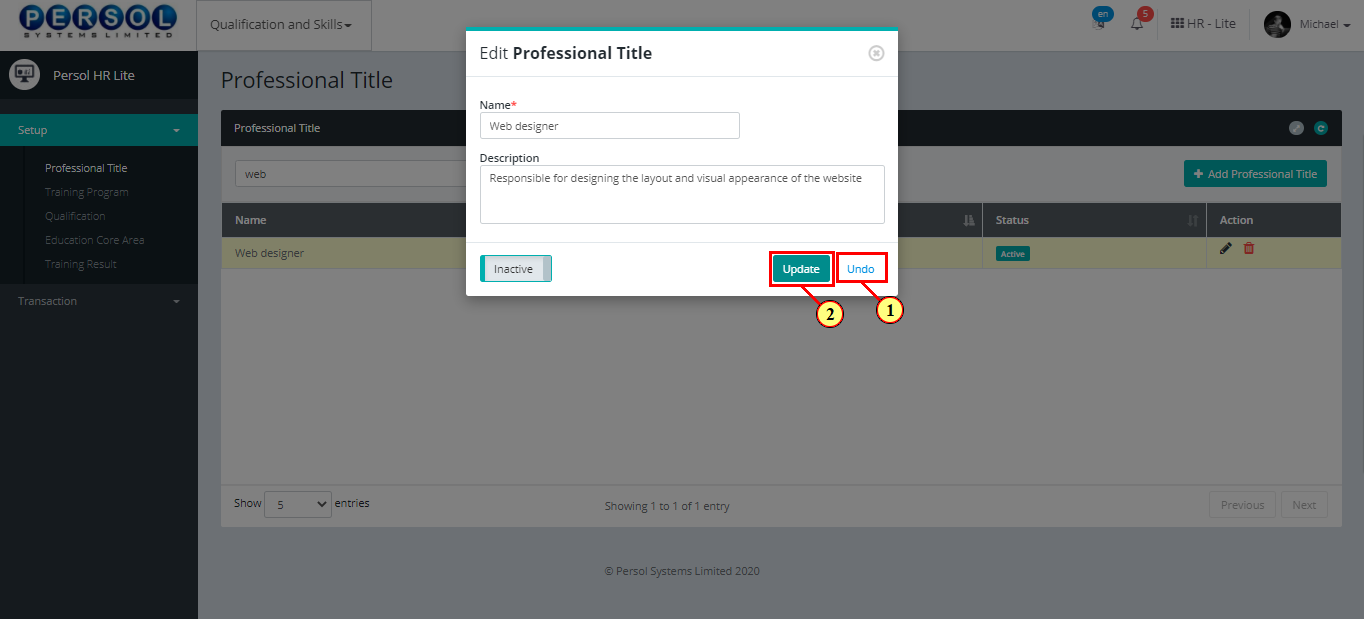
| Step | Action |
|---|---|
| (1) | A notification displays to indicate that the update has been saved successfully |

| Step | Action |
|---|---|
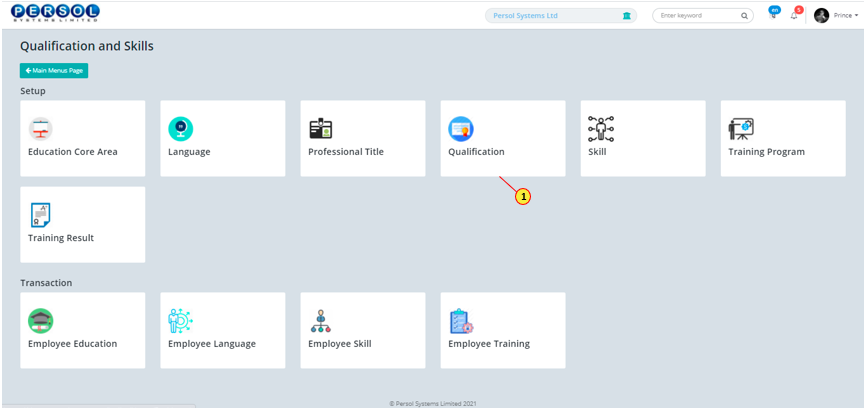
| (1) | On the Personax HR Lite homepage, select the 'Qualification and Skills' tile |

| Step | Action |
|---|---|
| The ‘Qualification’ submenus page opens | |
| (1) | Select the ‘Qualification’ tile |
| Step | Action |
|---|---|
| The ‘Qualification’ page opens | |
| (1) |
To setup a qualification, click on the 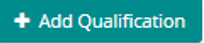 button button
|

| Step | Action |
|---|---|
| The ‘Add Qualification’ modal opens | |
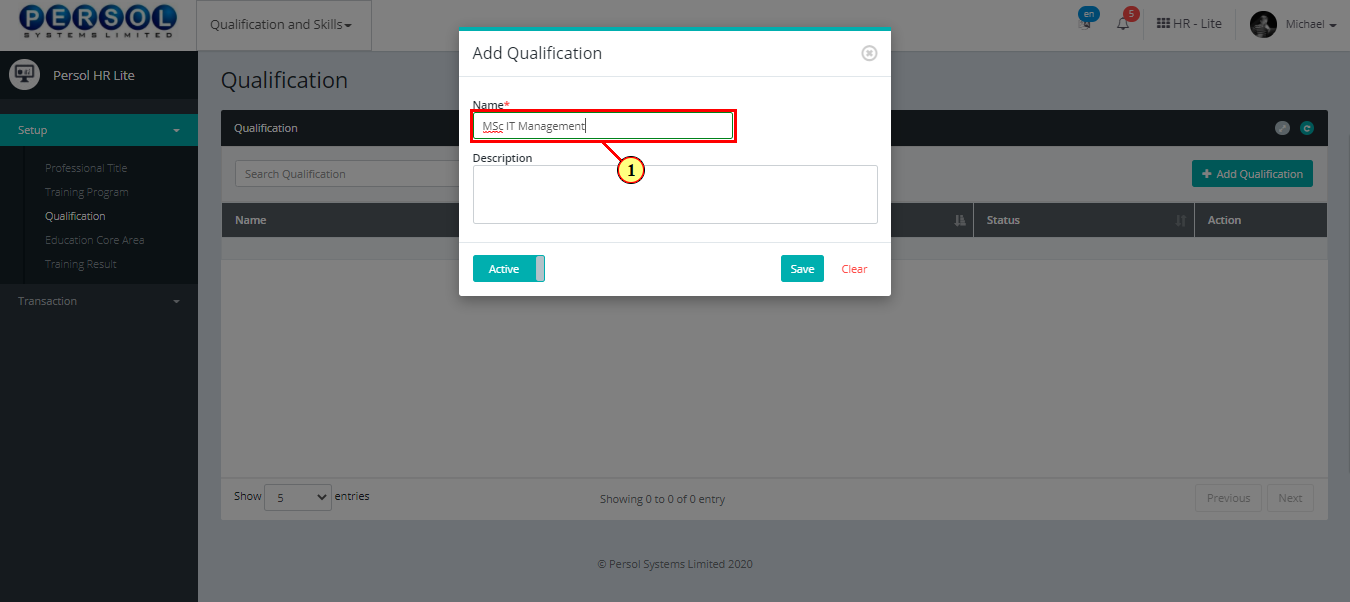
| (1) | Enter name of the qualification |
|
This field is required * |
| Step | Action |
|---|---|
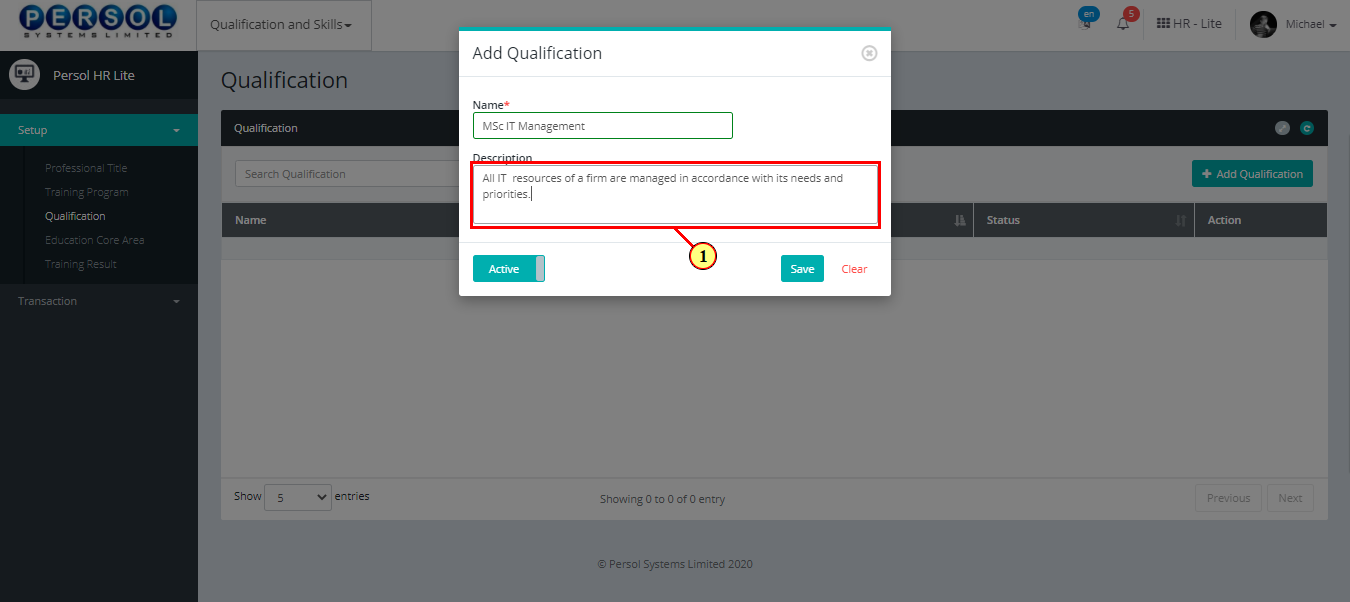
| (1) | Add description to provide more details on the qualification |
| Step | Action |
|---|---|
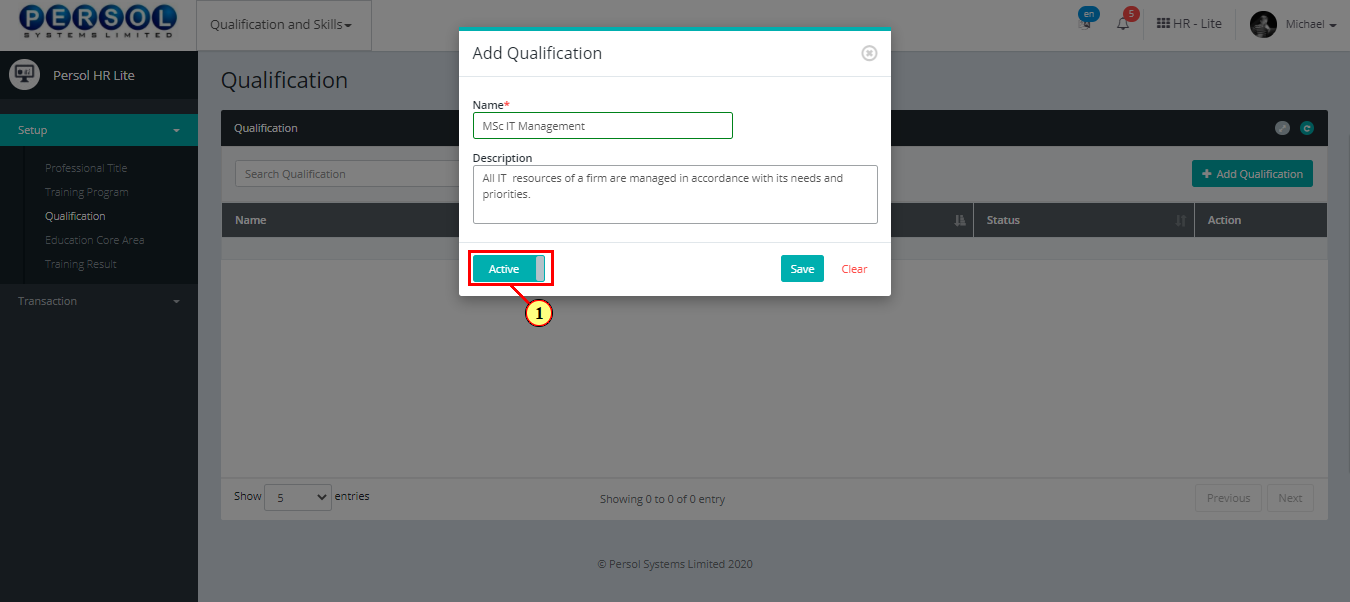
| (1) |
You may click on the  button to change status of the qualification to inactive button to change status of the qualification to inactive
|
|
- An active status means the qualification can be used in transactions on other pages - An inactive status means the qualification cannot be used in transactions on other pages |
| Step | Action |
|---|---|
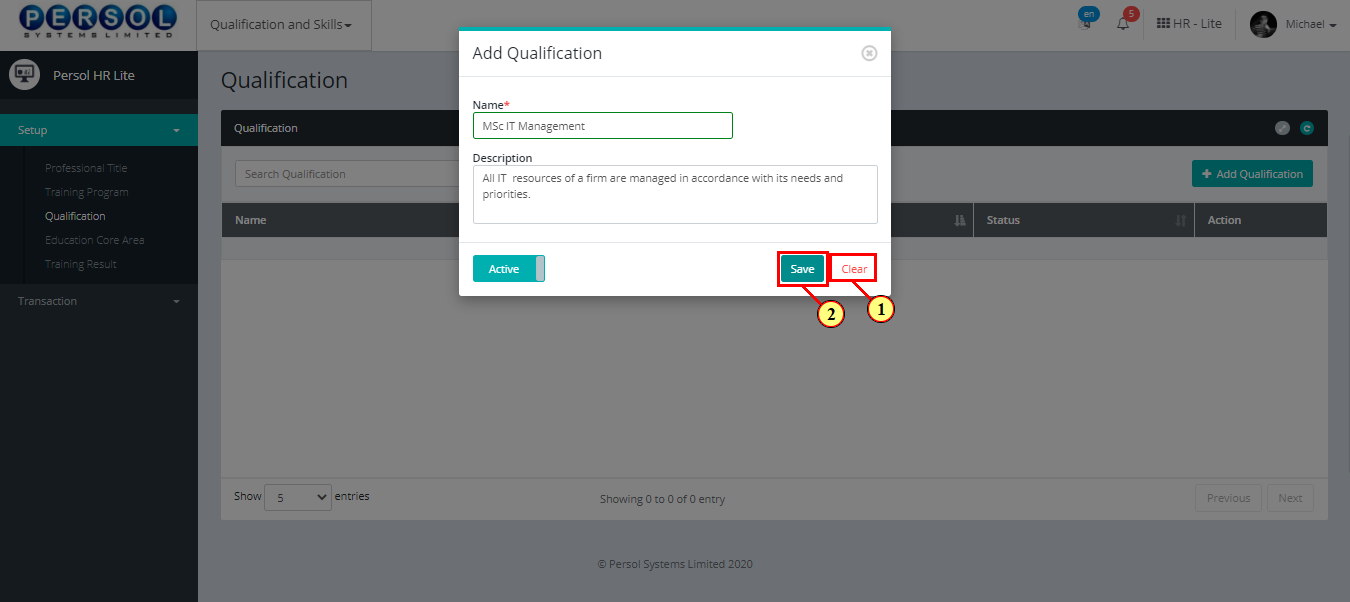
|
You may click on the  button to clear all details entered button to clear all details entered
|
| (1) |
Click on the  button to save the newly added qualification button to save the newly added qualification
|
| Step | Action |
|---|---|
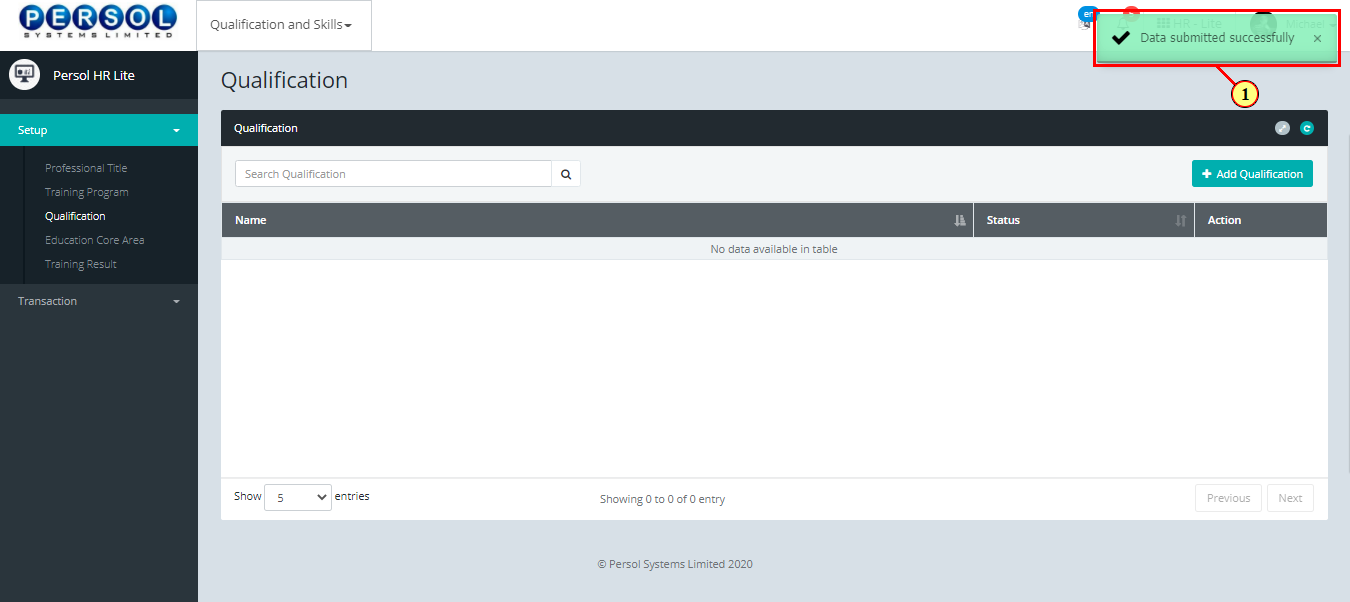
| (1) | A notification displays to indicate that the qualification setup has been saved successfully |
| Step | Action |
|---|---|
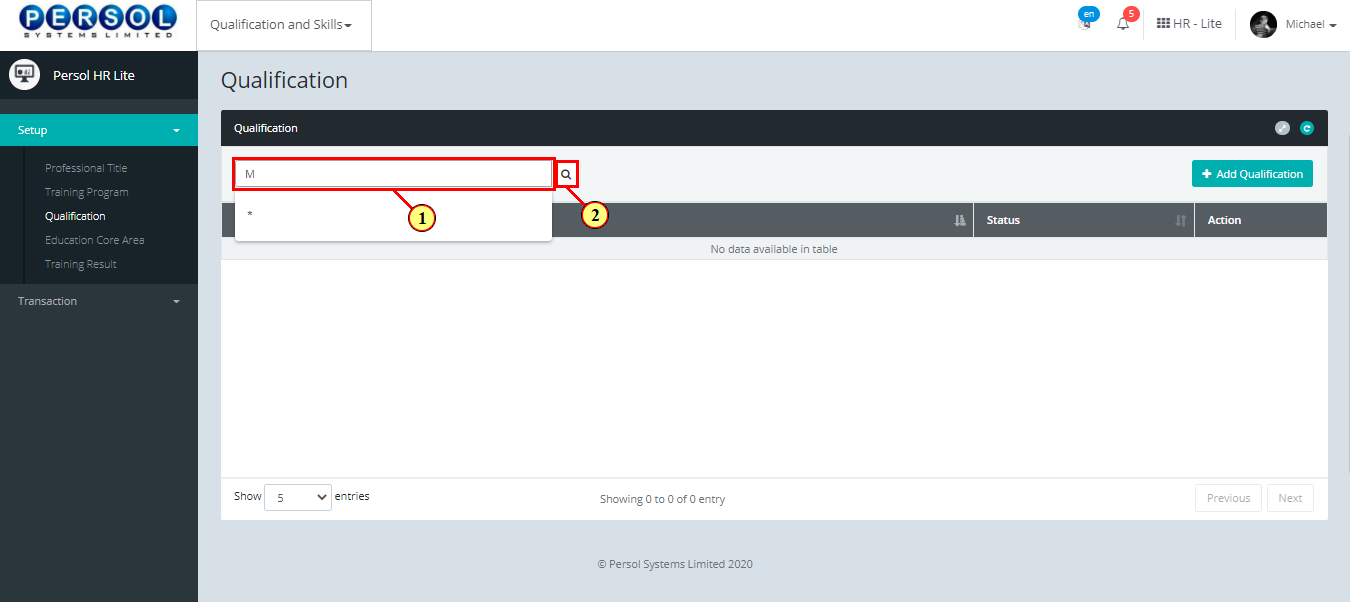
| (1) | To edit a qualification, enter name in the search box |
| (2) |
Click on the  icon to search icon to search
|
| Step | Action |
|---|---|
| The search result details display in the grid | |
|
The Action column consists of the Delete  and Edit and Edit  action icons action icons
|

| Step | Action |
|---|---|
|
You may click on the delete icon to delete the qualification
|
| (1) |
Click on the edit icon to edit the qualification
|

| Step | Action |
|---|---|
| The ‘Edit Qualification’ modal opens | |
| Edit the name, description or status of the qualification |
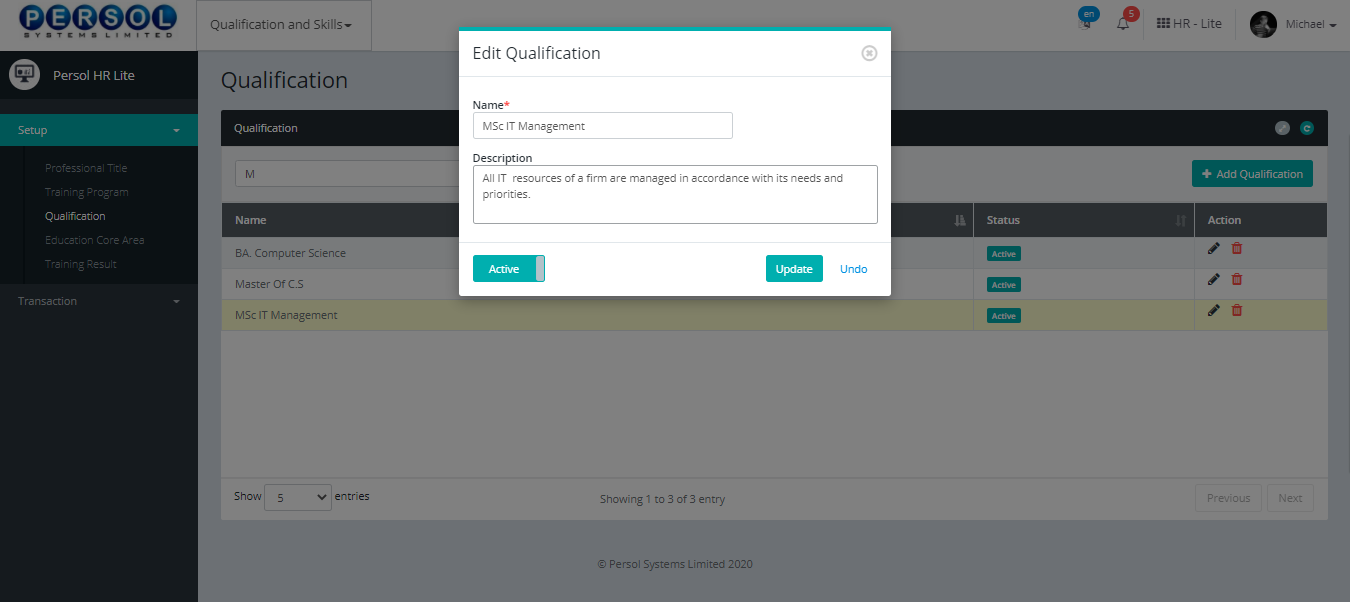
| Step | Action |
|---|---|
|
You may click on the  button to revert changes made button to revert changes made
|
| (1) |
Click on the update  button to save the changes made button to save the changes made
|

| Step | Action |
|---|---|
| (1) | A notification displays to indicate that the qualification setup has been saved successfully |

| Step | Action |
|---|---|
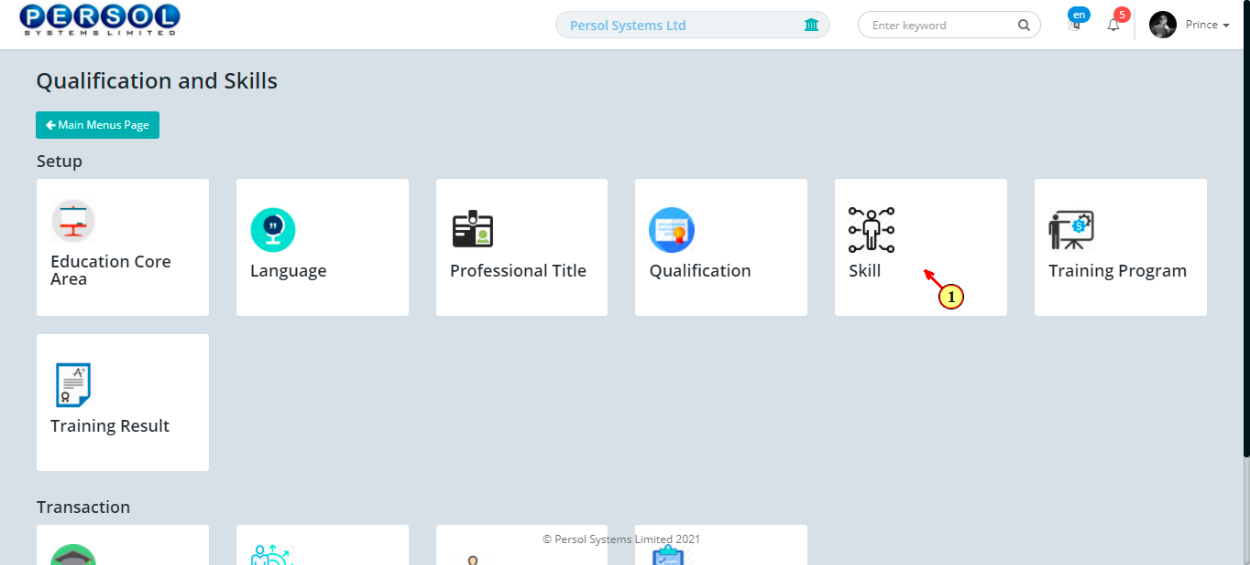
| (1) | On the Personax HR Lite homepage, select the 'Qualification and Skills’ tile |

| Step | Action |
|---|---|
| The ‘Qualification and Skills’ submenus page opens | |
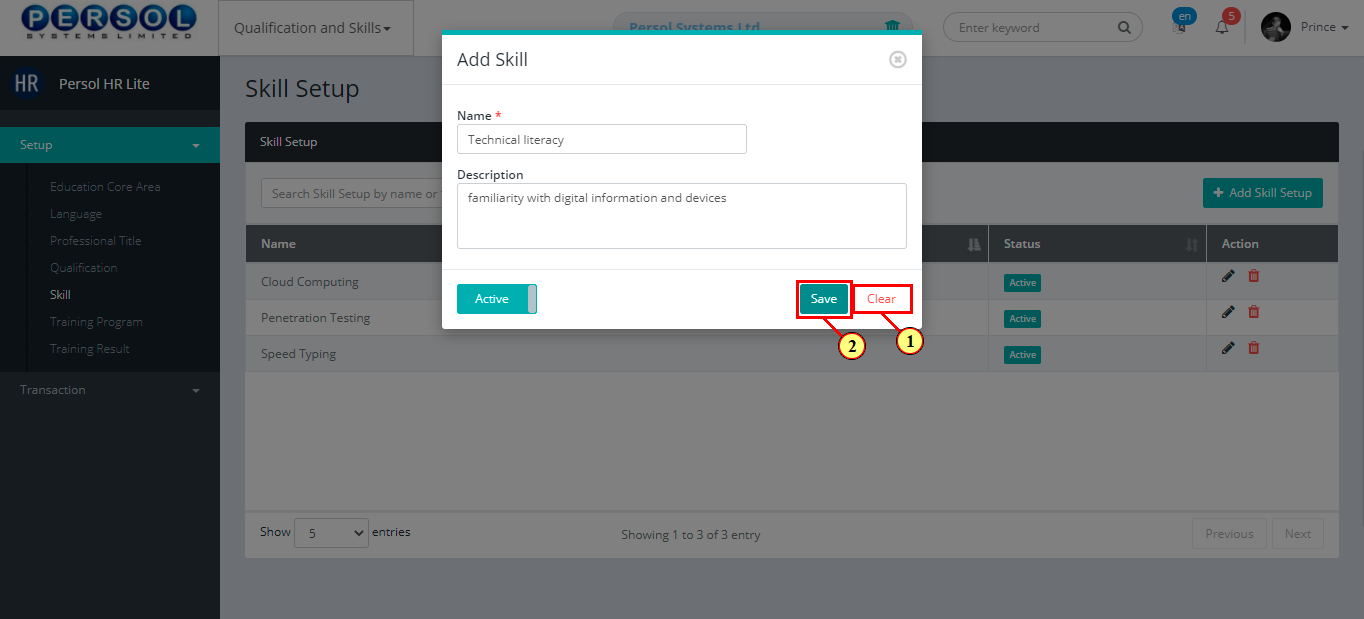
| (1) | Select the ‘Skill’ tile |
| Step | Action |
|---|---|
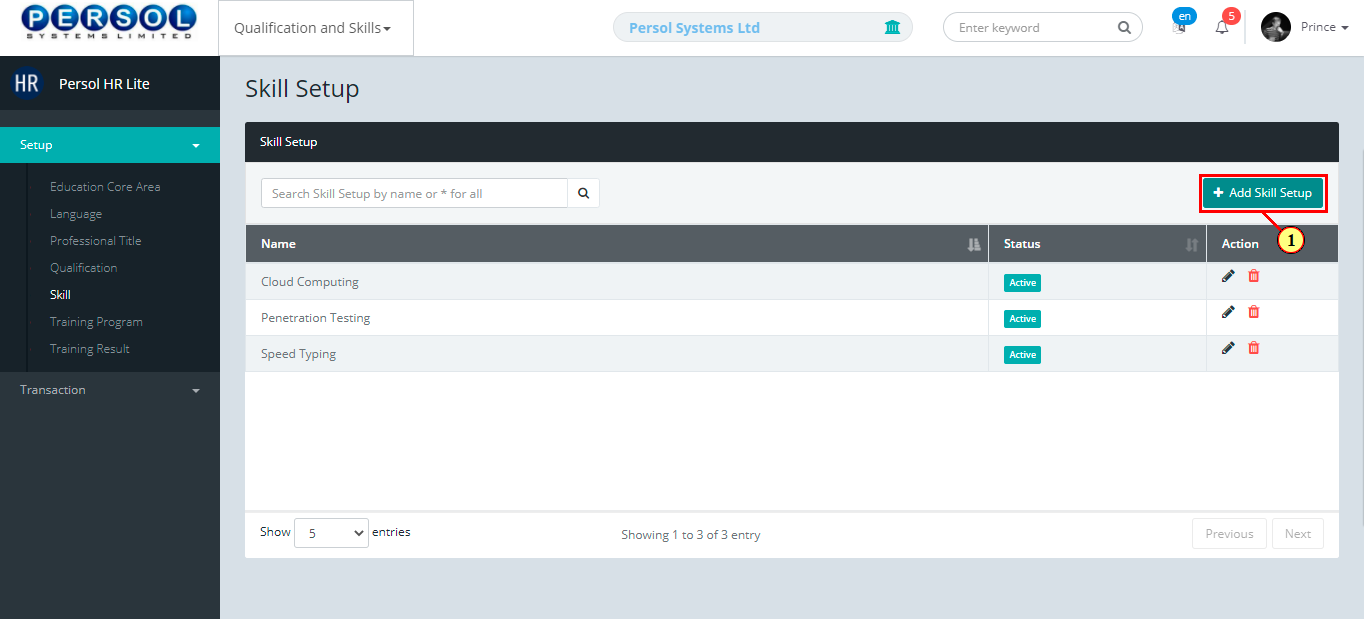
| The ‘Skill Setup’ page opens | |
| (1) |
To setup a skill, click on the 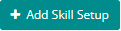 button button
|
| Step | Action |
|---|---|
| The ‘Add Skill' modal opens | |
| (1) | Enter the name of the skill |
|
This field is required * |
| Step | Action |
|---|---|
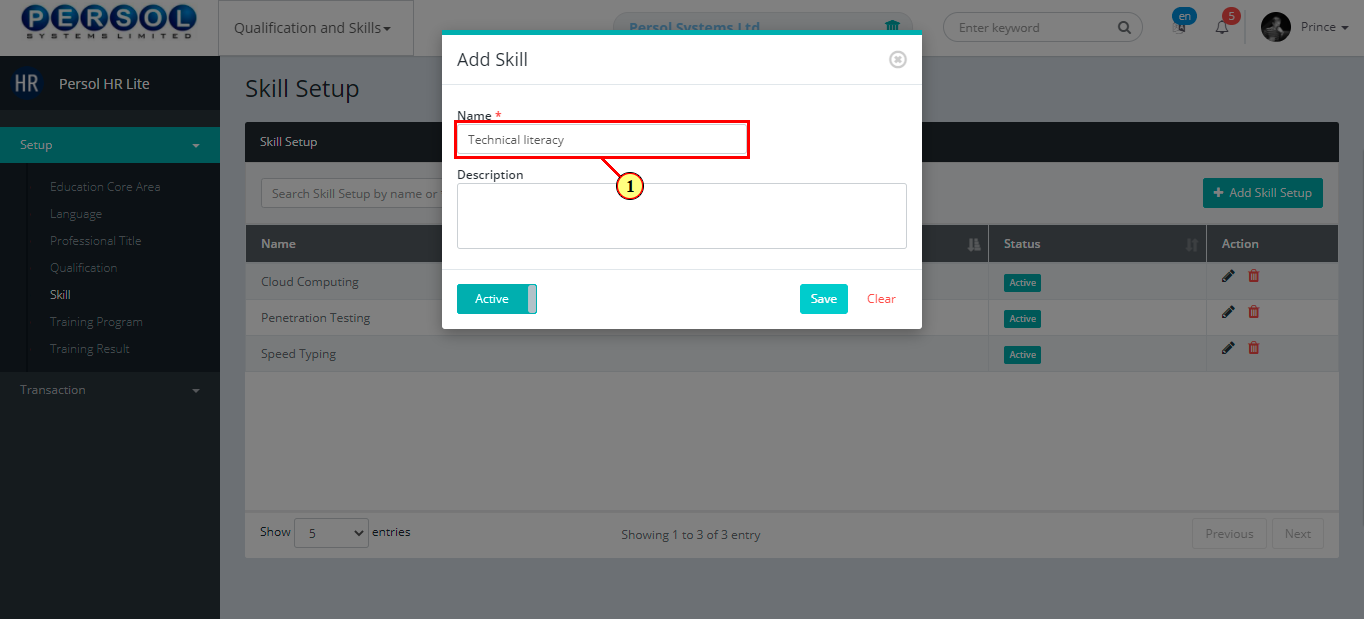
| (1) | Add description to provide more details on the skill |
| Step | Action |
|---|---|
| (1) |
You may click on the button to change status of the skill to inactive
|
|
- An active status means the skill can be used in transactions on other pages - An inactive status means the skill cannot be used in transactions on other pages |

| Step | Action |
|---|---|
|
You may click on the button to revert changes made
|
| (1) |
Click on the button to save the changes made
|
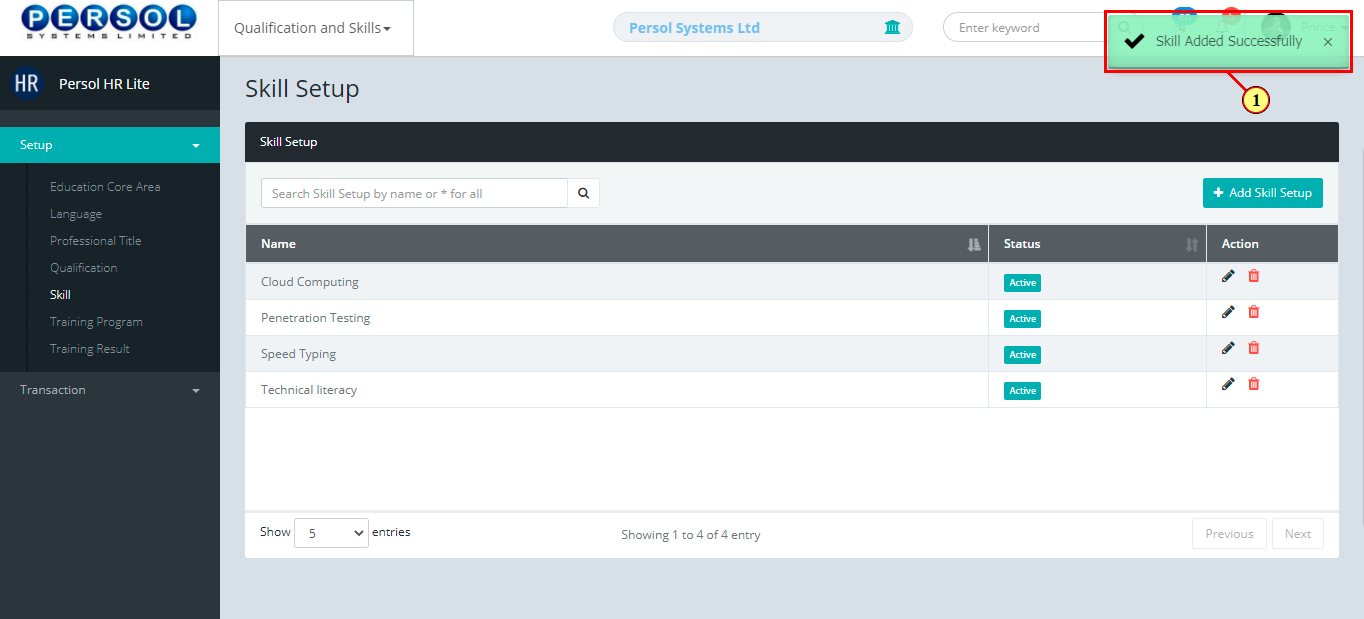
| Step | Action |
|---|---|
| (1) | A notification displays to indicate that the skill setup has been saved successfully |
| Step | Action |
|---|---|
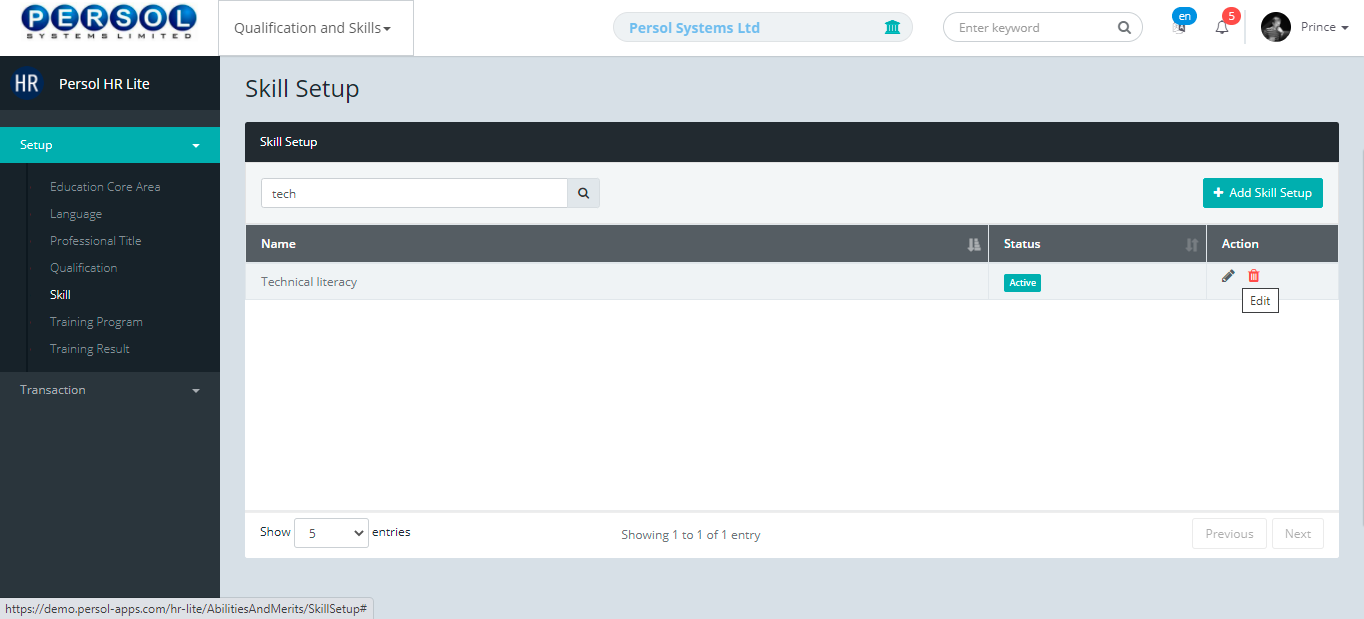
| (1) | To edit a skill, enter skill name in the search box |
| (2) |
Click on the icon to search
|

| Step | Action |
|---|---|
| The search result details display in the grid | |
|
The Action column consists of the Edit and Delete action icons
|
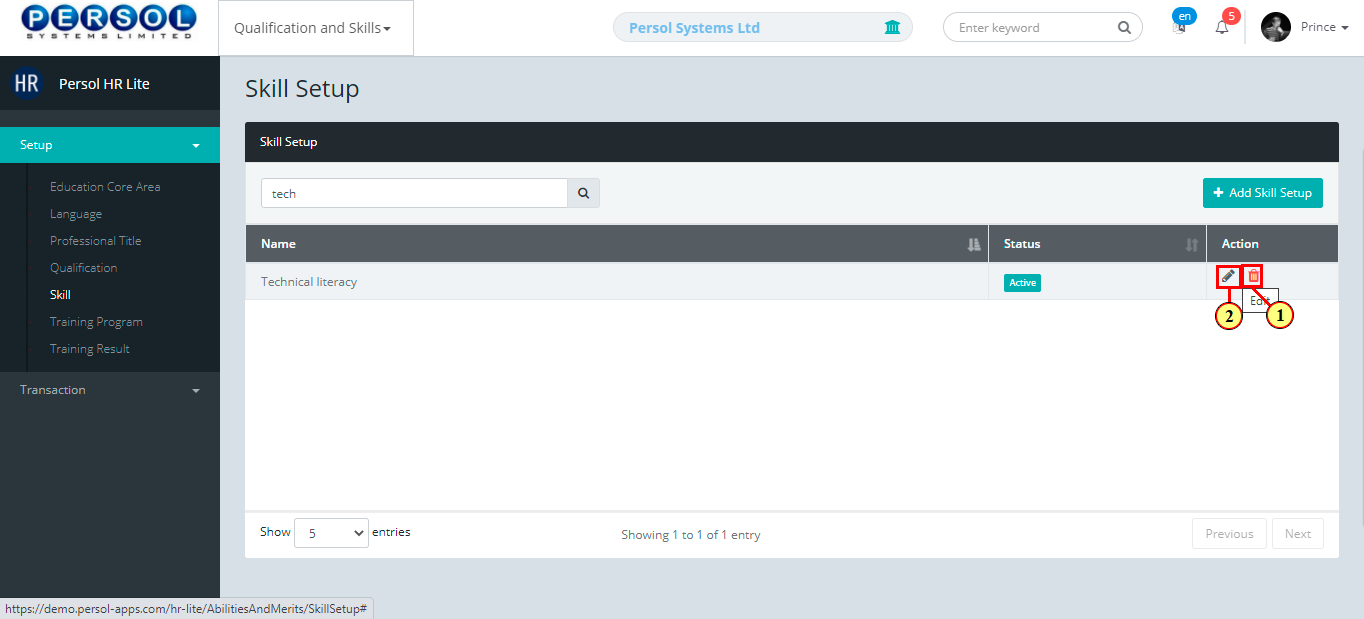
| Step | Action |
|---|---|
|
You may click on the delete icon to delete the skill
|
| (1) |
Click on the edit icon to edit the skill
|
| Step | Action |
|---|---|
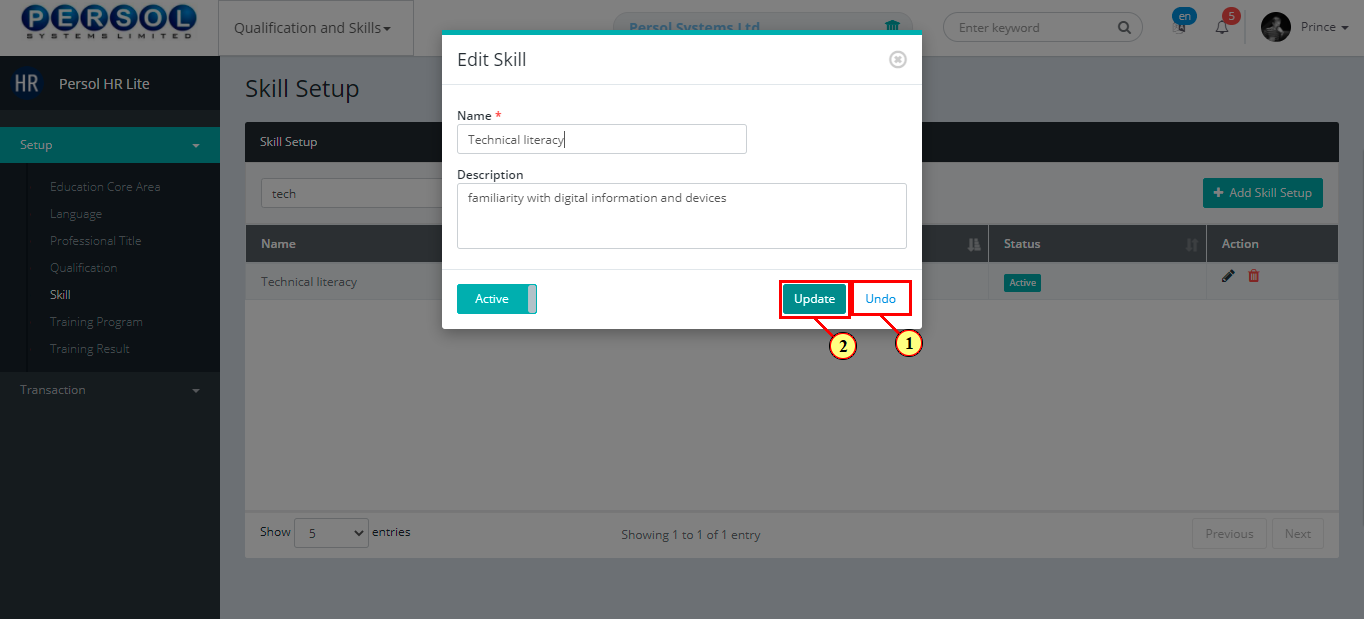
| The ‘Edit Skill’ modal opens | |
| Edit the name, description or status of the skill |
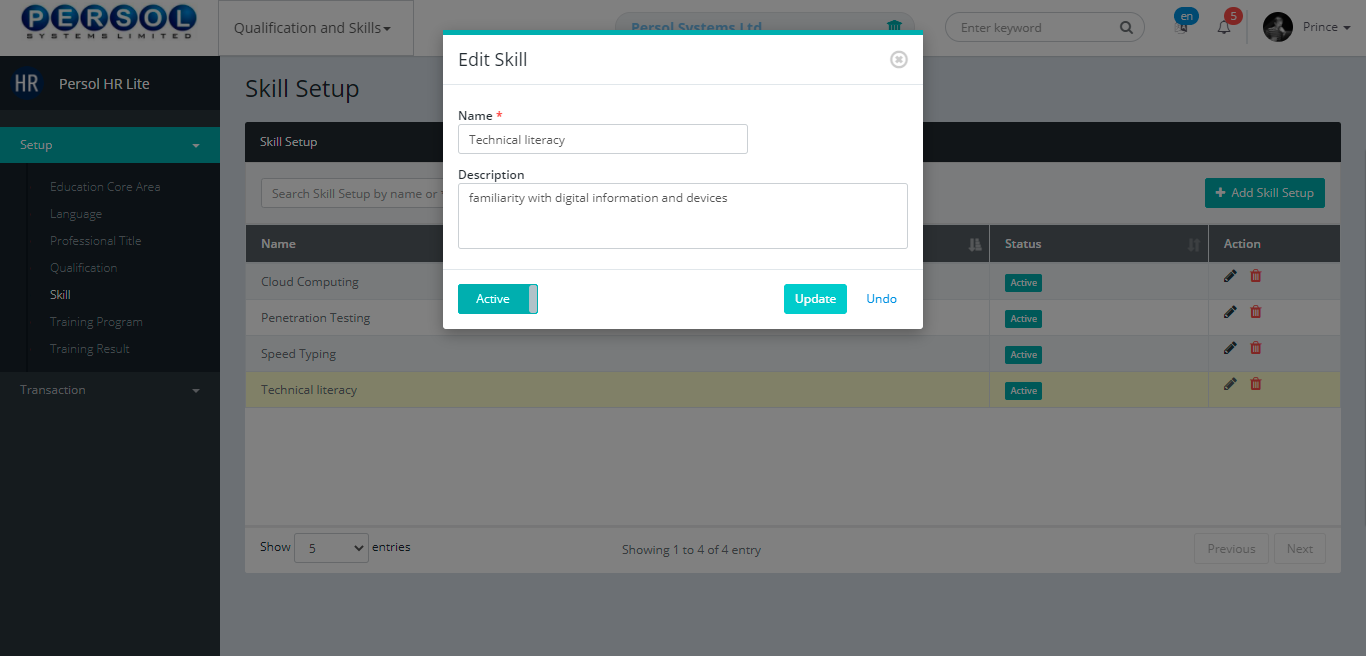
| Step | Action |
|---|---|
|
You may click on the button to revert changes made
|
| (1) |
Click on the button to save the changes made
|
| Step | Action |
|---|---|
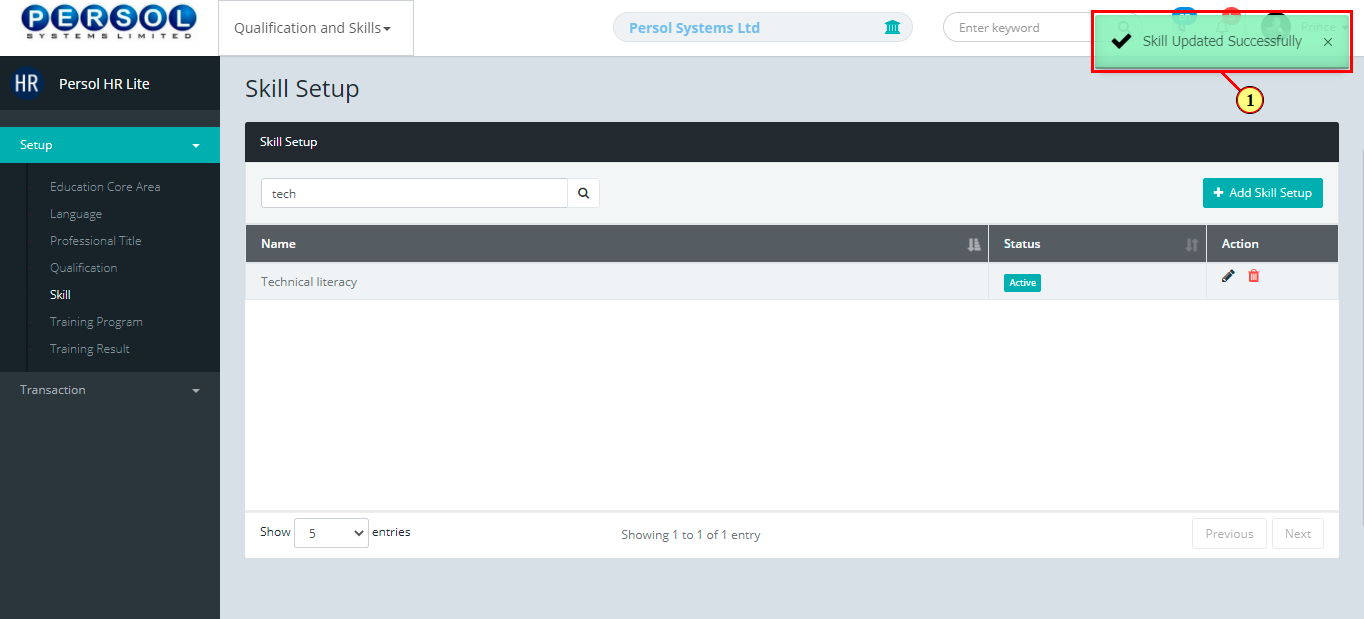
| (1) | A notification displays to indicate that the update has been saved successfully |
| Step | Action |
|---|---|
| (1) | On the Personax HR Lite homepage, select the 'Qualification and Skills' tile |
| Step | Action |
|---|---|
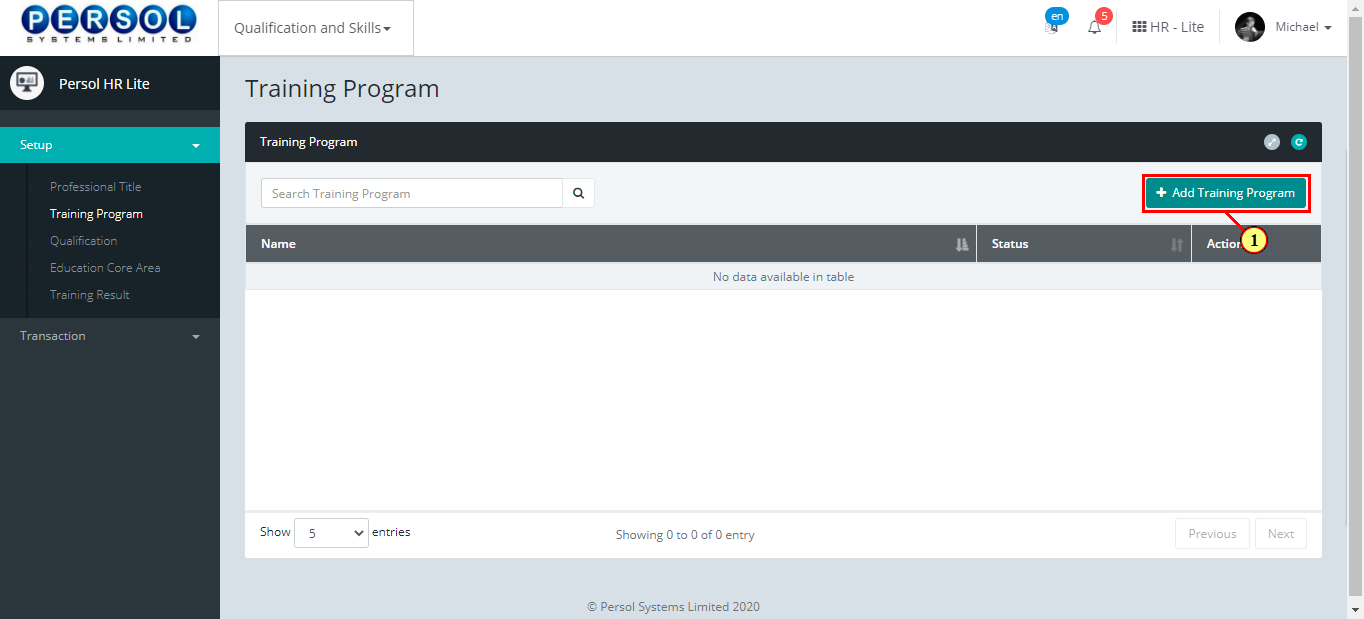
| The ‘Training Program’ submenus page opens | |
| (1) | Select the ‘Training Program’ tile |
| Step | Action |
|---|---|
| The ‘Training Program’ page opens | |
| (1) |
To setup a training program, click on the  button button
|
| Step | Action |
|---|---|
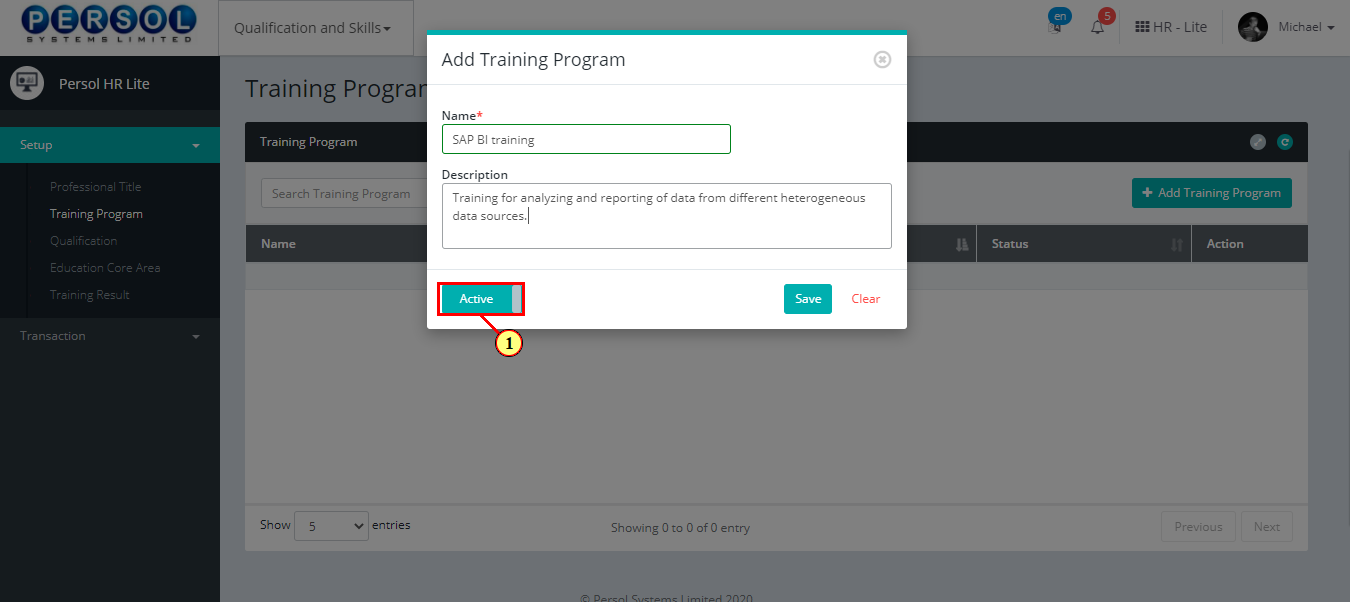
| The ‘Add Training Program’ modal opens | |
| (1) | Enter name of the training program |
|
This field is required * |

| Step | Action |
|---|---|
| (1) | Add description to provide more details on the training program |

| Step | Action |
|---|---|
| (1) |
You may click on the  button to change status of the training program to inactive button to change status of the training program to inactive
|
|
- An active status means the training program can be used in transactions on other pages - An inactive status means the training program cannot be used in transactions on other pages |
| Step | Action |
|---|---|
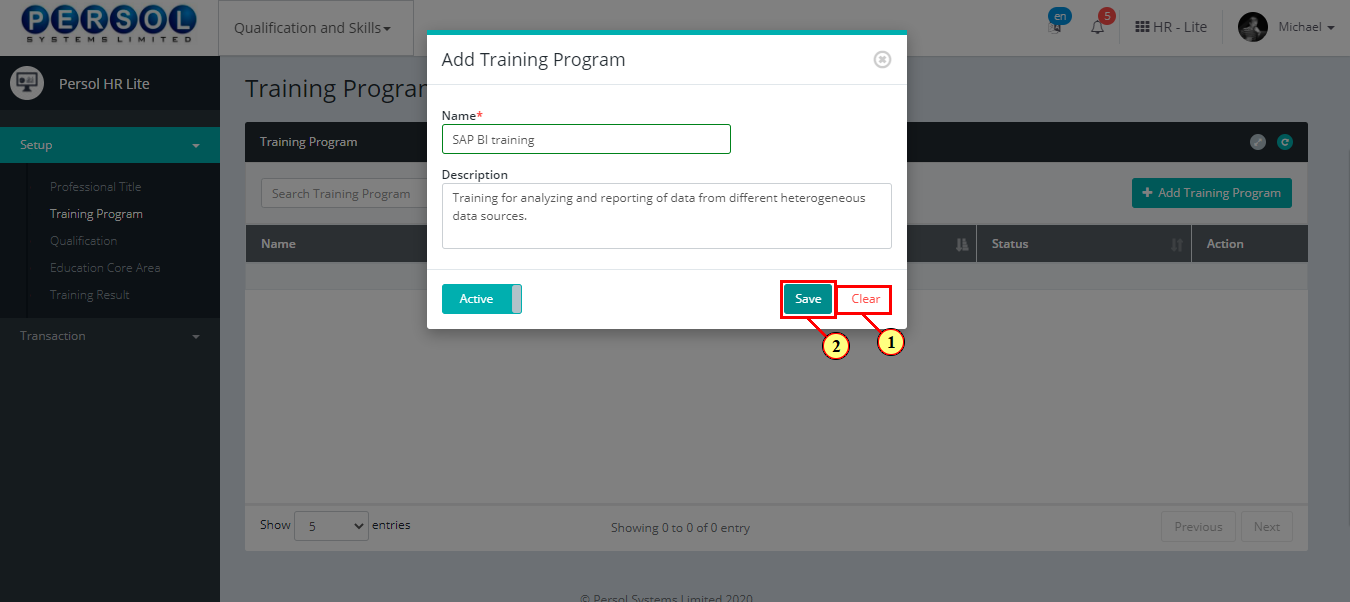
|
You may click on the  button to clear all details entered button to clear all details entered
|
| (1) |
Click on the  button to save the newly added training program button to save the newly added training program
|
| Step | Action |
|---|---|
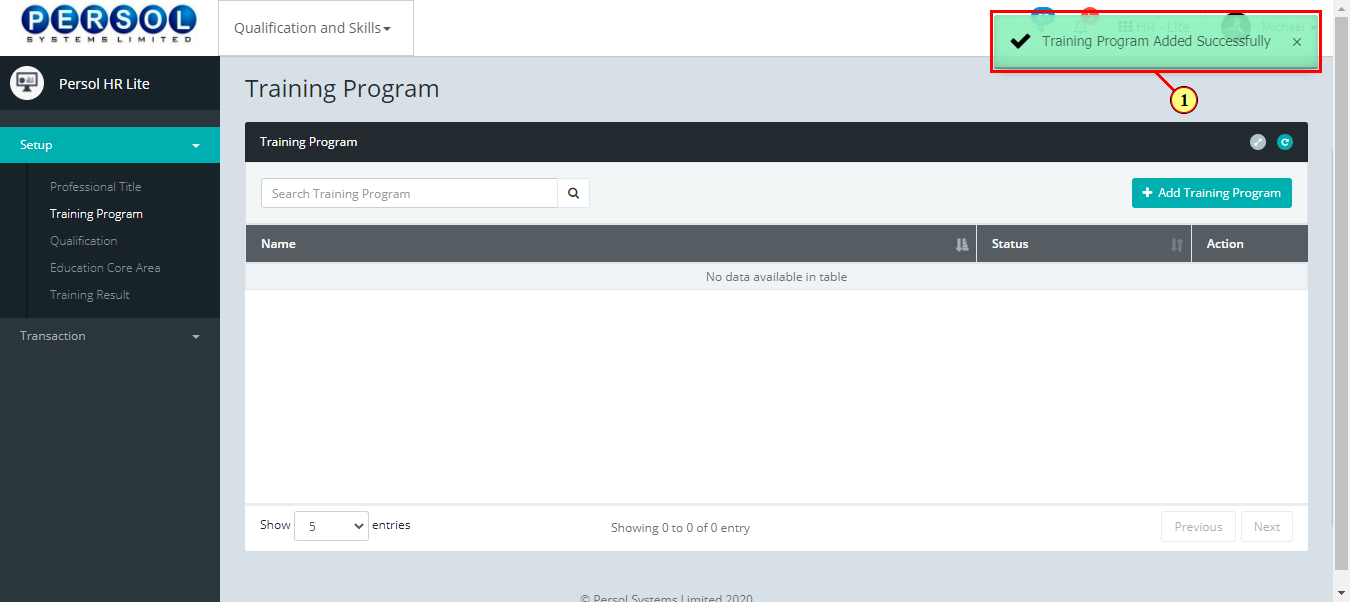
| (1) | A notification displays to indicate that the training program setup has been saved successfully |
| Step | Action |
|---|---|
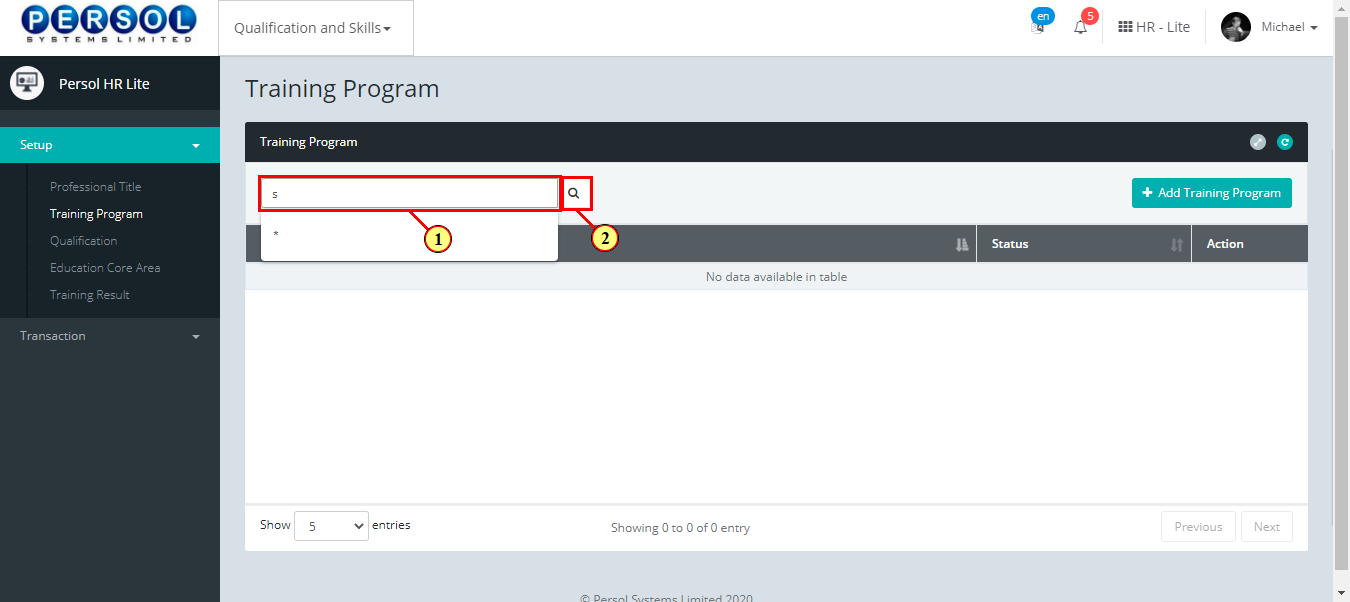
| (1) | To edit a training program, enter name in the search box |
| (2) |
Click on the  icon to search icon to search
|
| Step | Action |
|---|---|
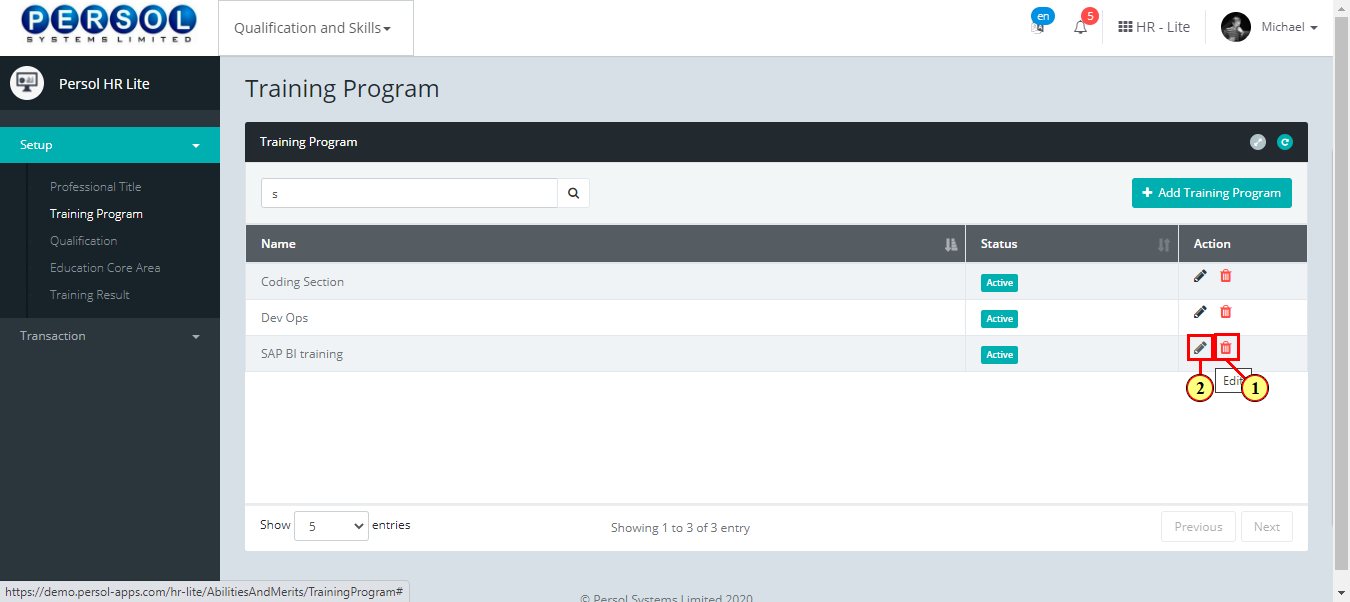
| The search result details display in the grid | |
|
The Action column consists of the Delete and Edit  action icons action icons
|
| Step | Action |
|---|---|
|
You may click on the delete icon to delete the training program
|
| (1) |
Click on the edit icon to edit the training program
|
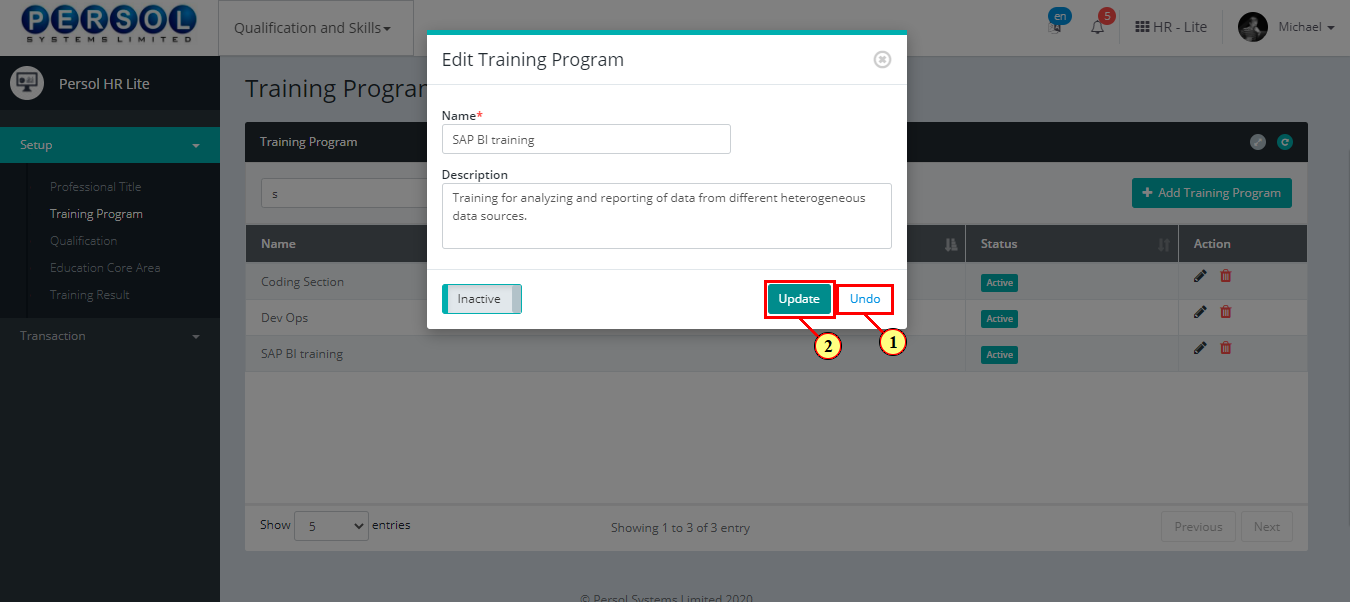
| Step | Action |
|---|---|
| The ‘Edit Training Program’ modal opens | |
| Edit the name, description or status of the training program |
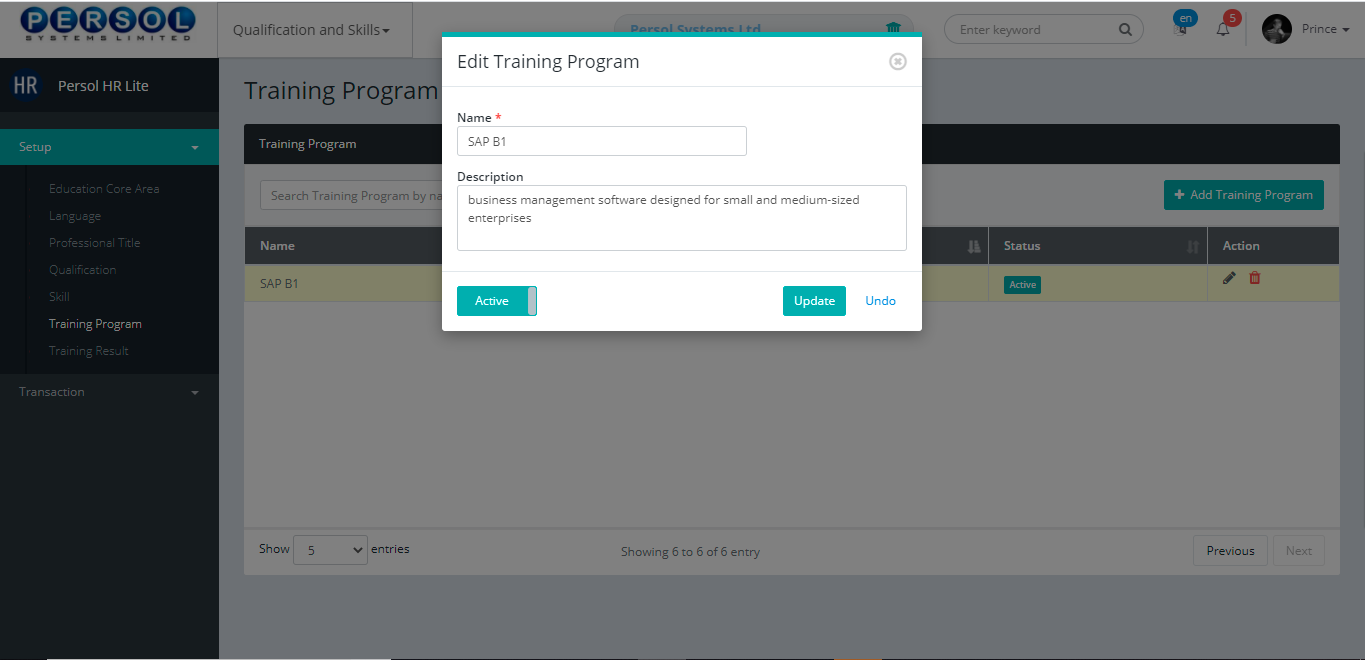
| Step | Action |
|---|---|
|
You may click on the  button to revert changes made button to revert changes made
|
| (1) |
Click on the update  button to save the changes made button to save the changes made
|
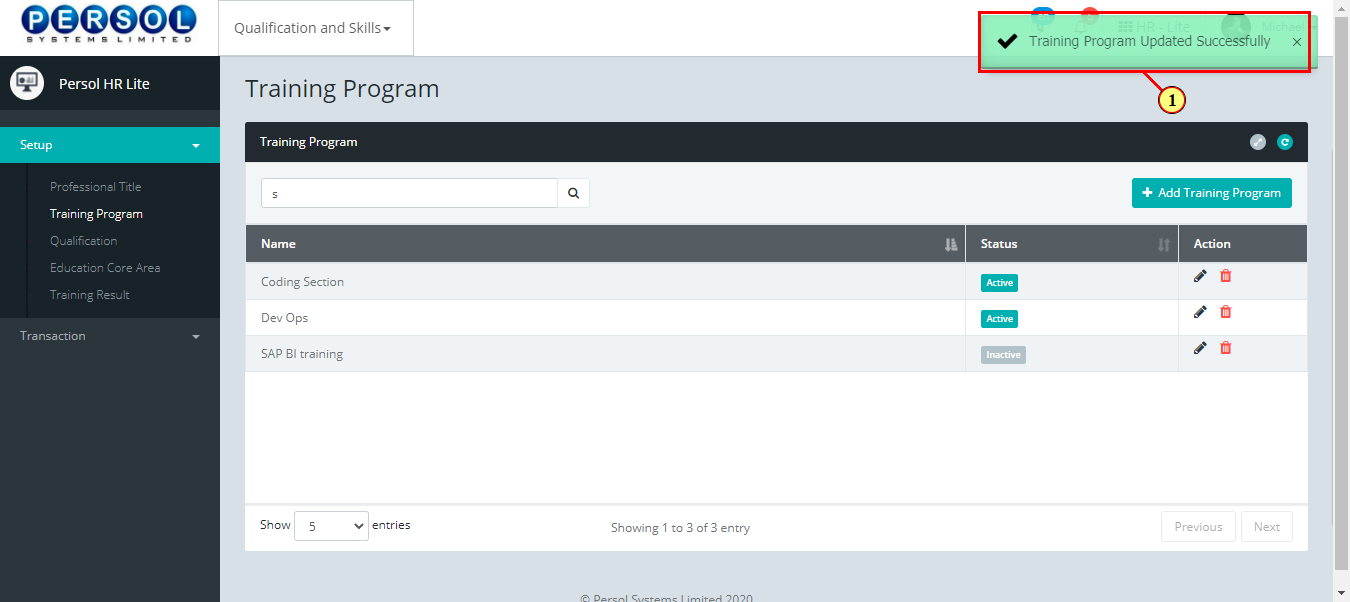
| Step | Action |
|---|---|
| (1) | A notification displays to indicate that the update has been saved successfully |
| Step | Action |
|---|---|
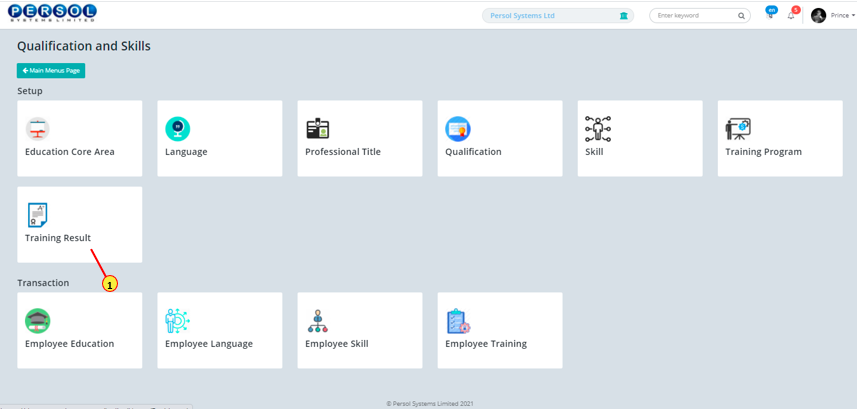
| (1) | On the Personax HR Litee homepage, select the 'Qualification and Skills' tile |

| Step | Action |
|---|---|
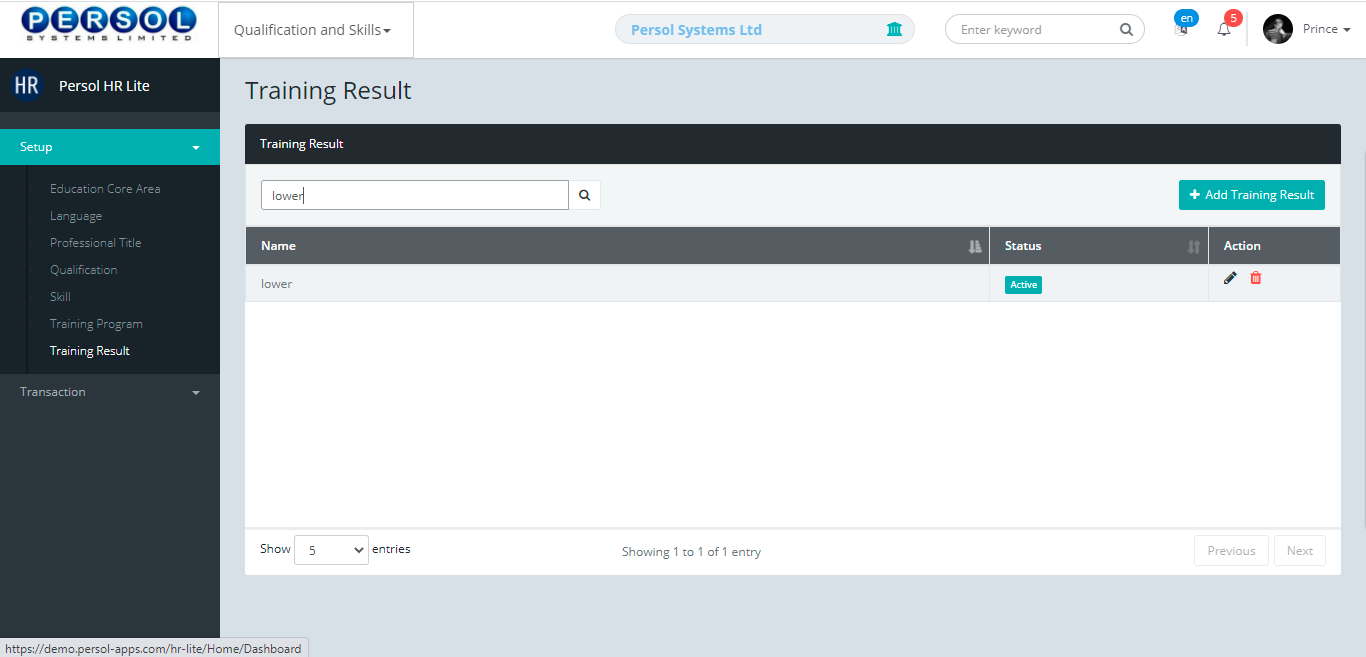
| The ‘Training Result’ submenus page opens | |
| (1) | Select the ‘Training Result’ tile |
| Step | Action |
|---|---|
| The ‘Training Result’ page opens | |
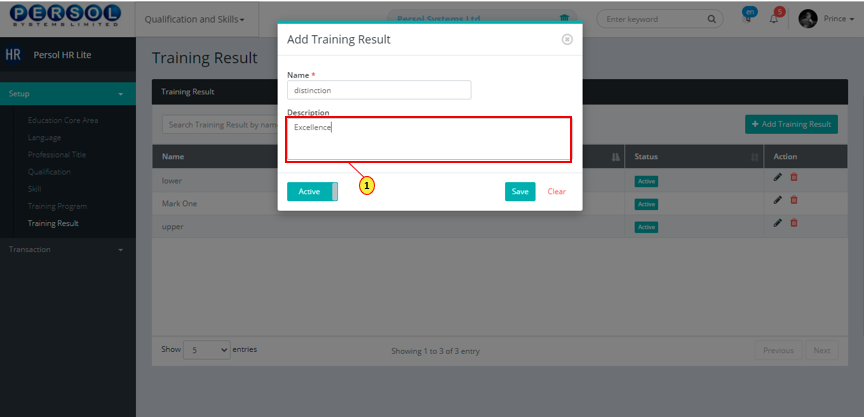
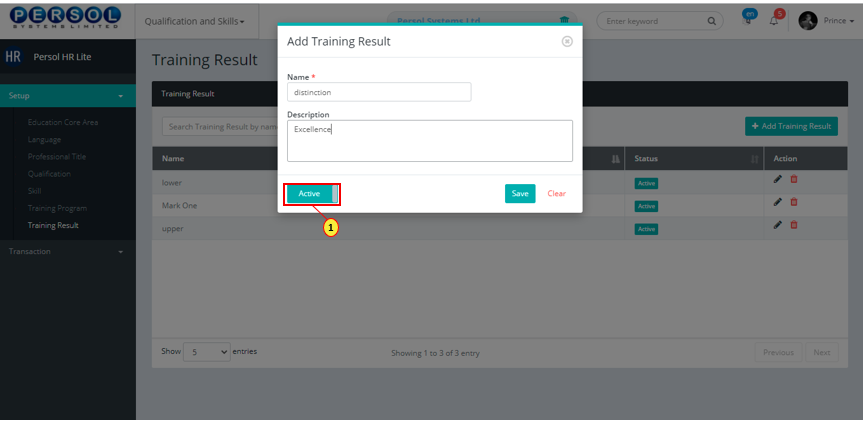
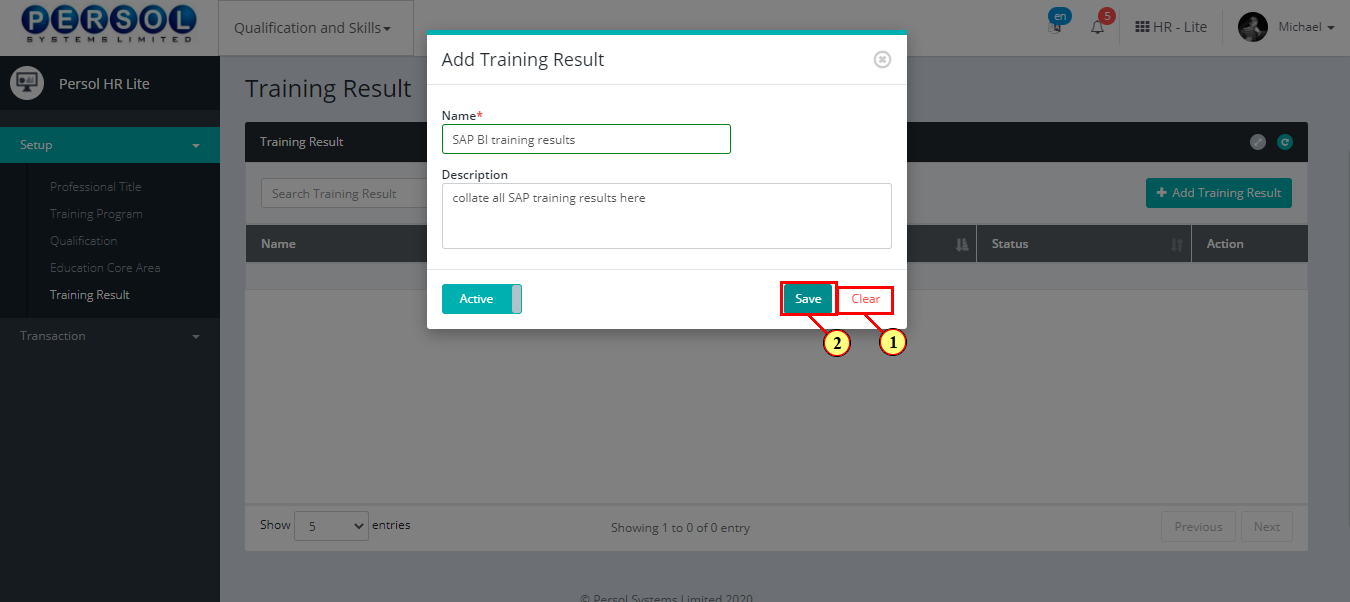
| (1) |
To setup a training result, click on the  button button
|

| Step | Action |
|---|---|
| The ‘Add Training Result’ modal opens | |
| (1) | Enter name of the training result |
|
This field is required * |

| Step | Action |
|---|---|
| (1) | Add description to provide more details on the training result |
| Step | Action |
|---|---|
| (1) |
You may click on the  button to change status of the training resultto inactive button to change status of the training resultto inactive
|
|
- An active status means the training result can be used in transactions on other pages - An inactive status means the training result cannot be used in transactions on other pages |
| Step | Action |
|---|---|
|
You may click on the  button to clear all details entered button to clear all details entered
|
| (1) |
Click on the  button to save the newly added training result button to save the newly added training result
|
| Step | Action |
|---|---|
| (1) | A notification displays to indicate that the training result setup has been saved successfully |

| Step | Action |
|---|---|
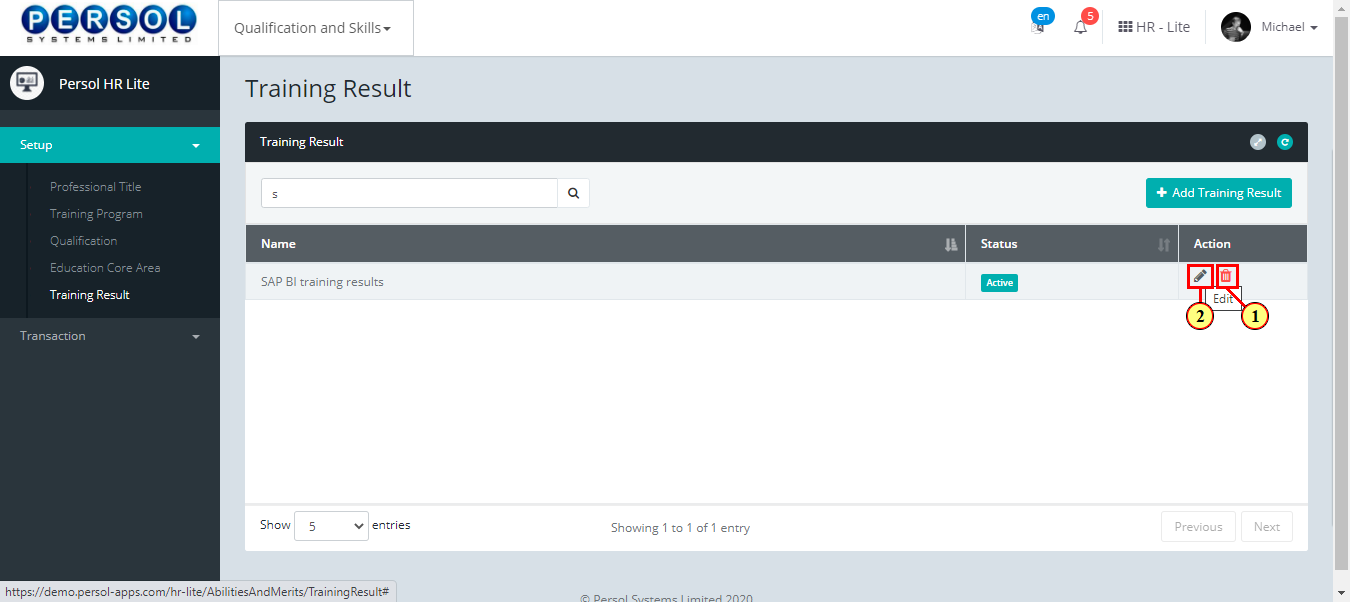
| (1) | To edit a training result, enter name in the search box |
| (2) |
Click on the  icon to search icon to search
|

| Step | Action |
|---|---|
| The search result details display in the grid | |
|
The Action column consists of the Delete  and Edit and Edit  action icons action icons
|
| Step | Action |
|---|---|
|
You may click on the delete icon to delete the training result
|
| (1) |
Click on the edit icon to edit the training result
|
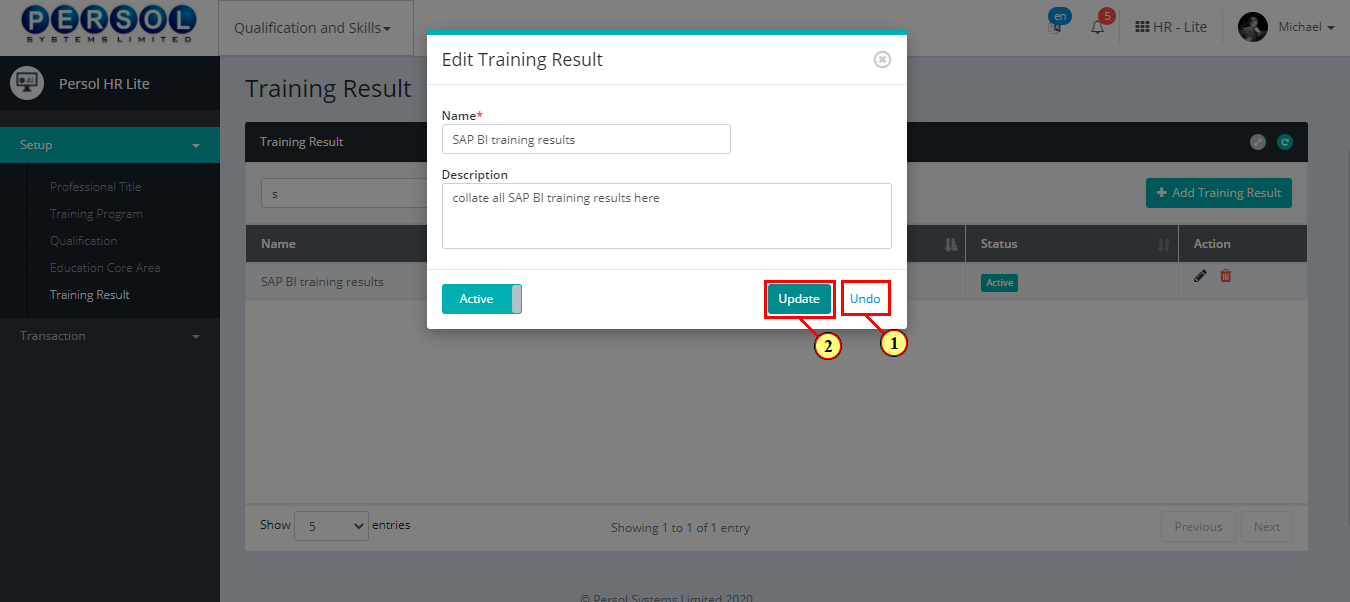
| Step | Action |
|---|---|
|
You may click on the  button to revert changes made button to revert changes made
|
| (1) |
Click on the update  button to save the changes made button to save the changes made
|
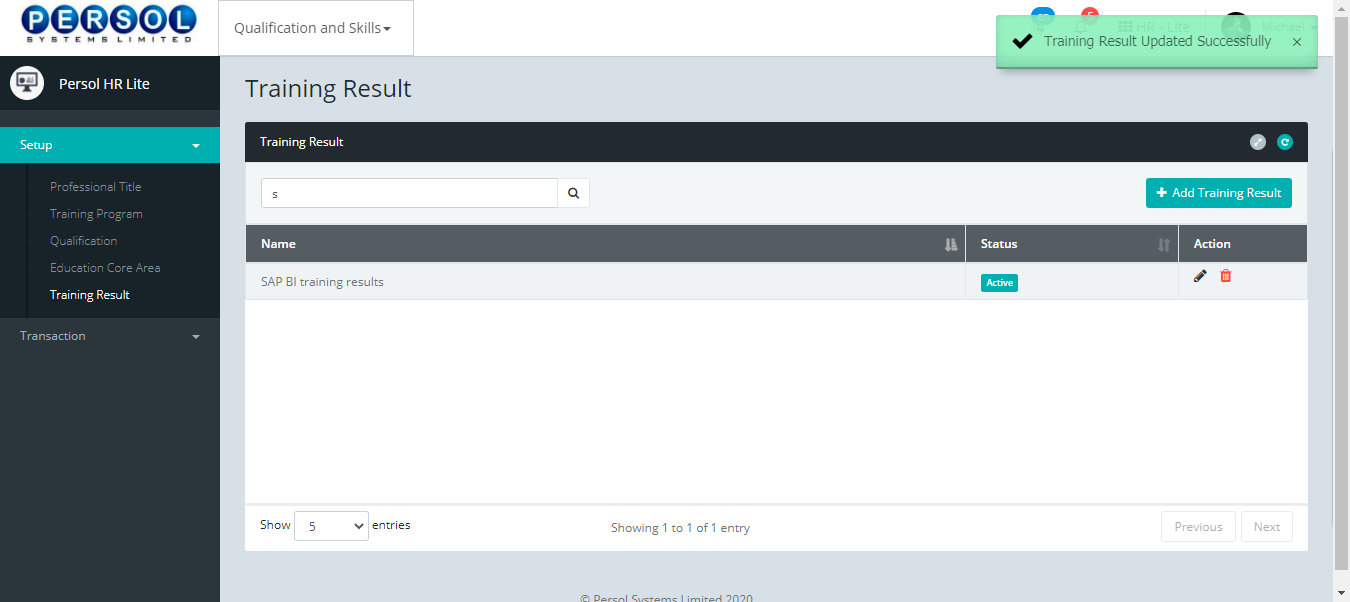
| Step | Action |
|---|---|
| (1) | A notification displays to indicate that the update has been saved successfully |
| Step | Action |
|---|---|
| (1) | On the Personax HR Lite homepage, select the 'Qualification and Skills' tile |

| Step | Action |
|---|---|
| The ‘Qualification & Skills’ submenus page opens | |
| (1) | Select the 'Employee Education’ tile |
| Step | Action |
|---|---|
| The ‘Employee Education’ page opens | |
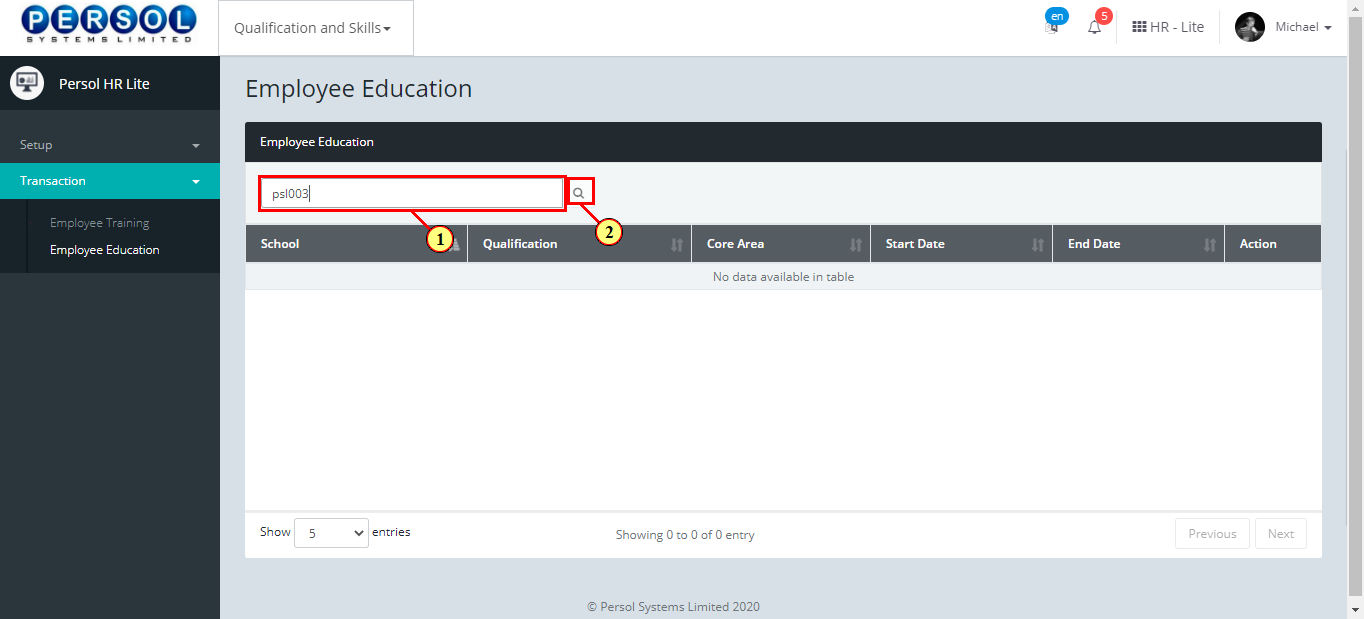
| (1) | To add an employee’s educational details, enter the employee’s name or ID in the search box |
| (2) |
Click on the  icon to search for employee icon to search for employee
|
| Step | Action |
|---|---|
|
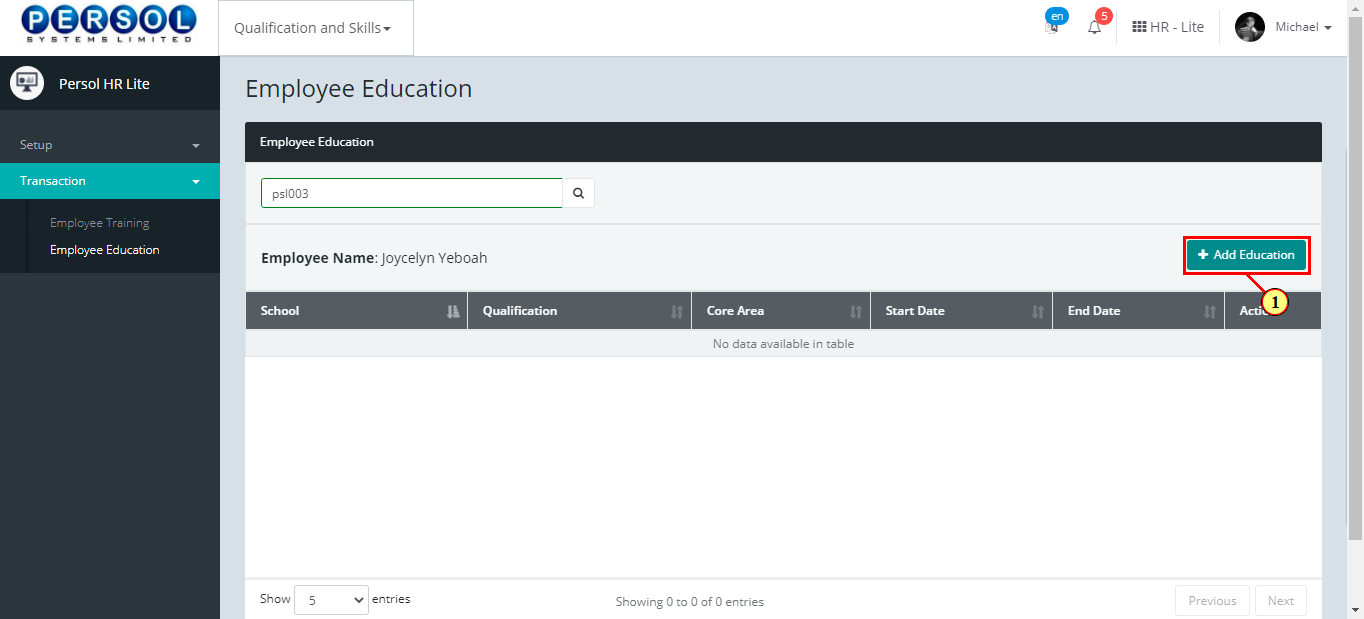
The employee's name and previous educational records (if any) display in the grid |
| (1) |
Click on the  button to add new education details to employee’s record button to add new education details to employee’s record
|
| Step | Action |
|---|---|
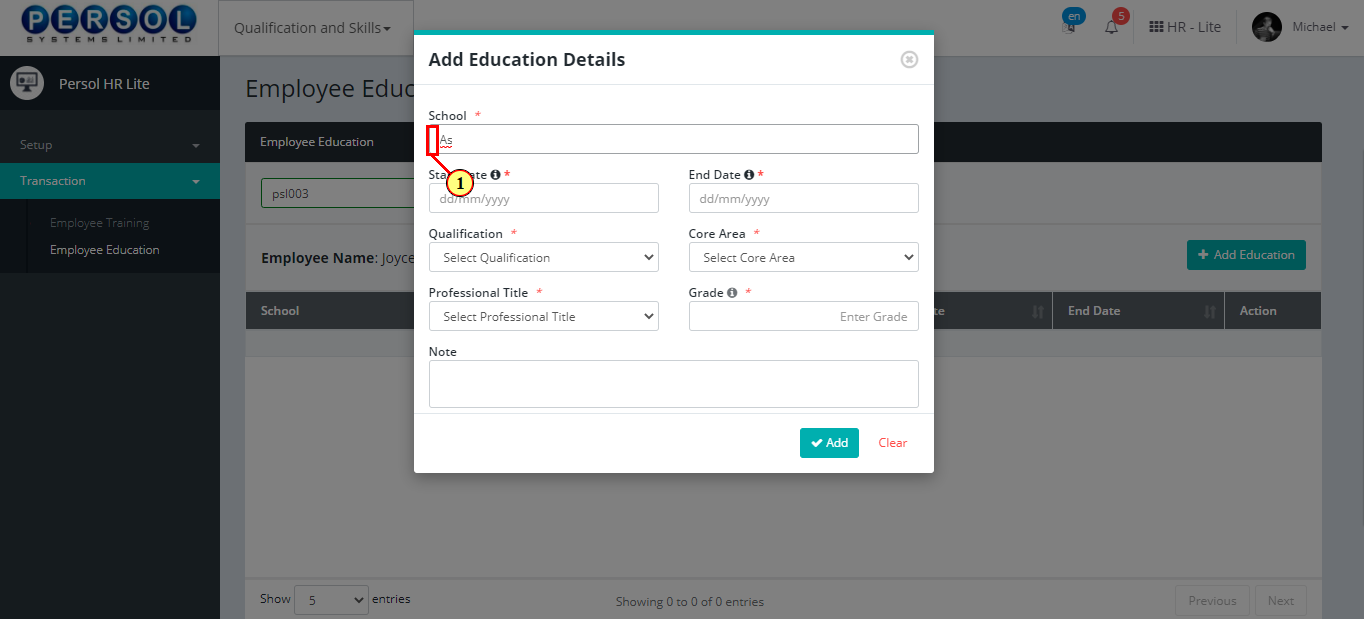
| The 'Add Education Details' modal opens | |
| (1) | Enter name of the school |
|
This field is required * |
| Step | Action |
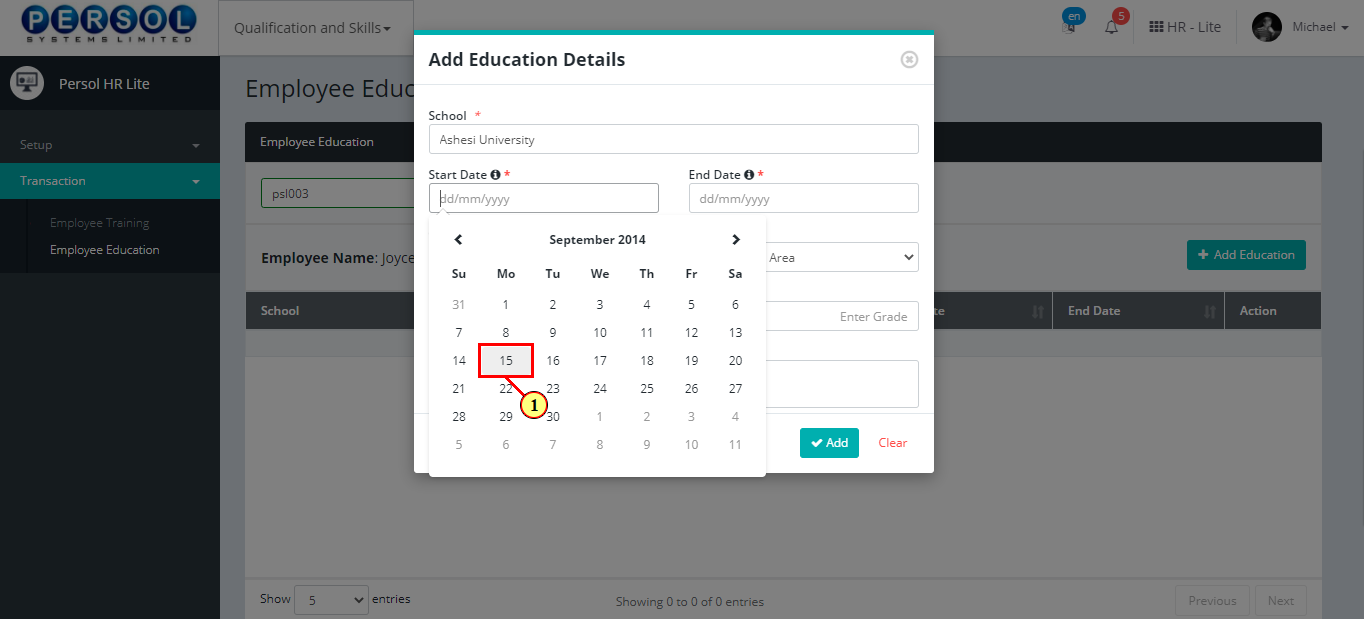
|---|---|
| (1) | Select the start date of education |
|
This field is required * |
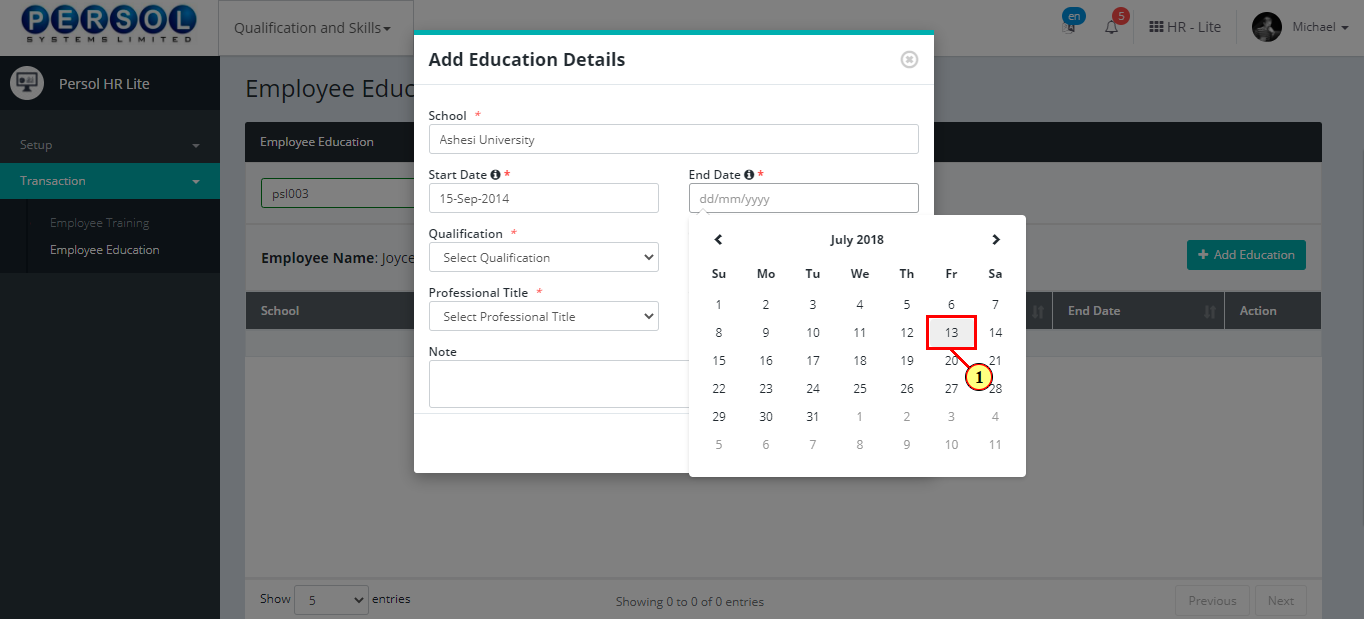
| Step | Action |
|---|---|
| (1) | Select the date of completion of education |
|
This field is required * |
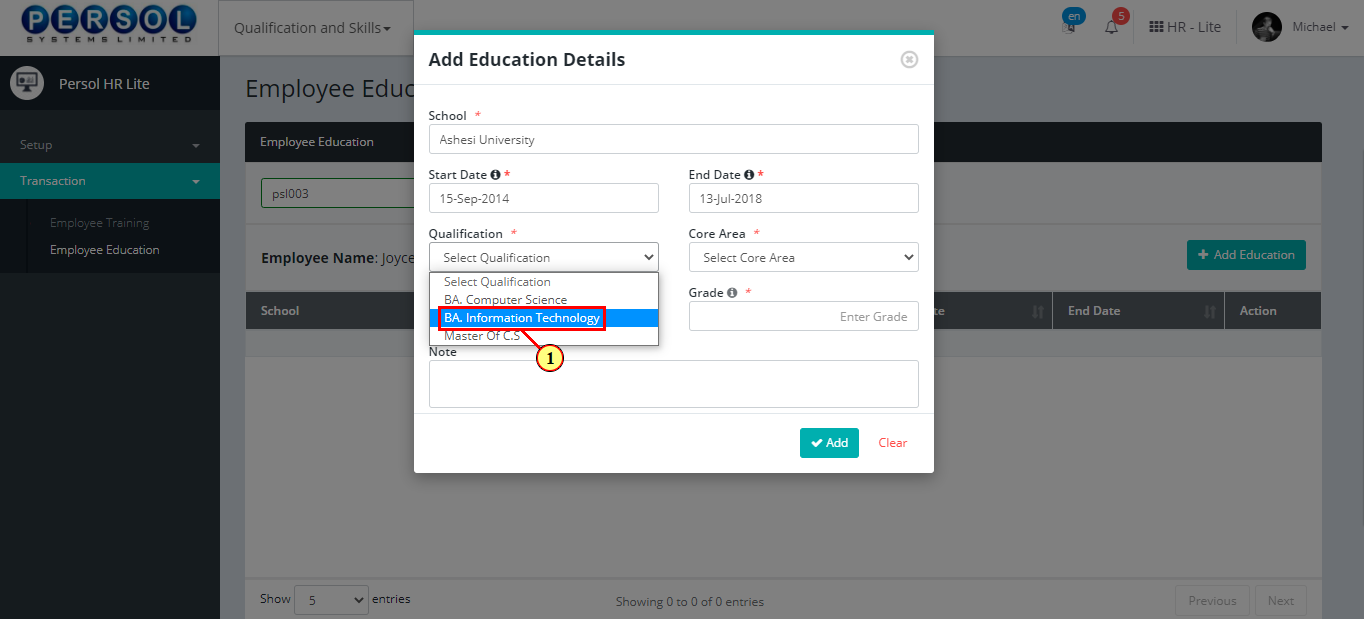
| Step | Action |
|---|---|
| (1) | Select the educational qualification from the dropdown options |
|
This field is required * |
| Step | Action |
|---|---|
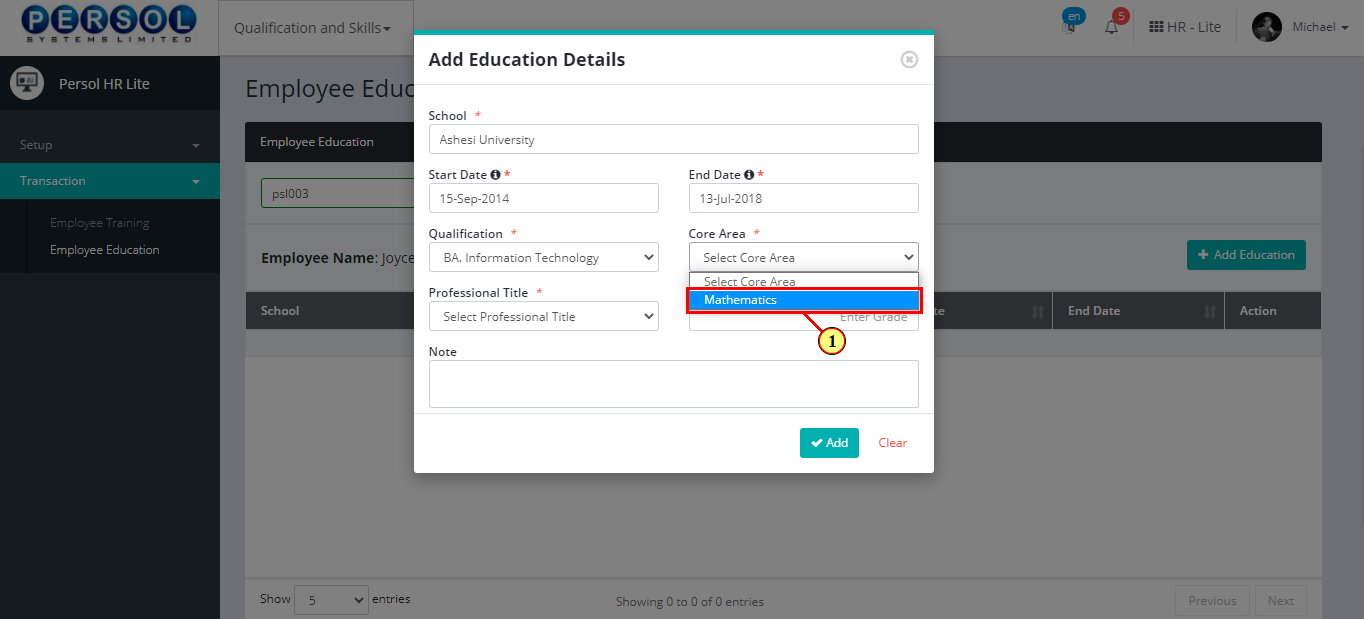
| (1) | Select the core area or subject from the dropdown options |
|
This field is required * |
| Step | Action |
|---|---|
| (1) | Select the employee’s professional title from the dropdown options |
|
This field is required * |

| Step | Action |
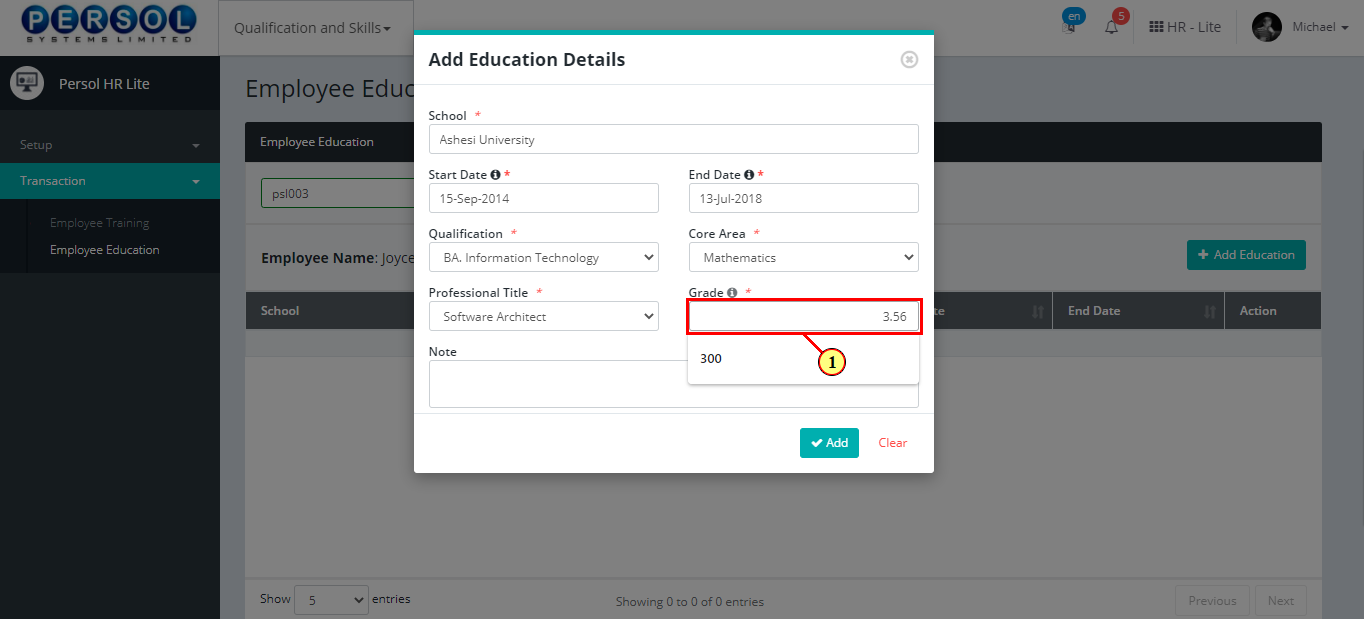
|---|---|
| (1) | Enter final grade or GPA equivalent |
|
This field is required * |
| Step | Action |
|---|---|
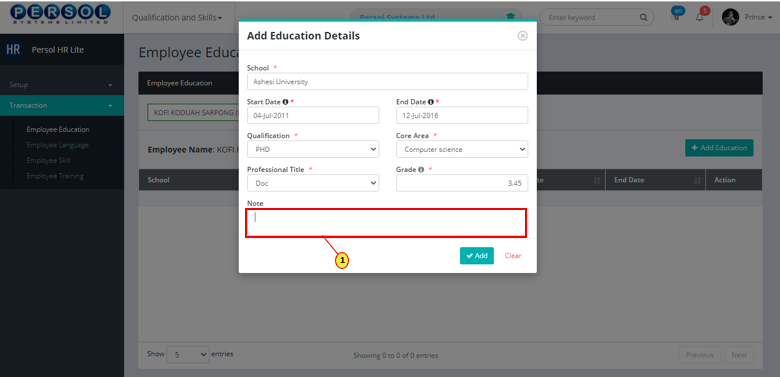
| (1) | Enter any additional info in the Notes section |
| Step | Action |
|---|---|
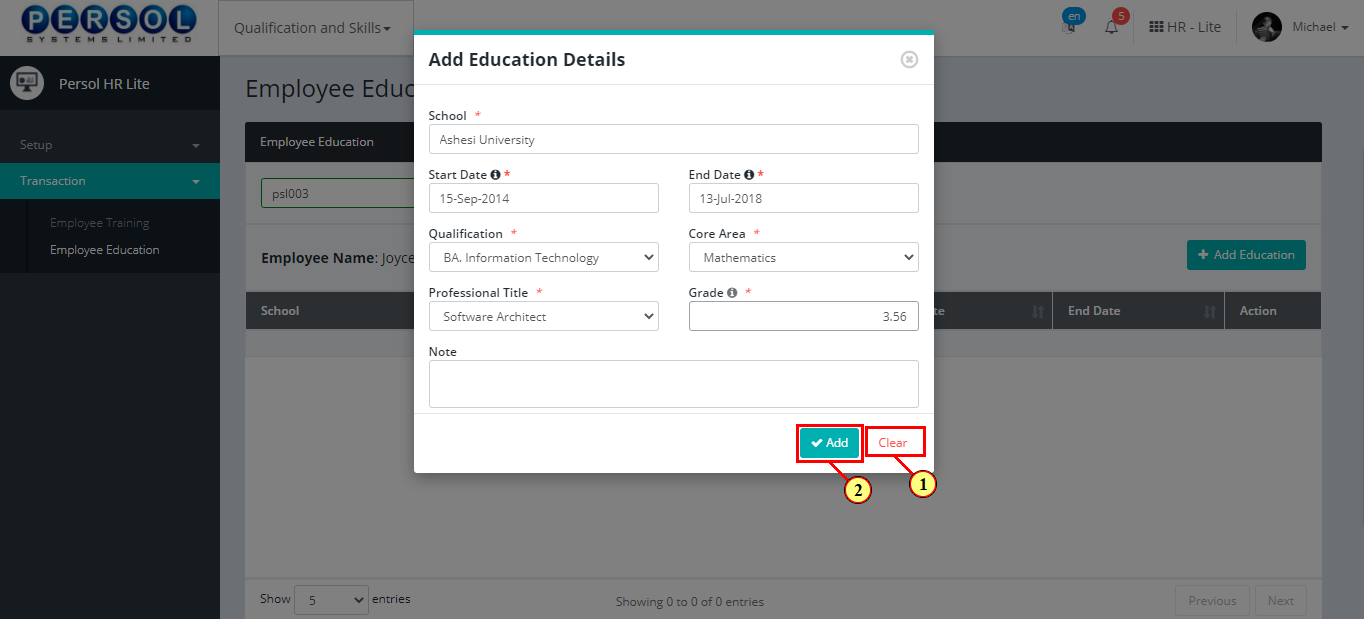
|
You may click on the button to clear all details entered
|
| (1) |
Click on the  button to save the newly added education record button to save the newly added education record
|
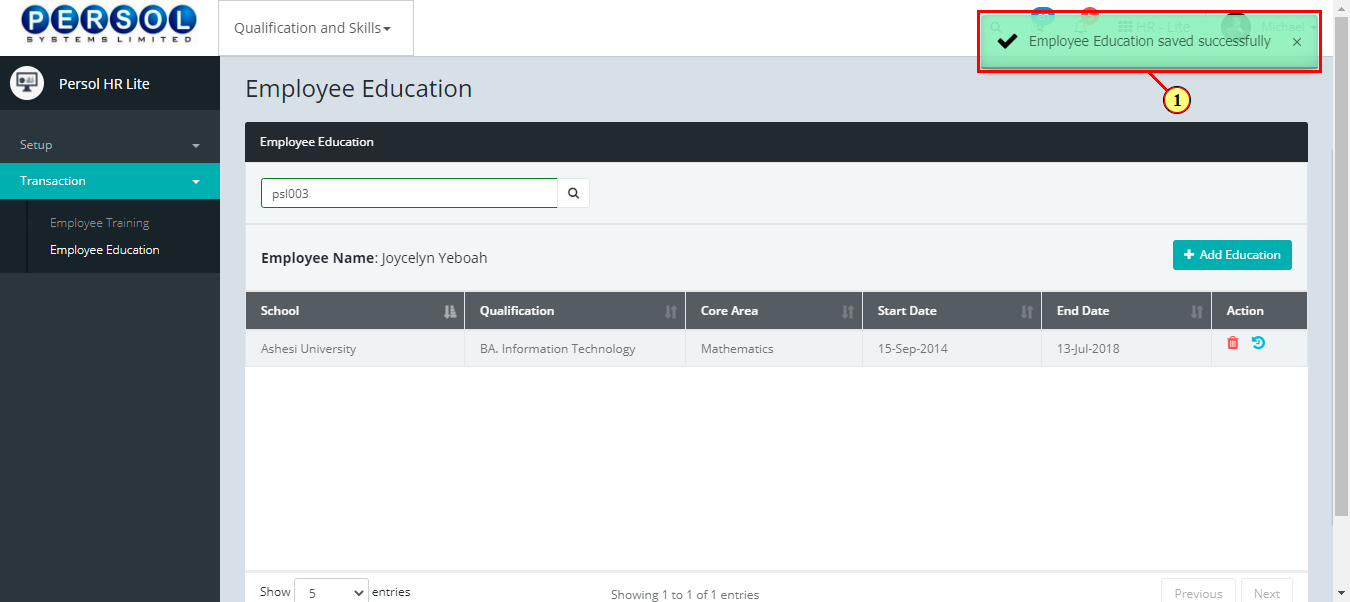
| Step | Action |
|---|---|
| (1) | A notification displays to indicate that the education details have been saved successfully |
|
The newly added educational record displays in the grid |
| Step | Action |
|---|---|
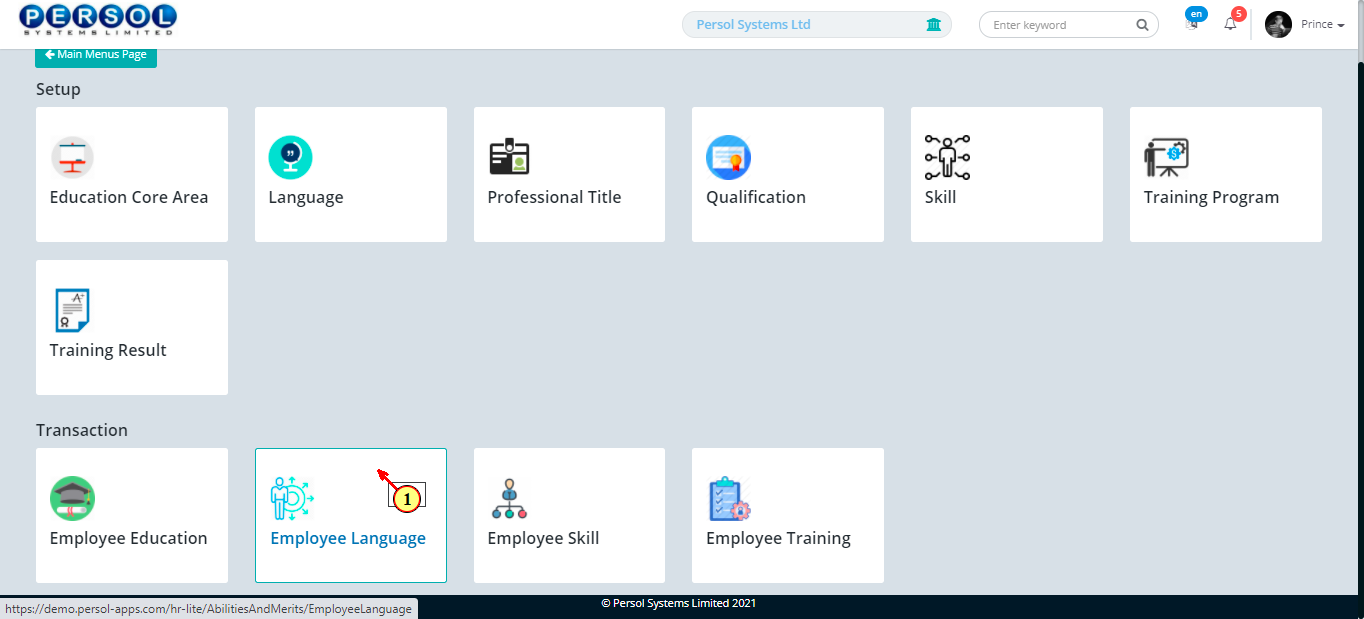
| (1) | On the Personax HR Lite homepage, select the 'Qualification and Skills' tile |

| Step | Action |
|---|---|
| The ‘Qualification & Skills’ submenus page opens | |
| (1) | Select the ‘Employee Language’ tile |
| Step | Action |
|---|---|
| The ‘Employee Language’ page opens | |
| (1) | To add a language to an employee's record, search for employee by name or ID |
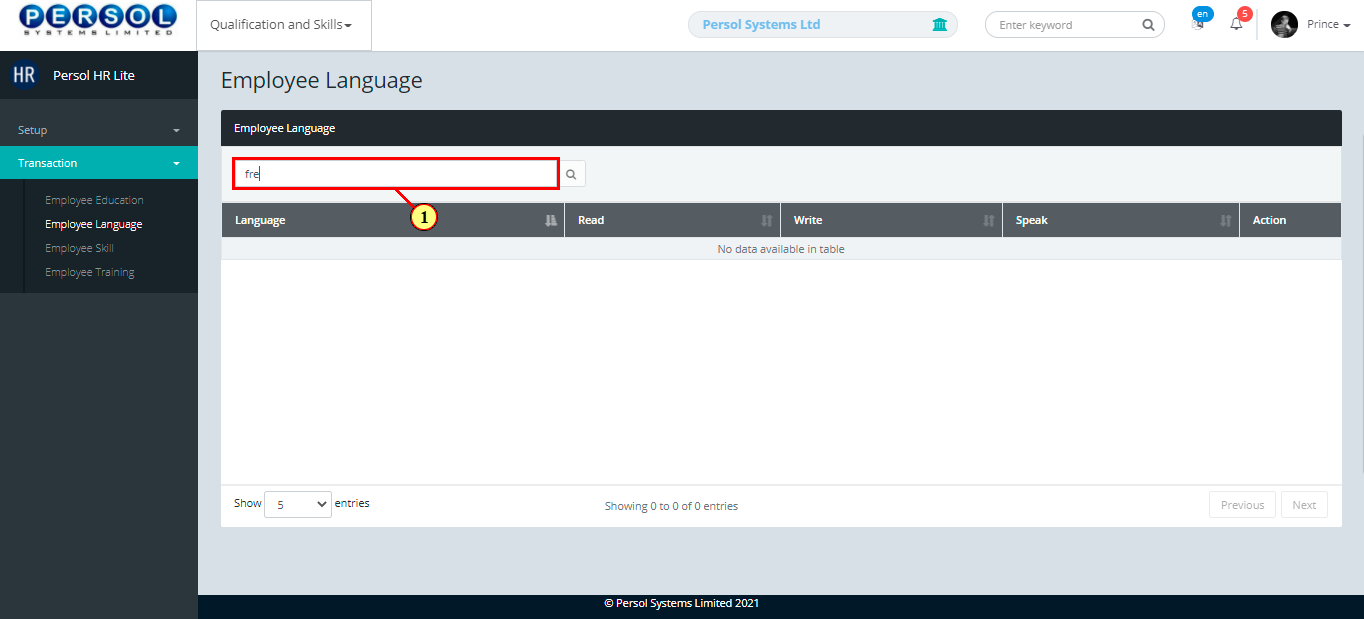
| Step | Action |
|---|---|
|
The employee's name and previous language record(if any) display in the grid |
| (1) |
Click on the  button to add a language to employee's record button to add a language to employee's record
|

| Step | Action |
|---|---|
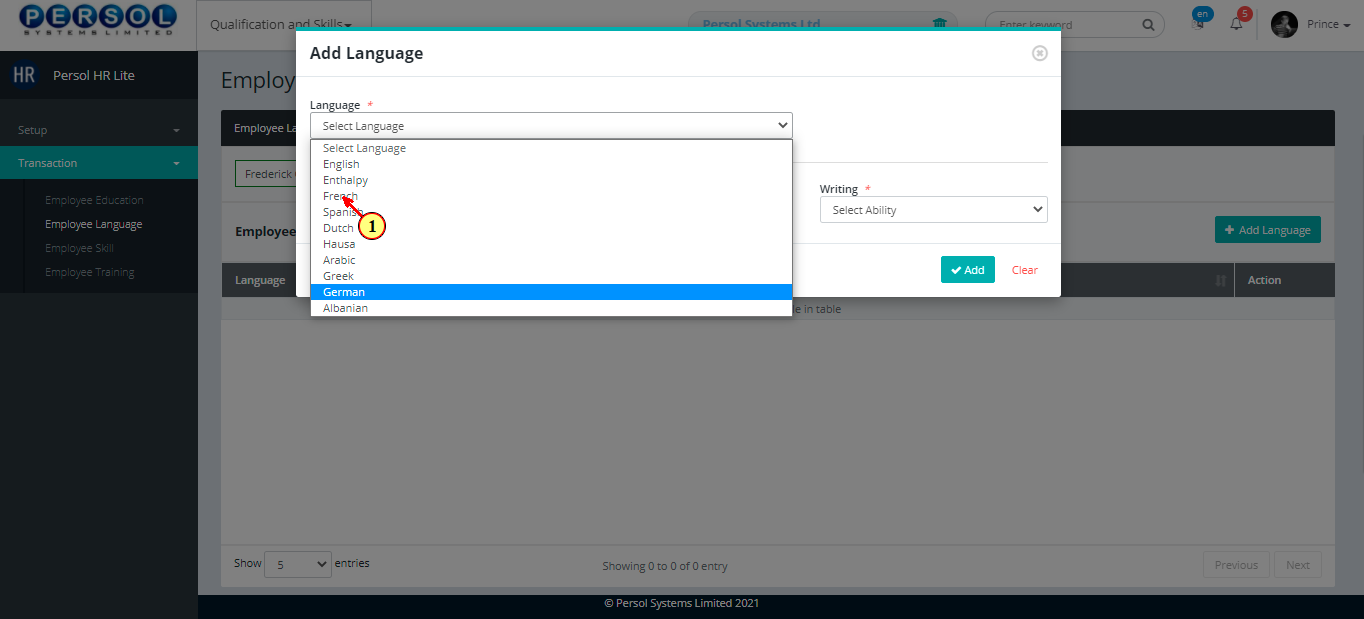
| The 'Add Language' modal opens | |
| (1) | Select a language from the dropdown options |
|
This field is required * |
| Step | Action |
|---|---|
| (1) | Select the employee's reading proficiency for the language |
|
This field is required * |
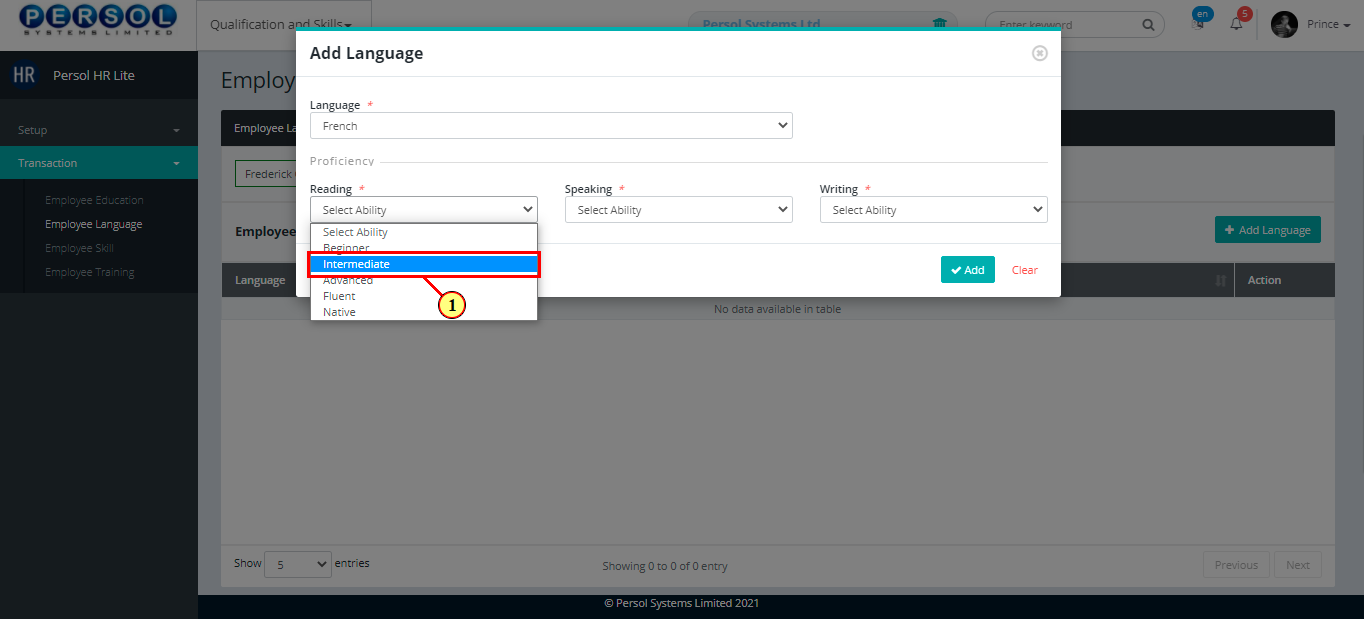
| Step | Action |
|---|---|
| (1) | Select the employee's speaking proficiency for the language |
|
This field is required * |
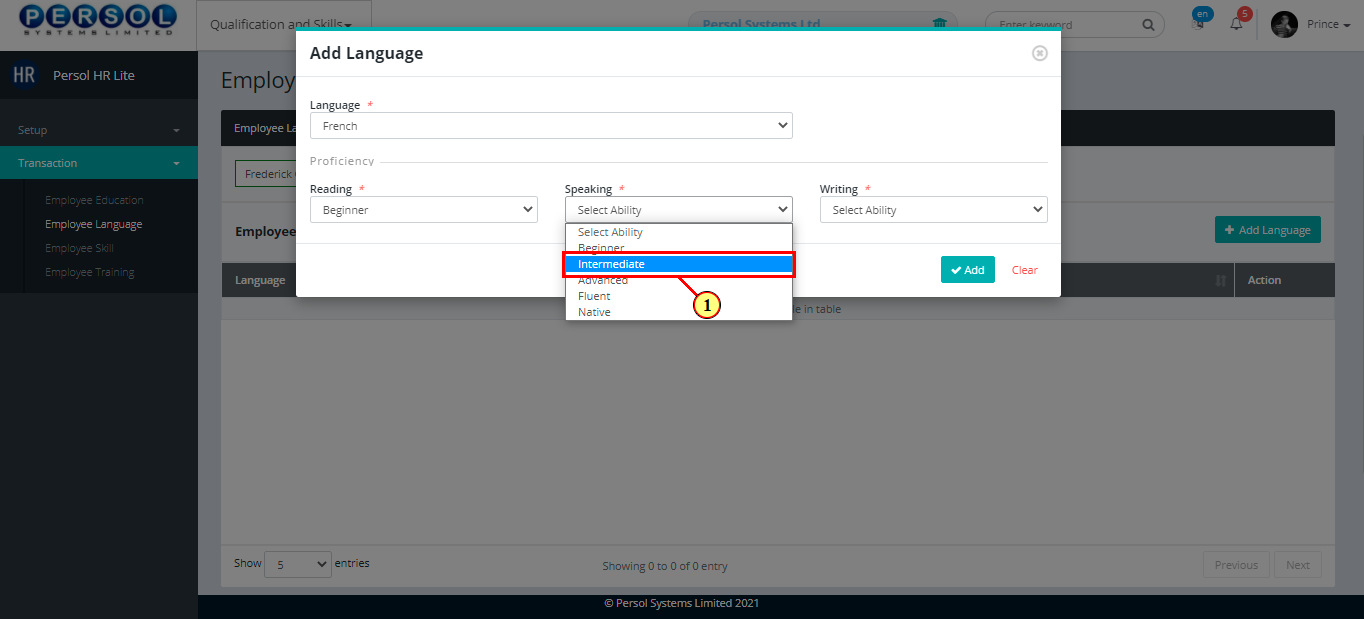
| Step | Action |
|---|---|
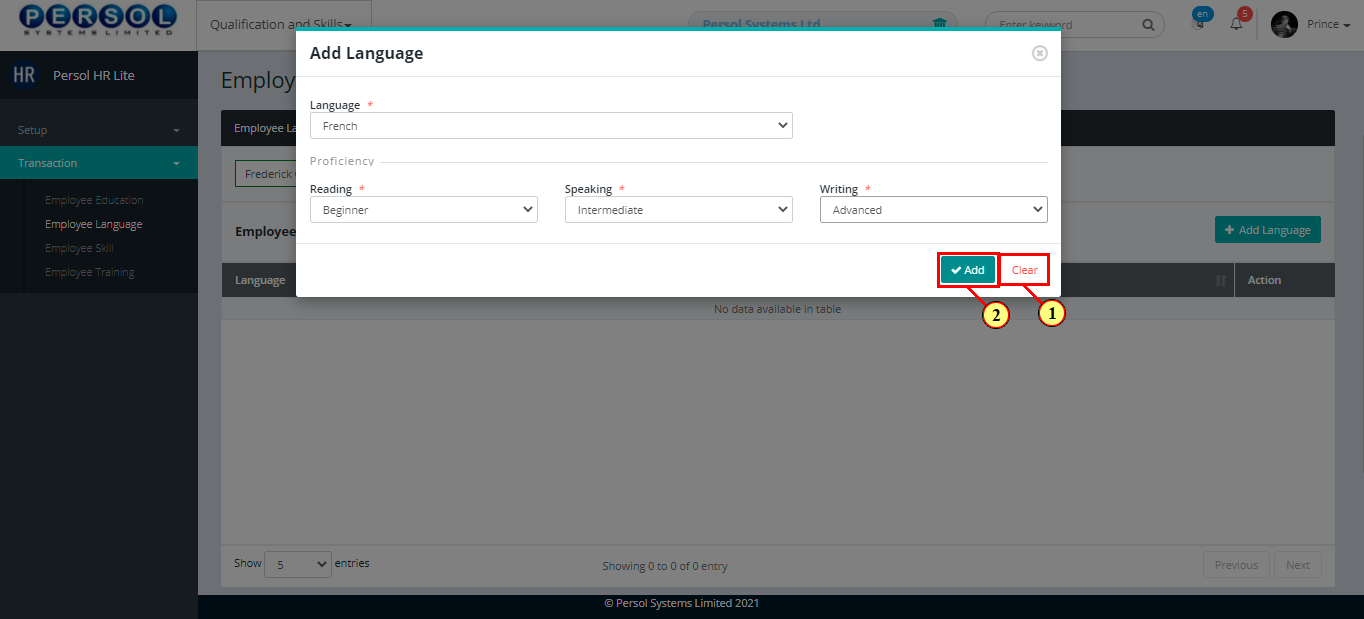
| (1) | Select the employee's writing proficiency for the language |
|
This field is required * |

| Step | Action |
|---|---|
|
You may click on the |
| (1) |
Click on the  button to save language to employee's record button to save language to employee's record
|
| Step | Action |
|---|---|
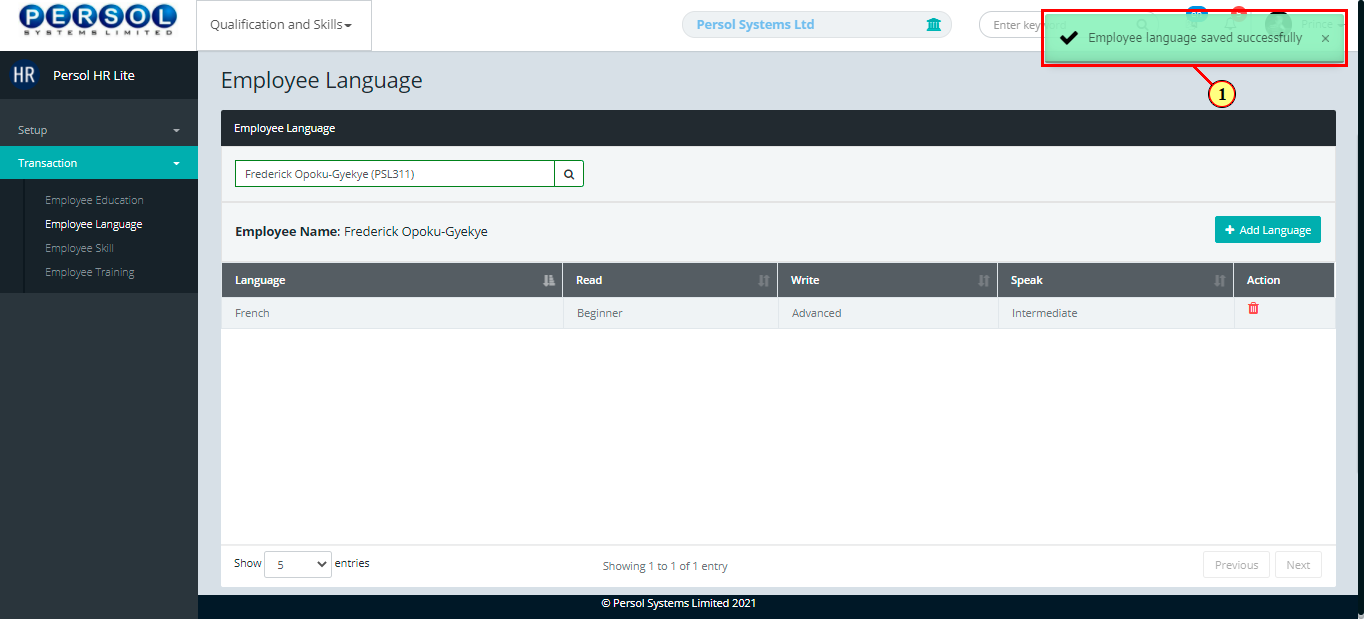
| (1) | A notification displays to indicate that the employee language has been saved successfully |
| Step | Action |
|---|---|
| The newly added language displays in the grid | |
| (1) |
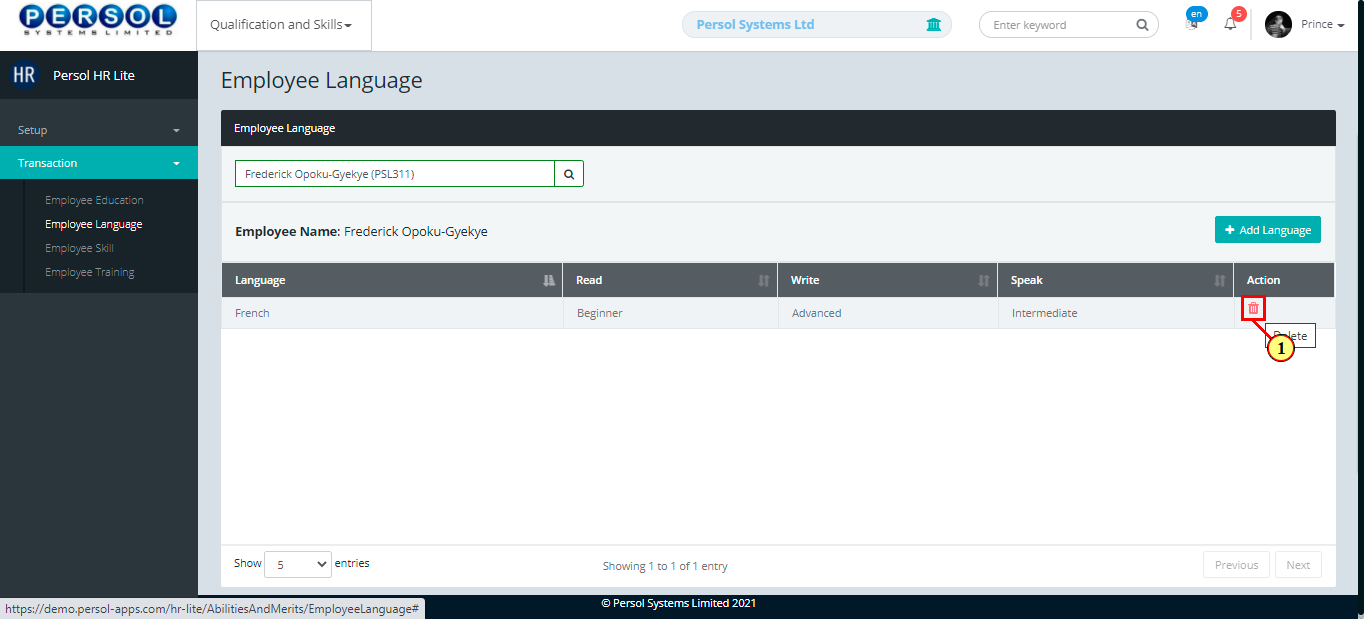
You may click on the delete icon  to delete a language from an employee’s record to delete a language from an employee’s record
|
| Step | Action |
|---|---|
| (1) | On the Personax HR Lite homepage, select the 'Qualification and Skills' tile |

| Step | Action |
|---|---|
| The ‘Qualification & Skills’ submenus page opens | |
| (1) | Select the ‘Employee Skill' tile |
| Step | Action |
|---|---|
| The ‘Employee Skill’ page opens | |
| (1) | To record an employee's skill, search for employee by name or ID |
| Step | Action |
|---|---|
| The employee's name and previously added skill (if any) display in the grid | |
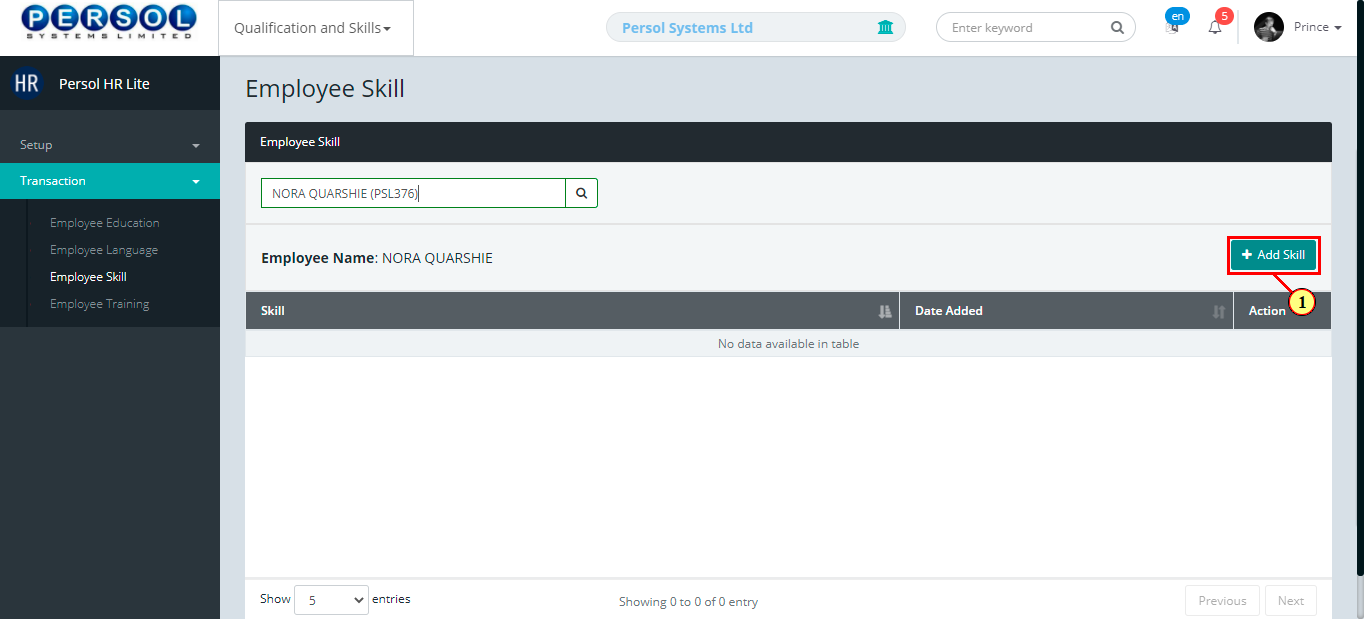
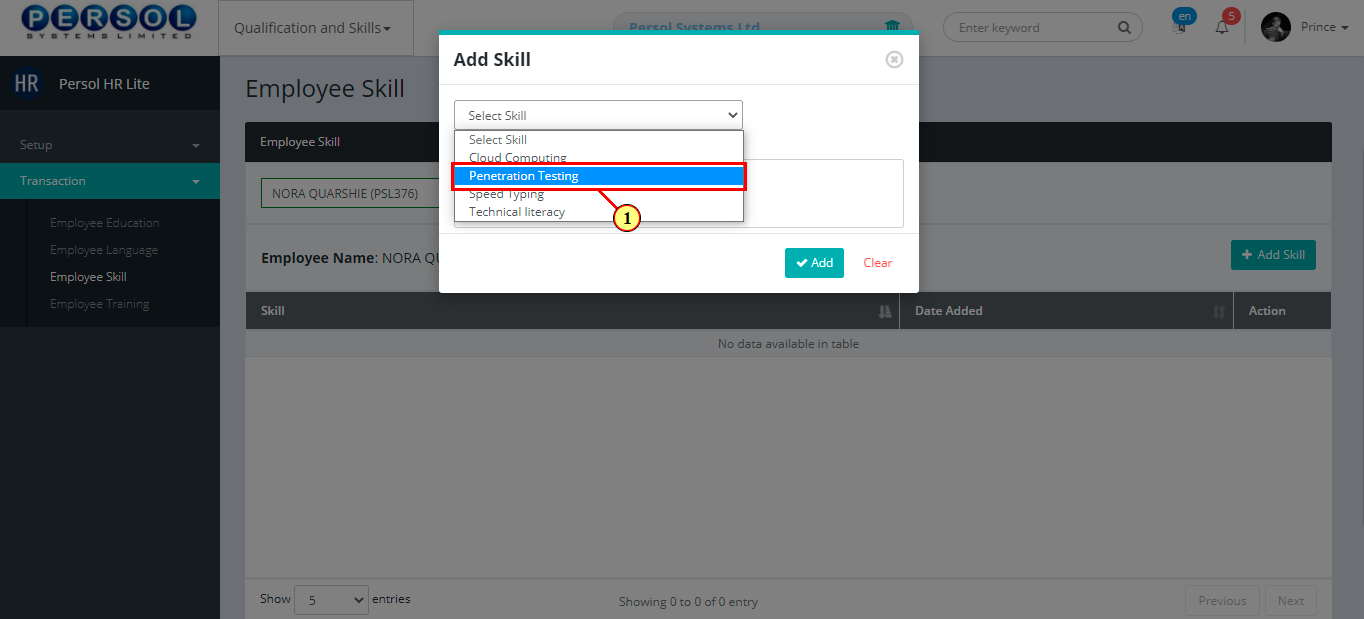
| (1) |
Click on the  button to add a new skill to the employee’s record button to add a new skill to the employee’s record
|
| Step | Action |
|---|---|
| The 'Add Skill' modal opens | |
| (1) | Select a skill from the dropdown options |
| Step | Action |
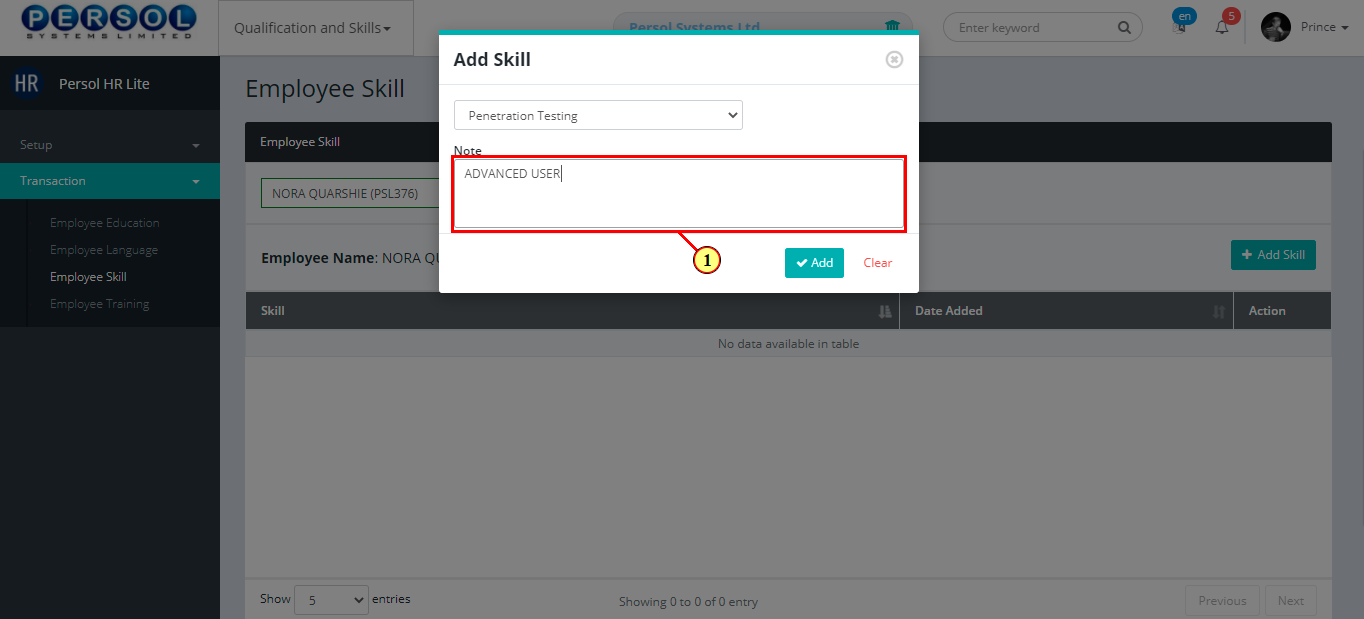
|---|---|
| (1) | Enter any additional information on the skill in the 'Notes' section |
| Step | Action |
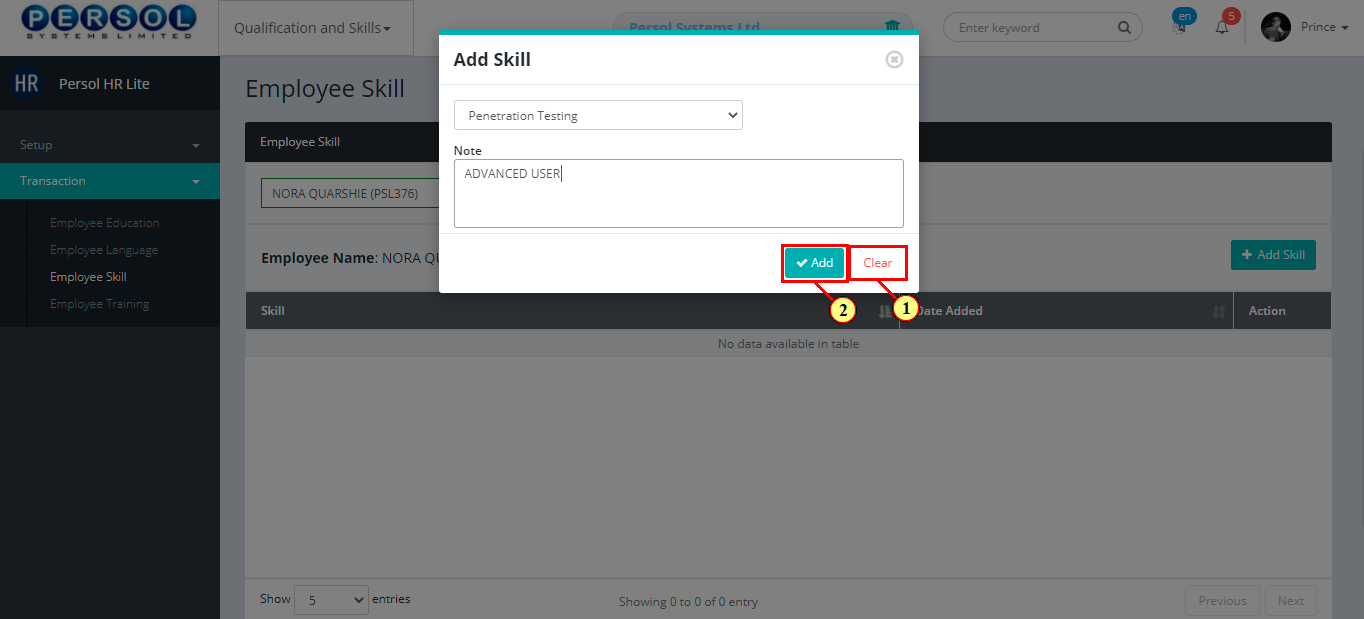
|---|---|
|
You may click on the  button to clear all details entered button to clear all details entered
|
| (1) |
Click on the  button to save the newly added employee skill button to save the newly added employee skill
|
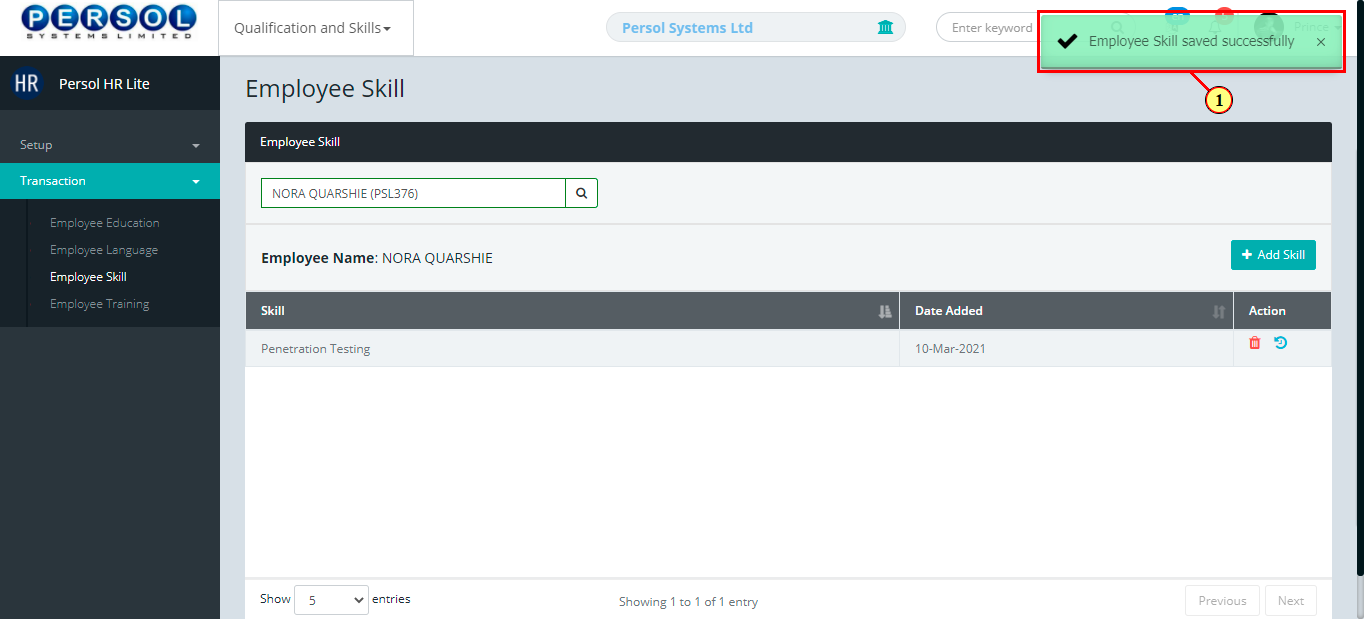
| Step | Action |
|---|---|
| (1) | A notification displays to indicate that the employee skill has been saved successfully |
|
The newly added employee skill displays in the grid |
| Step | Action |
|---|---|
| (1) |
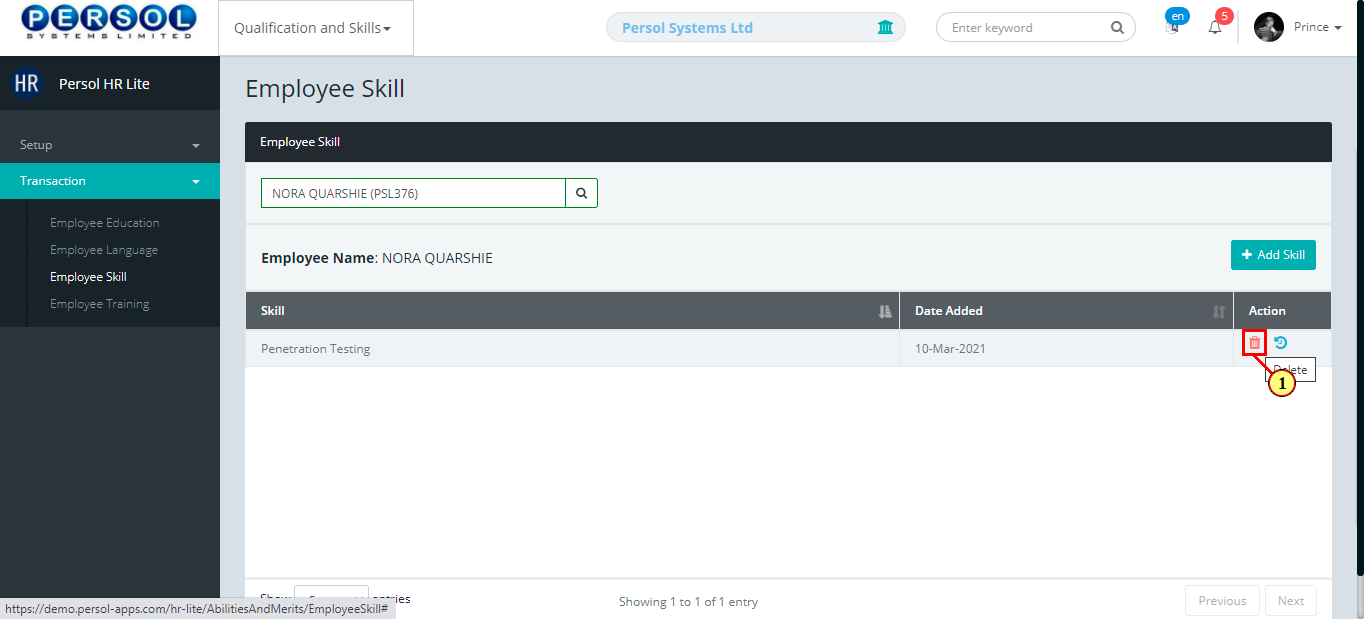
You may click on the delete icon  to delete a skill to delete a skill
|
| Step | Action |
|---|---|
| (1) | On the Personax HR Lite homepage, select the 'Qualification and Skills' tile |
| Step | Action |
|---|---|
| The ‘Qualification & Skills’ submenus page opens | |
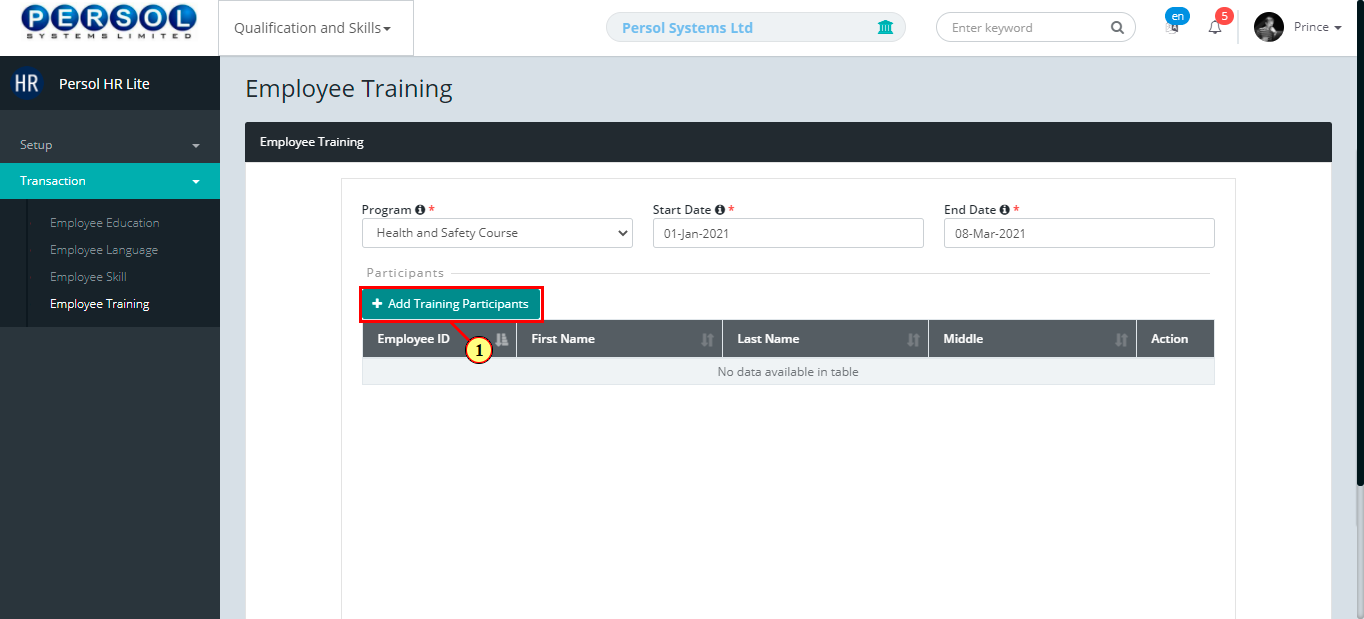
| (1) | Select the ‘Employee Training’ tile |

| Step | Action |
|---|---|
| The ‘Employee Training’ page opens | |
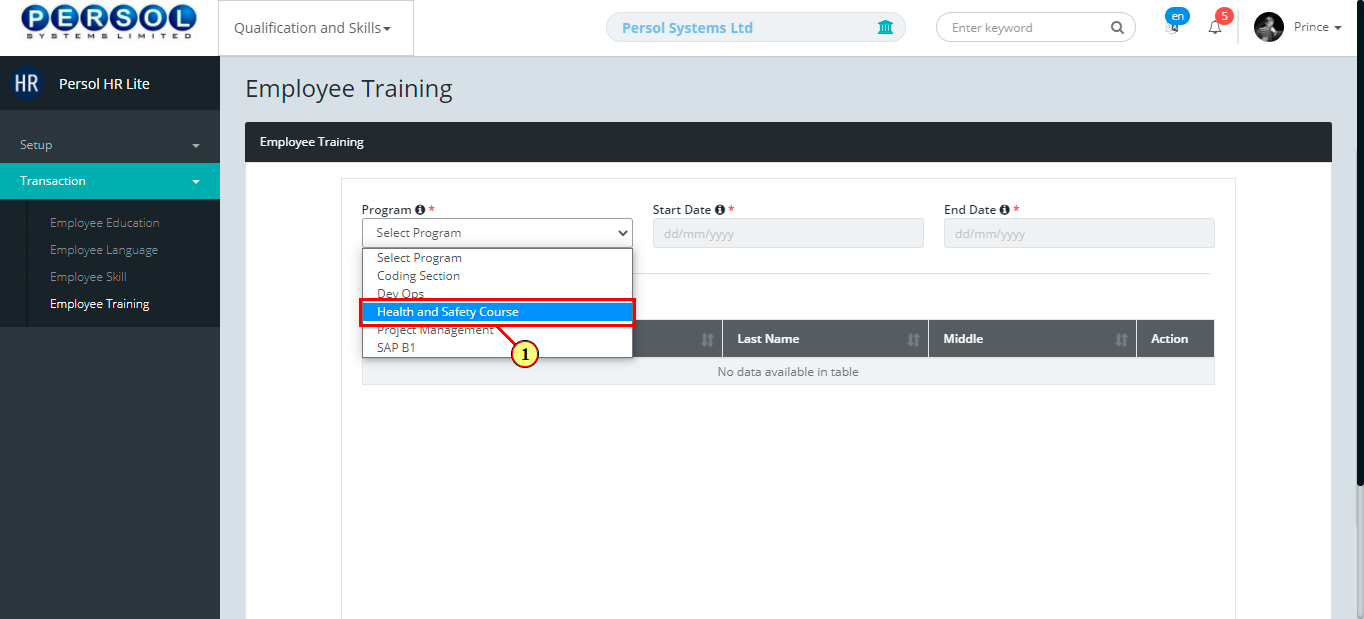
| (1) | To add employees to a training program, select the training program from the dropdown options |
|
This field is required * |
| Step | Action |
|---|---|
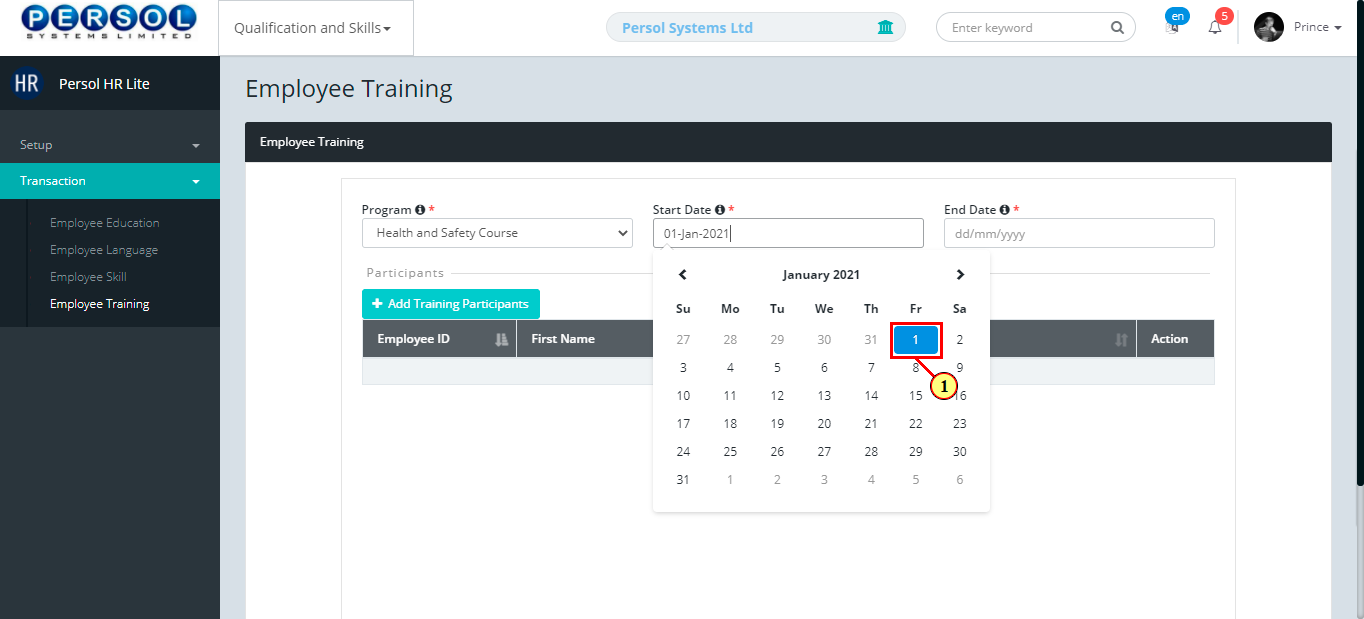
| (1) | Select the training start date from the calendar |
|
This field is required * |
| Step | Action |
|---|---|
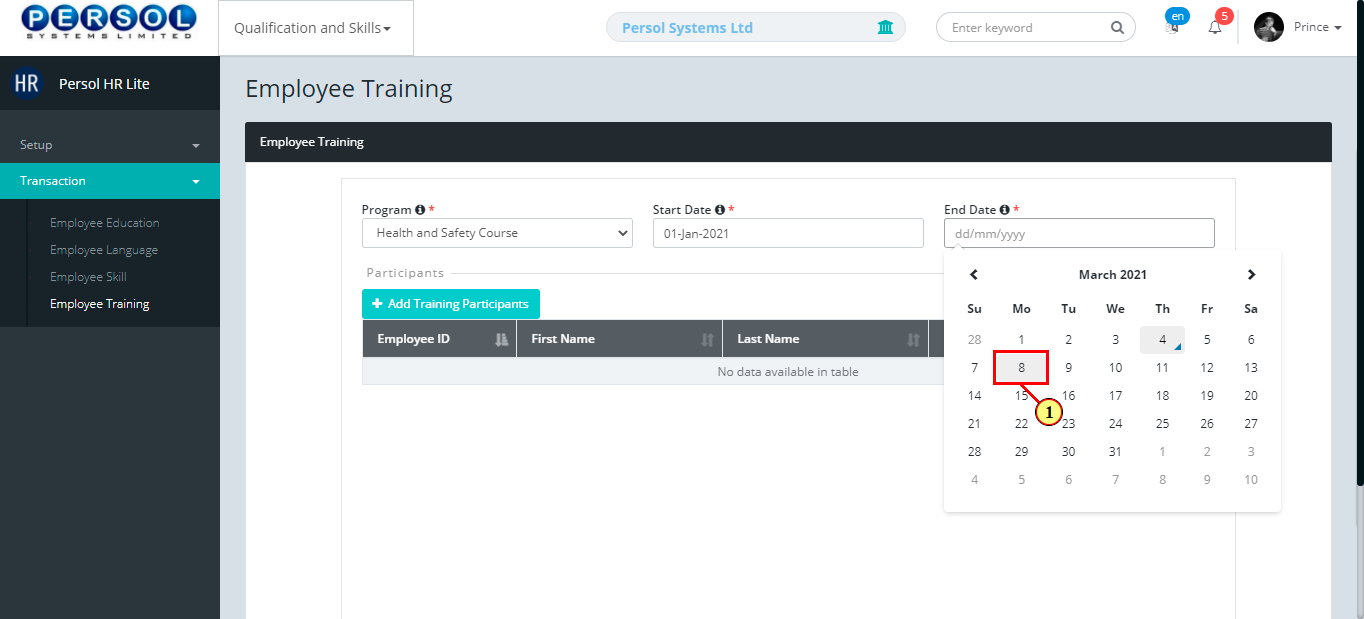
| (1) | Select the end date of the training program |
|
This field is required * |
| Step | Action |
|---|---|
| (1) |
Click on the  button to add participants to the training button to add participants to the training
|
| Step | Action |
|---|---|
| A modal opens to add training participant | |
| (1) | Search for employee by name or ID |
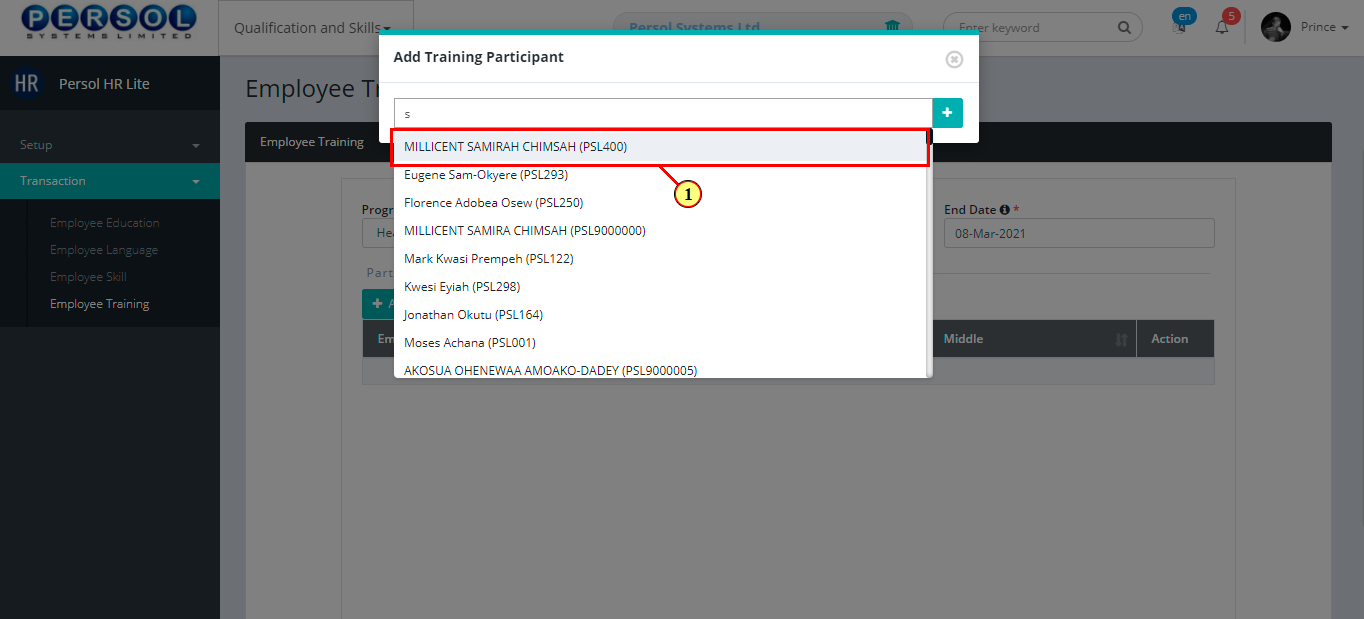
| Step | Action |
|---|---|
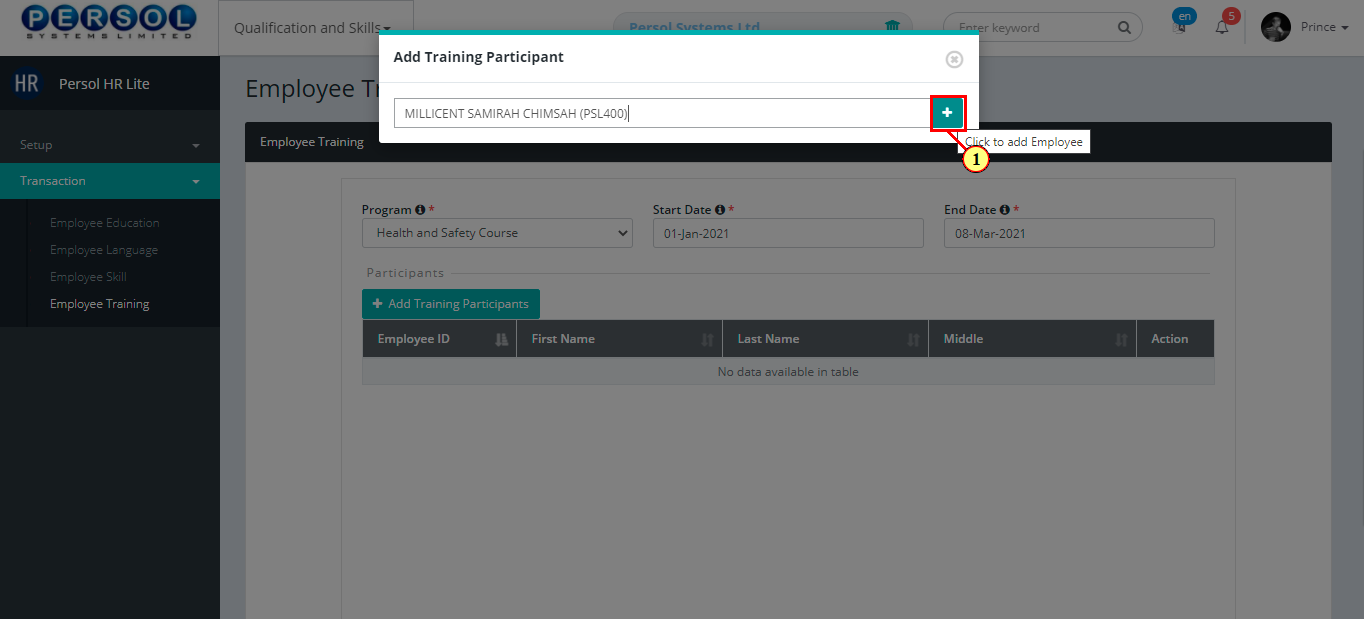
| (1) |
Click on the  to add the employee to the training participant grid to add the employee to the training participant grid
|
|
Repeat steps 7 and 8 to add all training participants |
| Step | Action |
|---|---|
| (1) |
Click on the close icon  after adding employees/participants after adding employees/participants
|
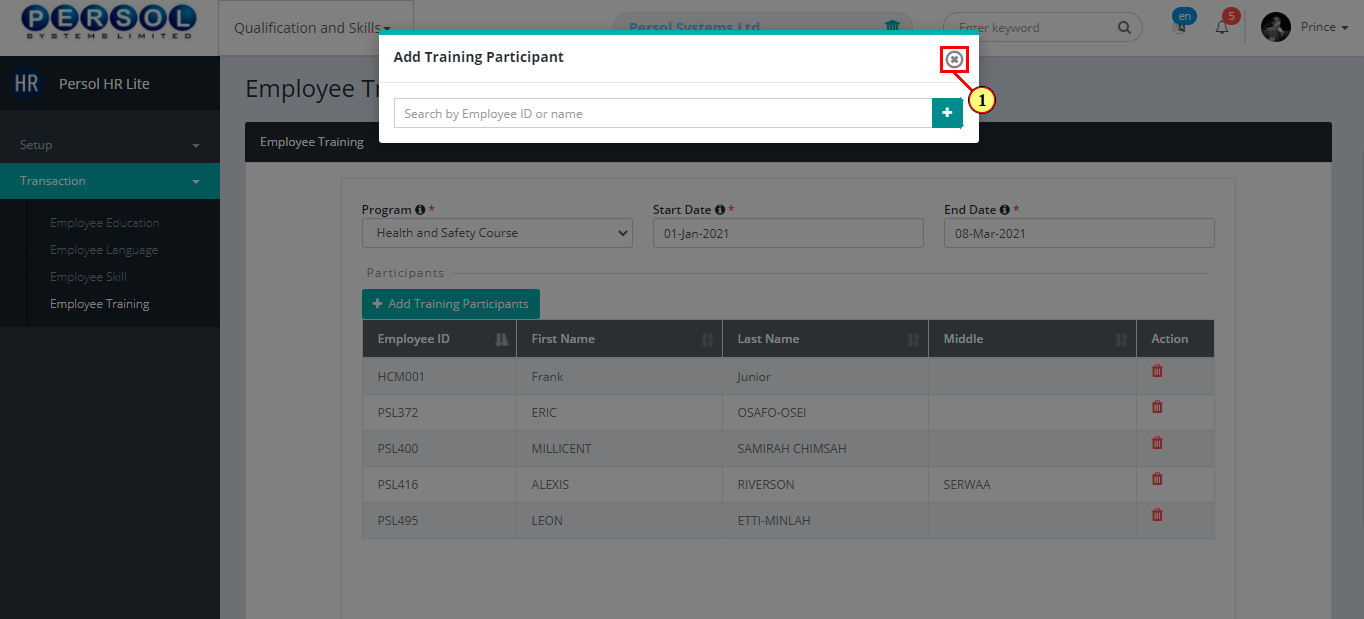
| Step | Action |
|---|---|
| The added participant’s details display in the grid | |
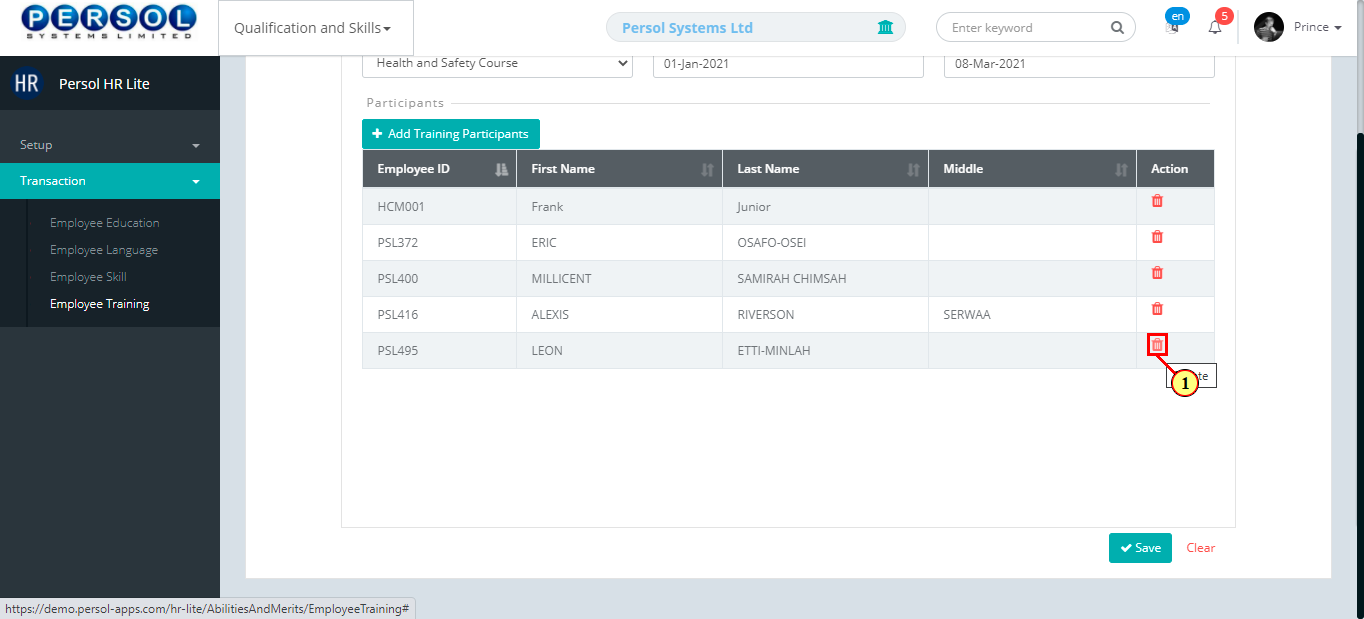
| (1) |
You may click on the delete icon to delete a participant
|
| Step | Action |
|---|---|
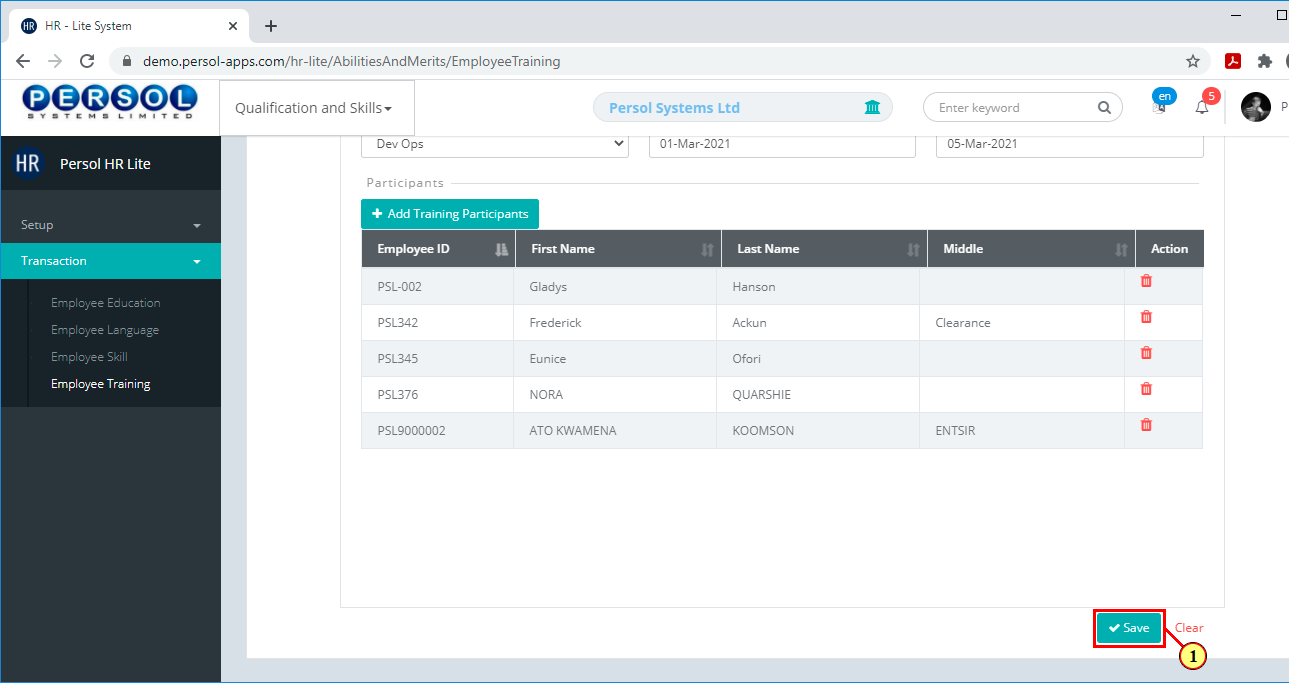
| (1) |
Click on the  button to save the list of participants to the training program button to save the list of participants to the training program
|
| Step | Action |
|---|---|
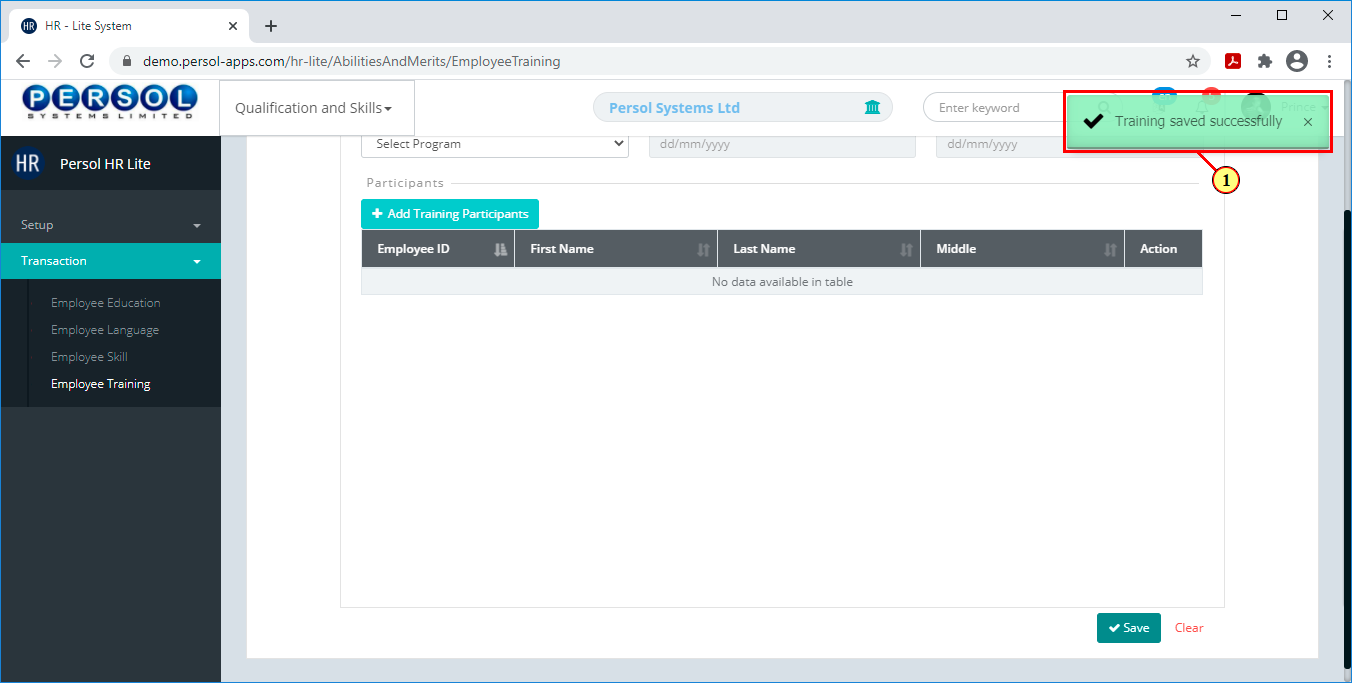
| (1) | A notification displays to indicate that the list of participants for the training program has been saved successfully |
| Step | Action |
|---|---|
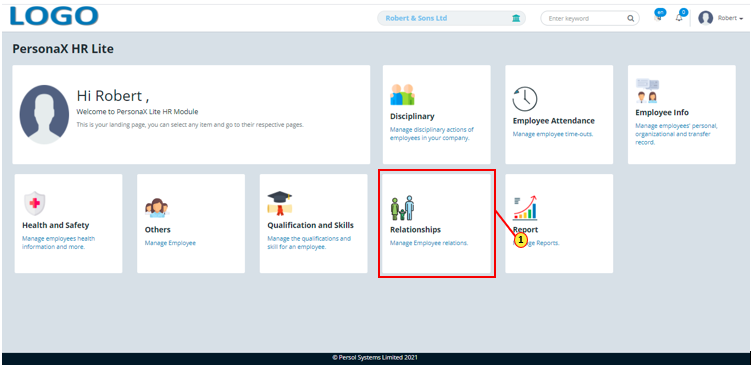
| (1) | On the Personax HR Lite homepage, select the 'Relationships' tile |

| Step | Action |
|---|---|
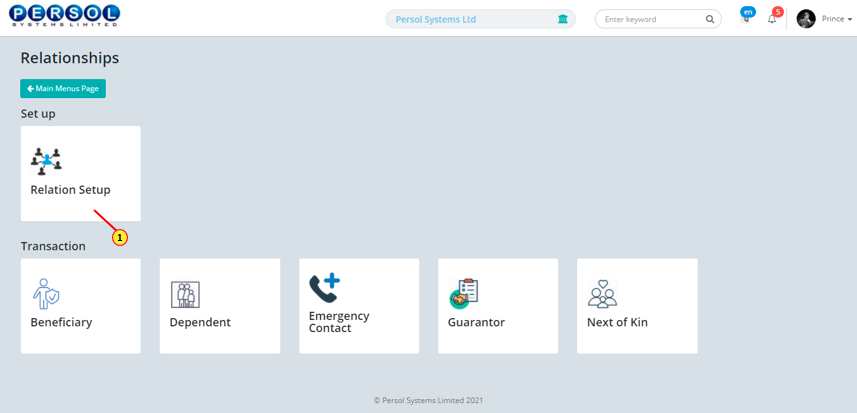
| The ‘Relationships’ submenus page opens | |
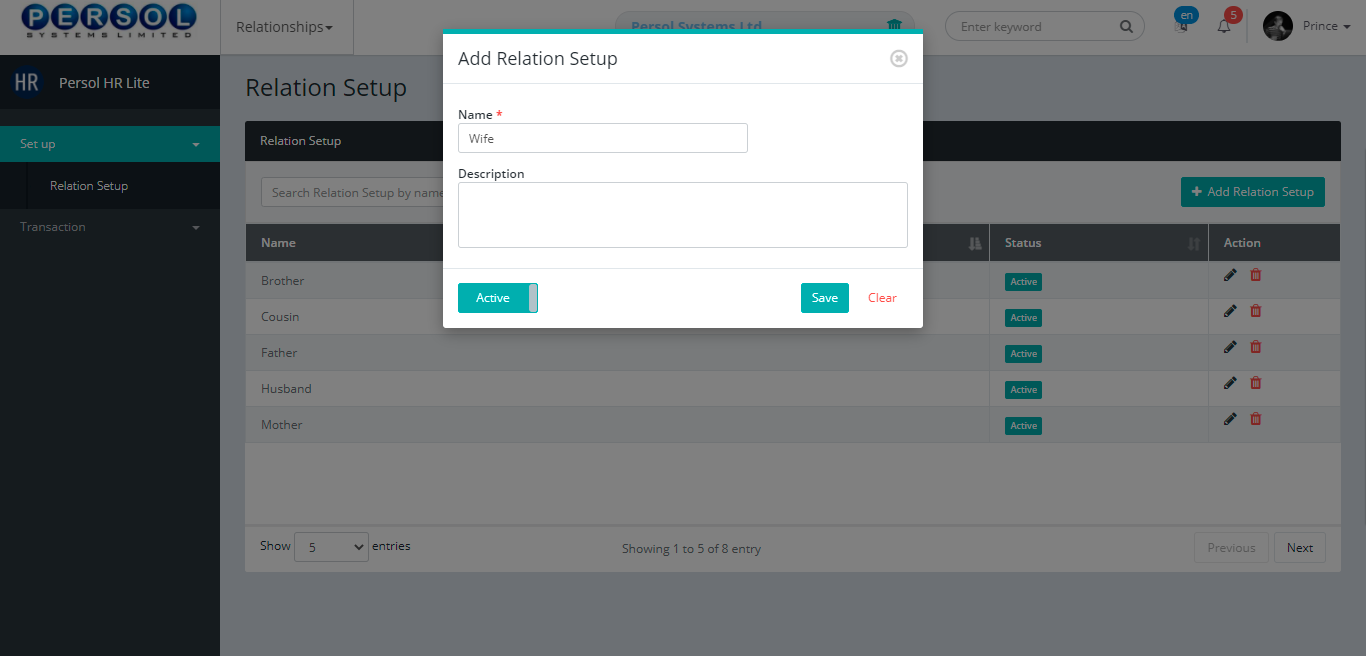
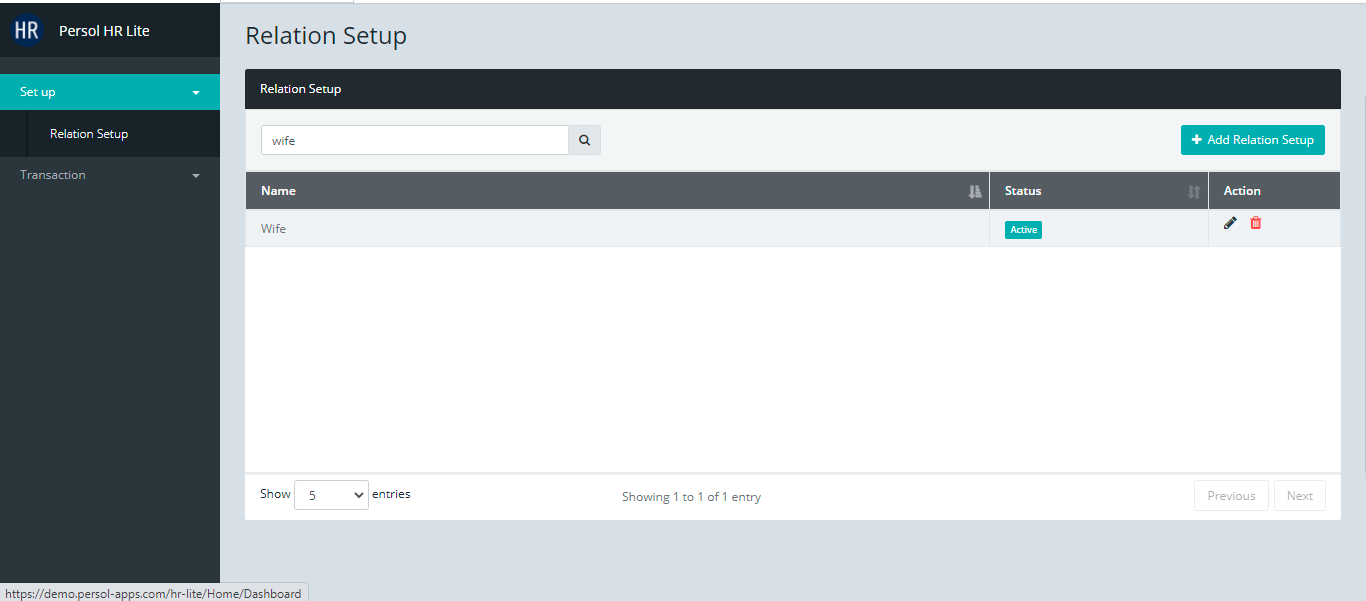
| (1) | Select the ‘Relation Setup’ tile |
| Step | Action |
|---|---|
| The ‘Relation Setup’ page opens | |
| (1) |
To setup a relation, click on the  button button
|

| Step | Action |
|---|---|
| The ‘Add Relation Setup’ modal opens | |
| (1) | Enter name of the relation type |
|
This field is required * |
| Step | Action |
|---|---|
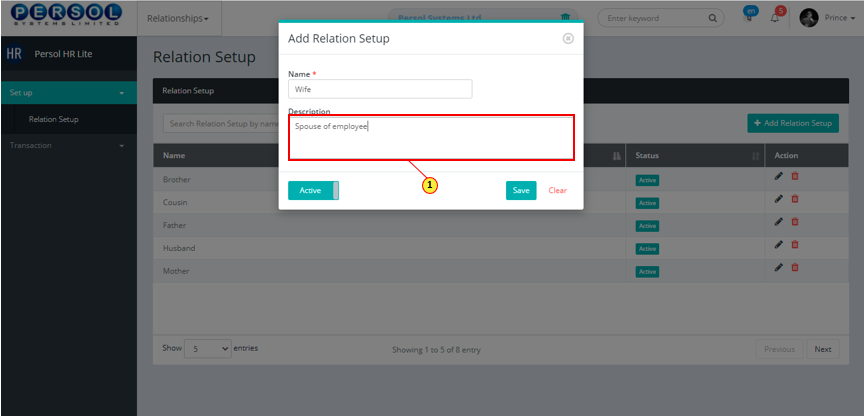
| (1) | Add description to provide more details on the relation type |
| Step | Action |
|---|---|
| (1) |
You may click on the button to change status of the relation to inactive
|
|
- An active status means the relation type can be used in transactions on other pages - An inactive status means the relation type cannot be used in transactions on other pages |
| Step | Action |
|---|---|
|
You may click on the button to clear all details entered
|
| (1) |
Click on the button to save the newly added relation
|
| Step | Action |
|---|---|
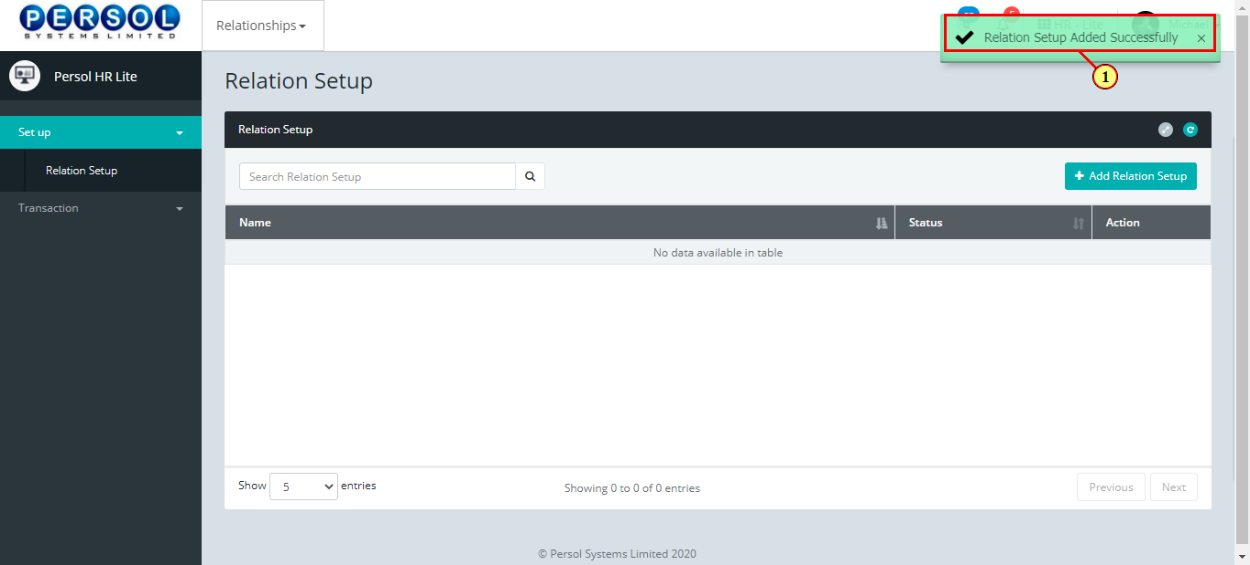
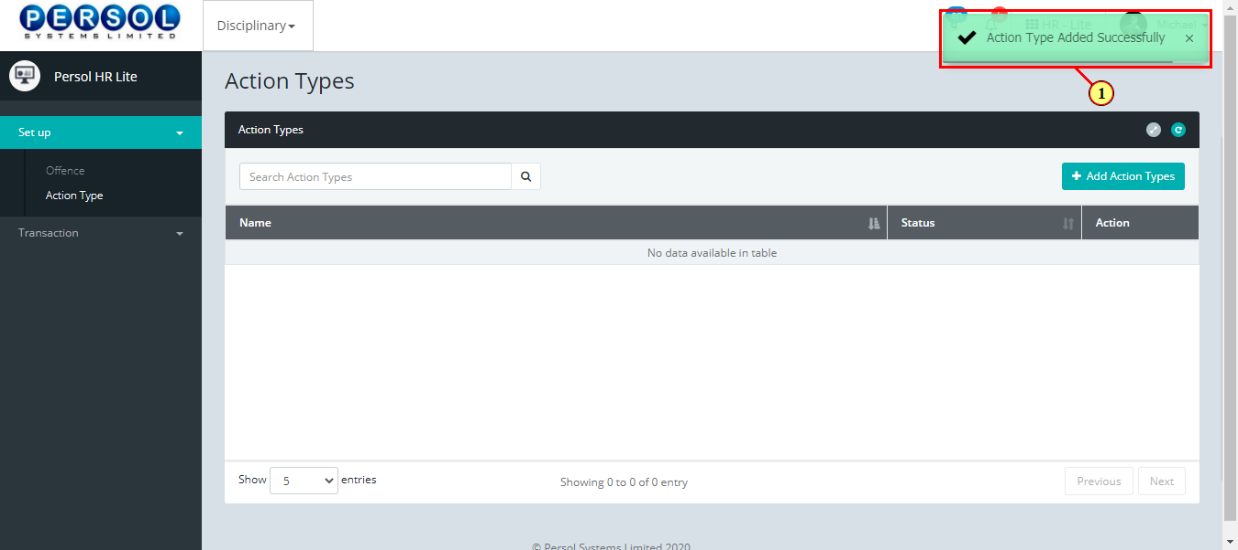
| (1) | A notification displays to indicate that the relation setup has been saved successfully |

| Step | Action |
|---|---|
| (1) |
To edit a relation setup, enter the relation name in the search box and click on the  icon to search icon to search
|

| Step | Action |
|---|---|
| The search result details display in the grid | |
|
The Action column consists of the Delete and Edit action icons
|
| Step | Action |
|---|---|
|
You may click on the delete icon to delete the relation
|
| (1) |
Click on the edit icon to edit the relation
|

| Step | Action |
|---|---|
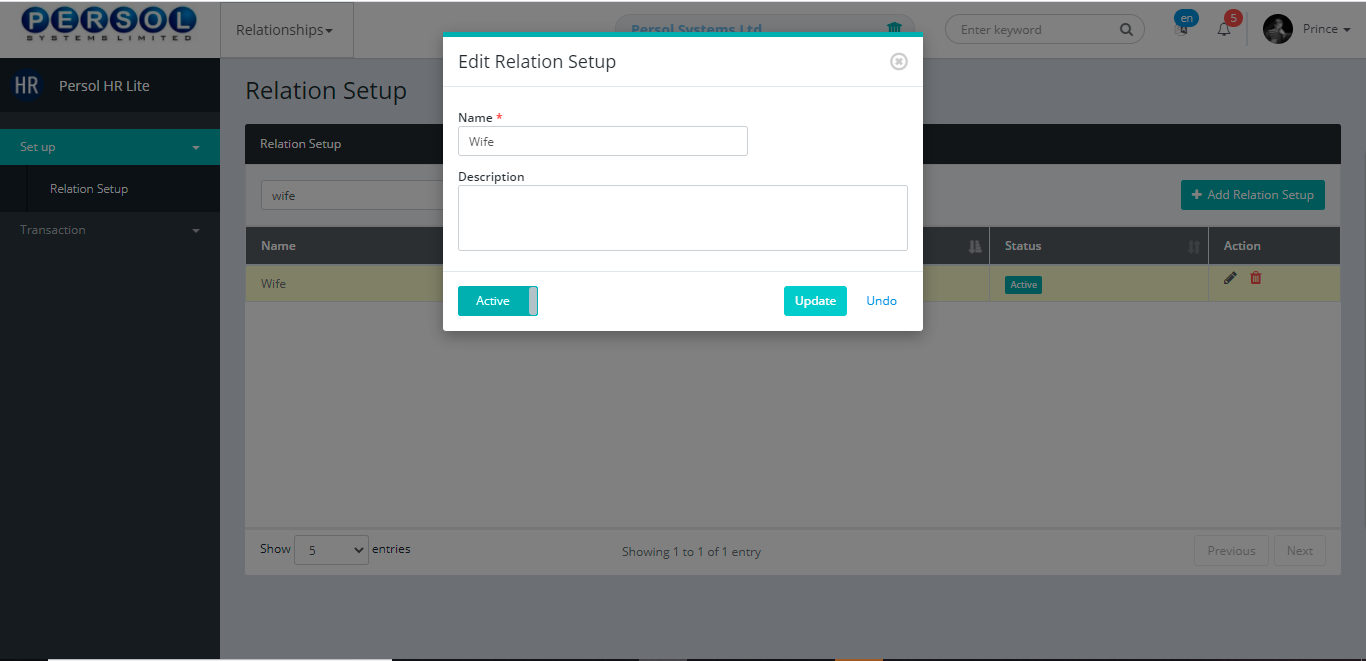
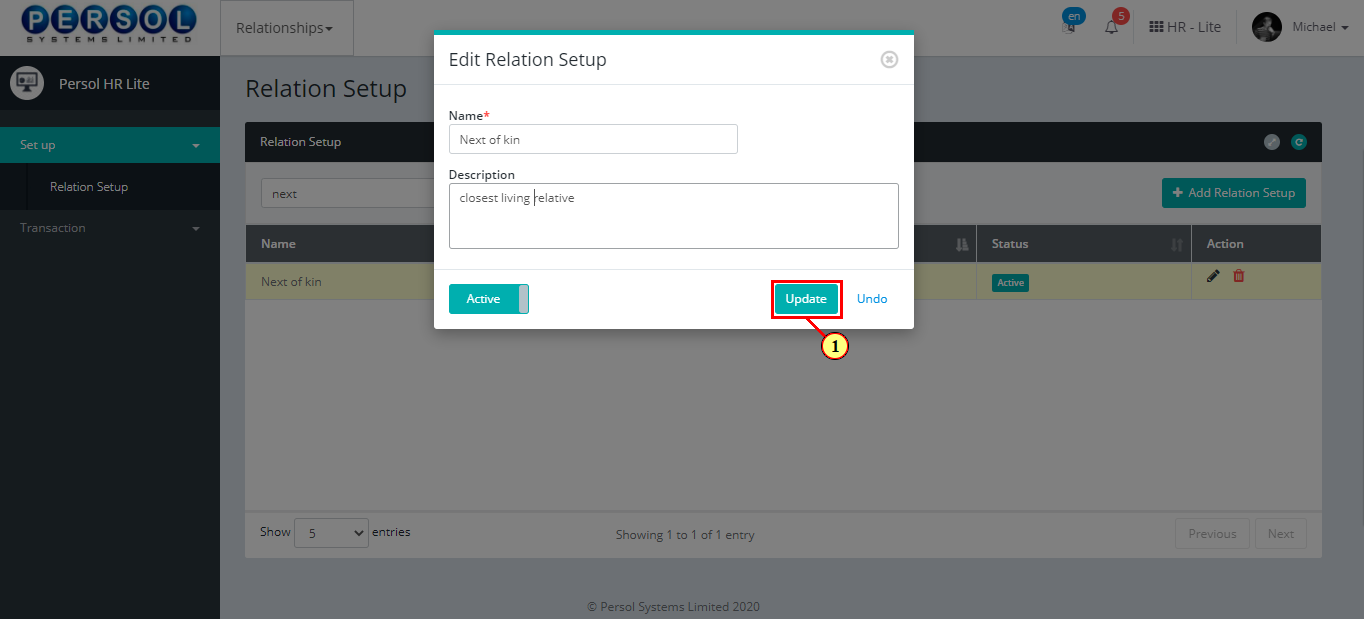
| The ‘Edit Relation Setup’ modal opens | |
| Edit the name, description or status of the relation setup |
| Step | Action |
|---|---|
|
You may click on the button to revert changes made
|
| (1) |
Click on the button to save the changes made
|
| Step | Action |
|---|---|
| (1) | A notification displays to indicate that the update has been saved successfully |

| Step | Action |
|---|---|
| (1) | On the Personax HR Lite homepage, select the 'Relationships' tile |

| Step | Action |
|---|---|
| The ‘Relationships’ submenus page opens | |
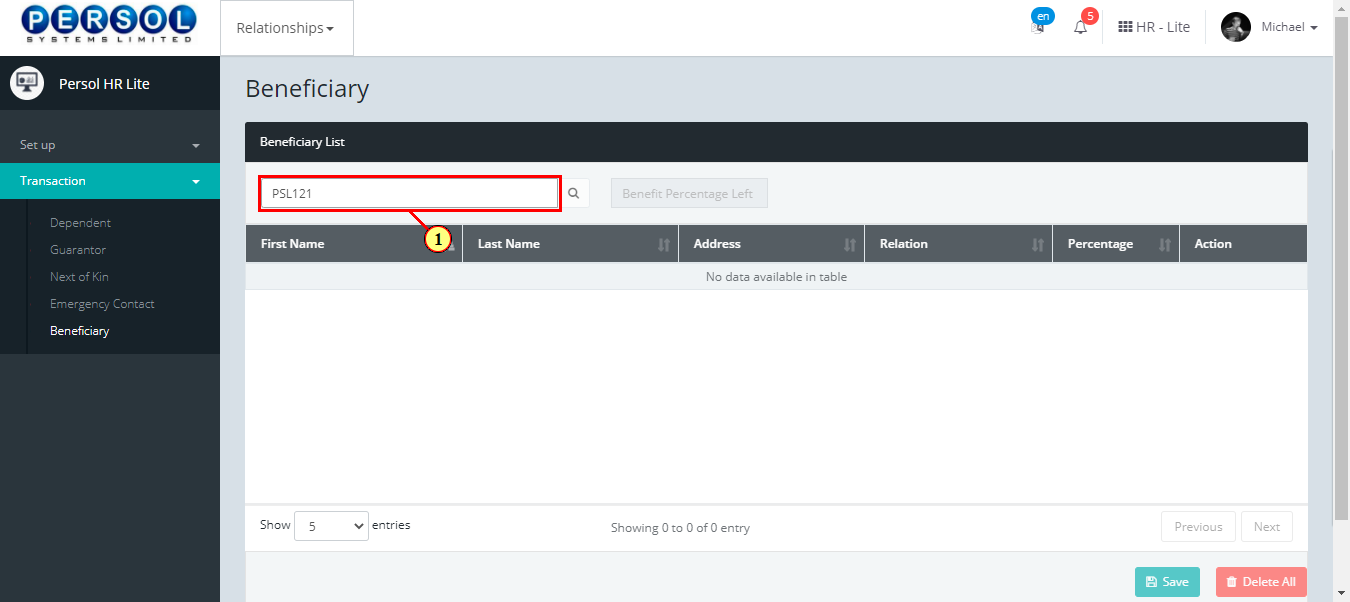
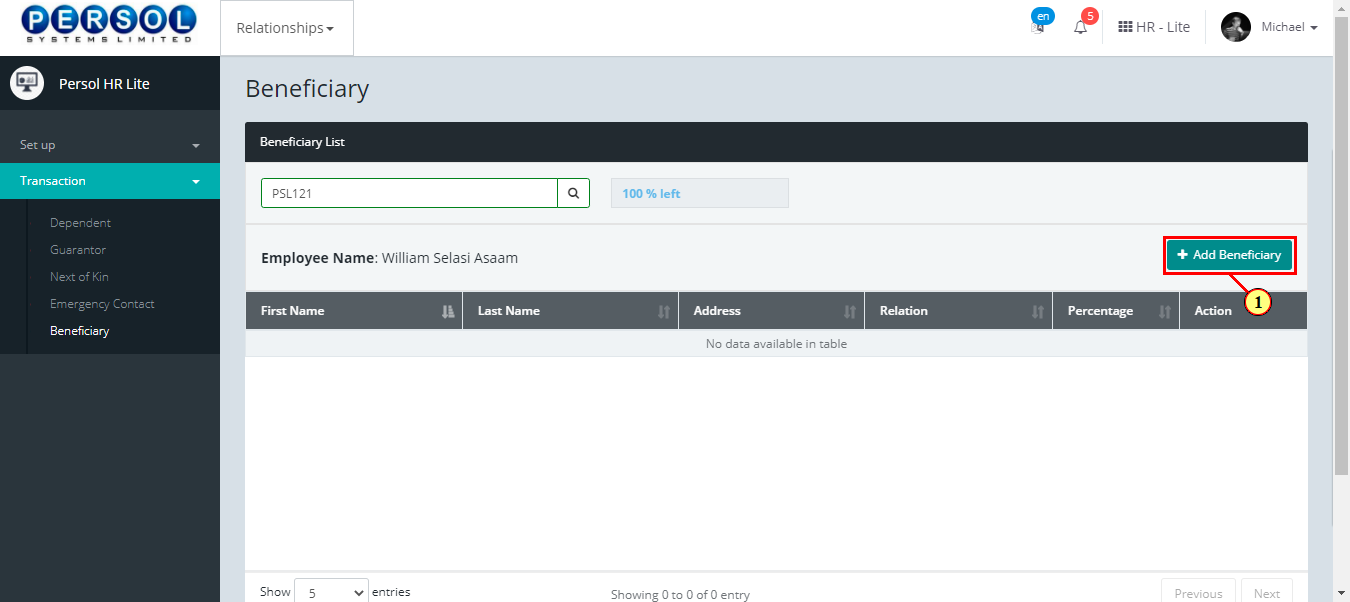
| (1) | Select the ‘Beneficiary’ tile under the ‘Transaction’ sub menu |

| Step | Action |
|---|---|
| The ‘Beneficiary’ page opens | |
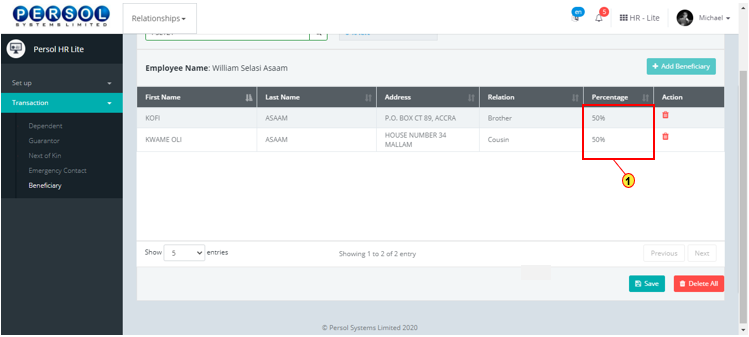
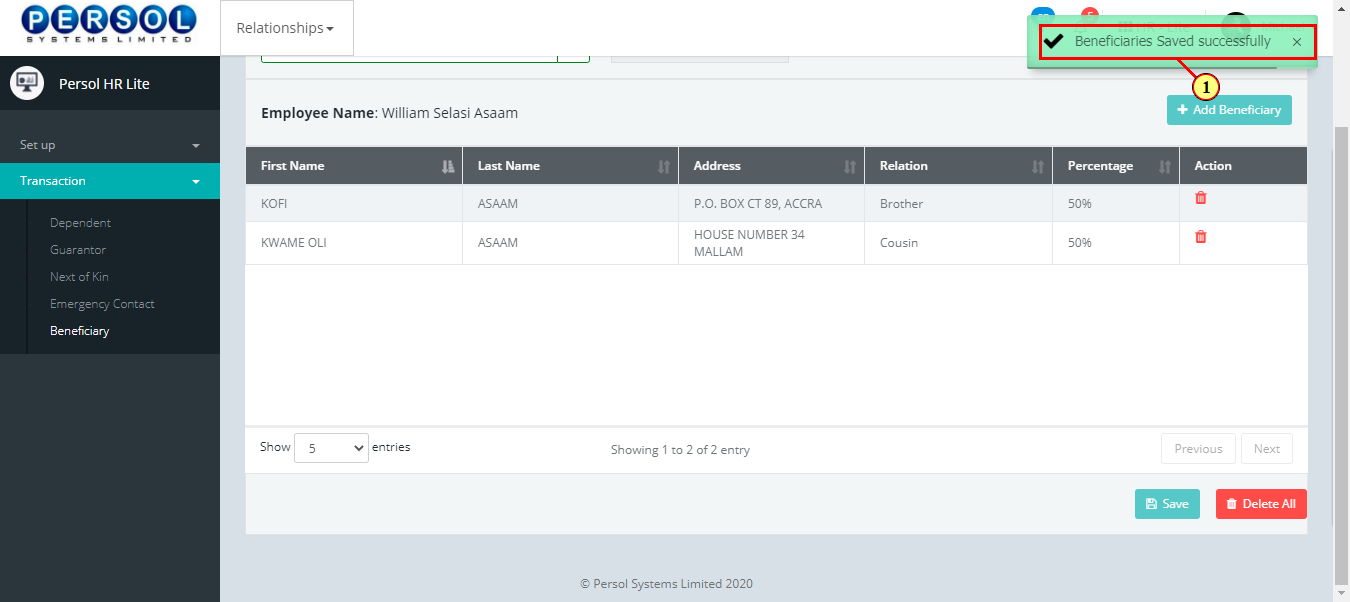
| (1) | To add a beneficiary to an employee’s record, enter the employee’s name or ID in the search box and click to search |
| Step | Action |
|---|---|
|
The Employee’s name and beneficiary percentage allocation left display |
|
Previously added beneficiary details display in the grid (if any) |
| (1) |
Click on the  button to add a beneficiary to the employee’s record button to add a beneficiary to the employee’s record
|
| Step | Action |
|---|---|
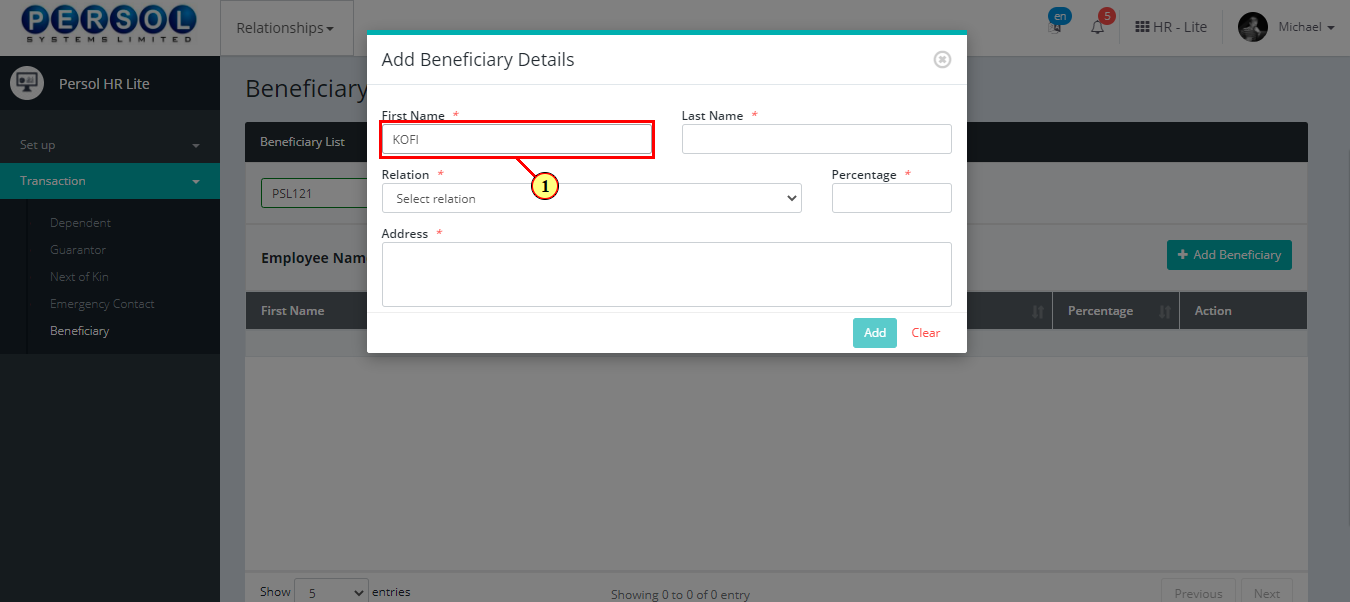
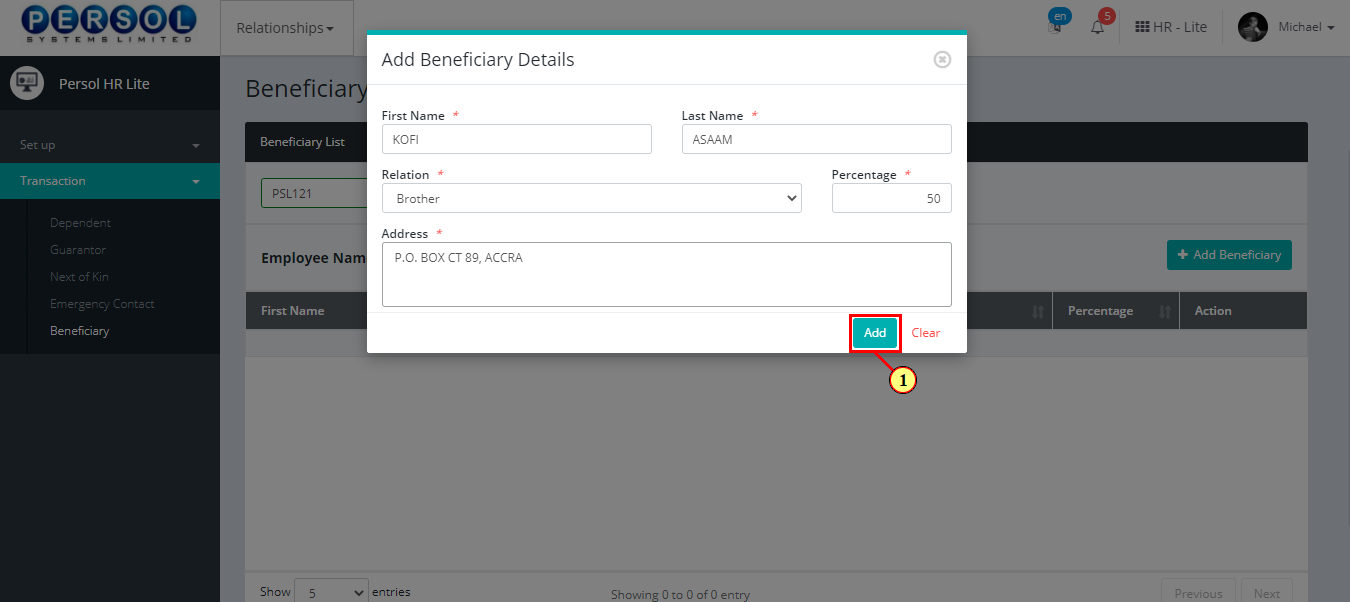
| The ‘Add Beneficiary Details’ modal opens | |
| (1) |
Provide the following details of the beneficiary:
|
|
All fields are required * |
| Step | Action |
|---|---|
|
You may click on the |
| (1) |
Click on the  button to add the beneficiary details to employee’s record button to add the beneficiary details to employee’s record
|
| Step | Action |
|---|---|
|
The beneficiary percentages must add up to 100% before the details can be saved |
| Step | Action |
|---|---|
|
You may click on the  button to delete all beneficiary details from the grid button to delete all beneficiary details from the grid
|
|
You may click on the delete icon  to delete a beneficiary to delete a beneficiary
|
| (1) |
Click on the  button to save the employee’s beneficiary details button to save the employee’s beneficiary details
|
| Step | Action |
|---|---|
| (1) | A notification displays to indicate that the employee beneficiary details have been saved successfully |
| Step | Action |
|---|---|
| (1) | On the Personax HR Lite homepage, select the 'Relationships' tile |

| Step | Action |
|---|---|
| The ‘Relationships’ submenus page opens | |
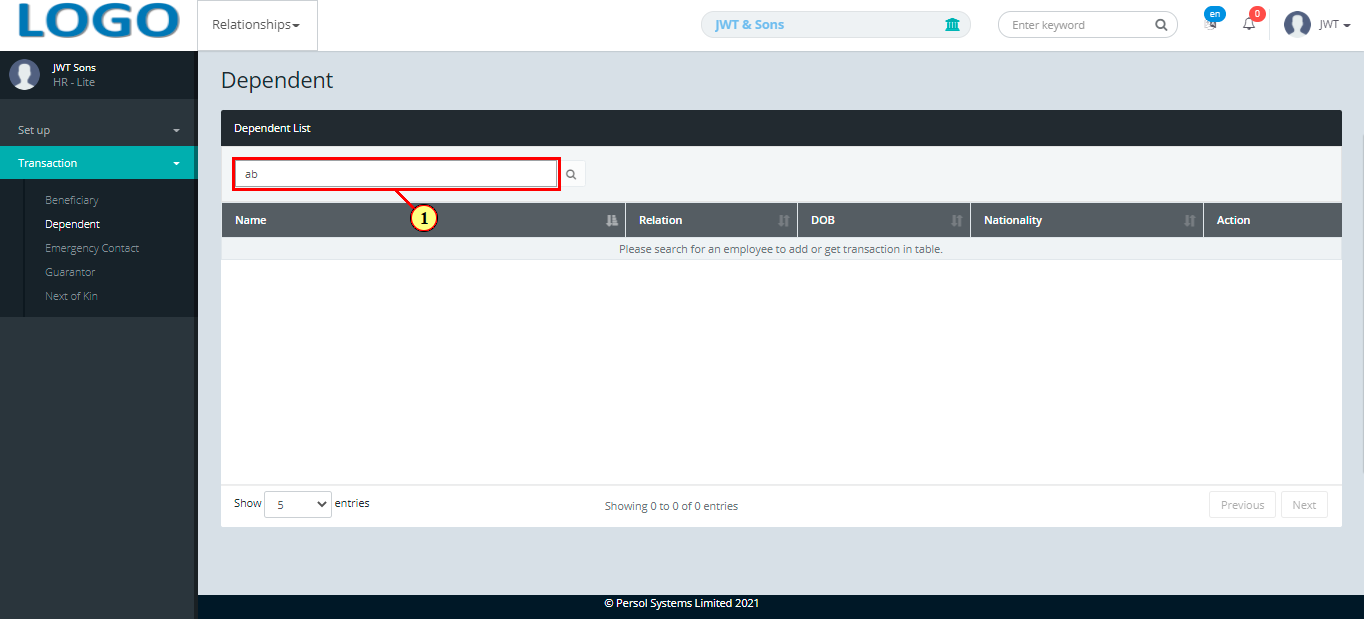
| (1) | Select the ‘Dependent’ setup tile |

| Step | Action |
|---|---|
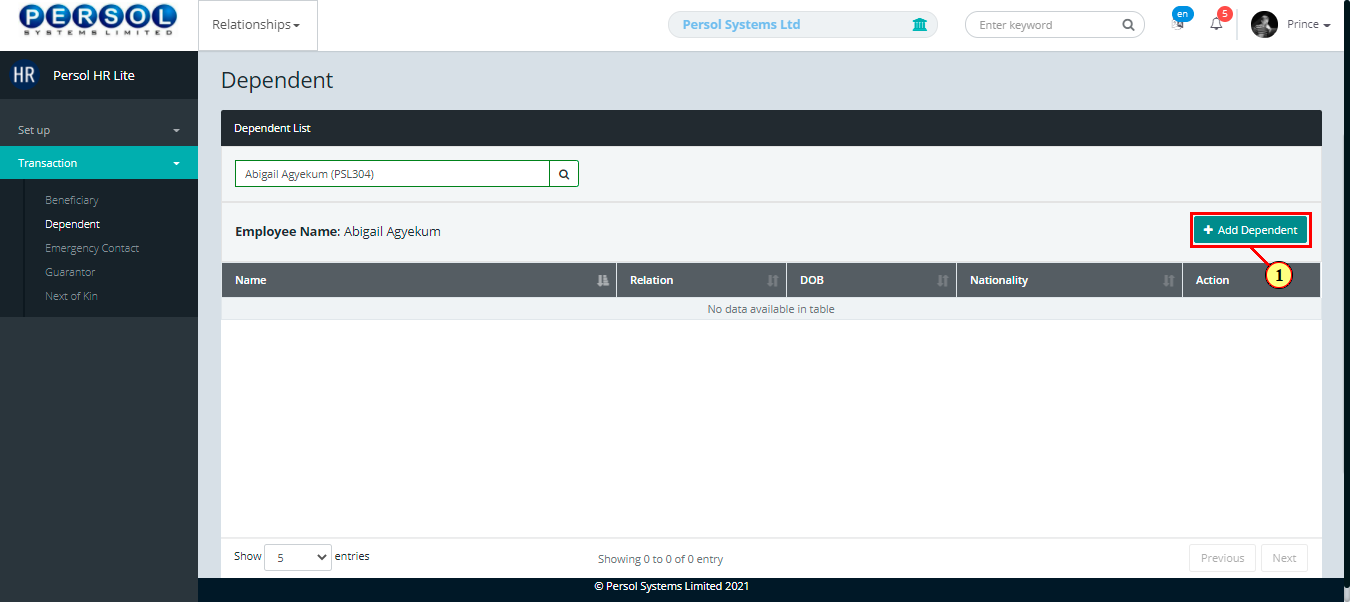
| The ‘Dependent’ page opens | |
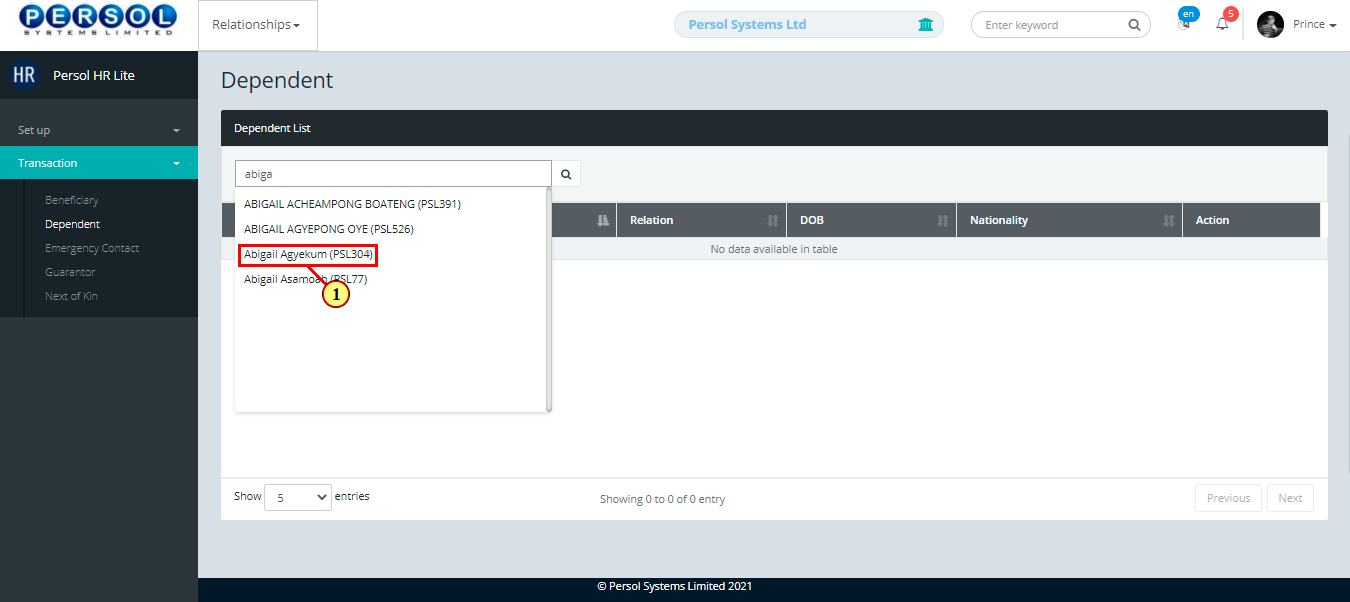
| (1) | To add a dependent to an employee's record, search for employee by name and click on the search icon |
| Step | Action |
|---|---|
| The employee's name and the previously added dependents (if any) display | |
| (1) |
Click on the 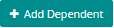 button to add a new dependent to the employee’s record button to add a new dependent to the employee’s record
|
| Step | Action |
|---|---|
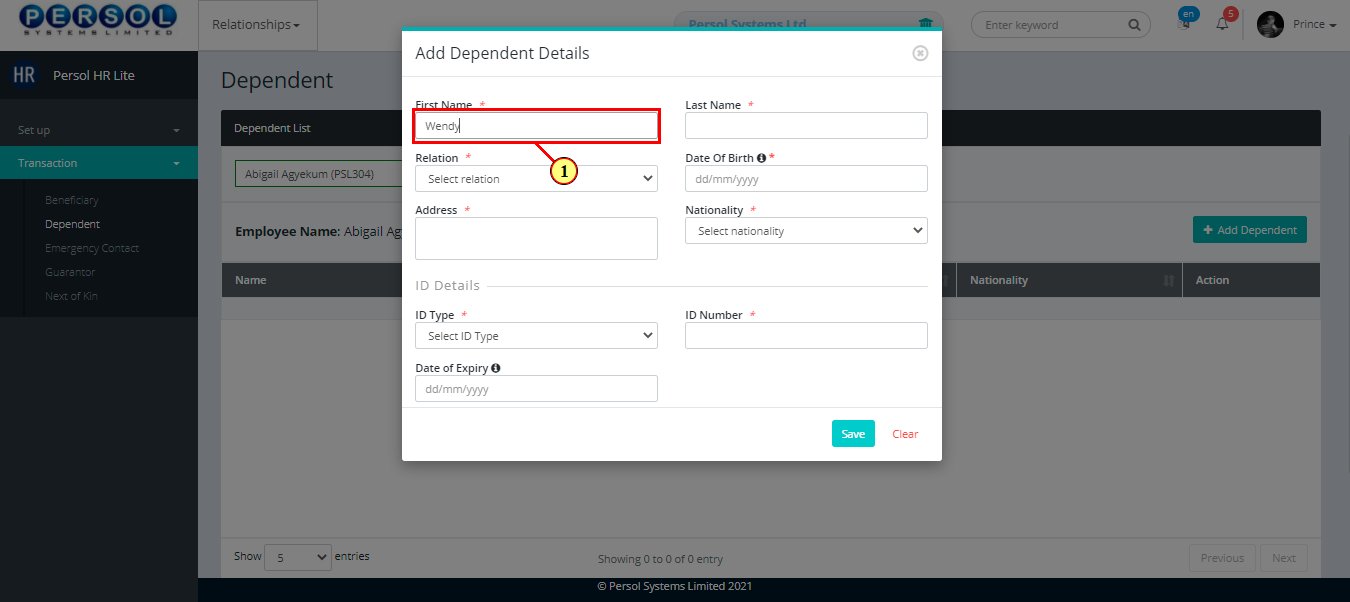
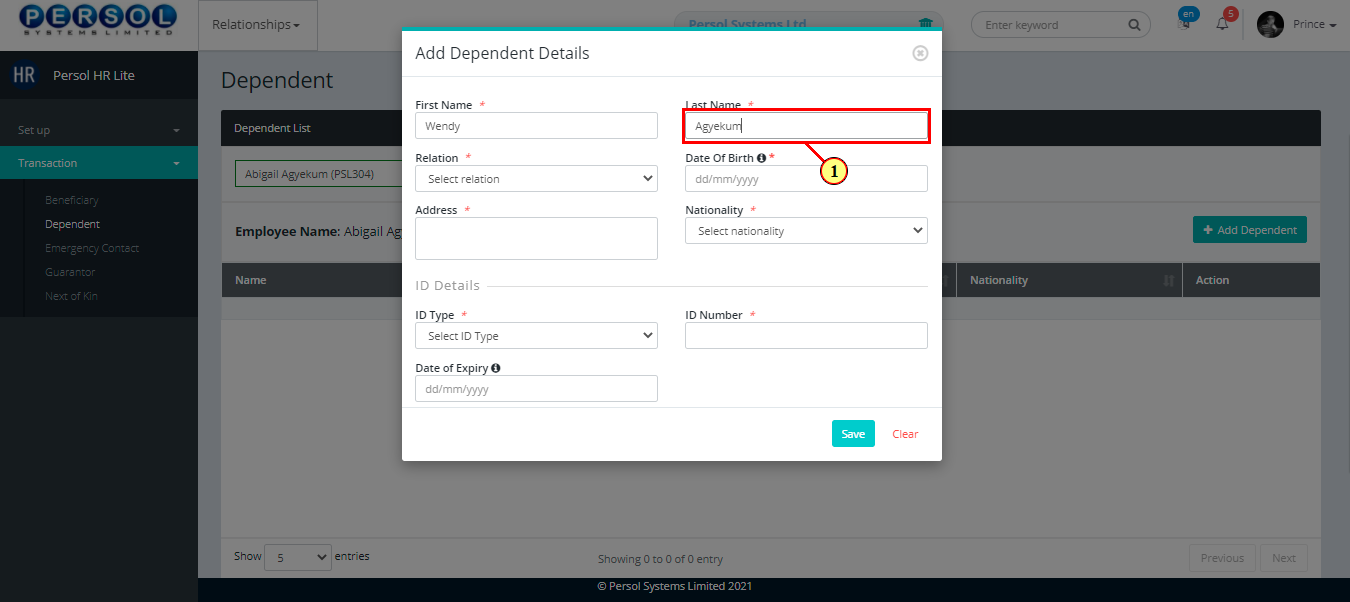
| The 'Add Dependent Details' modal opens | |
| (1) | Enter Dependent's first name |
|
This field is required * |
| Step | Action |
|---|---|
| (1) | Enter dependent's last name |
|
This field is required * |
| Step | Action |
|---|---|
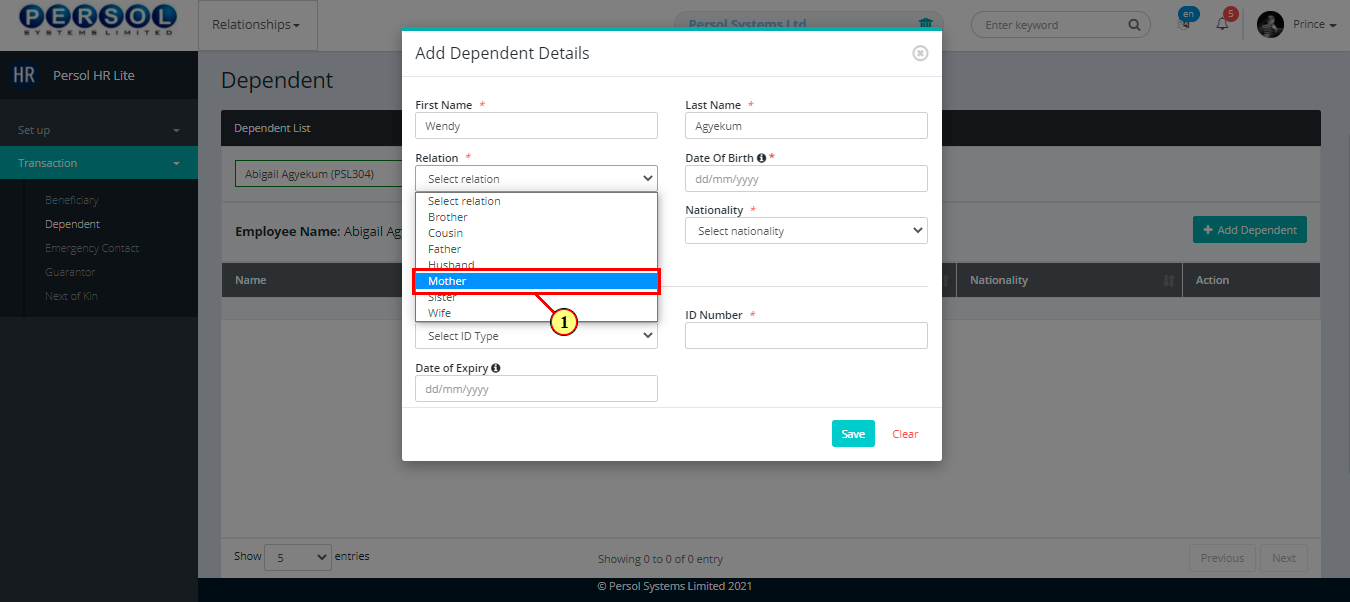
| (1) | Select the dependant’s relation to the employee from the dropdown options |
|
This field is required * |
| Step | Action |
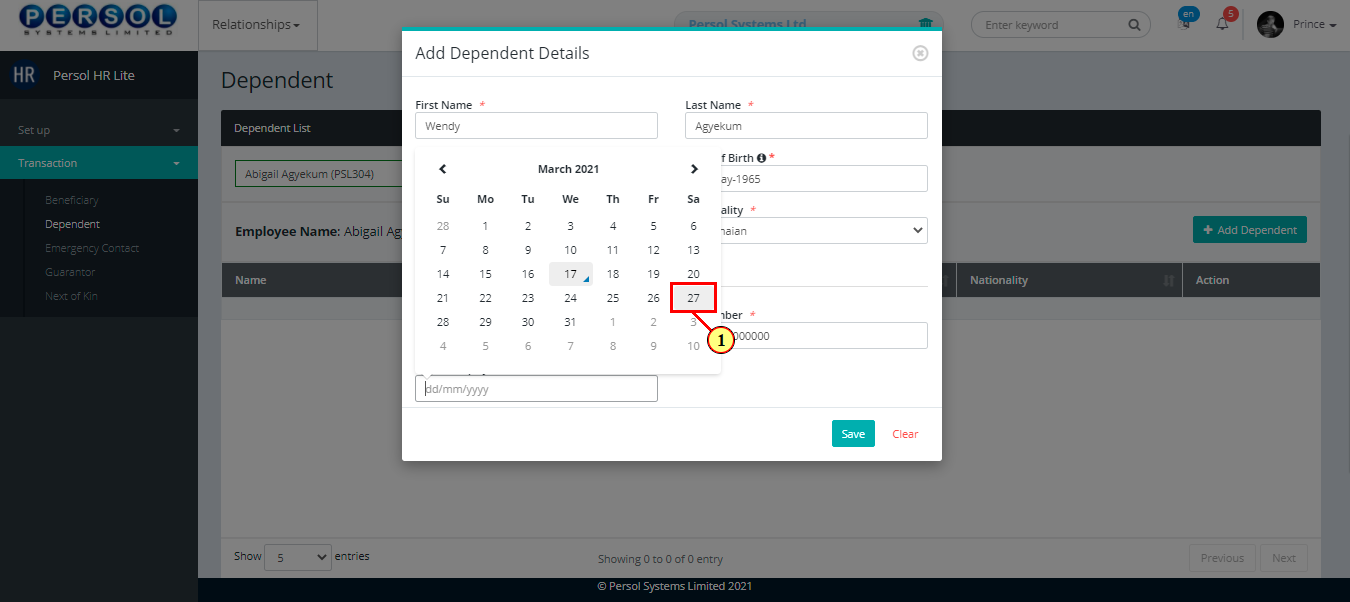
|---|---|
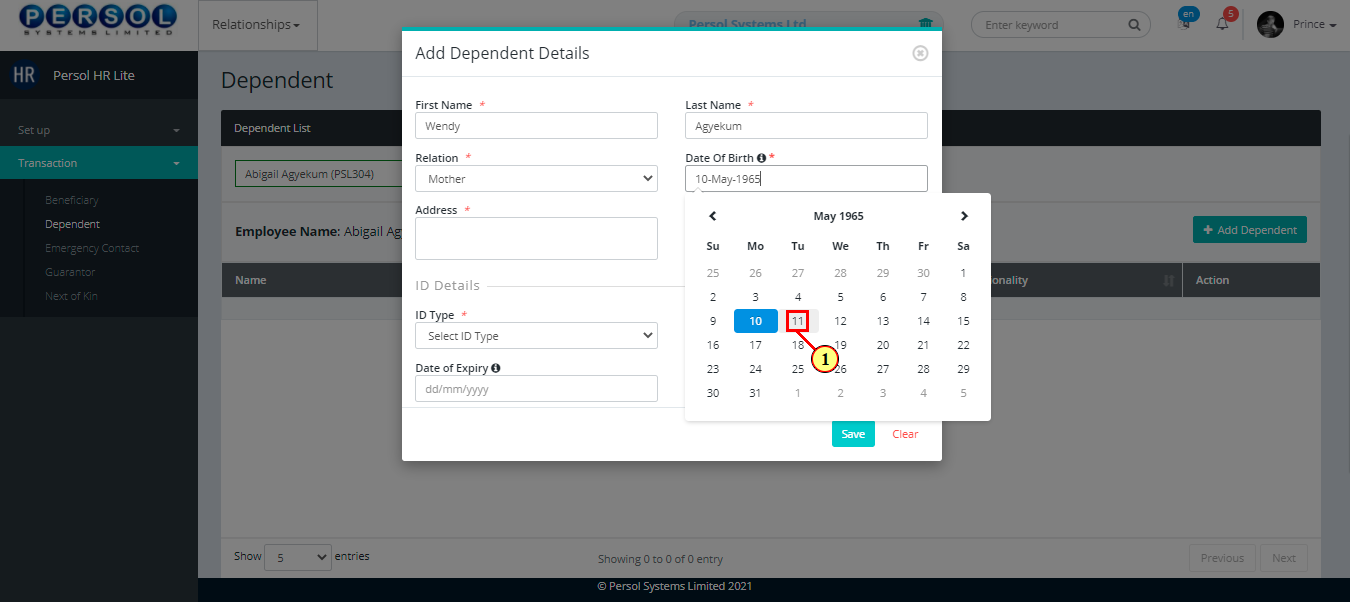
| (1) | Select the dependent's date of birth from the dropdown calendar |
|
This field is required * |
| Step | Action |
|---|---|
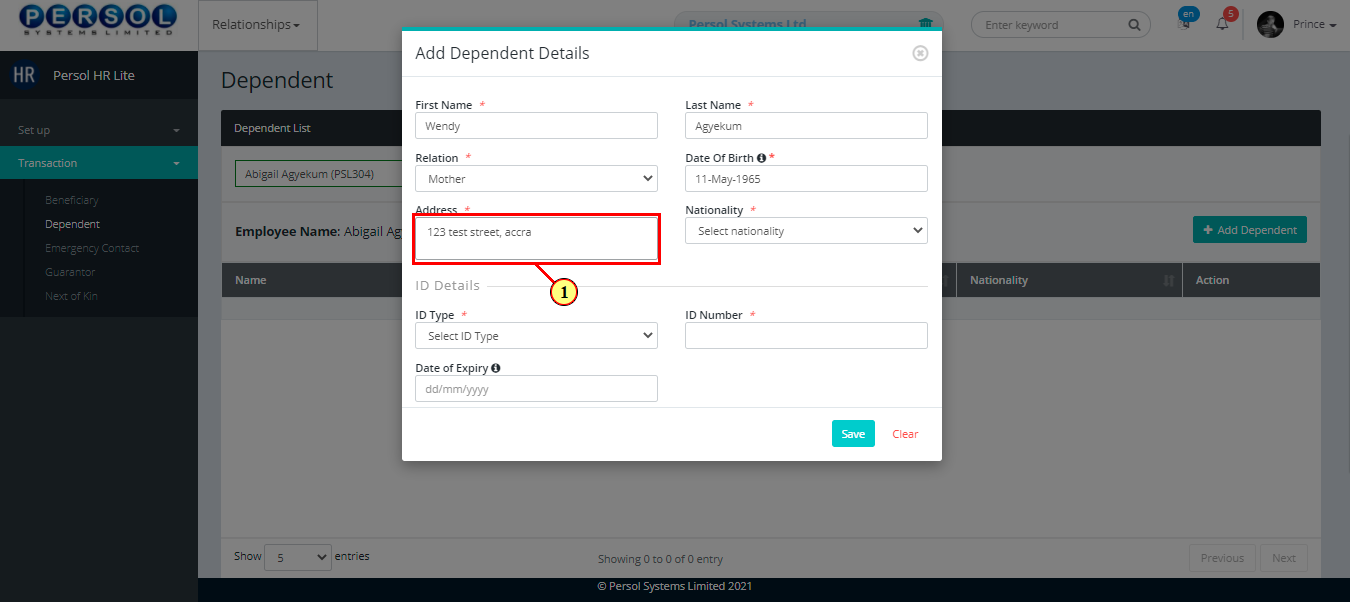
| (1) | Provide the dependent's residential or postal address |
|
This field is required * |
| Step | Action |
|---|---|
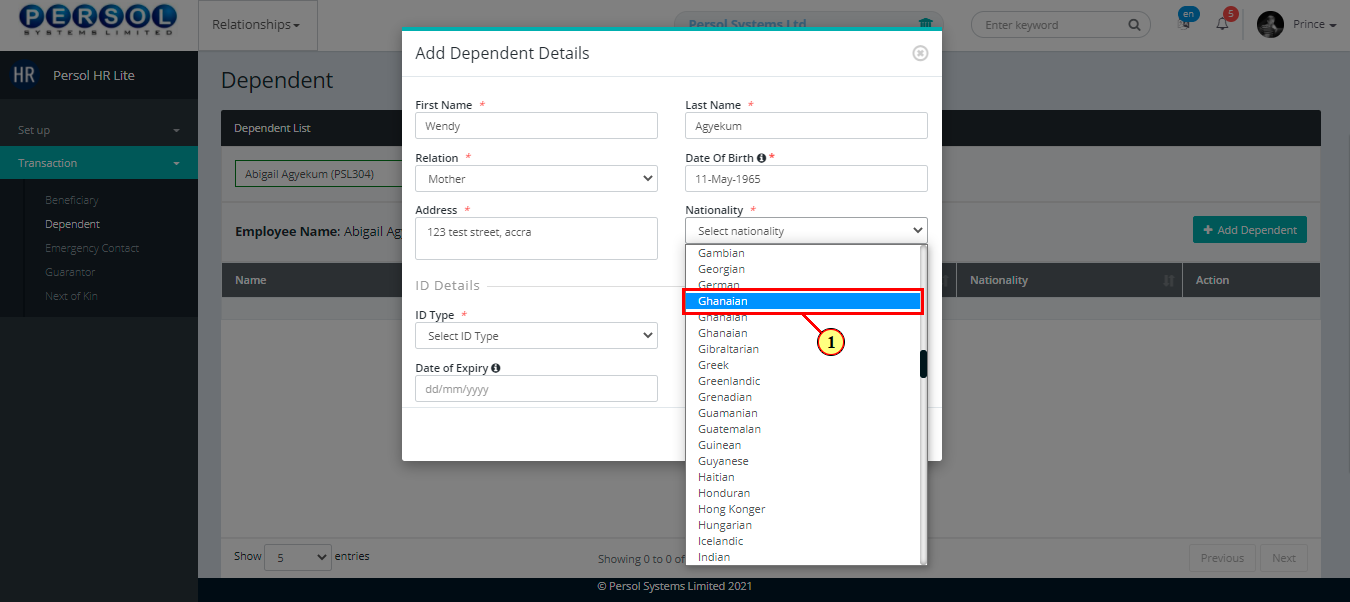
| (1) | Select the dependent's nationality from the dropdown list |
|
This field is required * |
| Step | Action |
|---|---|
| (1) | Select an ID type for the dependent |
|
This field is required * |
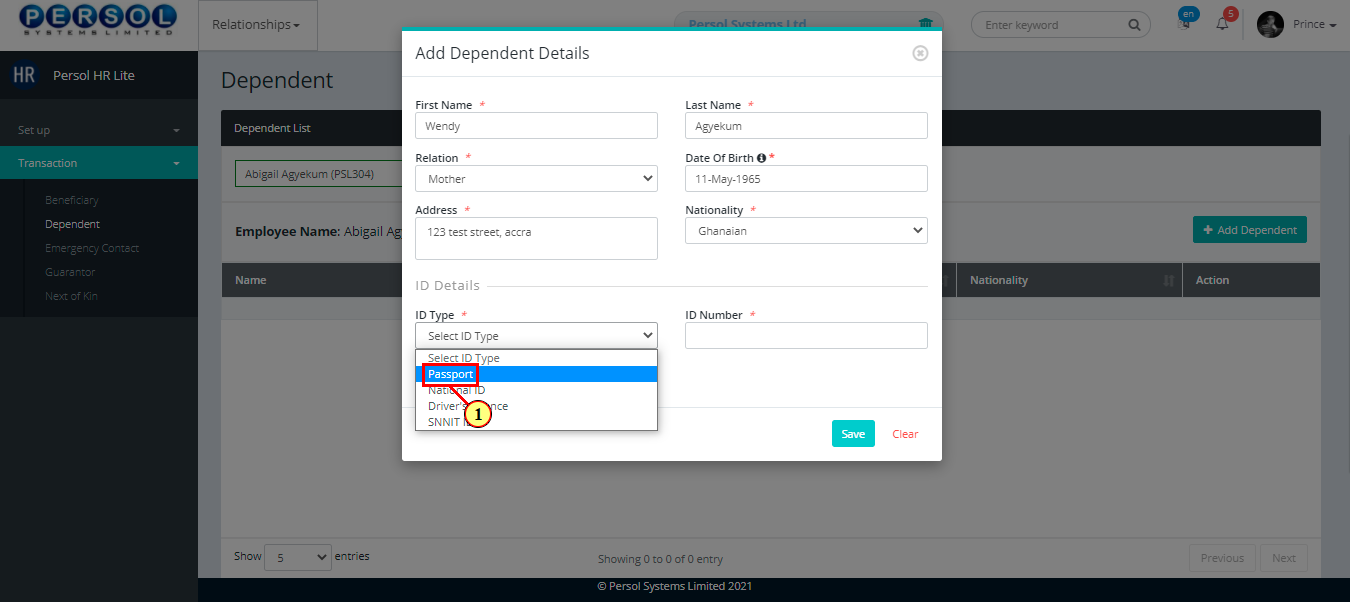
| Step | Action |
|---|---|
| (1) | Enter the ID number |
|
This field is required * |
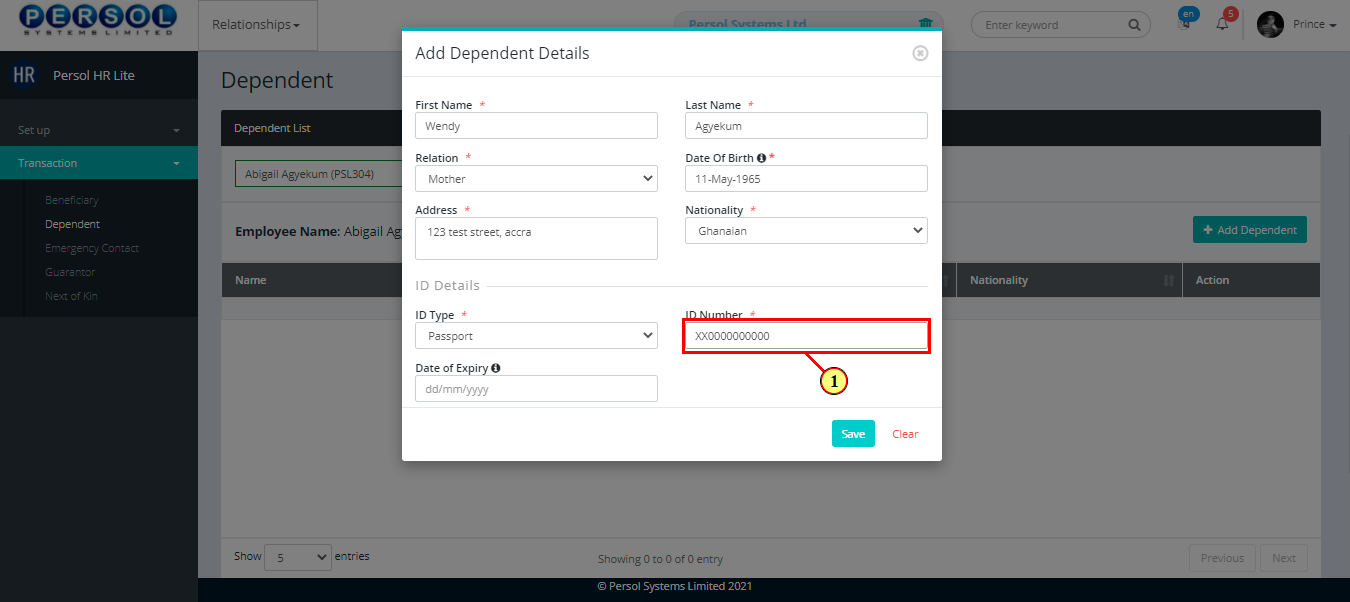
| Step | Action |
|---|---|
| (1) | Provide the expiry date of the selected ID type for dependent |
|
This field is required * |
| Step | Action |
|---|---|
|
You may click on the |
| (1) |
Click on the  button to save details of the newly added employee dependent button to save details of the newly added employee dependent
|

| Step | Action |
|---|---|
| (1) | A notification displays to indicate that the dependent's details have been saved successfully |

| Step | Action |
|---|---|
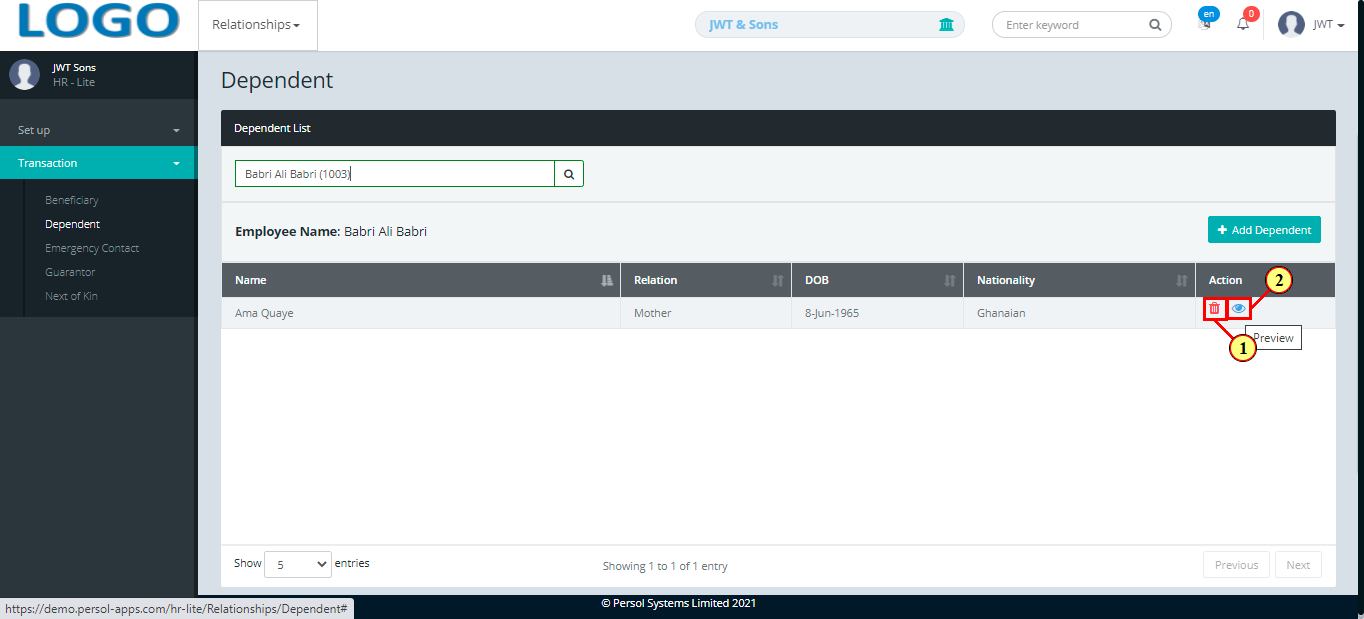
| (1) | To view or delete a dependant from an employee's record, search for the employee by name or ID |
| Step | Action |
|---|---|
| The search result details display in the grid | |
| (1) | You may click on the delete icon to delete the employee's dependent record |
| (2) |
Click on the view icon  to view the dependent's details to view the dependent's details
|
| Step | Action |
|---|---|
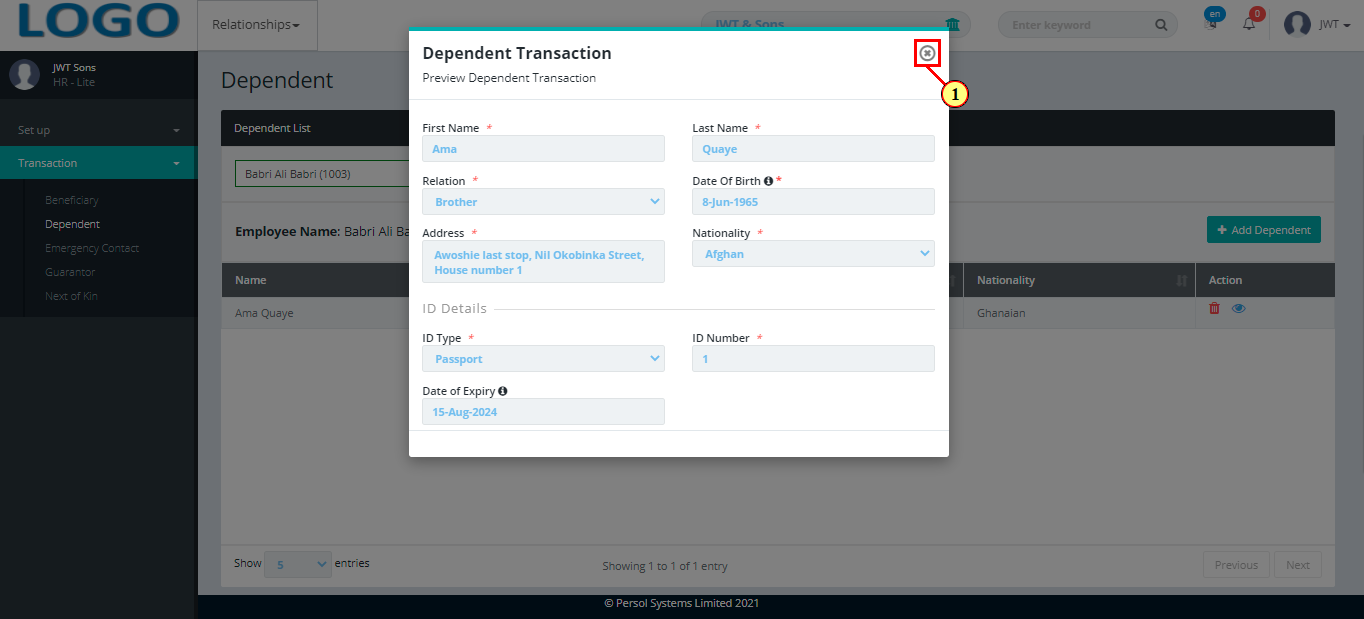
|
A modal opens to preview dependent’s details |
| (1) |
Click on the icon  to close modal to close modal
|
| Step | Action |
|---|---|
| (1) | On the Personax HR Lite homepage, select the 'Relationships' tile |

| Step | Action |
|---|---|
| The ‘Relationships’ submenus page opens | |
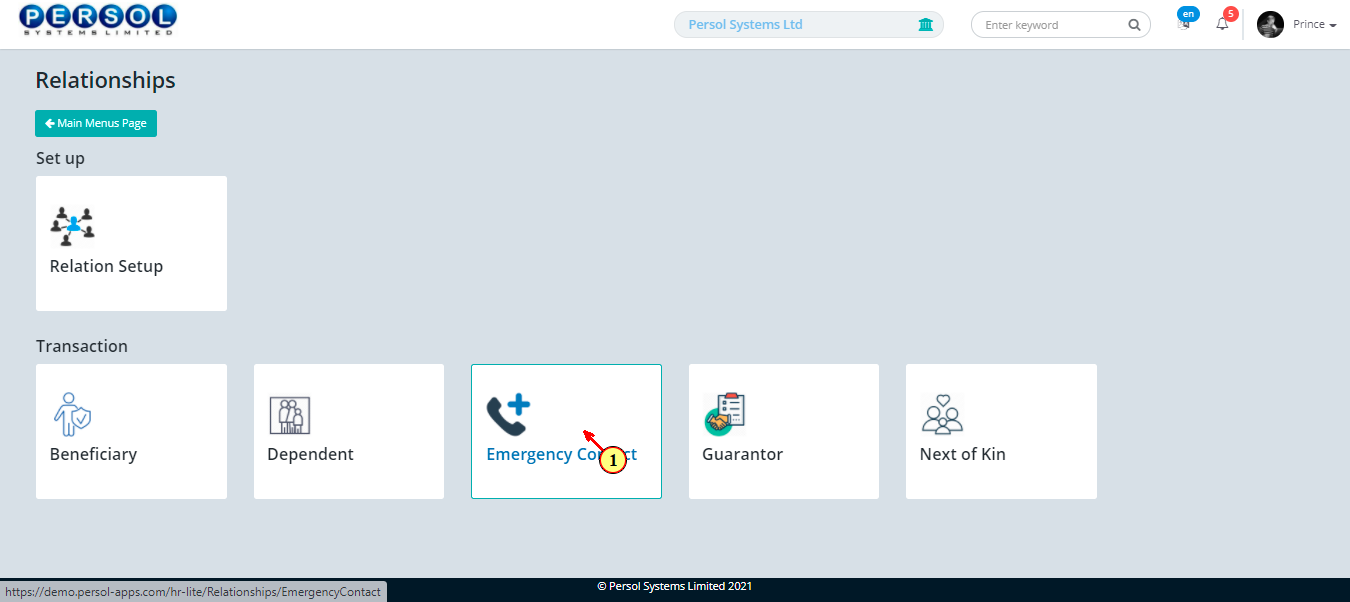
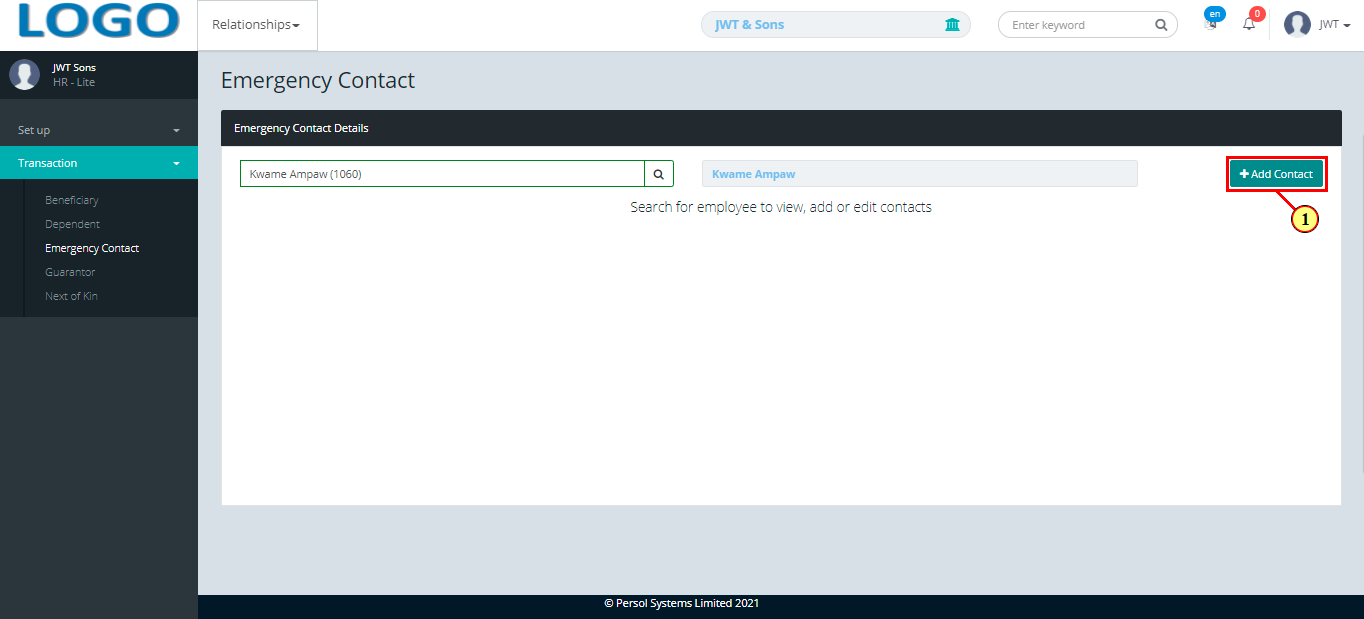
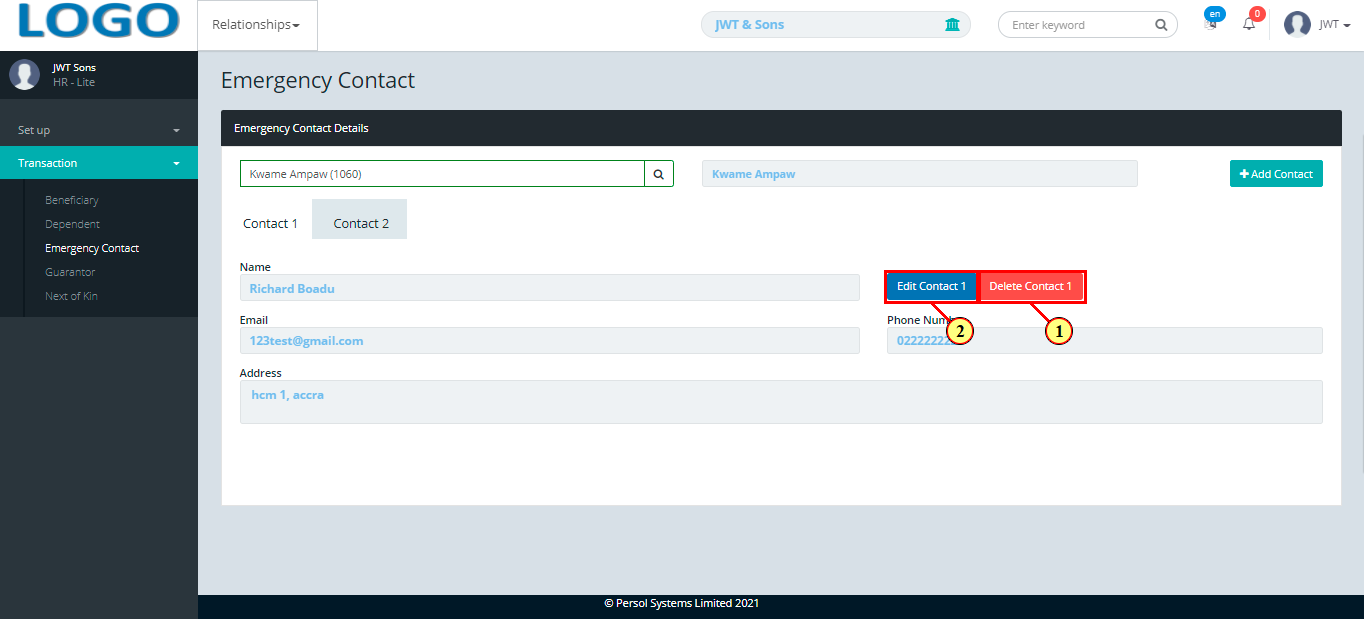
| (1) | Select the ‘Emergency Contact' transaction tile |
| Step | Action |
|---|---|
| The 'Emergency Contact' page opens | |
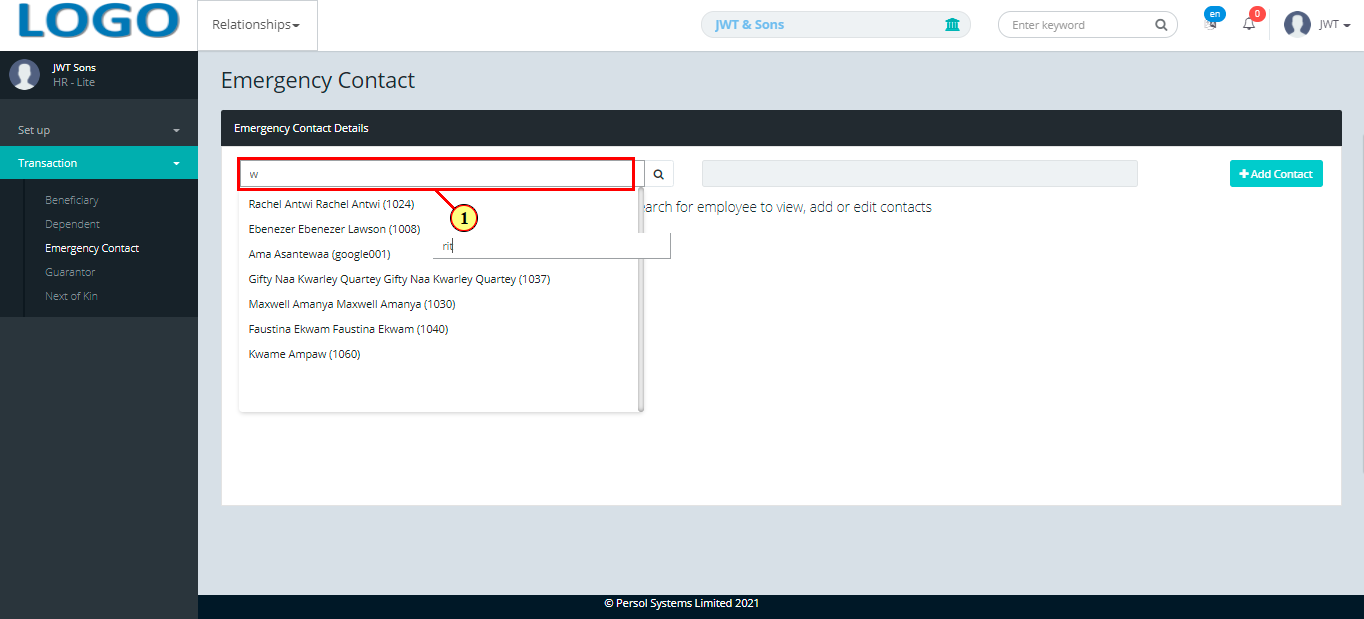
| (1) | To add an emergency contact to an employee's record, search for the employee by name or ID |
| Step | Action |
|---|---|
|
Previously added emergency contact details of the employee (if any) display in the grid |
| (1) | A notification displays if no emergency contact details exist for the employee |
| Step | Action |
|---|---|
| (1) |
Click on the  button to add an emergency contact to the employee's record button to add an emergency contact to the employee's record
|
|
Only 2 emergency contacts can be added per employee |
| Step | Action |
|---|---|
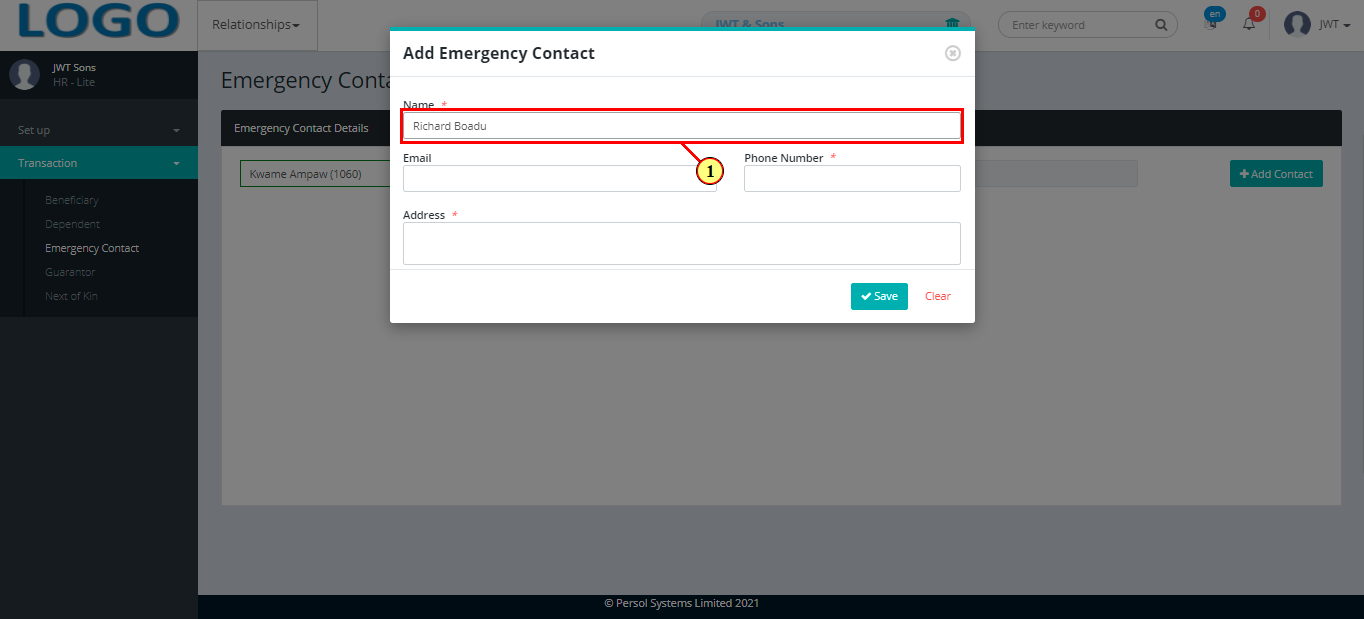
| The 'Add Emergency Contact' modal opens | |
| (1) | Enter the name of the emergency contact |
|
This field is required * |
| Step | Action |
|---|---|
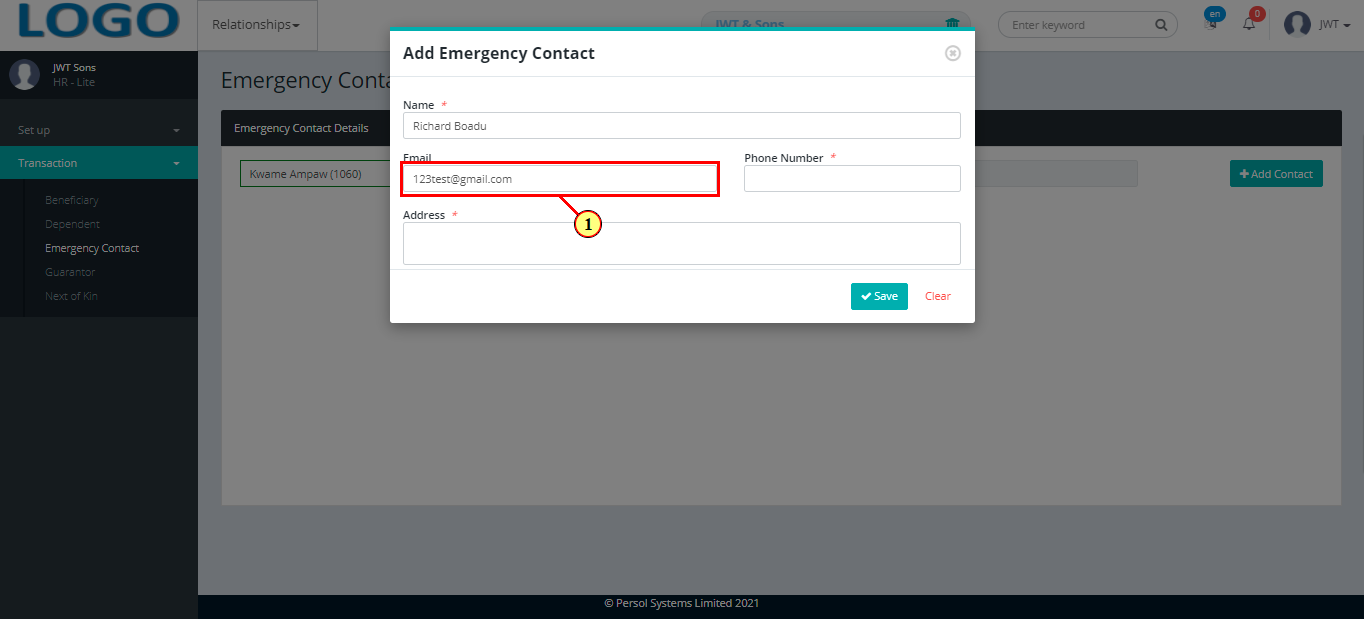
| (1) | Enter the emergency contact's email address |
| Step | Action |
|---|---|
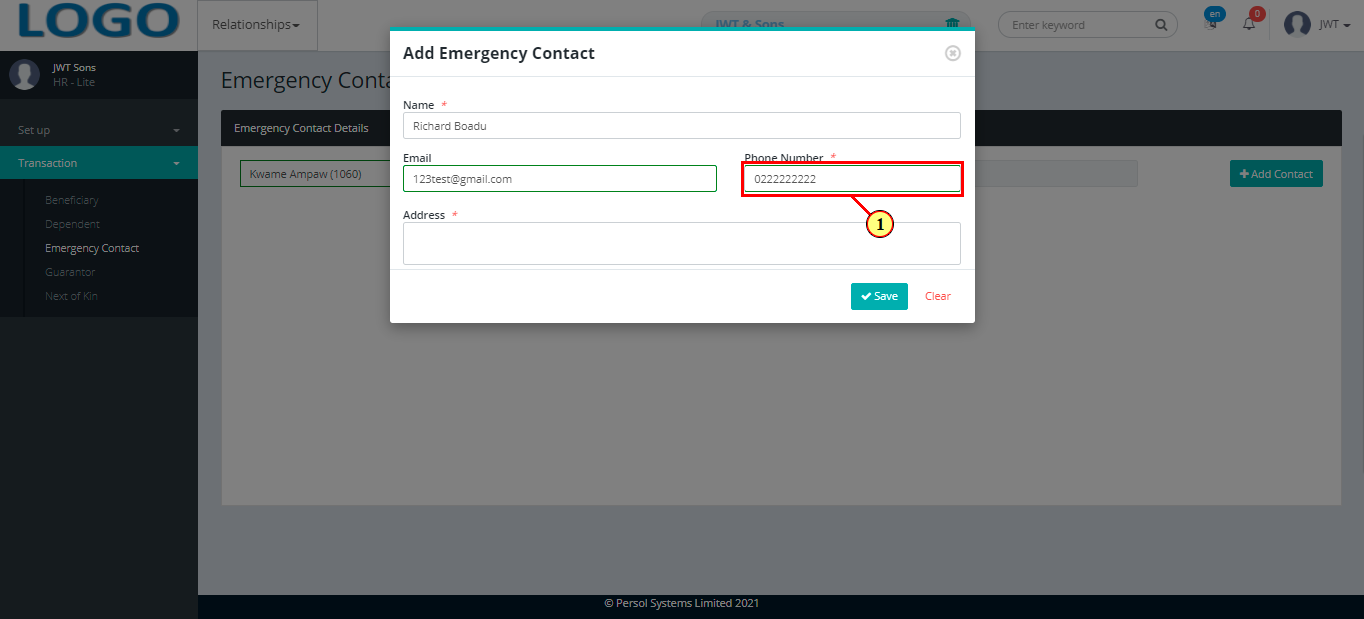
| (1) | Provide the emergency contact's phone number |
|
This field is required * |
| Step | Action |
|---|---|
| (1) | Enter the postal or residential address of the emergency contact |
|
This field is required * |
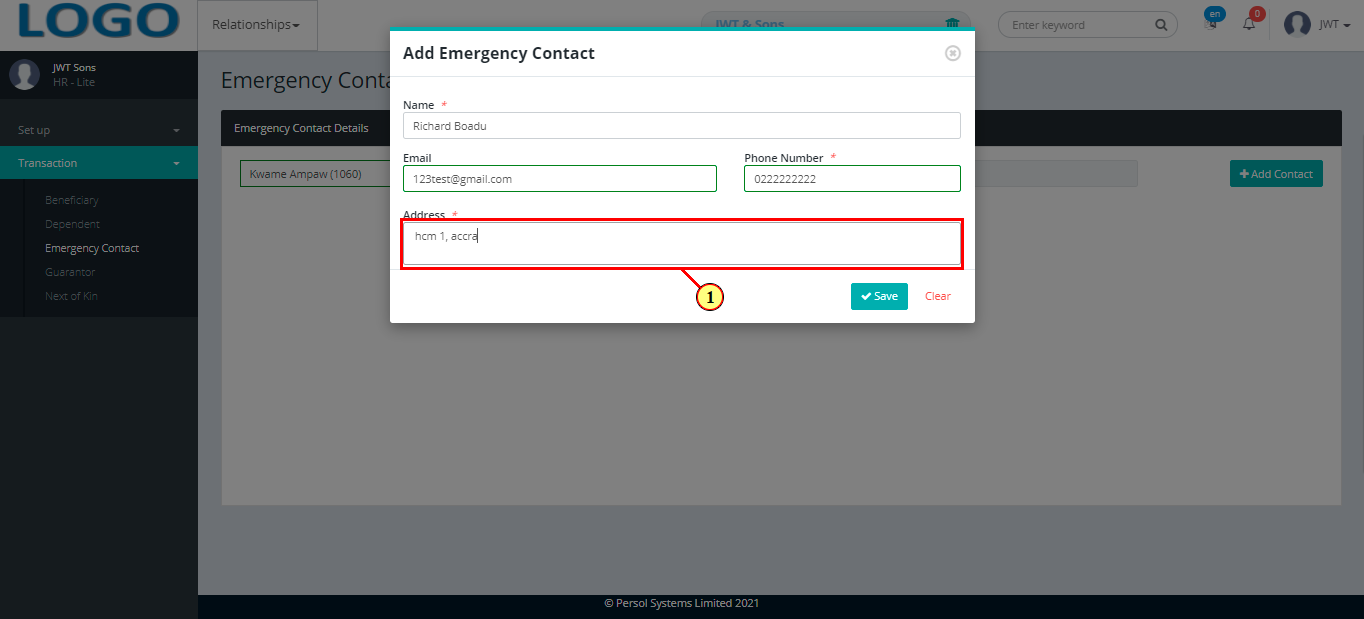
| Step | Action |
|---|---|
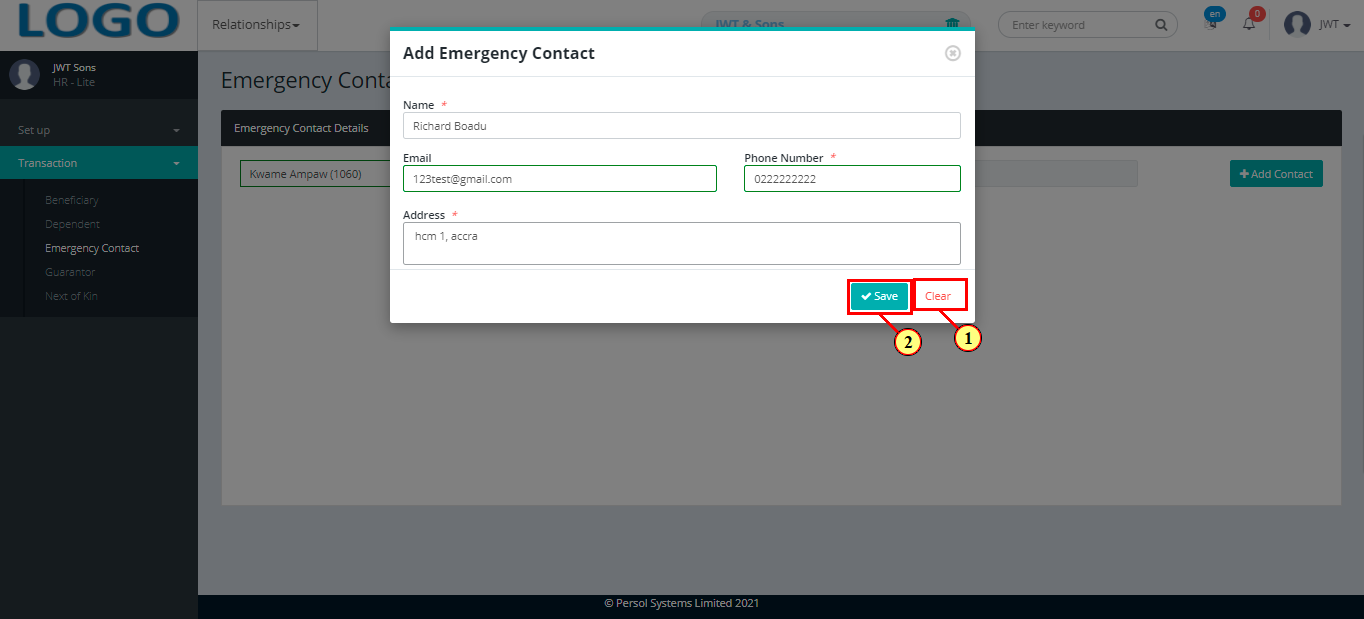
| (1) | You may click on the 'Clear' button to clear all details entered |
| (2) |
Clivck on the  button to save the emergency contact's details button to save the emergency contact's details
|
| Step | Action |
|---|---|
| (1) | A notification displays to indicate that the emergency contact's details have been saved successfully |
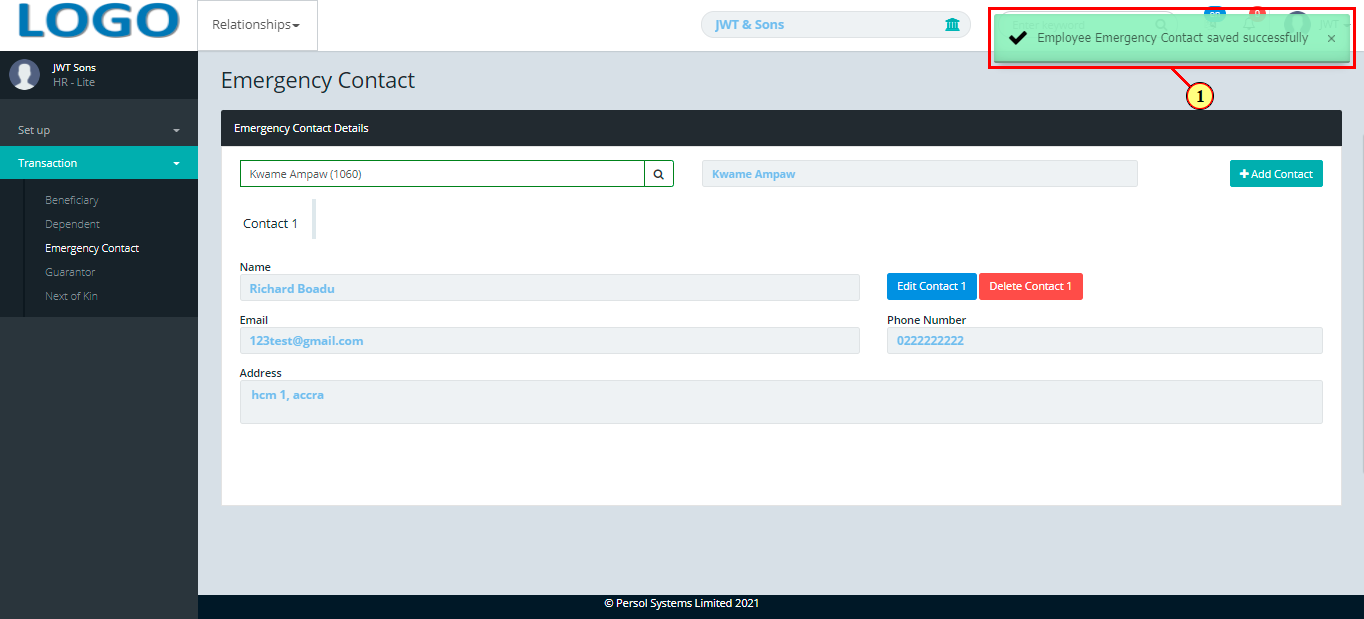
| Step | Action |
|---|---|
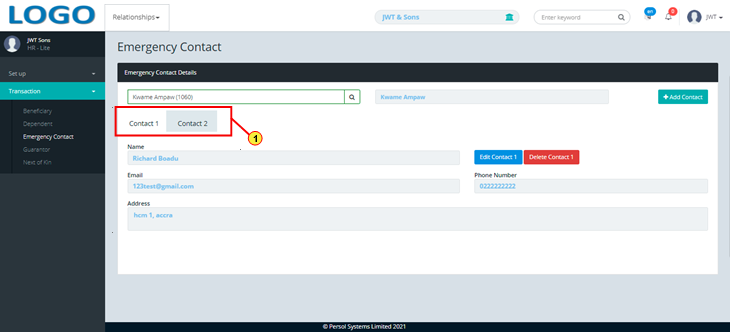
| The added emergency contact details display in the grid | |
| (1) | To view the details of each emergency contact, click on the tabs |
| Step | Action |
|---|---|
| (1) |
You may click on the  button to revert changes made button to revert changes made
|
| (2) |
Click on the update  button to save the changes made button to save the changes made
|
| Step | Action |
|---|---|
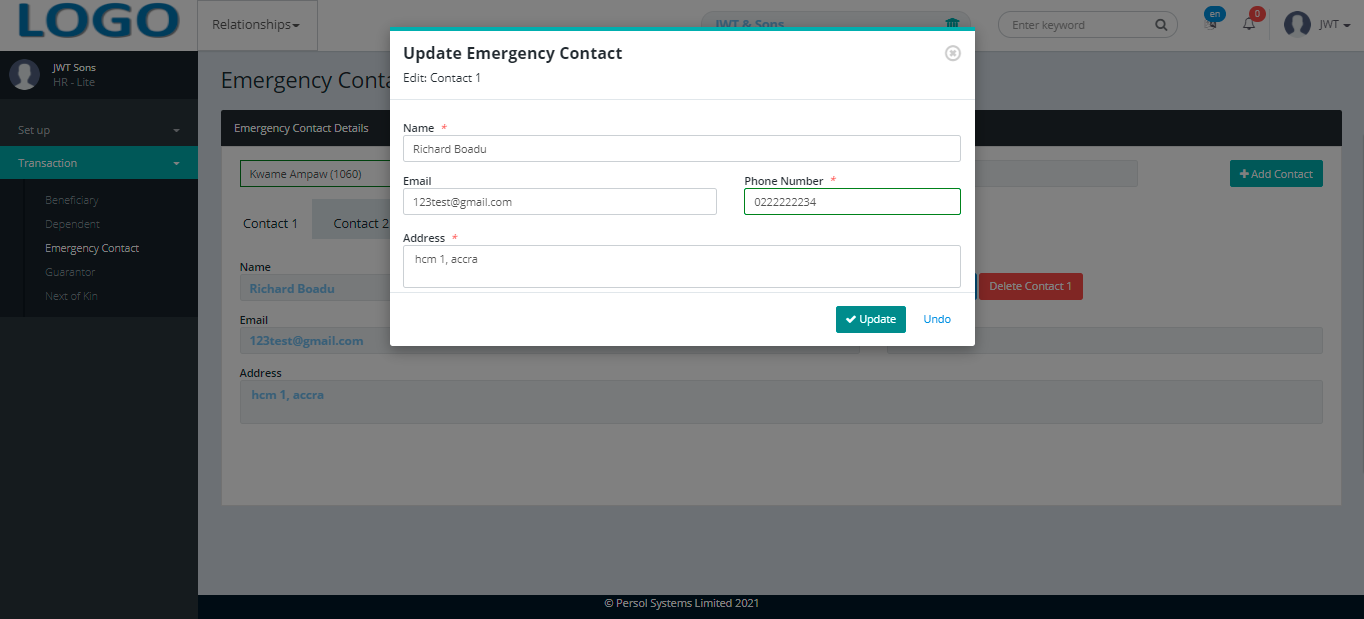
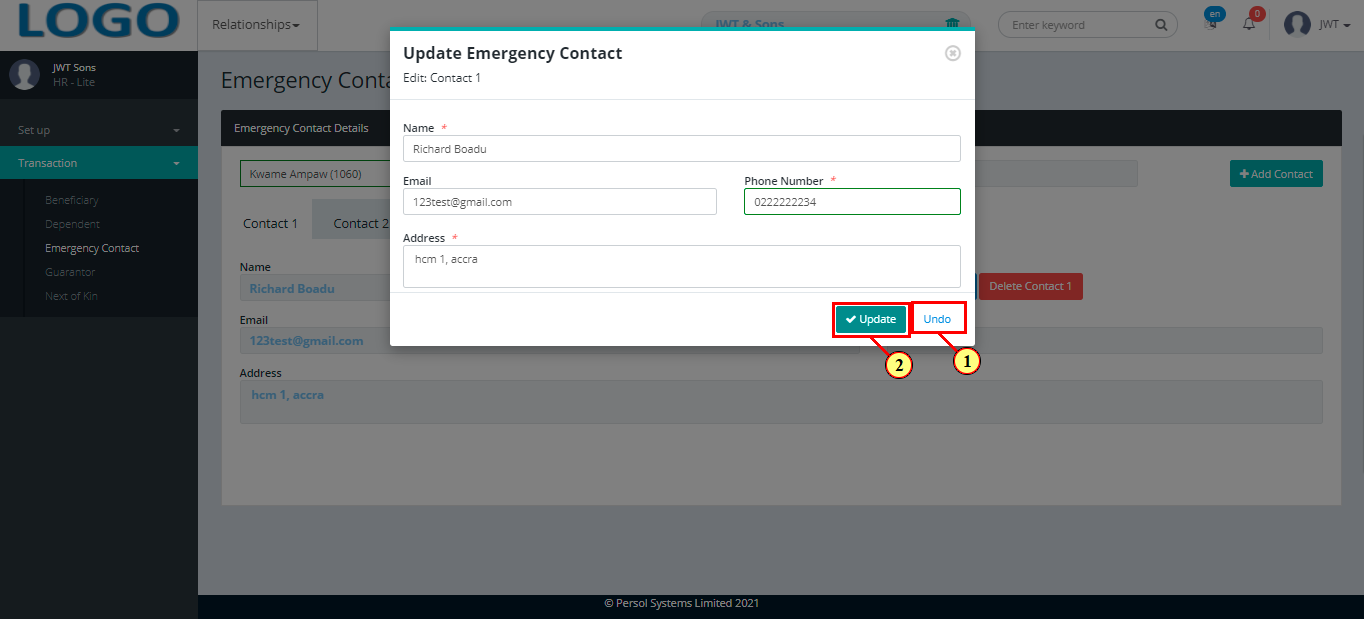
| A modal opens to edit the emergency contact's details | |
|
Edit the name, email, phone and/or address of the emergency contact |
| Step | Action |
|---|---|
| (1) | Click on the 'Undo' button to revert all changes made |
| (2) |
Click on the .png) button to save the changes made button to save the changes made
|
| Step | Action |
|---|---|
| (1) | A notification displays to indicate that the emergency contact's details have been updated successfully |

| Step | Action |
|---|---|
| (1) | On the Personax HR Lite homepage, select the 'Relationships' tile |

| Step | Action |
|---|---|
| The ‘Relationships’ submenus page opens | |
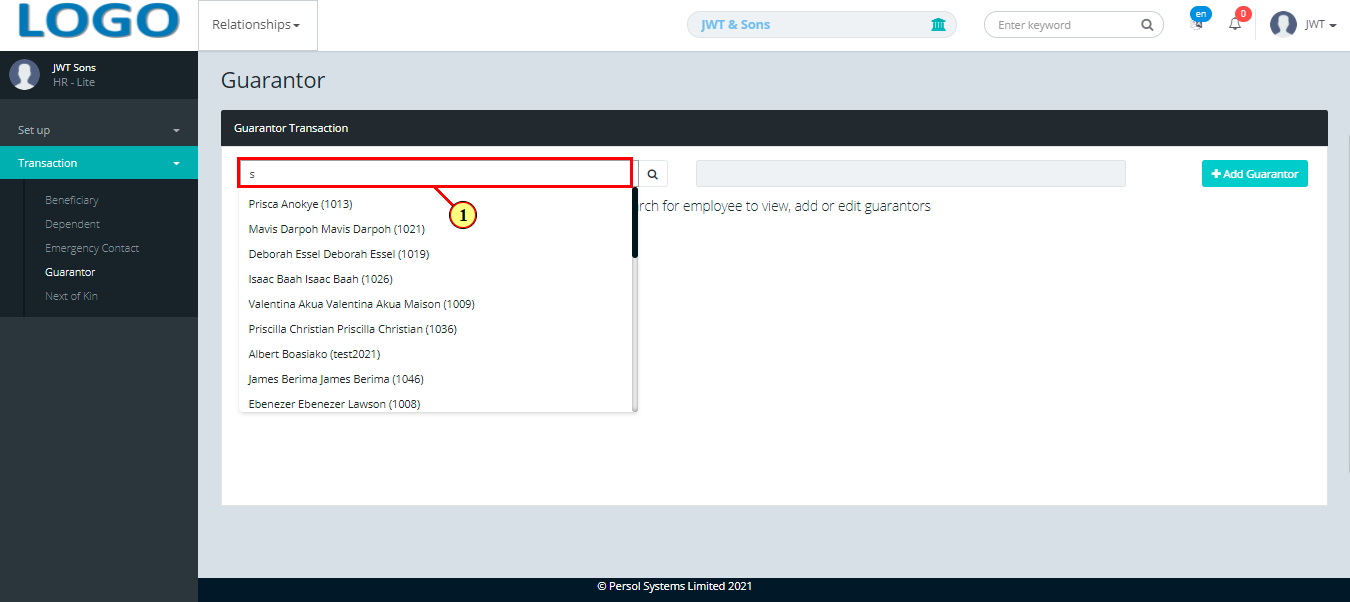
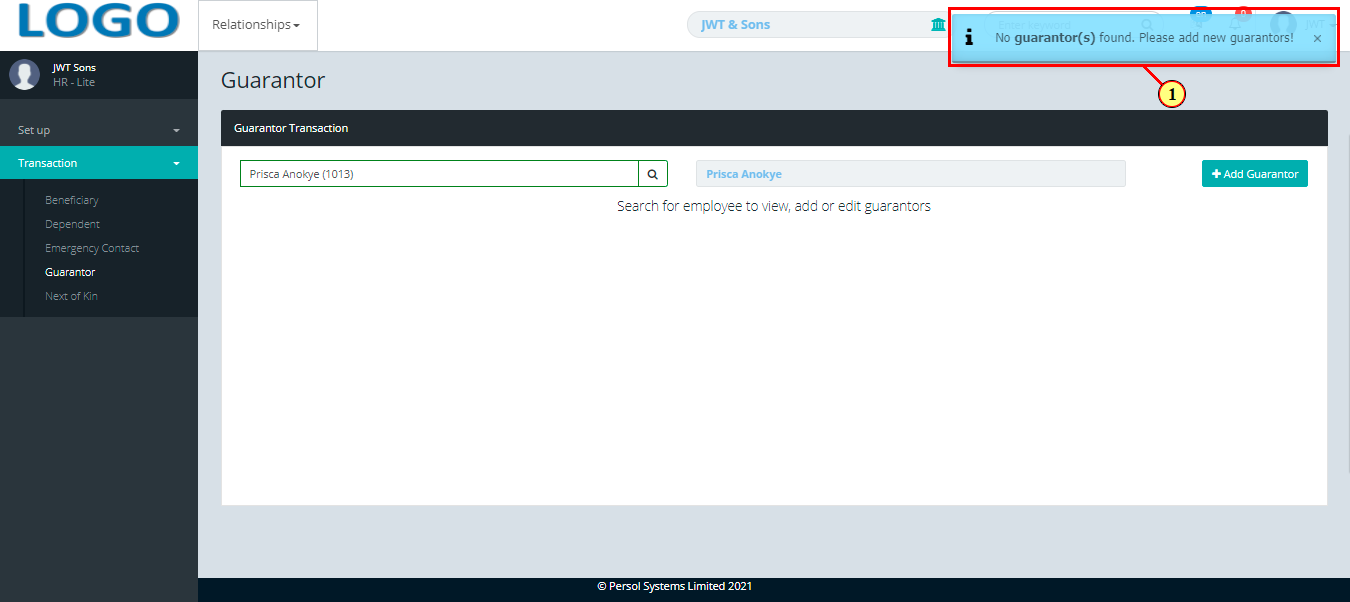
| (1) | Click on the 'Guarantor' transaction tile |

| Step | Action |
|---|---|
| The 'Guarantor' page opens | |
| (1) | To add a guarantor to an employee's record, search for the employee by name or ID |
| Step | Action |
|---|---|
| Previously added guarantor details of the employee (if any) display in the grid | |
| (1) | A notification displays if no guarantor details exist for the employee |
| Step | Action |
|---|---|
| (1) |
Click on the 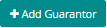 button to add a guarantor to the employee's record button to add a guarantor to the employee's record
|
|
Only two guarantors can be added per employee |
| Step | Action |
|---|---|
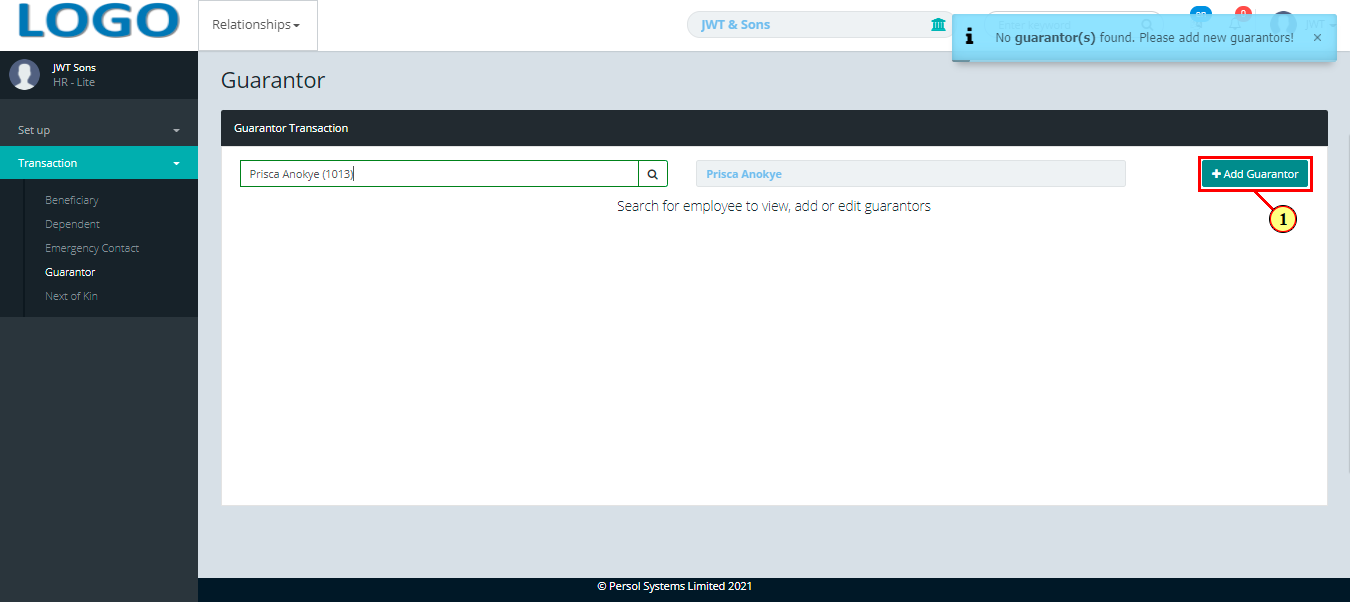
| The 'Add Guarantor' modal opens | |
| (1) | Enter the name of the guarantor |
|
This field is required * |
| Step | Action |
|---|---|
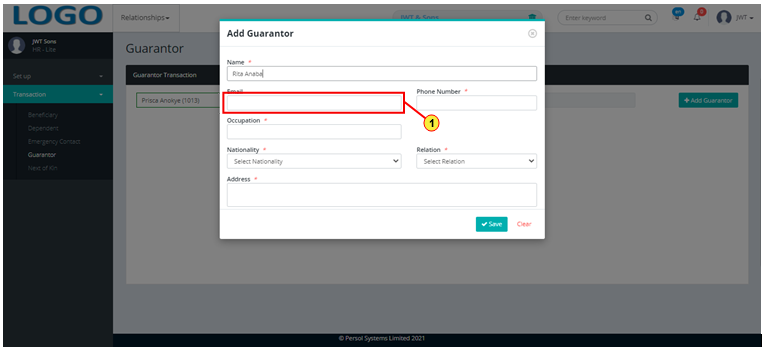
| Enter the guarantor's email address |
| Step | Action |
|---|---|
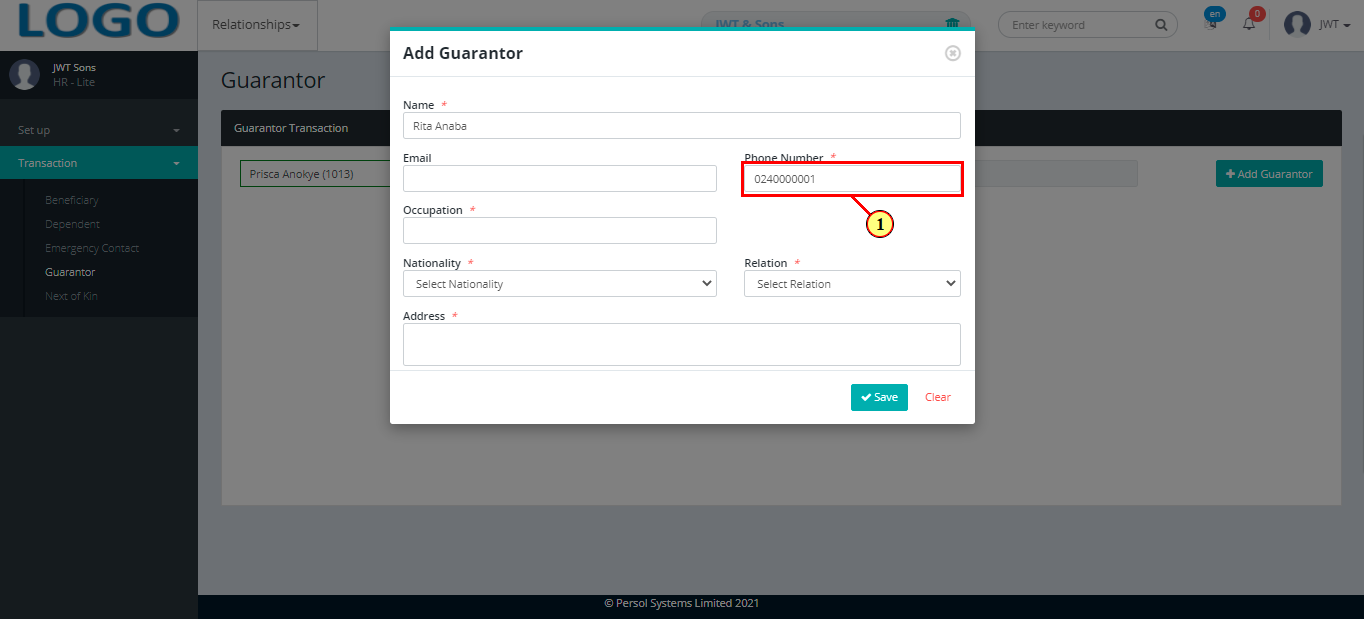
| (1) | Provide the guarantor's phone number |
|
This field is required * |
| Step | Action |
|---|---|
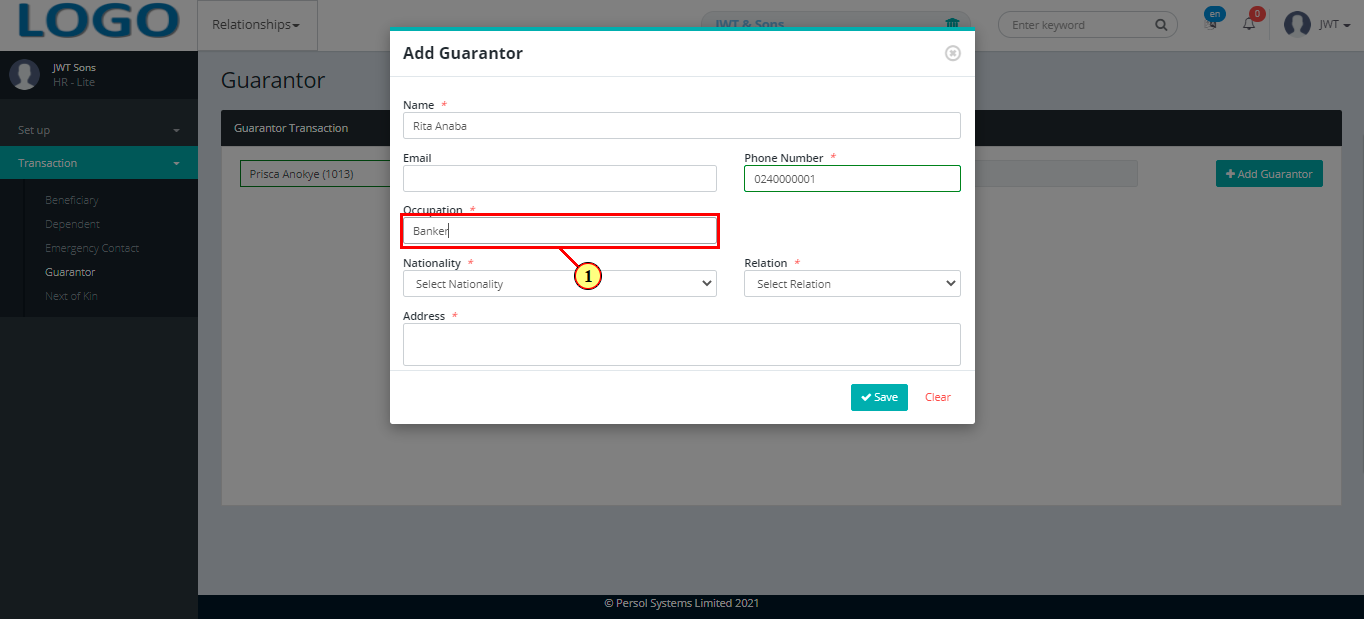
| (1) | Enter the guarantor's occupation |
|
This field is required * |
| Step | Action |
|---|---|
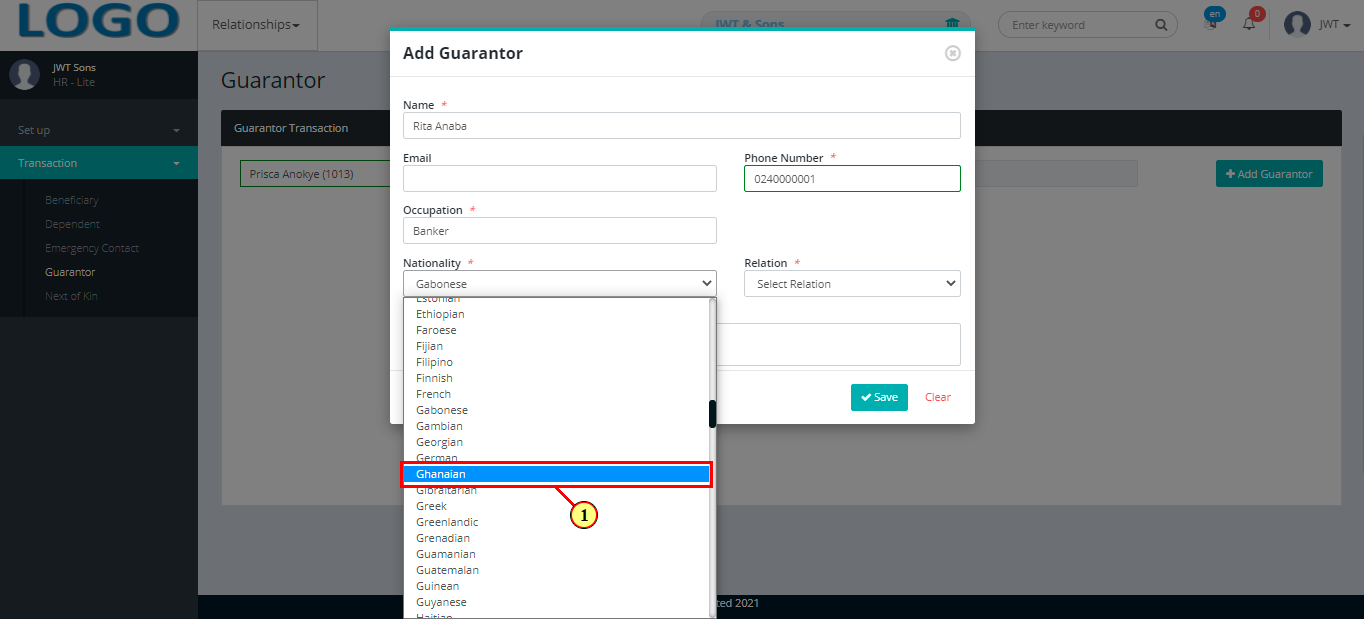
| (1) | Select the guarantor's nationality from the dropdown list |
|
This field is required * |
| Step | Action |
|---|---|
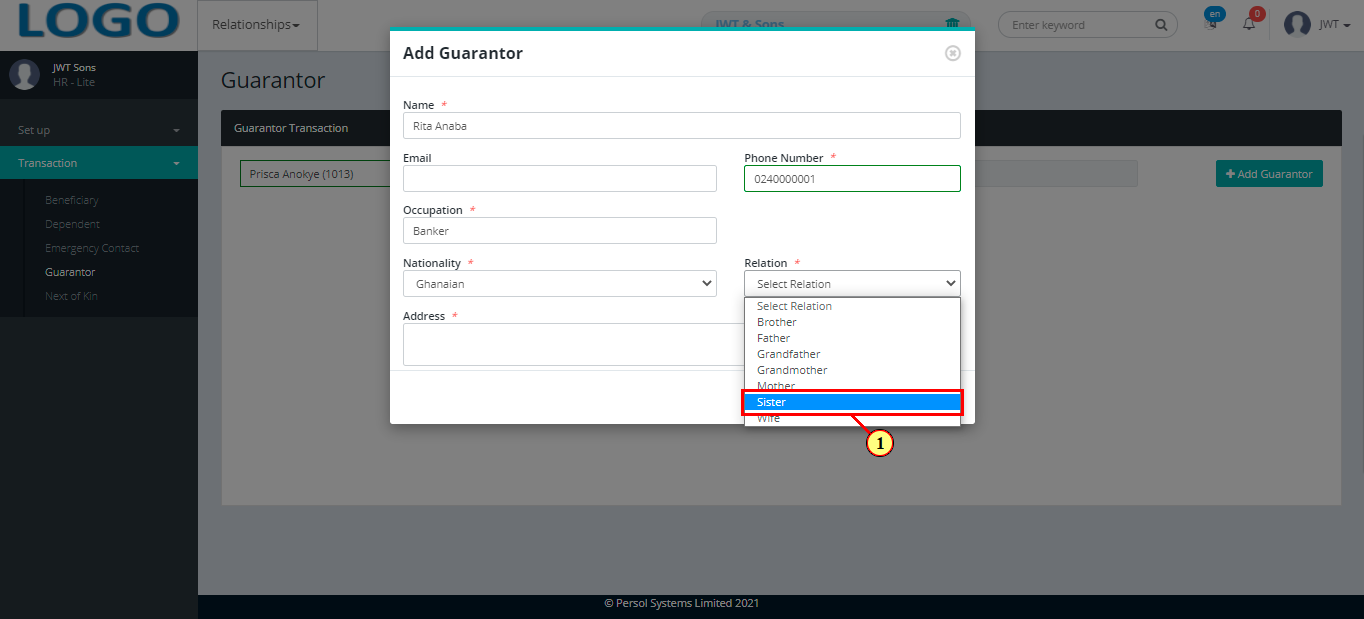
| (1) | Select the guarantor's relation to the employee from the dropdown options |
|
This field is required * |
| Step | Action |
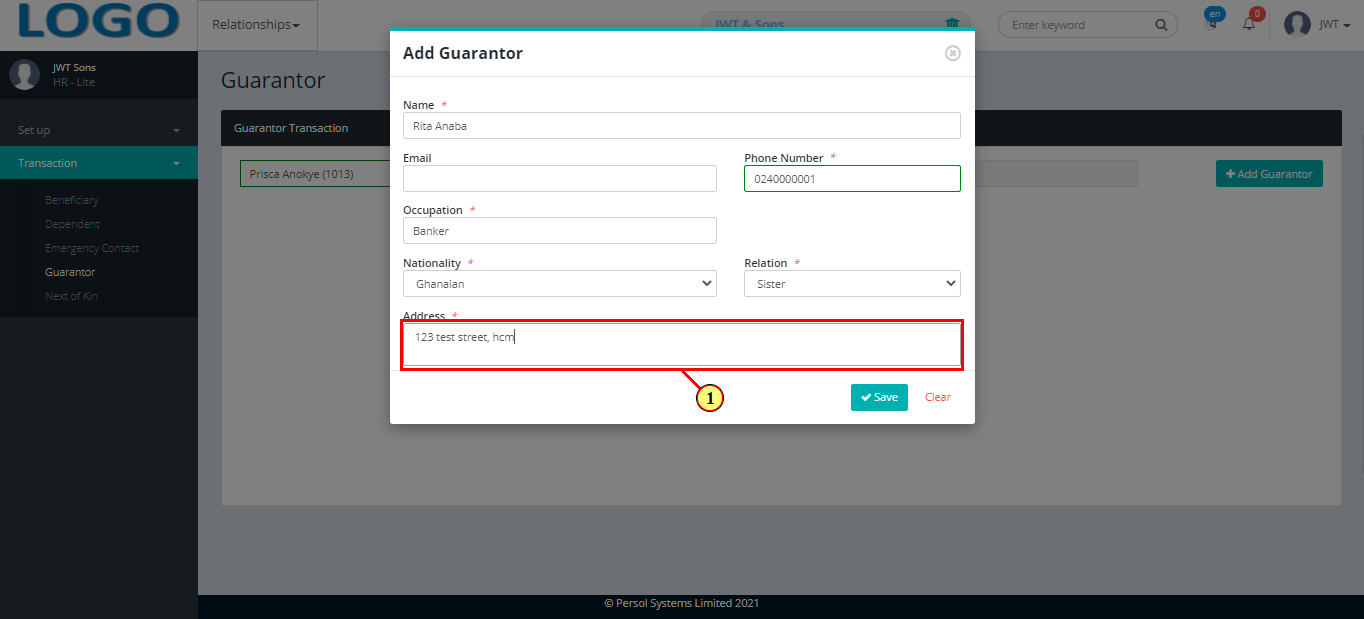
|---|---|
| (1) | Enter the postal or residential address of the guarantor |
|
This field is required * |
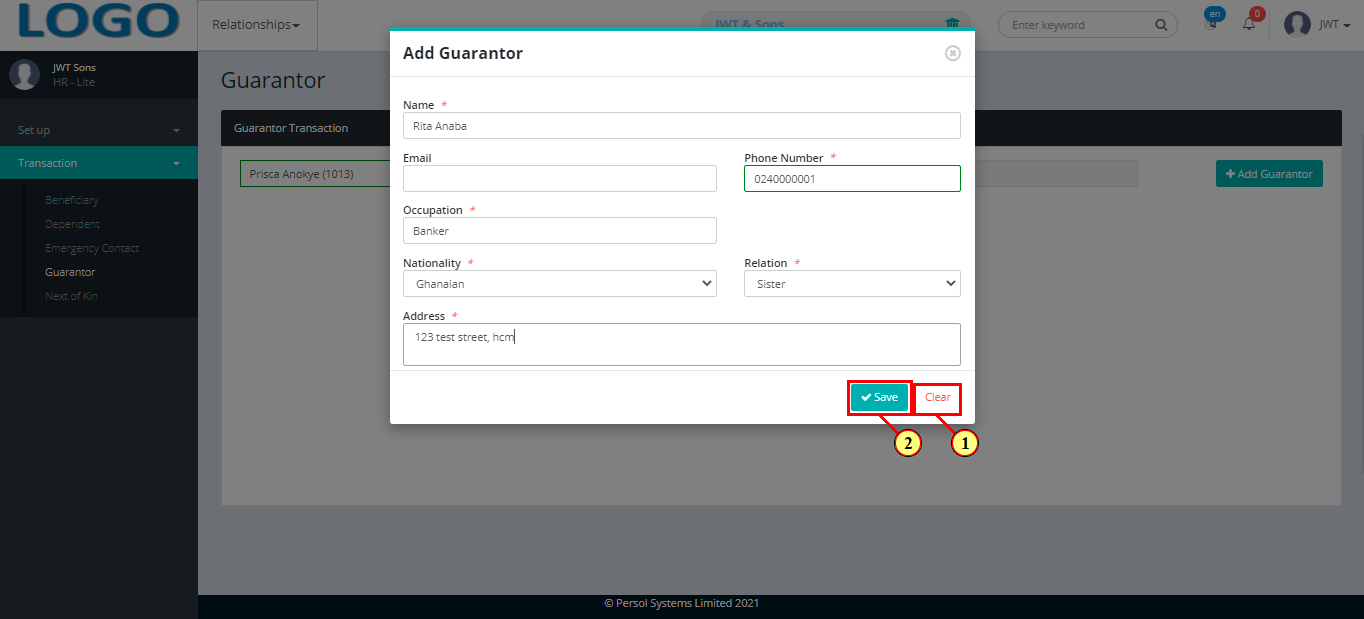
| Step | Action |
|---|---|
| (1) | You may click on the 'Clear' button to clear all details entered |
| (2) |
Click on  button to save the details of the newly added guarantor button to save the details of the newly added guarantor
|
| Step | Action |
|---|---|
| (1) | A notification displays to indicate that the guarantor's details have been saved successfully |
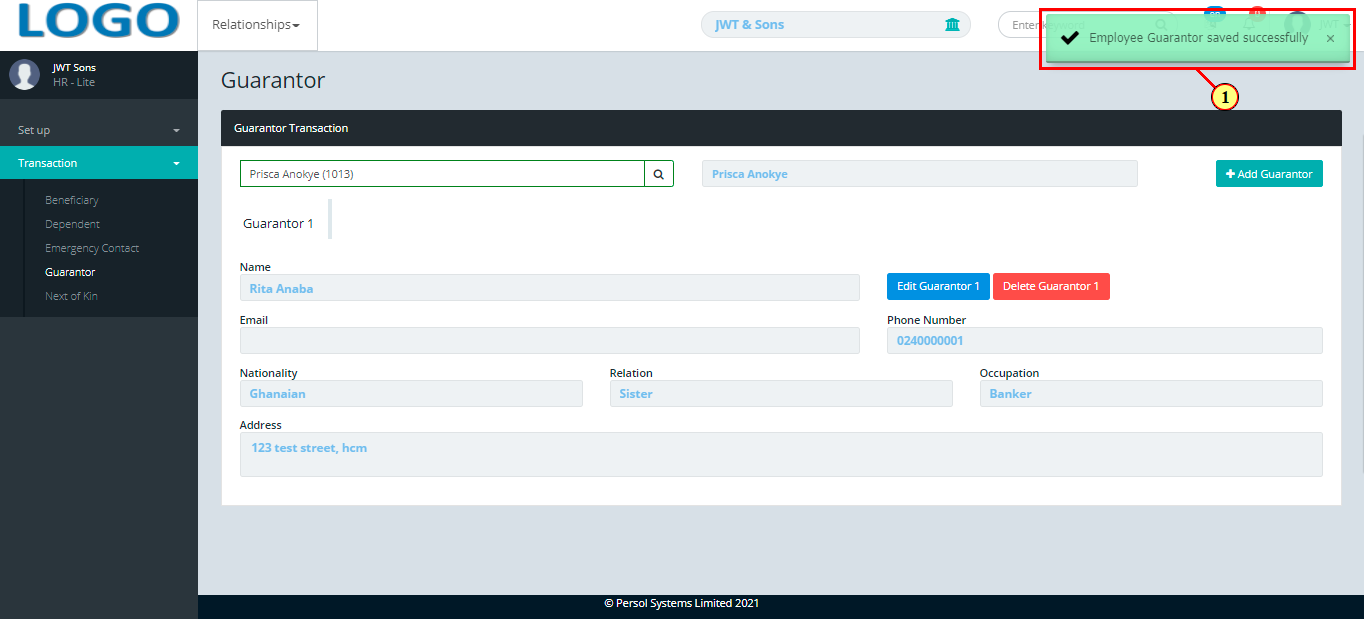
| Step | Action |
|---|---|
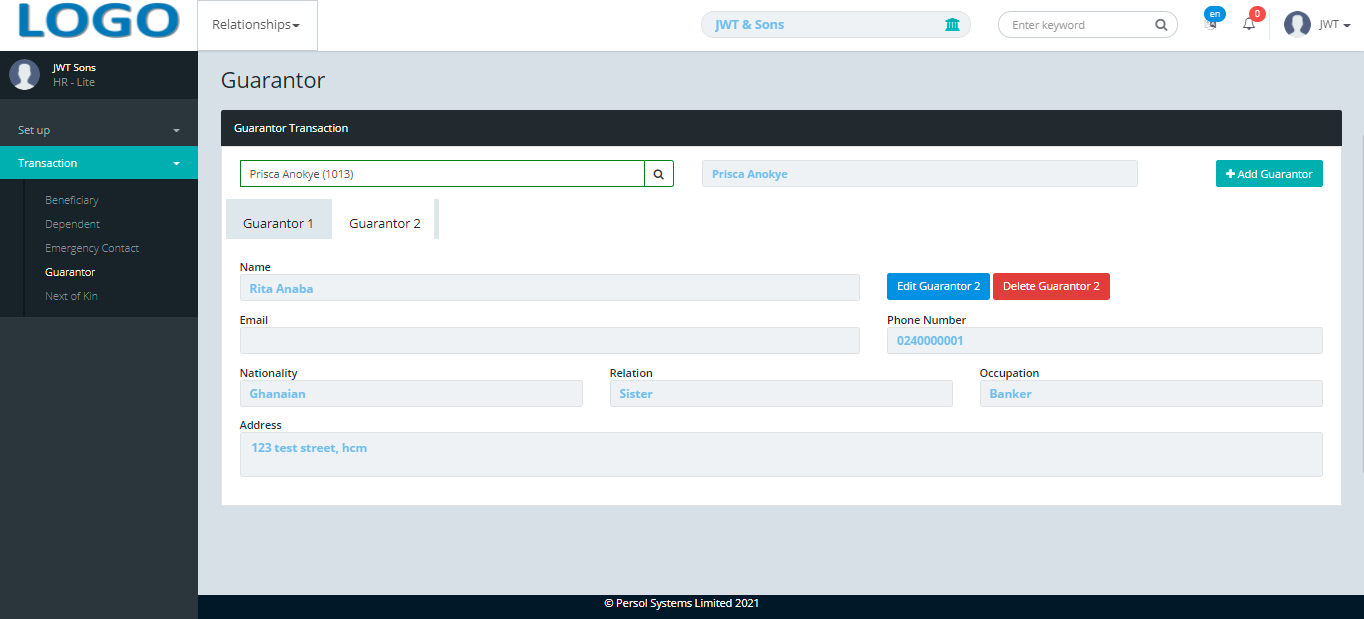
| The guarantor's details display in the grid | |
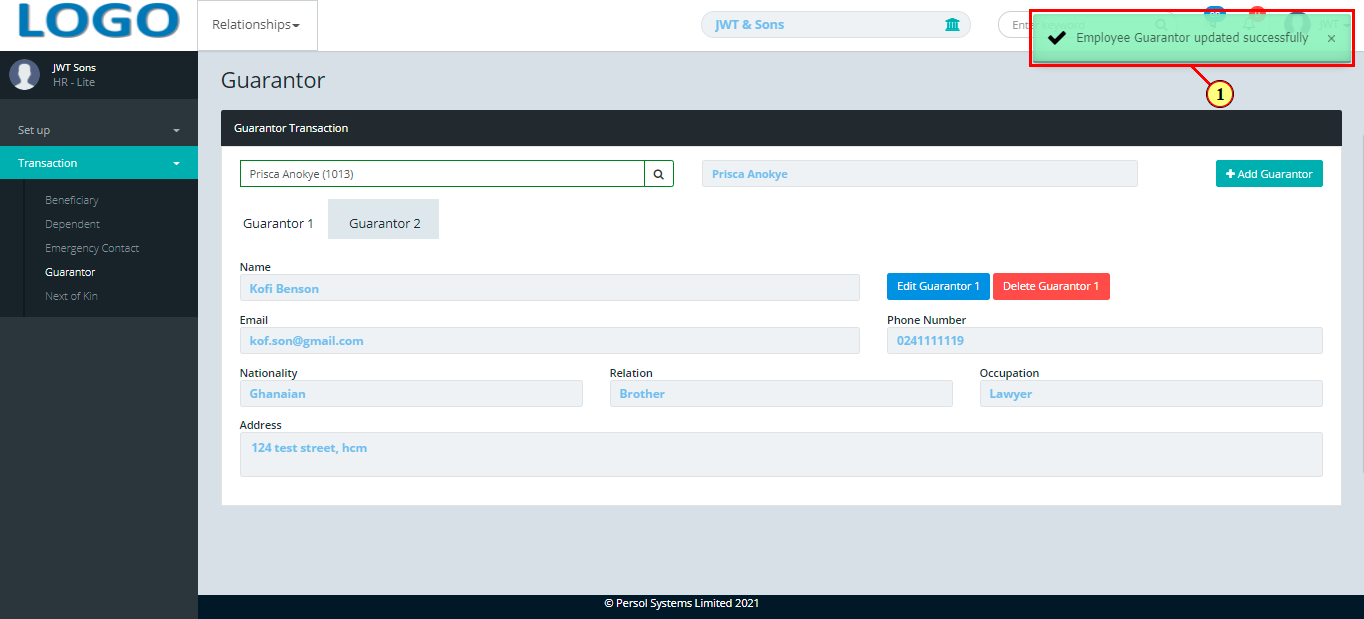
| (1) | To view the details of a guarantor, click on the guaranter’s tab |
| Step | Action |
|---|---|
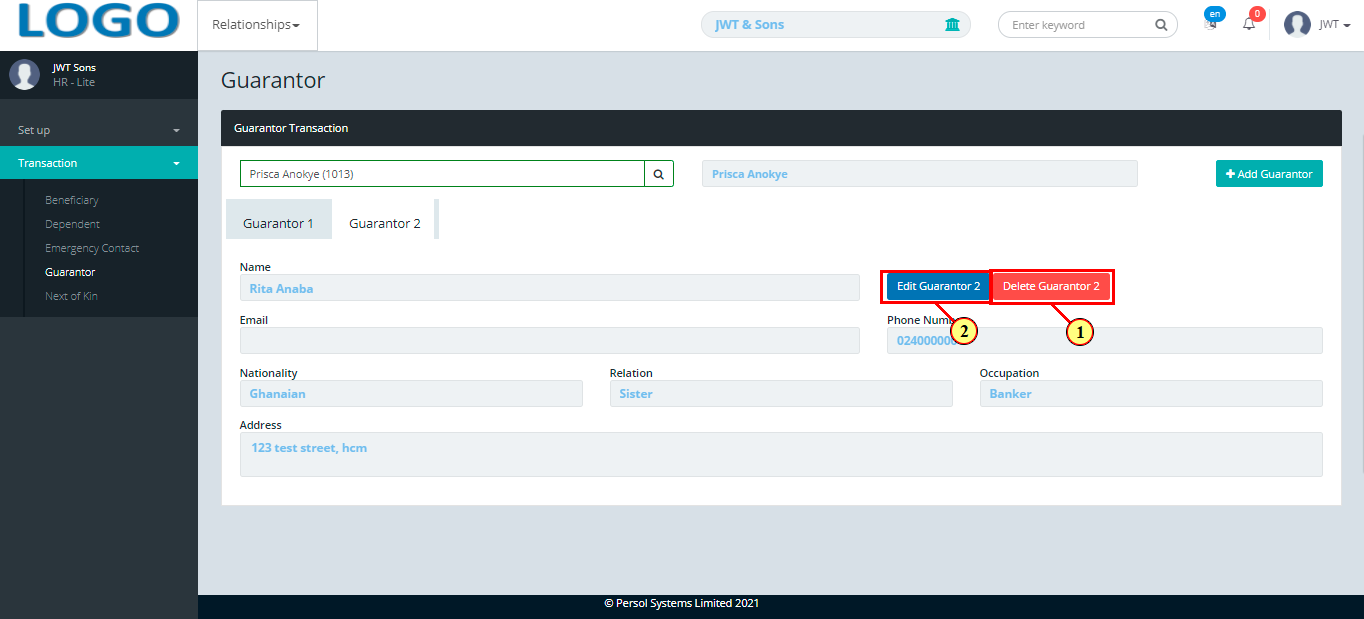
| (1) | You may click on the ‘Delete’ button to delete a guarantor's details |
| (2) | To edit a guarantor's details, click on the ‘Edit’ button for that guarantor |
| Step | Action |
|---|---|
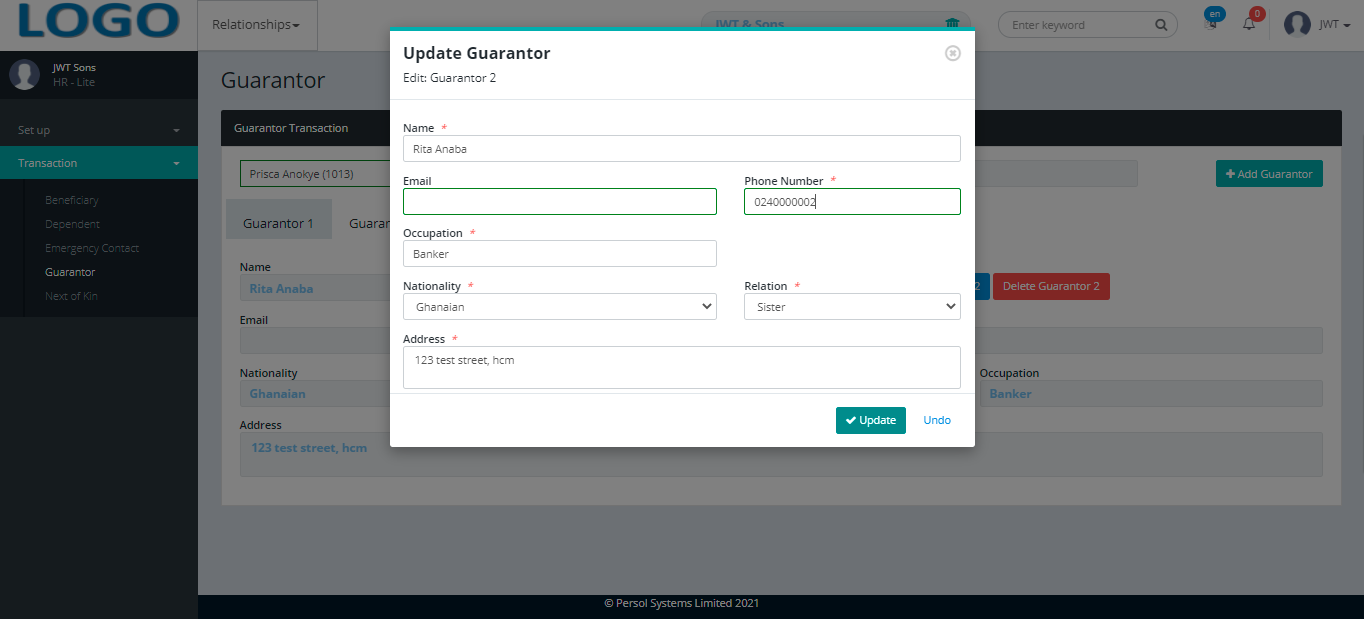
| A modal opens to edit the guarantor's details | |
|
Edit the details of the guarantor |
| Step | Action |
|---|---|
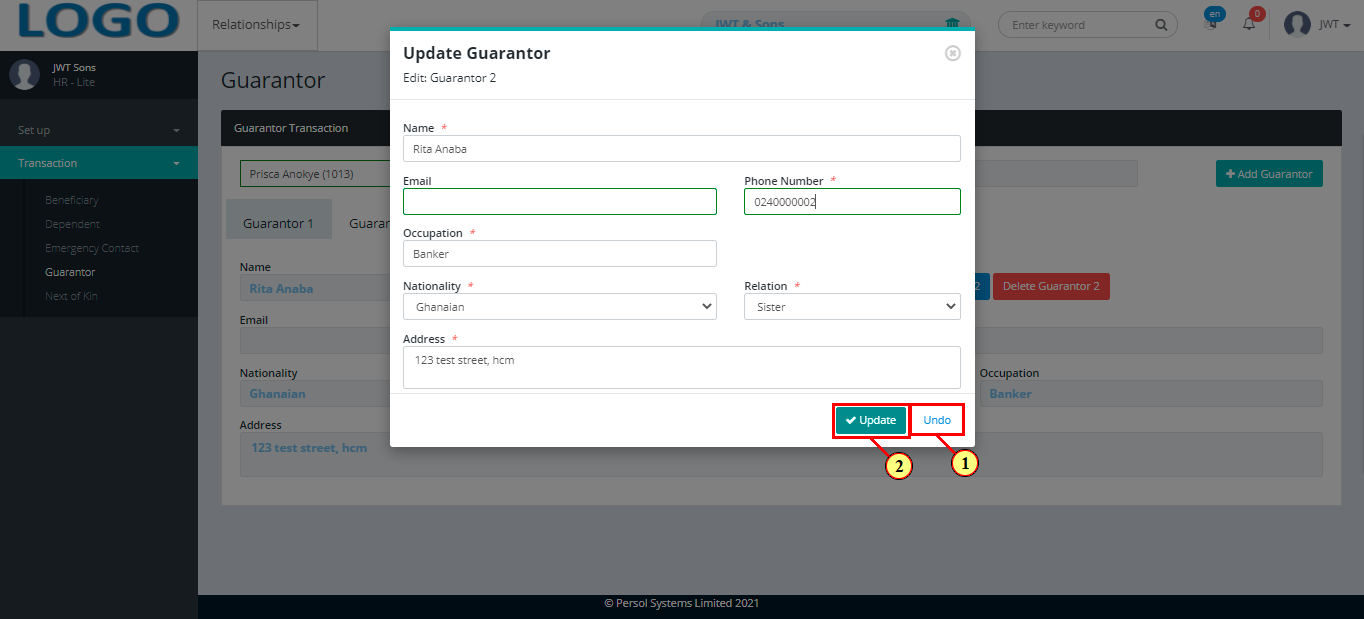
| (1) | You may click on the 'Undo' button to revert all changes made |
| (1) |
Click on the  button to save the changes made button to save the changes made
|
| Step | Action |
|---|---|
| (1) | A notification displays to indicate that the guarantor's details have been updated successfully |
| Step | Action |
|---|---|
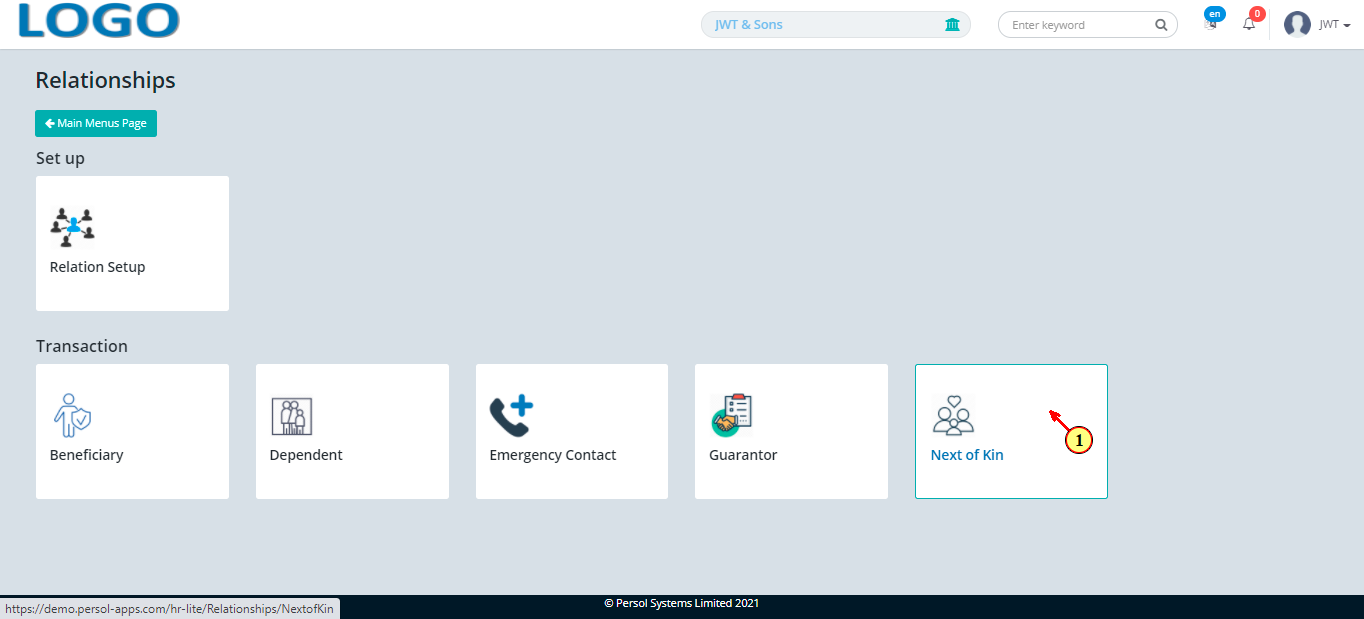
| (1) | On the Personax HR Lite homepage, select the 'Relationships' tile |
| Step | Action |
|---|---|
| The ‘Relationships’ submenus page opens | |
| (1) | Select the 'Next of Kin' transaction tile |
| Step | Action |
|---|---|
| The 'Next of Kin' page opens | |
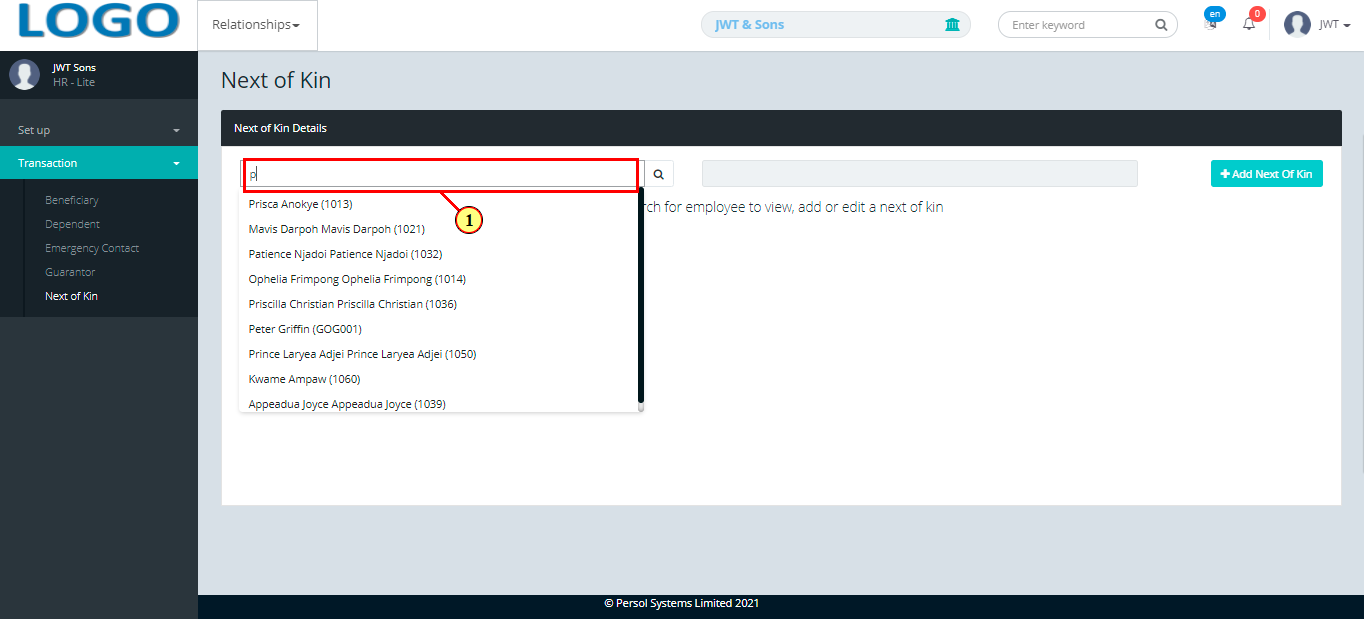
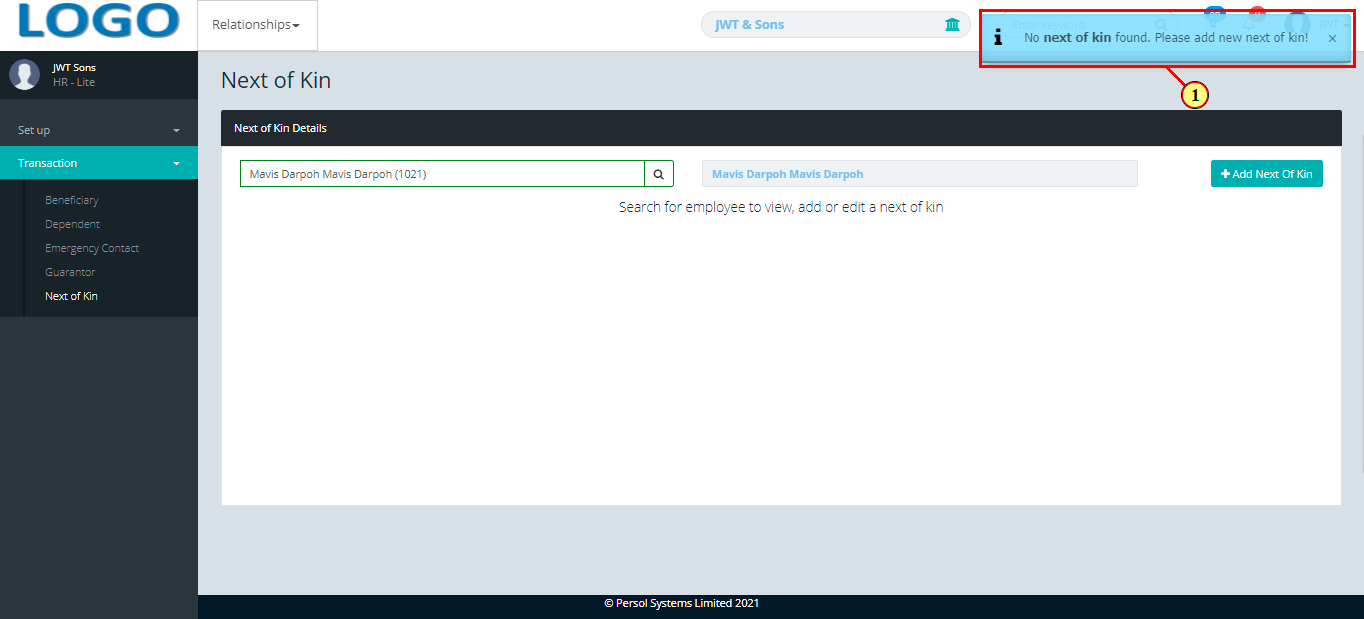
| (1) | To add a next of kin to an employee's record, search for the employee by name or ID |
|
This field is required * |
| Step | Action |
|---|---|
|
Previously added next of kin details for the employee display in the grid (if any) |
| (1) | A notification displays if no next of kin details exist for the employee |
| Step | Action |
|---|---|
| (1) |
Click on the 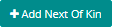 button to add a next of kin to the employee's record button to add a next of kin to the employee's record
|
|
Only 1 next of kin can be added per employee |
| Step | Action |
|---|---|
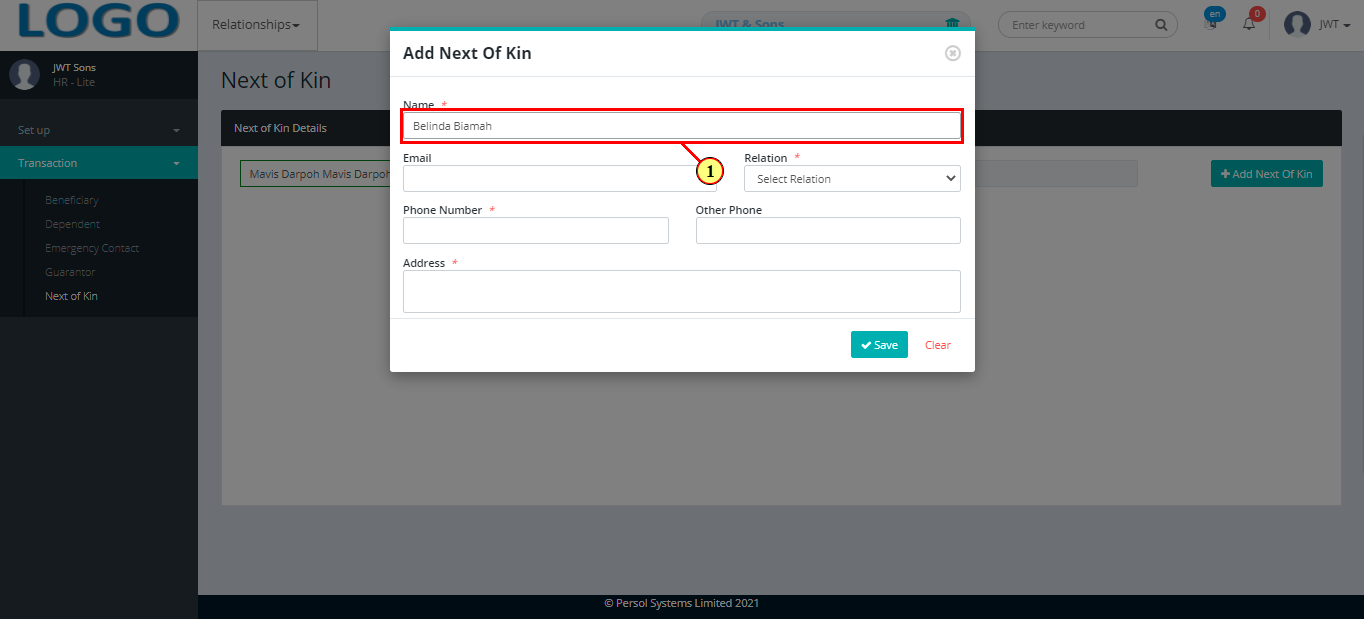
| The 'Add Next Of Kin' modal opens | |
| (1) | Enter the name of the next of kin |
|
This field is required * |

| Step | Action |
|---|---|
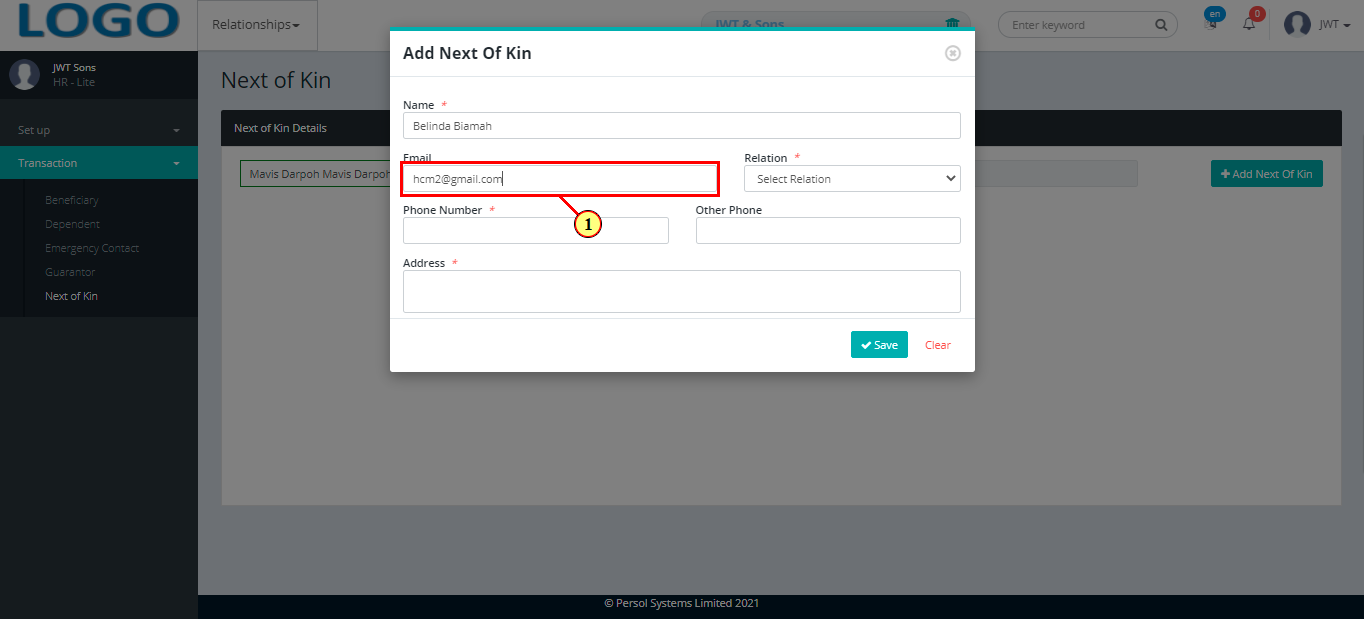
| (1) | Enter the next of kin's email address |
| Step | Action |
|---|---|
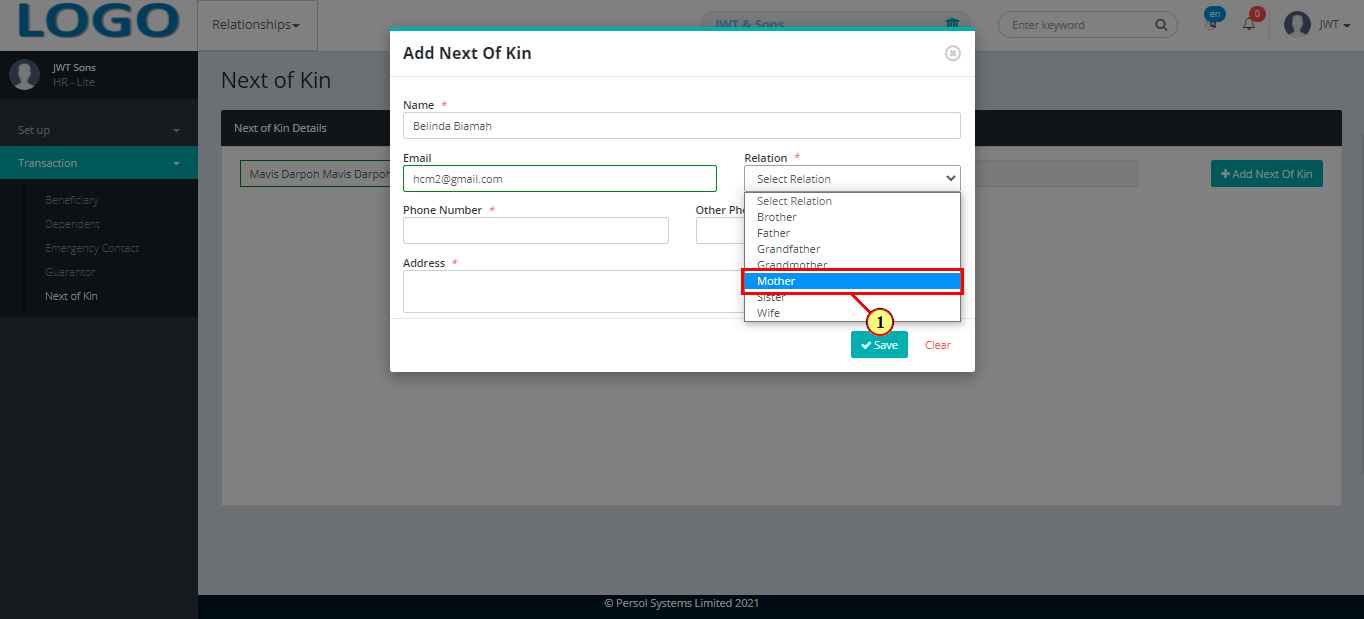
| (1) | Select the next of kin's relation to the employee from the dropdown options |
|
This field is required * |
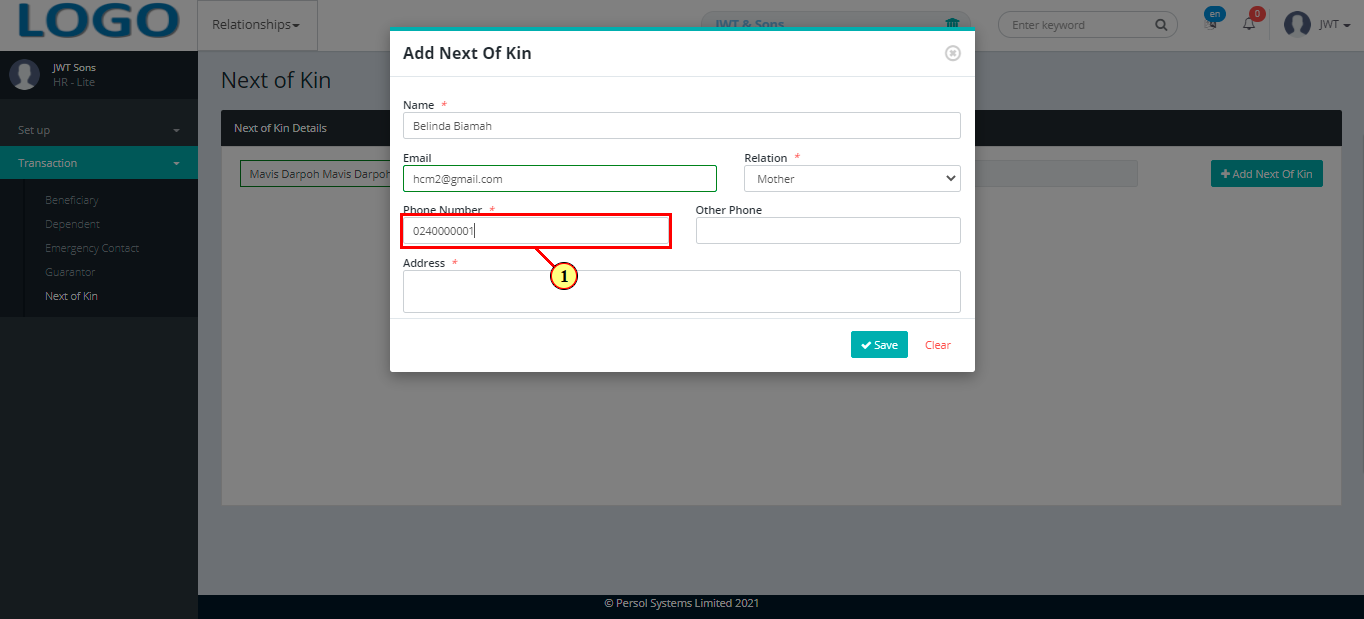
| Step | Action |
|---|---|
| (1) | Provide the next of kin's phone number |
|
This field is required * |
|
Enter an additional phone number in the ‘Other Phone’ field if any |
| Step | Action |
|---|---|
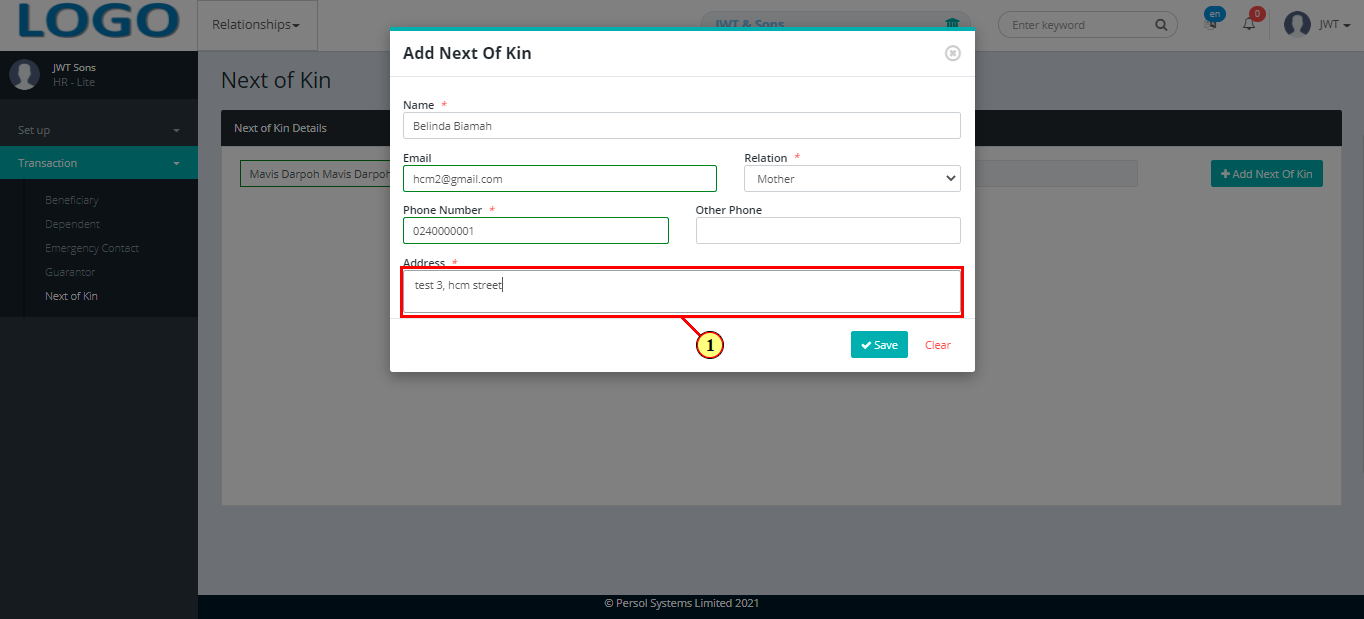
| (1) | Enter the postal or residential address of the next of kin |
|
This field is required * |
| Step | Action |
|---|---|
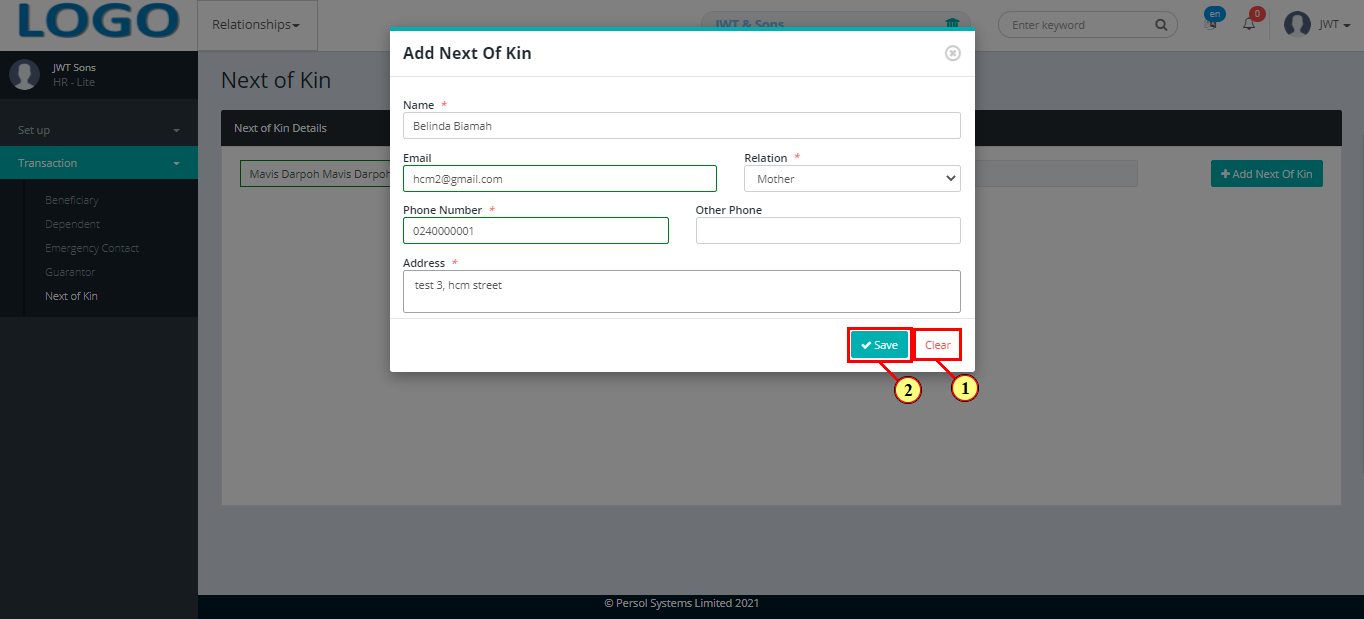
| (1) | You may click on the 'Clear' button to clear all details entered |
| (2) |
Click on the  button to save the details of the newly added next of kin button to save the details of the newly added next of kin
|
| Step | Action |
|---|---|
| (1) | A notification displays to indicate that the next of kin's details have been saved successfully |
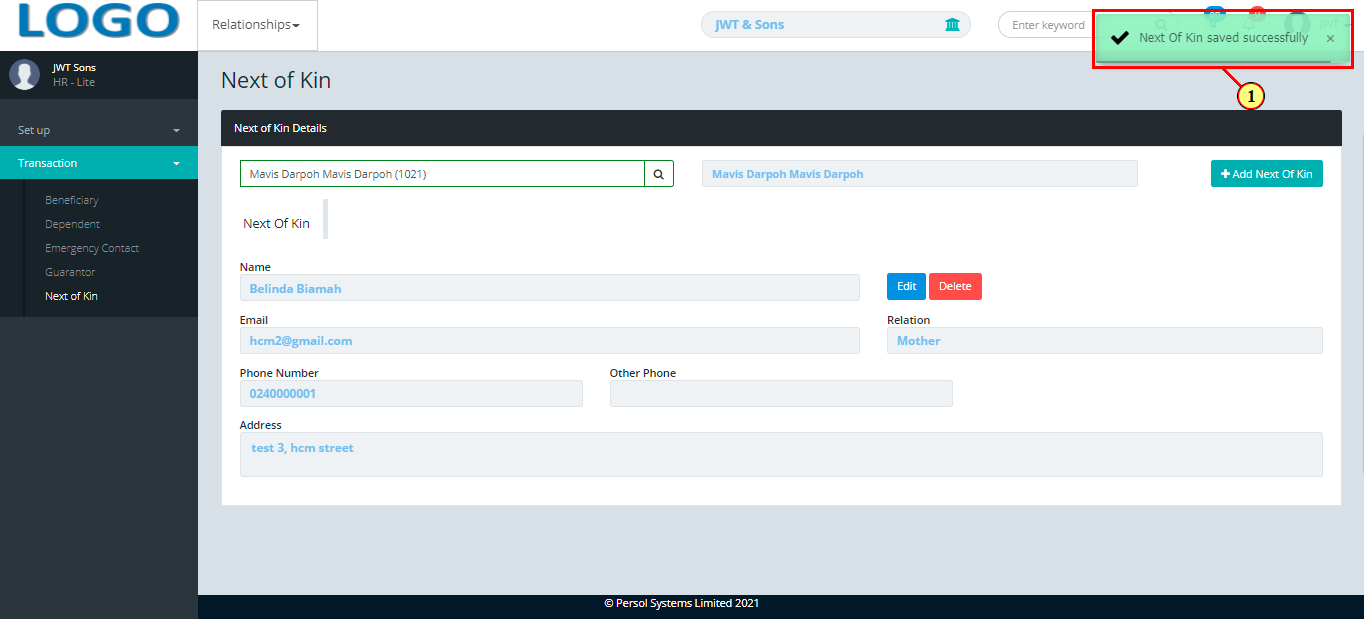
| Step | Action |
|---|---|
| The next of kin's details display in the grid | |
| (1) |
You may click on the  button to delete the next of kin's record button to delete the next of kin's record
|
| (2) |
To edit the next of kin's details, click on the button
|

| Step | Action |
|---|---|
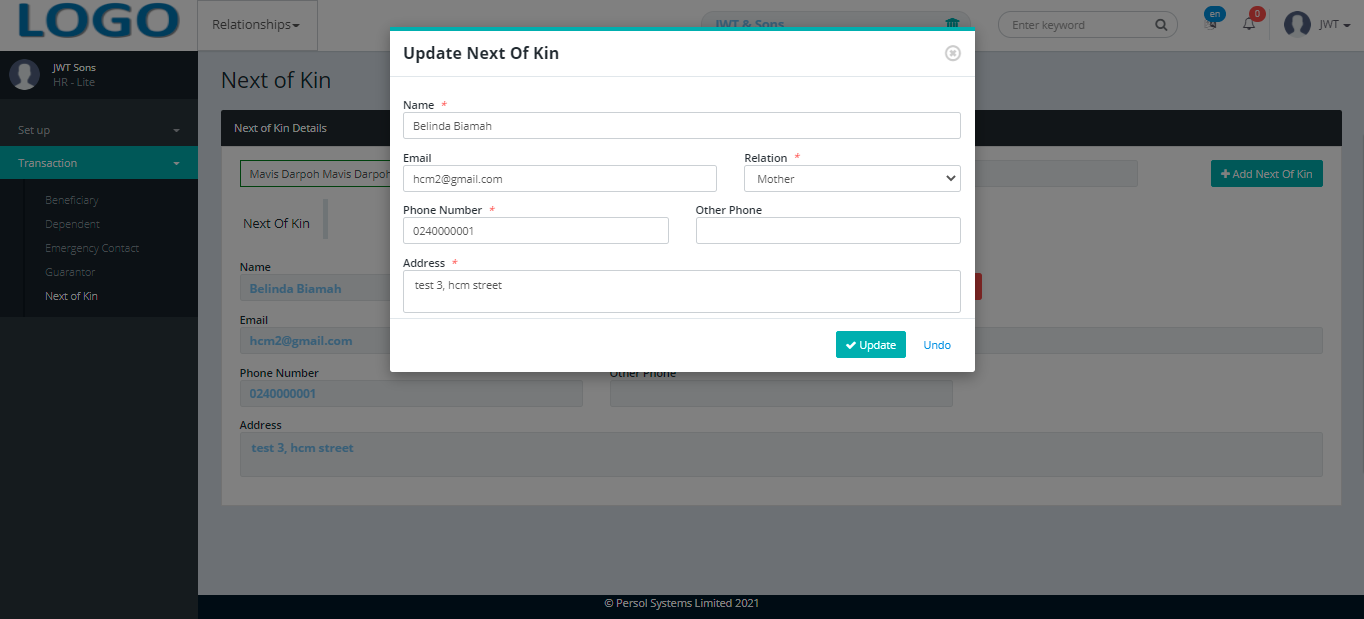
| A modal opens to edit the next of kin's details | |
|
Edit the details of the next of kin |
| Step | Action |
|---|---|
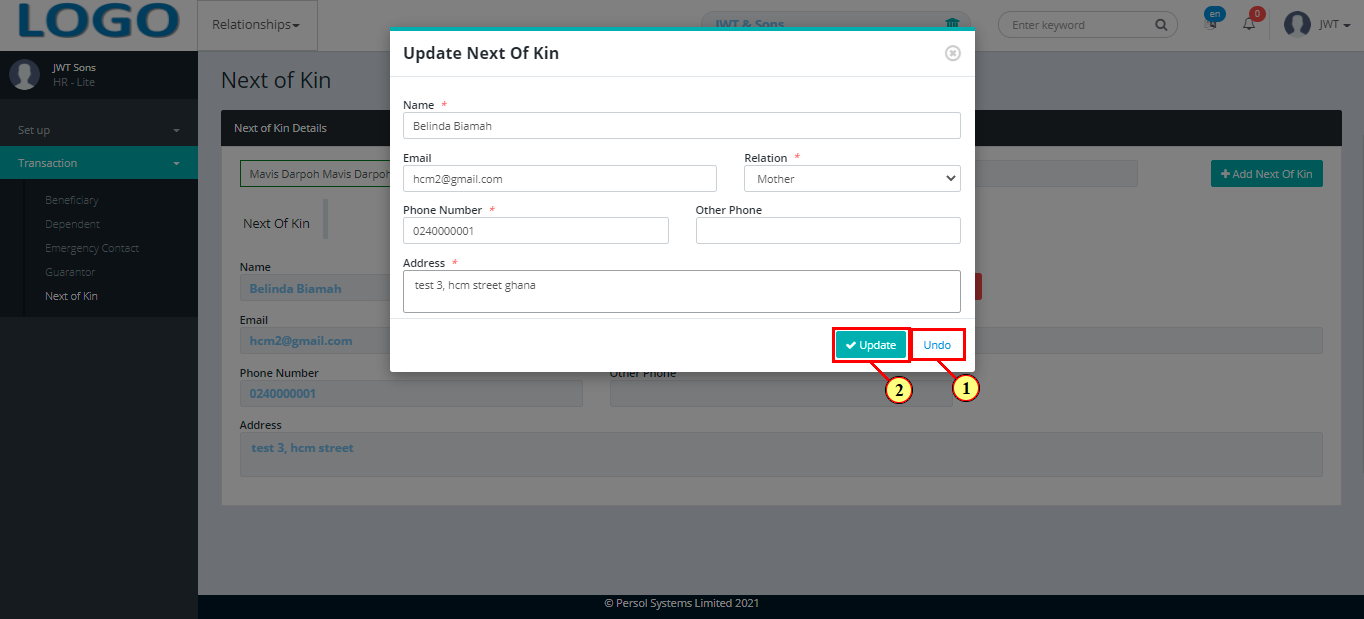
| (1) | You may click on the 'Undo' button to revert changes made |
| (2) |
click on the  button to save the changes made button to save the changes made
|
| Step | Action |
|---|---|
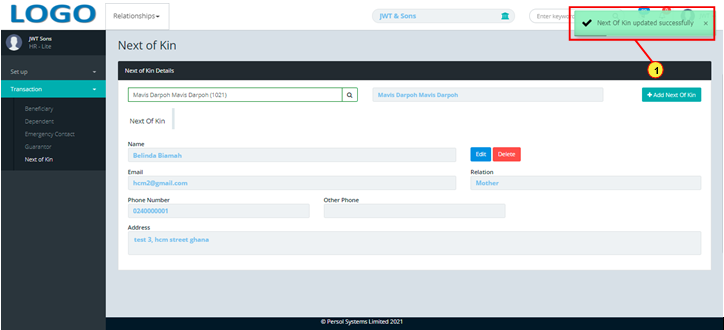
| (1) | A notification displays to indicate that the next of kin's details have been updated successfully |
| Step | Action |
|---|---|
| (1) | On the Personax HR Lite homepage, select the 'Report’ tile |

| Step | Action |
|---|---|
| The 'Report' page opens | |
| (1) | To view a report, select the report type |
| Step | Action |
|---|---|
| (1) | Select the name of the report |
| Step | Action |
|---|---|
| (1) | Select the criteria by which the report should be sorted |
| Step | Action |
|---|---|
| (1) | Check box to view all available categories on the report |
|
OR: Click here to view alternative |
|
Click here to continue steps |
| Step | Action |
|---|---|
| (1) | Uncheck box to select the specific categories to show on report |
| (2) | Select the range (from & to) for each category that you want to show on the report |
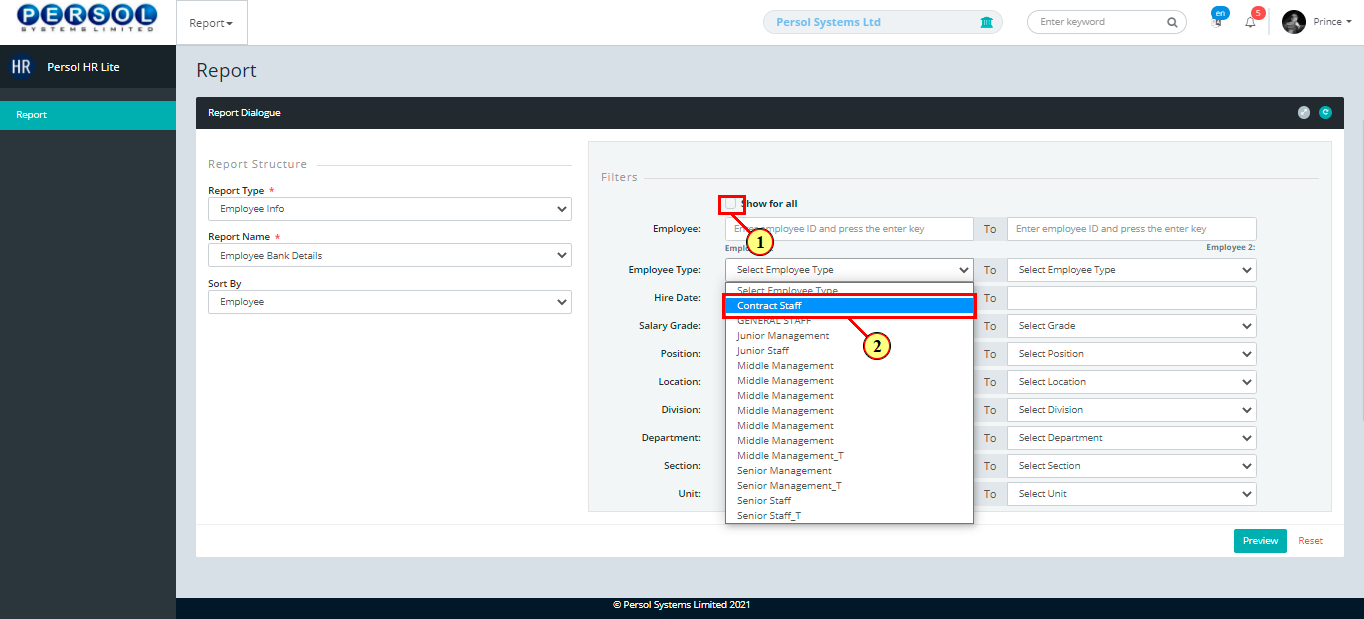
| Step | Action |
|---|---|
| (1) |
Click on the  button to open report button to open report
|
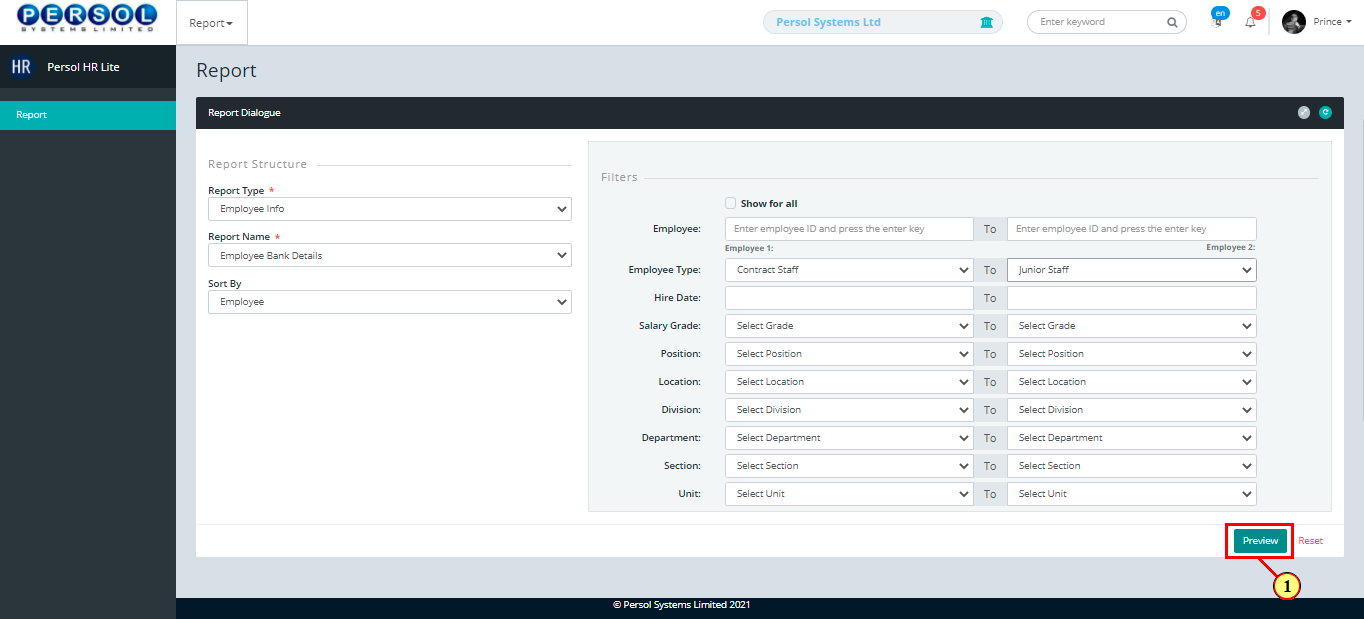
| Step | Action |
|---|---|
| The report page opens in the browser |