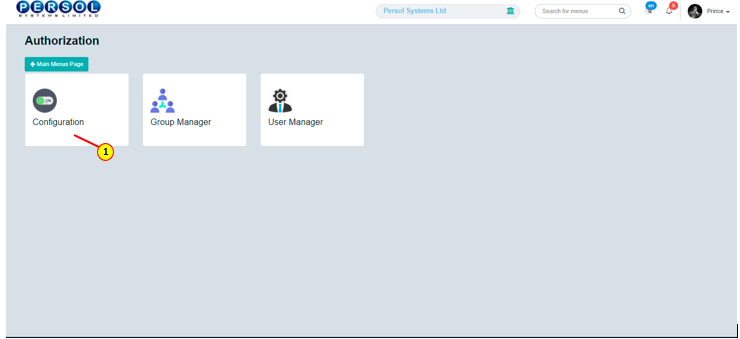
Customer Admin
| Step | Action |
|---|---|
| (1) | On the PersonaX Customer Admin homepage, select the ‘Authorization’ tile |

| Step | Action |
|---|---|
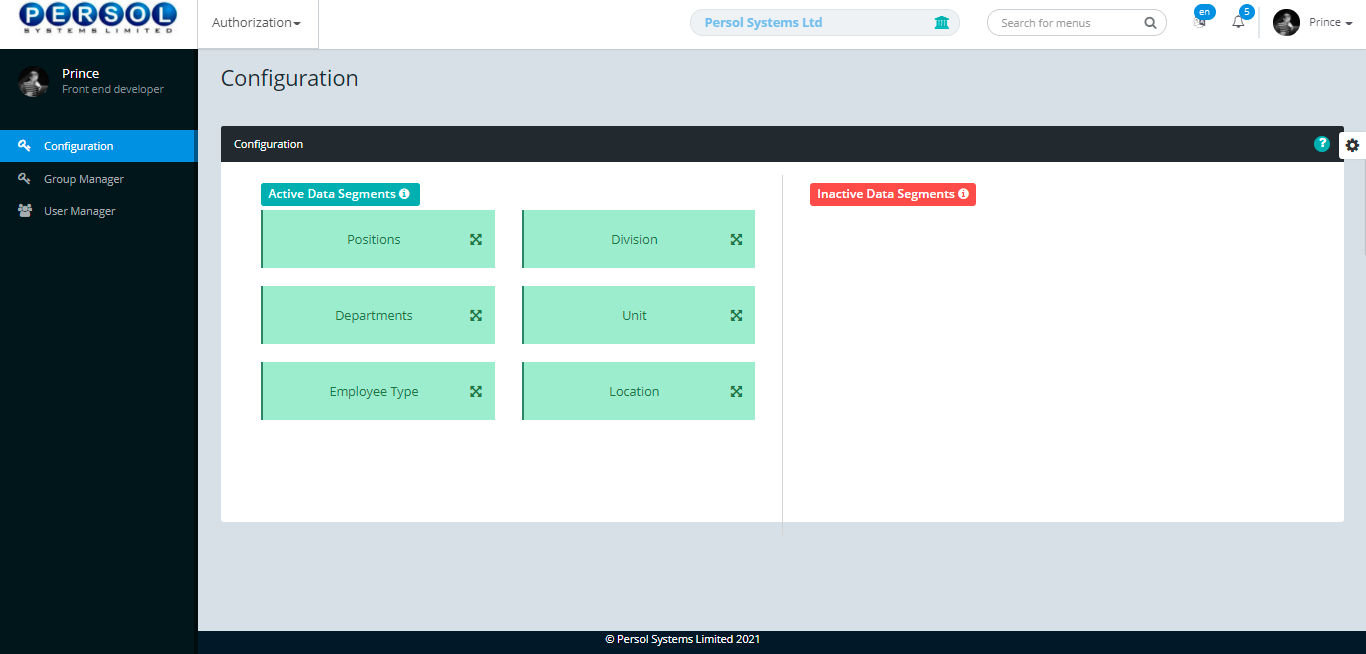
| The ‘Authorization’ submenus page opens | |
| (1) | Select the ‘Configuration’ tile |
| Step | Action |
|---|---|
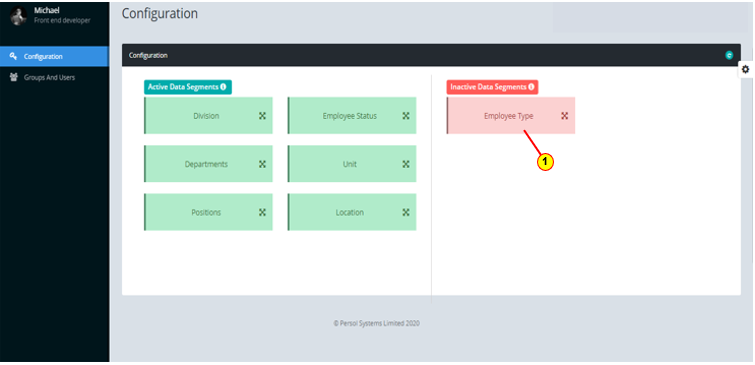
| The ‘Configuration’ page opens | |
 |
All data segments are active by default |
| Step | Action |
|---|---|
| (1) | To make a segment inactive, drag and drop the segment into the Inactive Data Segments section and vice versa |
|
A segment cannot be made inactive if it has been used to setup a user already |
| Step | Action |
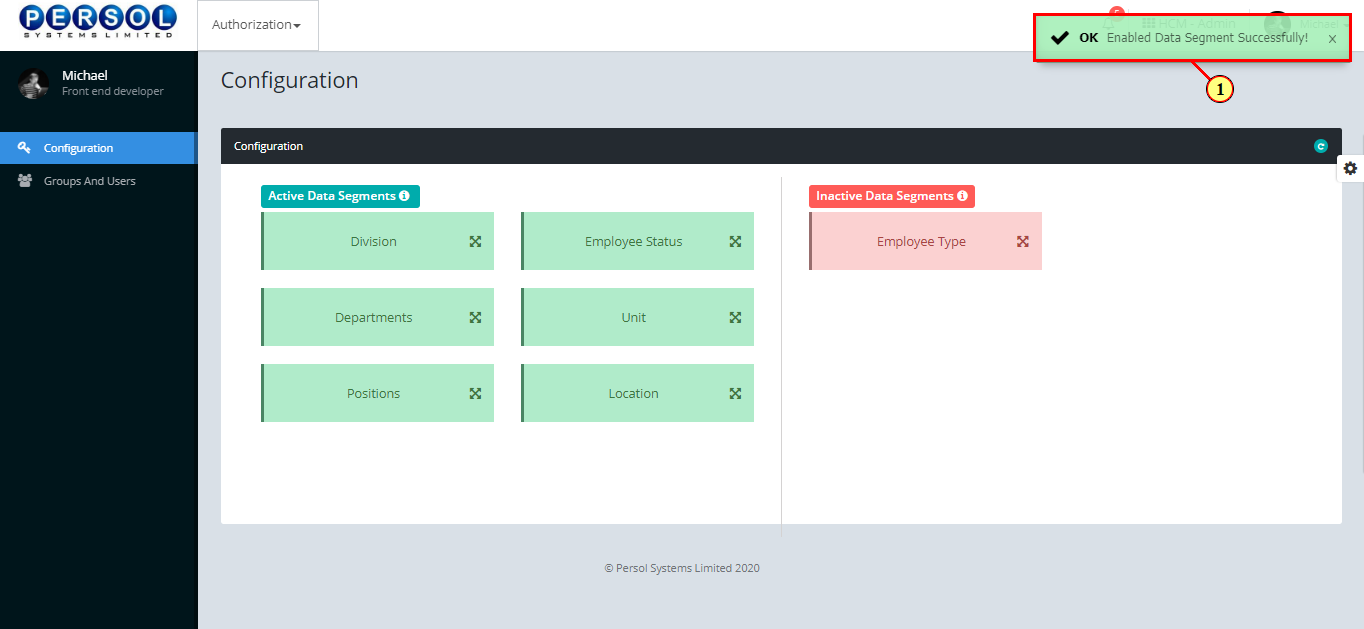
|---|---|
| (1) | A notification displays to indicate that the status of the data segment has been successfully changed |
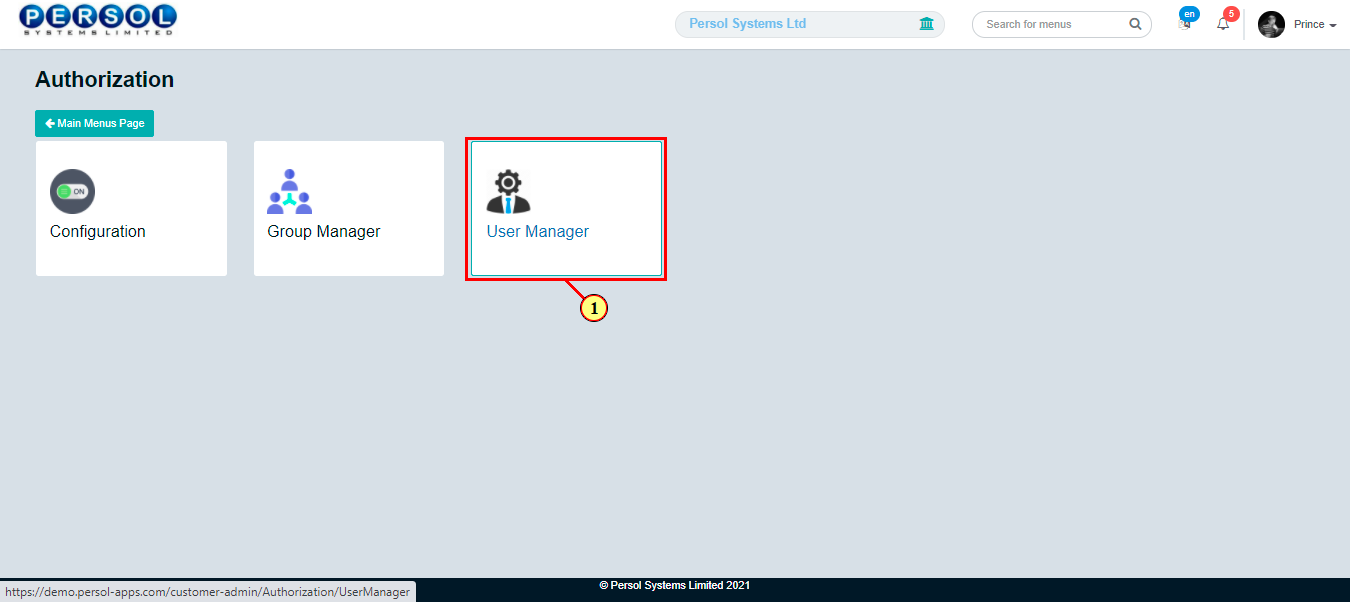
| Step | Action |
|---|---|
| (1) | On the PersonaX Customer Admin homepage, select the ‘Authorization’ tile |

| Step | Action |
|---|---|
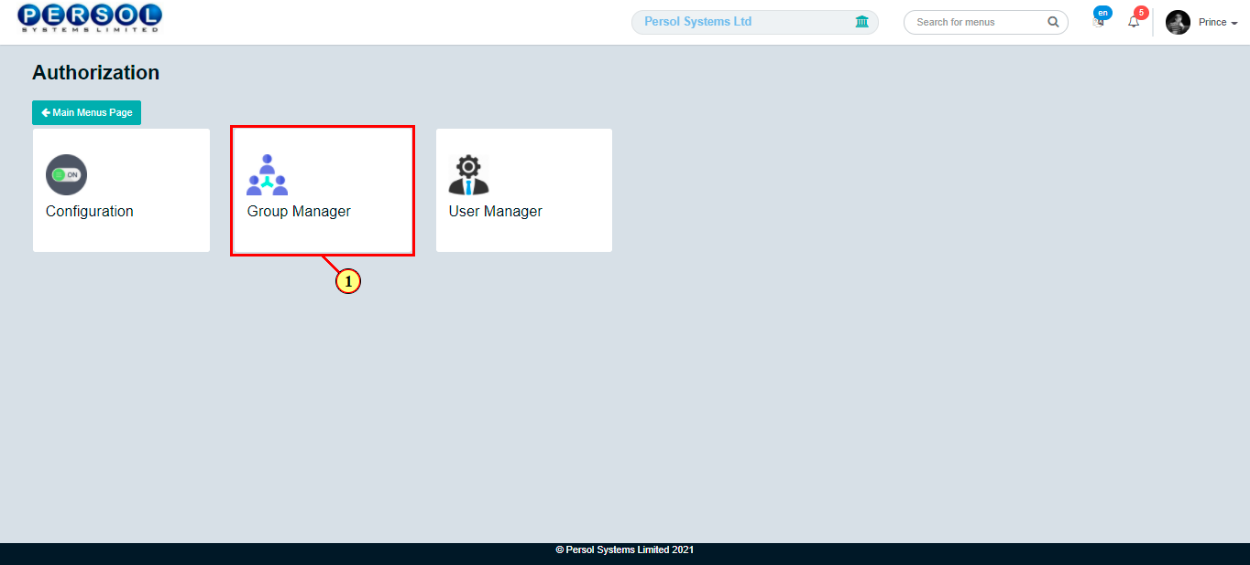
| The ‘Authorization’ submenus page opens | |
| (1) | Select the ‘Group Manager’ tile |
| Step | Action |
|---|---|
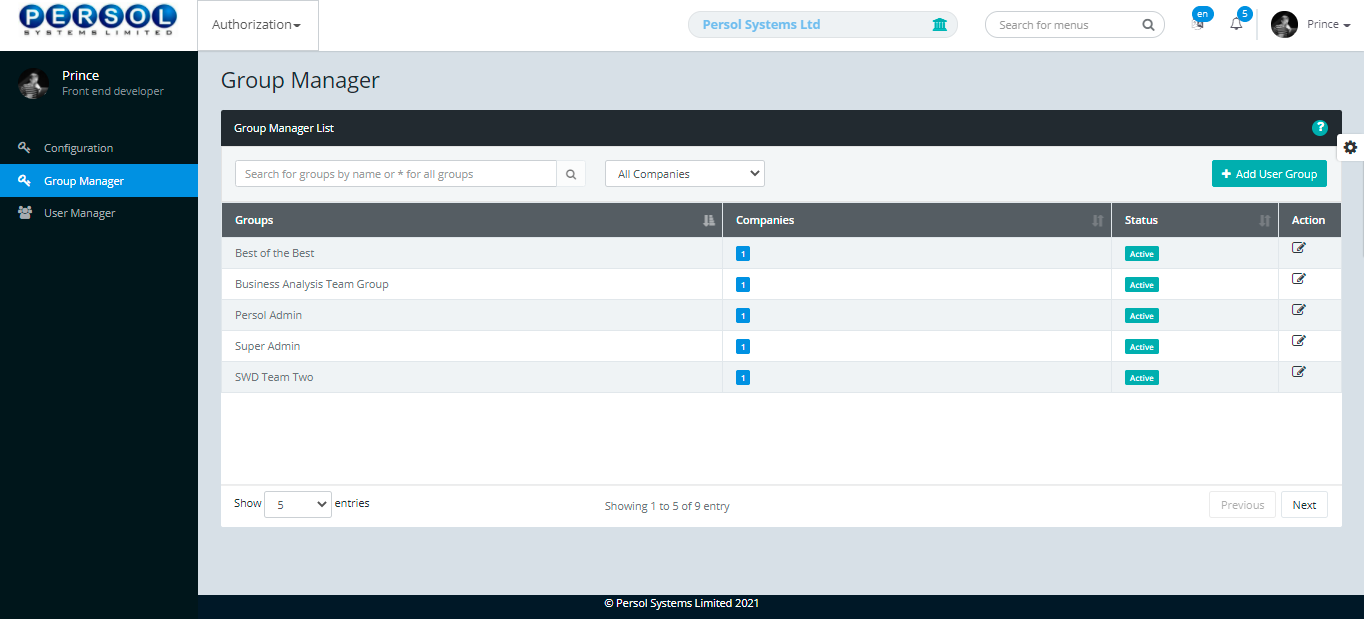
| The 'Group Manager' page opens showing previously setup groups (if any) in the grid |
| Step | Action |
|---|---|
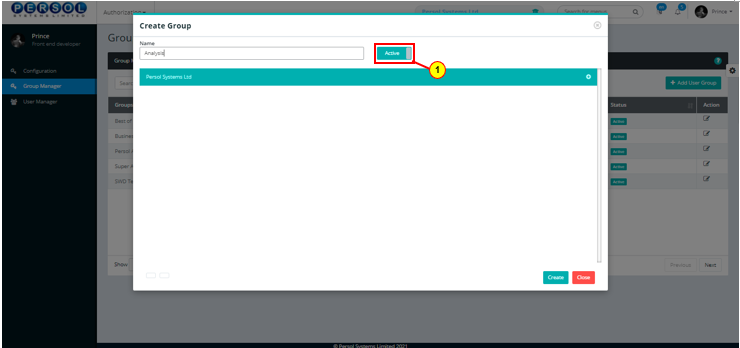
| (1) |
To setup a new user group, click on the 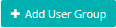 button button
|
| Step | Action |
|---|---|
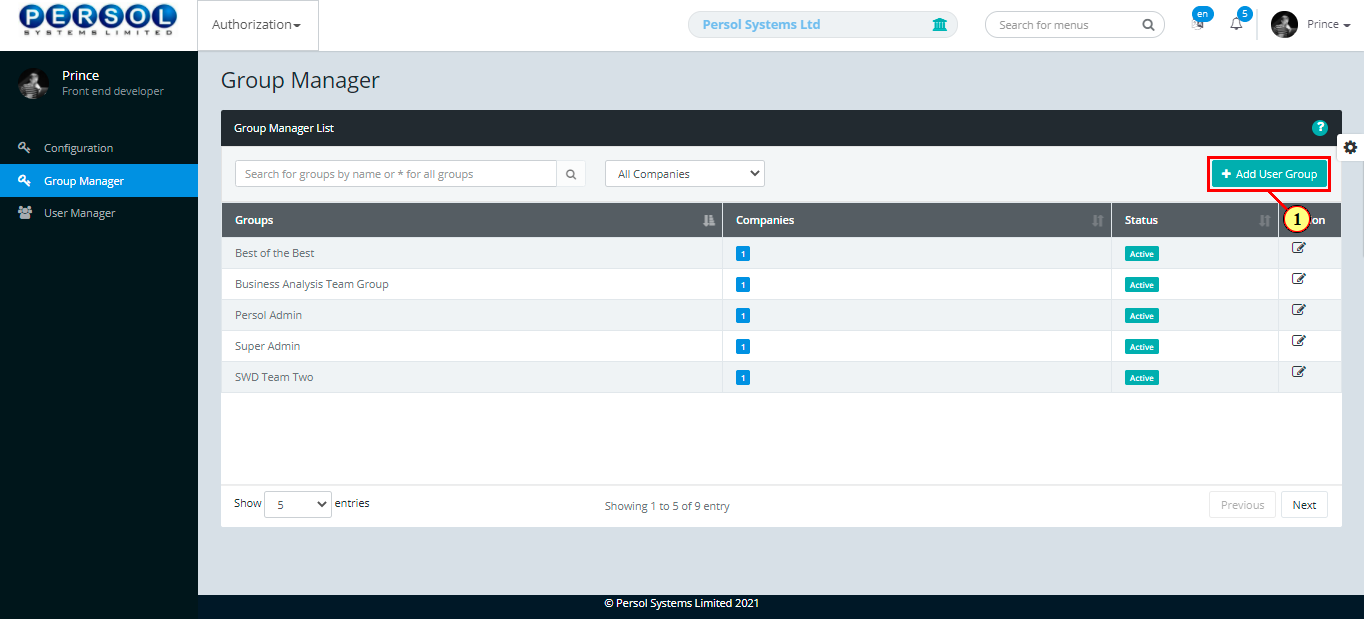
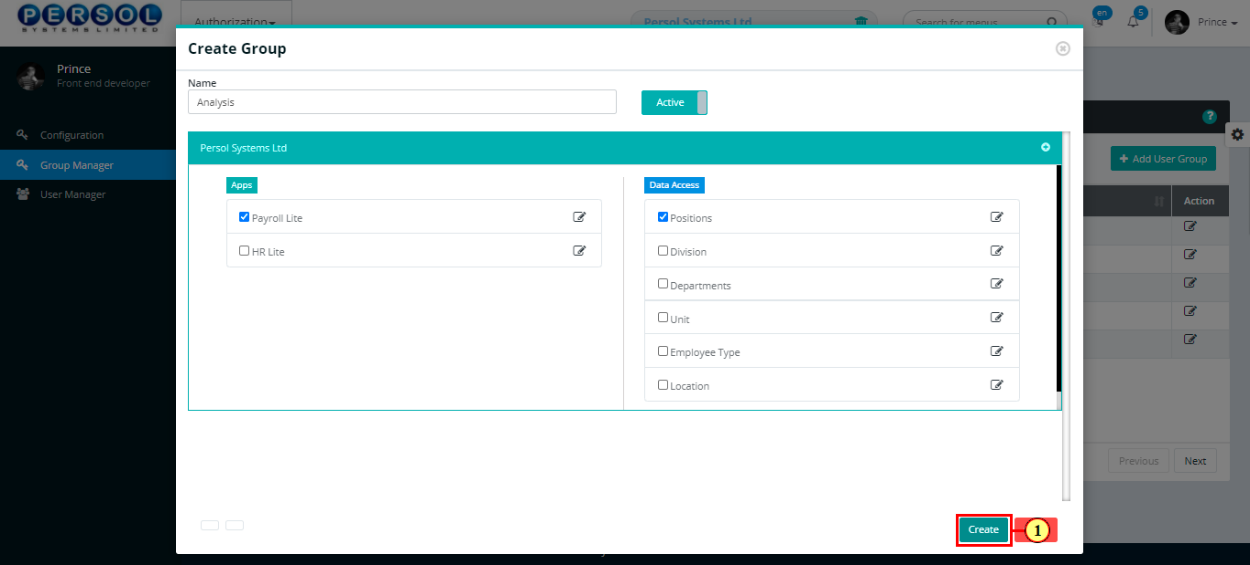
| The 'Create Group' modal opens | |
|
The list of compan(ies) that the admin has access to display |
| Step | Action |
|---|---|
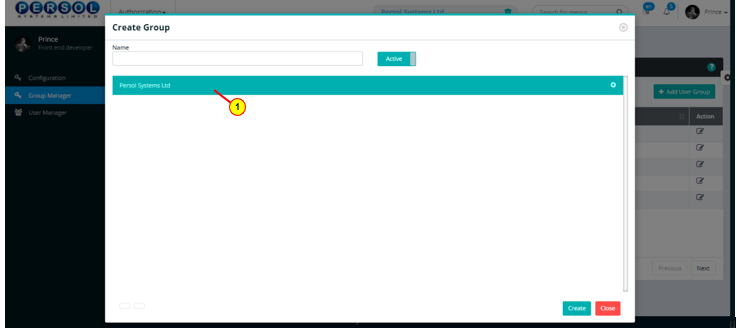
| (1) | Enter the name of the new user group |
| Step | Action |
|---|---|
| (1) |
You may click on the  button to change the status of the group to inactive button to change the status of the group to inactive
|
|
- An active status means the group can be used to setup new users - An inactive status means the group cannot be used to setup new users |
| Step | Action |
|---|---|
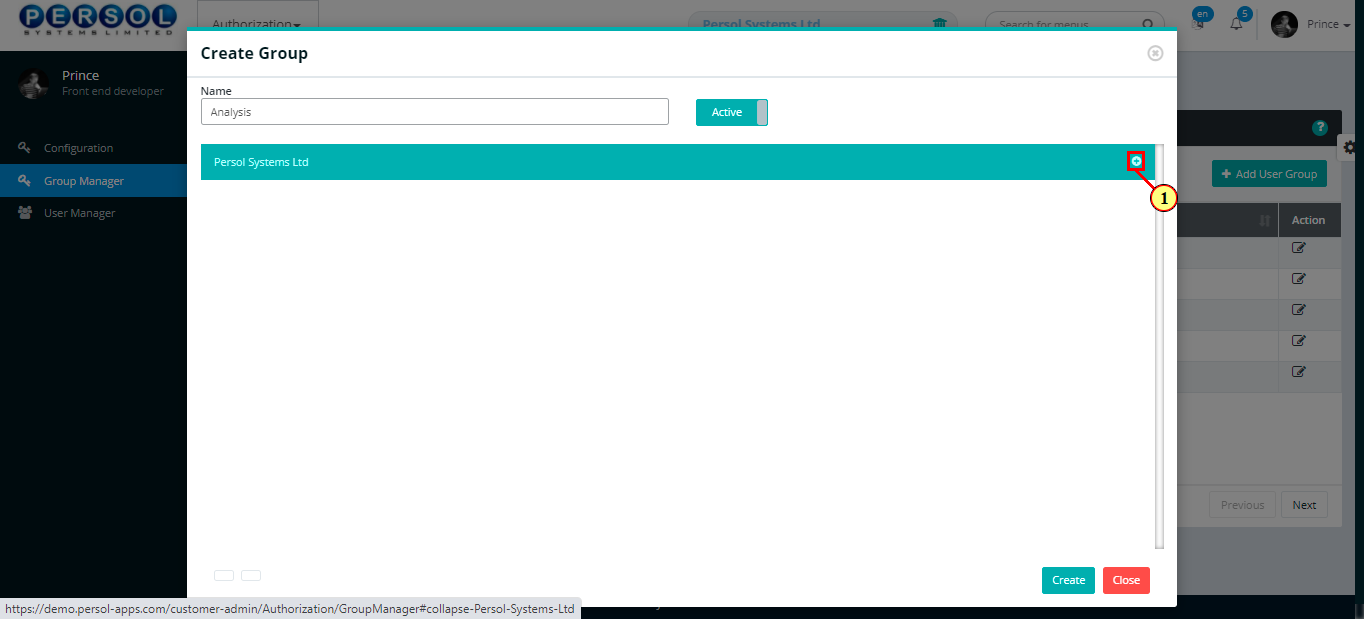
| (1) |
Click on the  button to add applications and data access fields to the group button to add applications and data access fields to the group
|
| Step | Action |
|---|---|
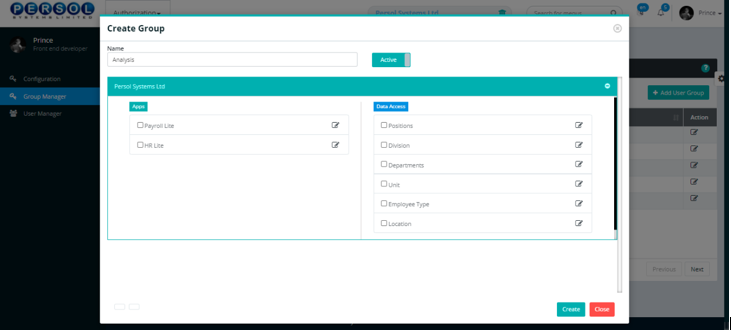
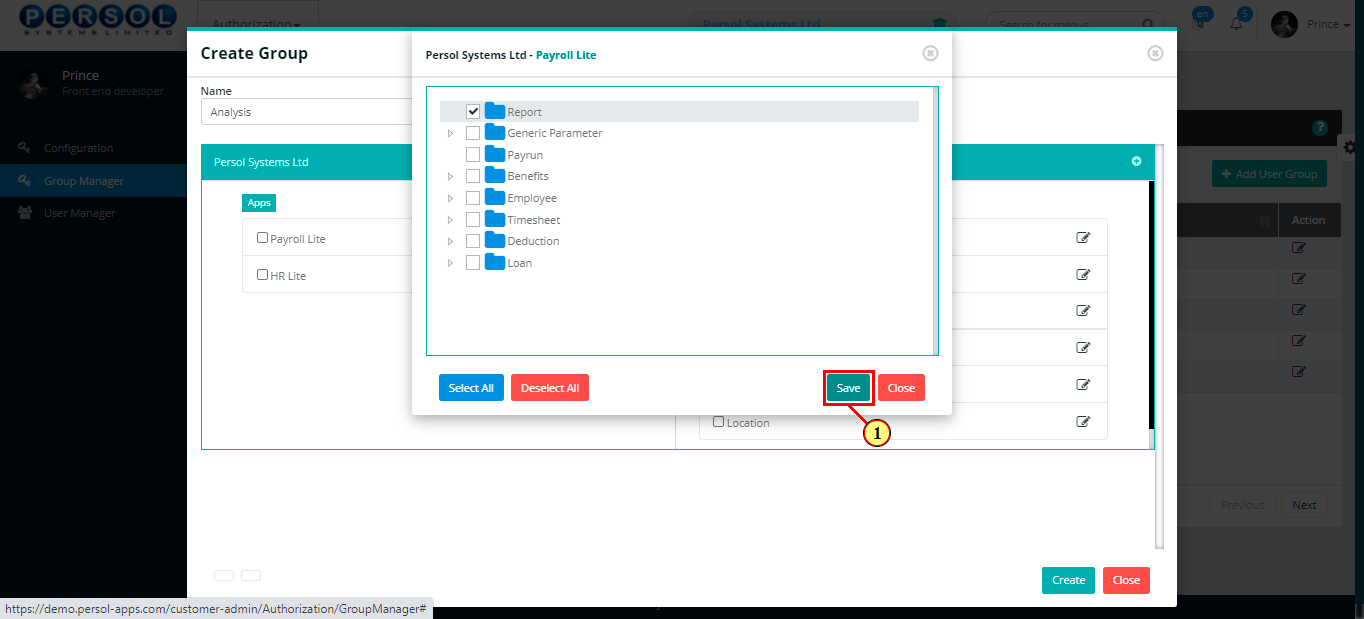
| (1) | The available applications and data access menus for the company display |
| Step | Action |
|---|---|
| (1) | Under ‘Apps’, check box to select the HCM application(s) that the group can have access to |

| Step | Action |
|---|---|
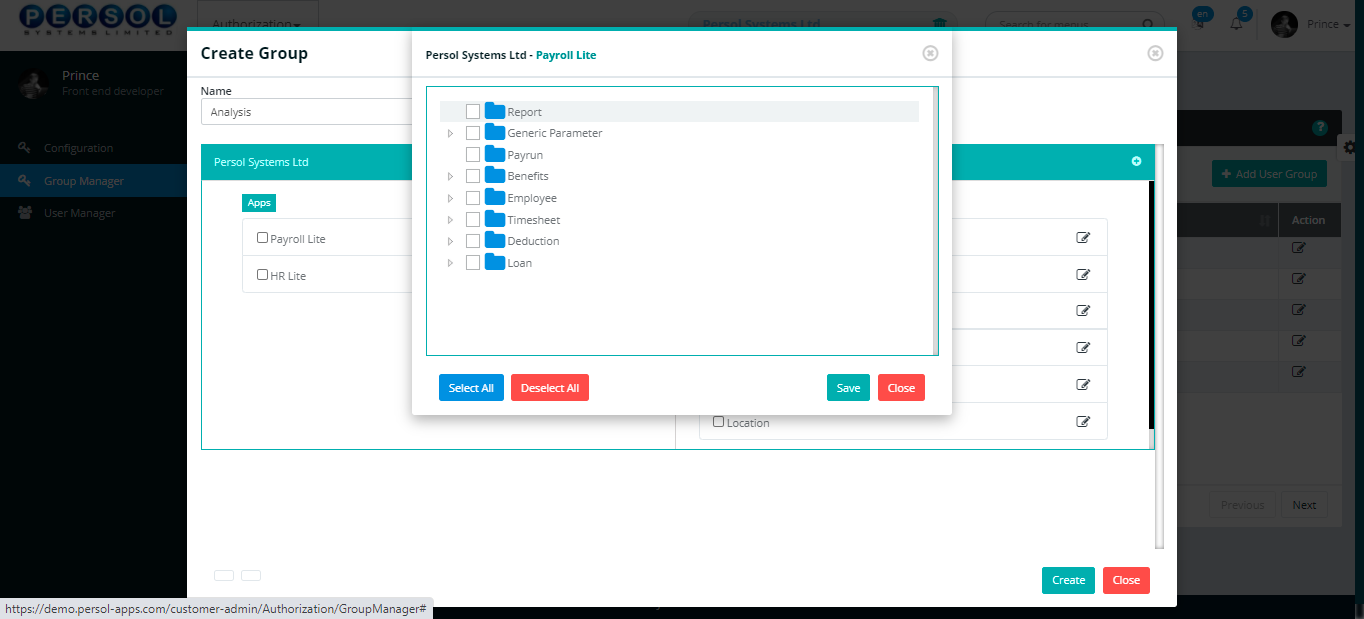
| The menus for the selected application display |
| Step | Action |
|---|---|
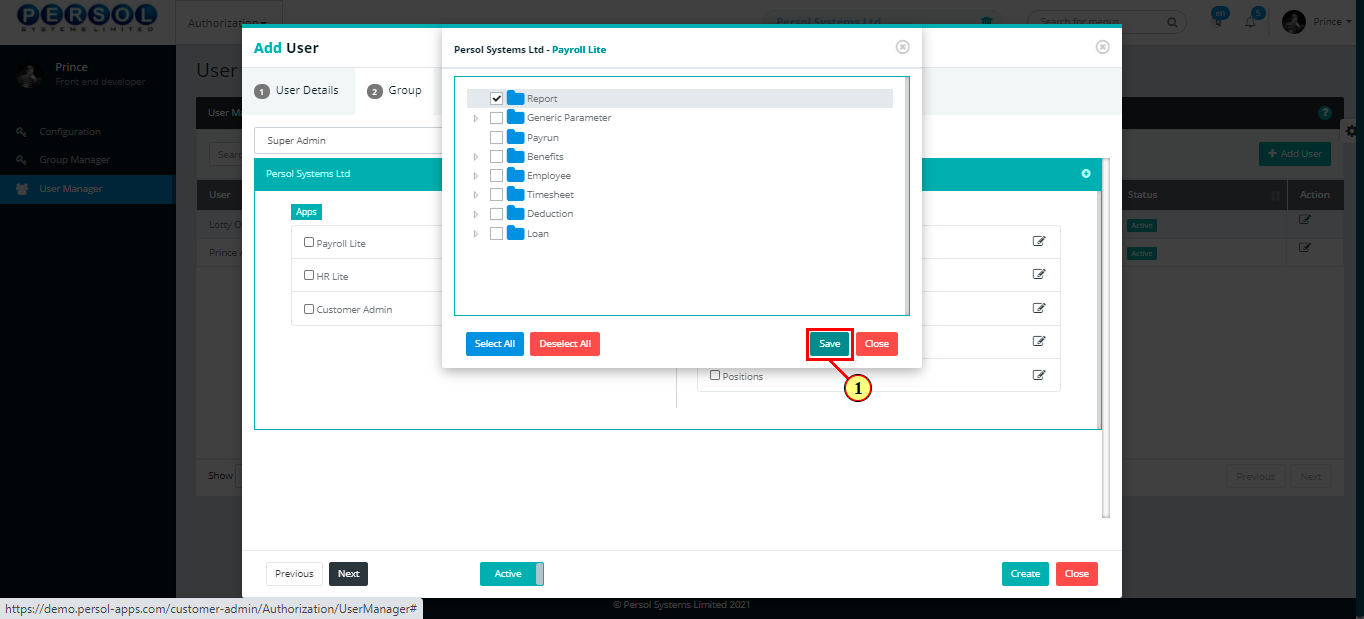
| (1) | Check box to select the application menus that the group can have access to |
|
You may click on these buttons to 'Select All' or 'Deselect All' menus |

| Step | Action |
|---|---|
| (1) |
Click on the  button to save the selected application menus button to save the selected application menus
|
| Step | Action |
|---|---|
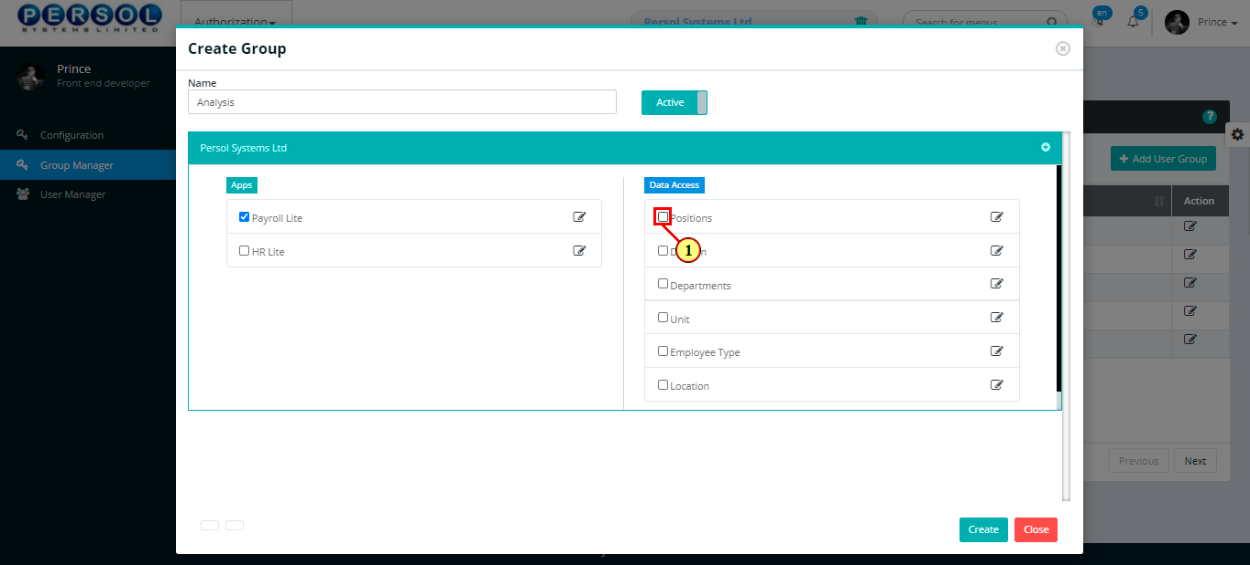
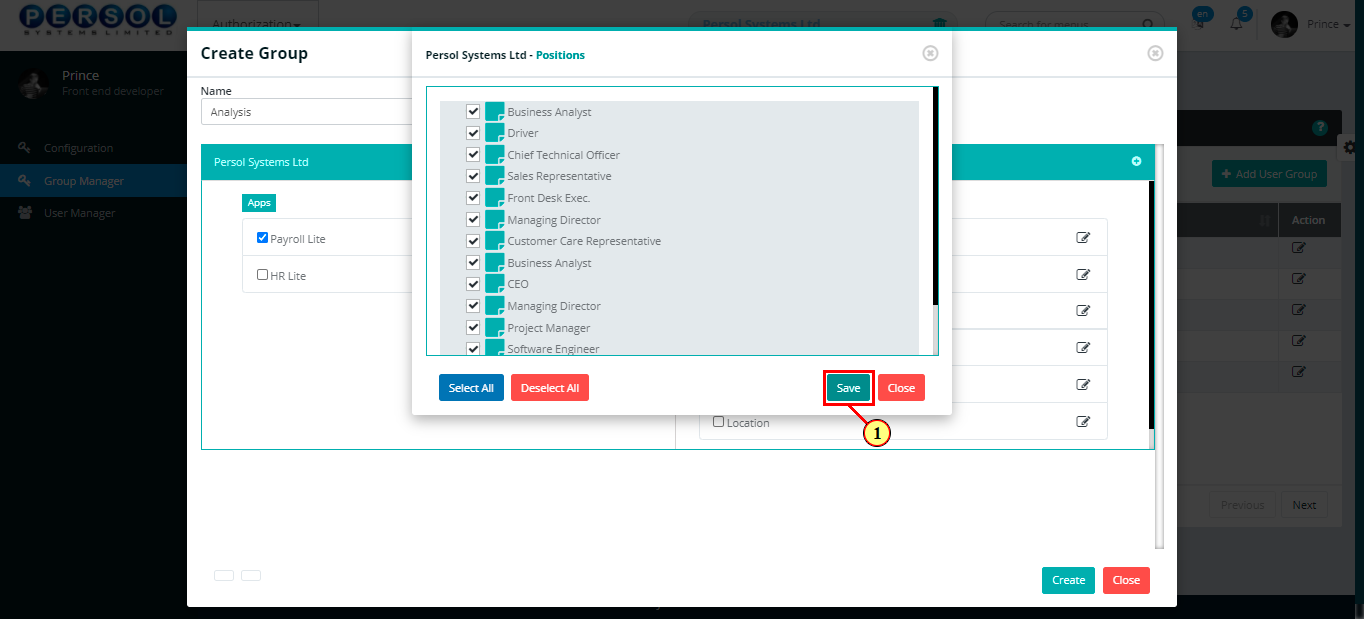
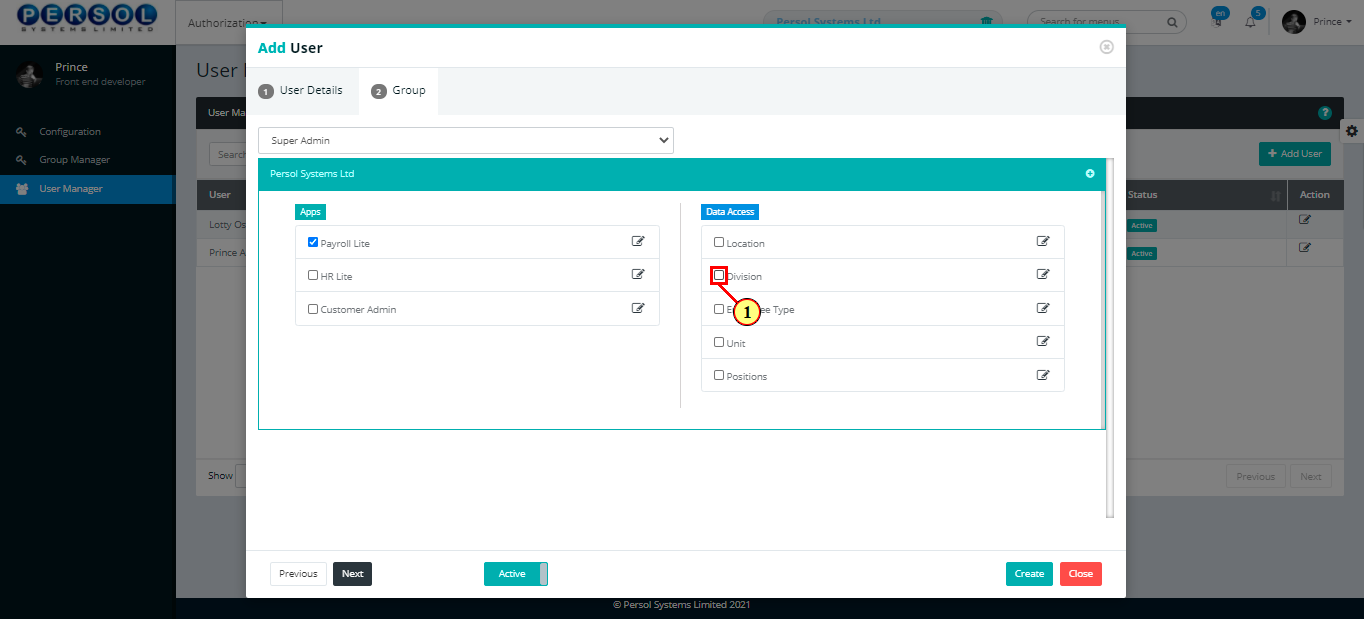
| (1) | Check box to select the data access fields that the group can have access to |
| Step | Action |
|---|---|
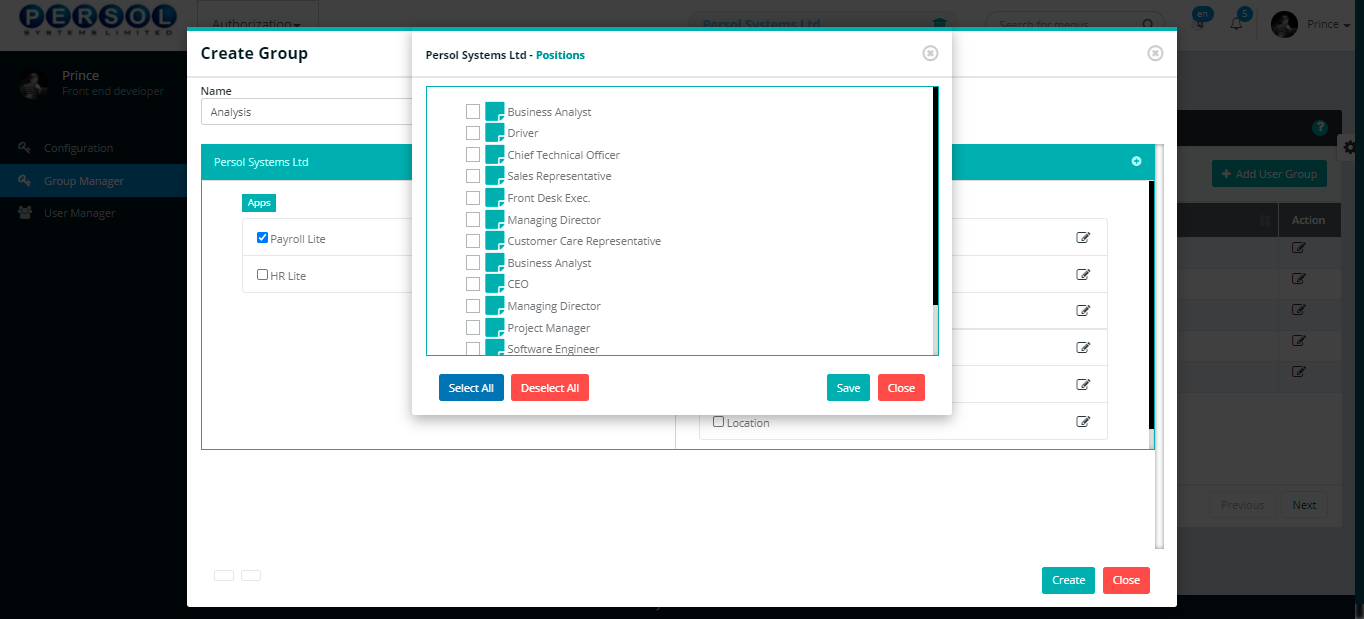
| The menus for the selected data access field display |
| Step | Action |
|---|---|
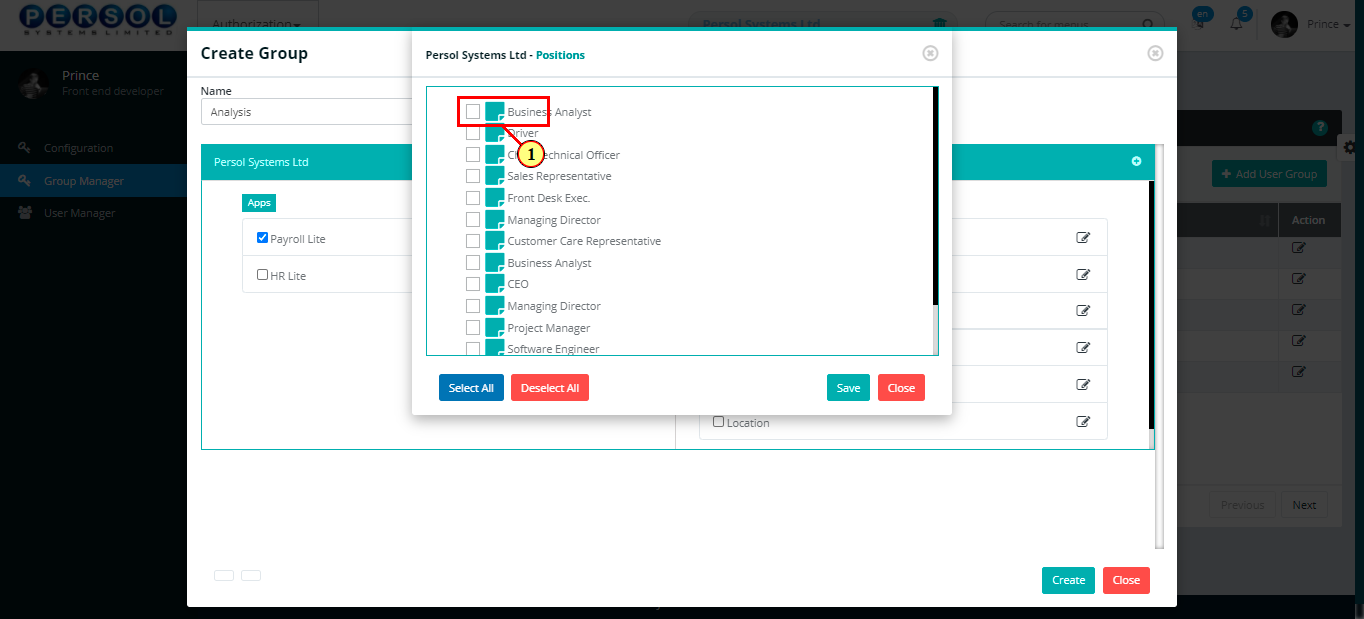
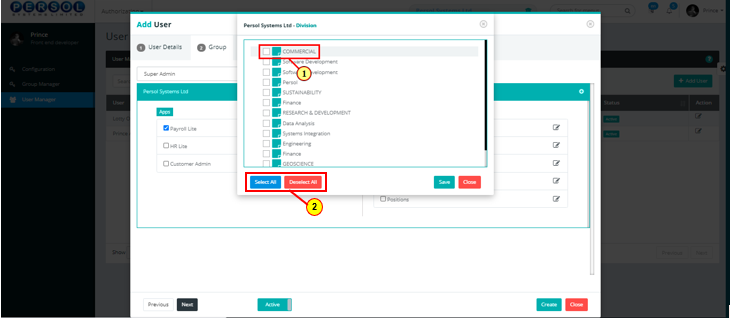
| (1) | Check box to select the data access menus that the group can have access to |
|
You may click on these buttons to 'Select All' or 'Deselect All' menus |
| Step | Action |
|---|---|
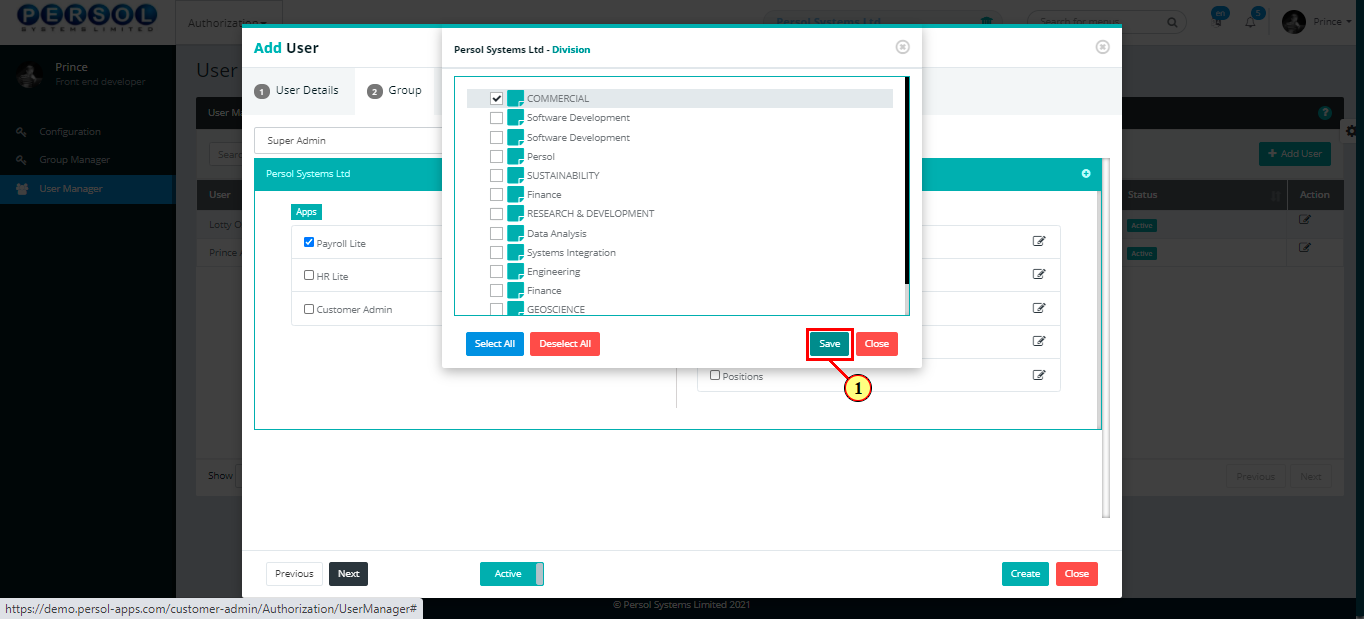
| (1) |
Click on the  button to save the selected data access menus button to save the selected data access menus
|
| Step | Action |
|---|---|
| (1) |
Click on the  button to save group details button to save group details
|
| Step | Action |
|---|---|
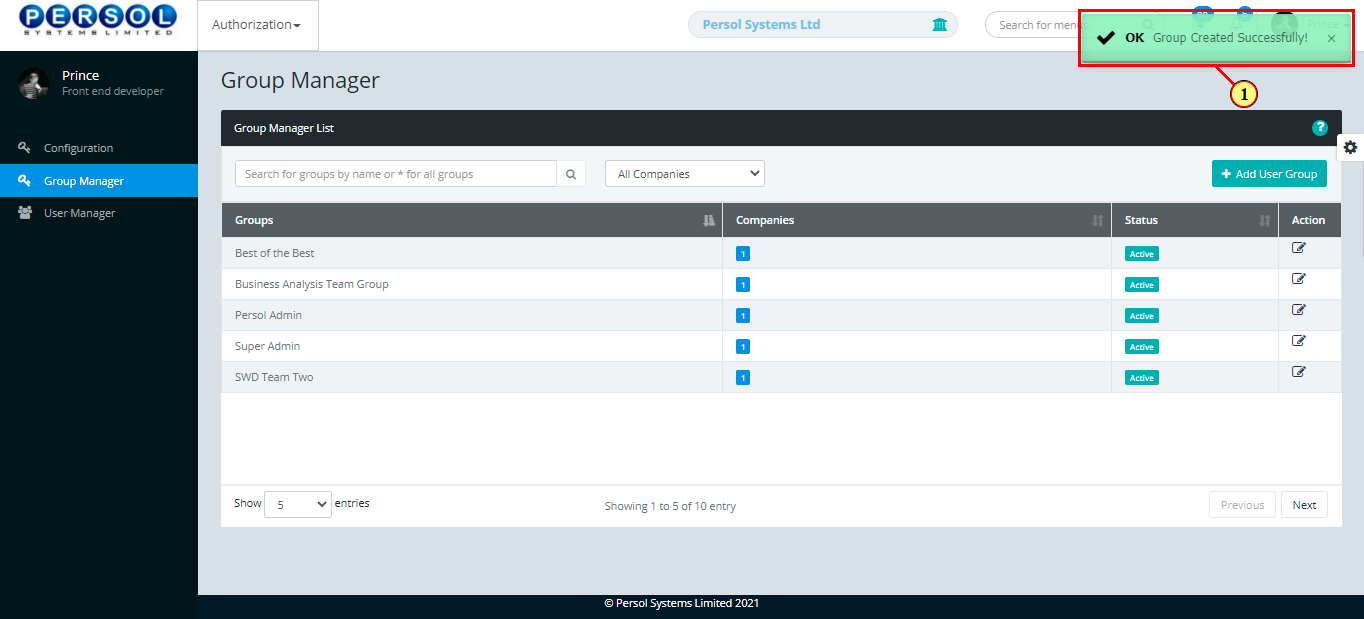
| (1) | A notification displays to indicate that the group has been created successfully |
|
The new group created displays in the grid |
| Step | Action |
|---|---|
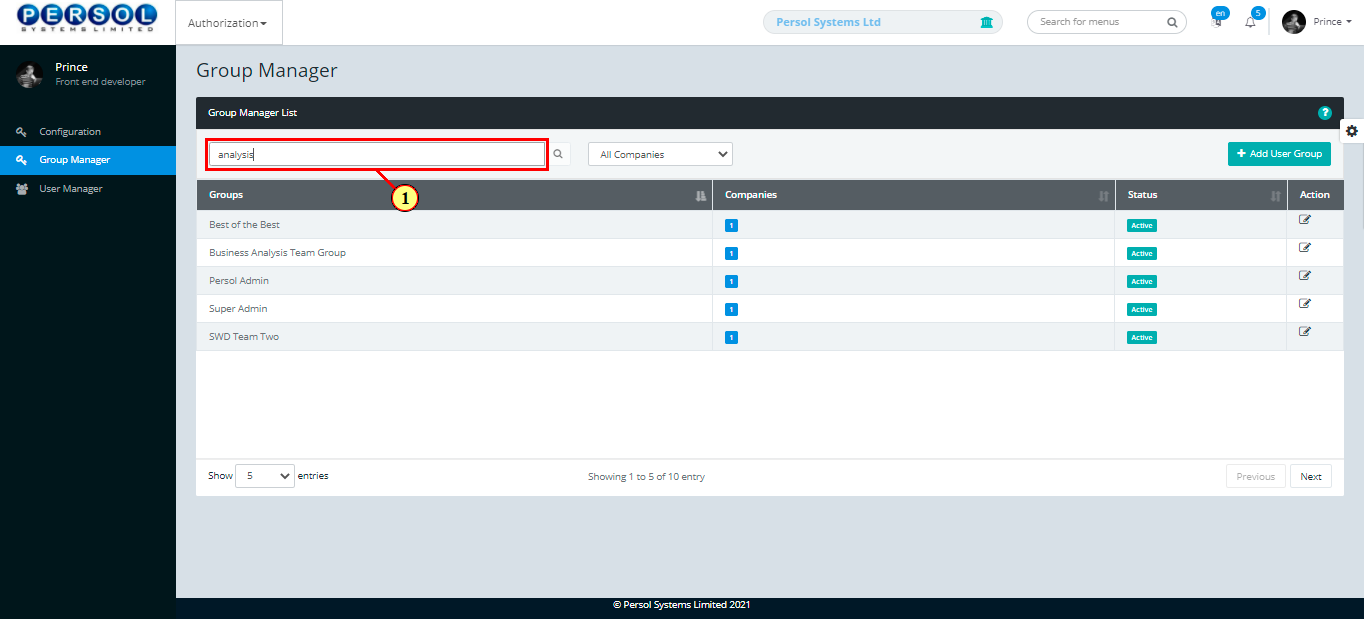
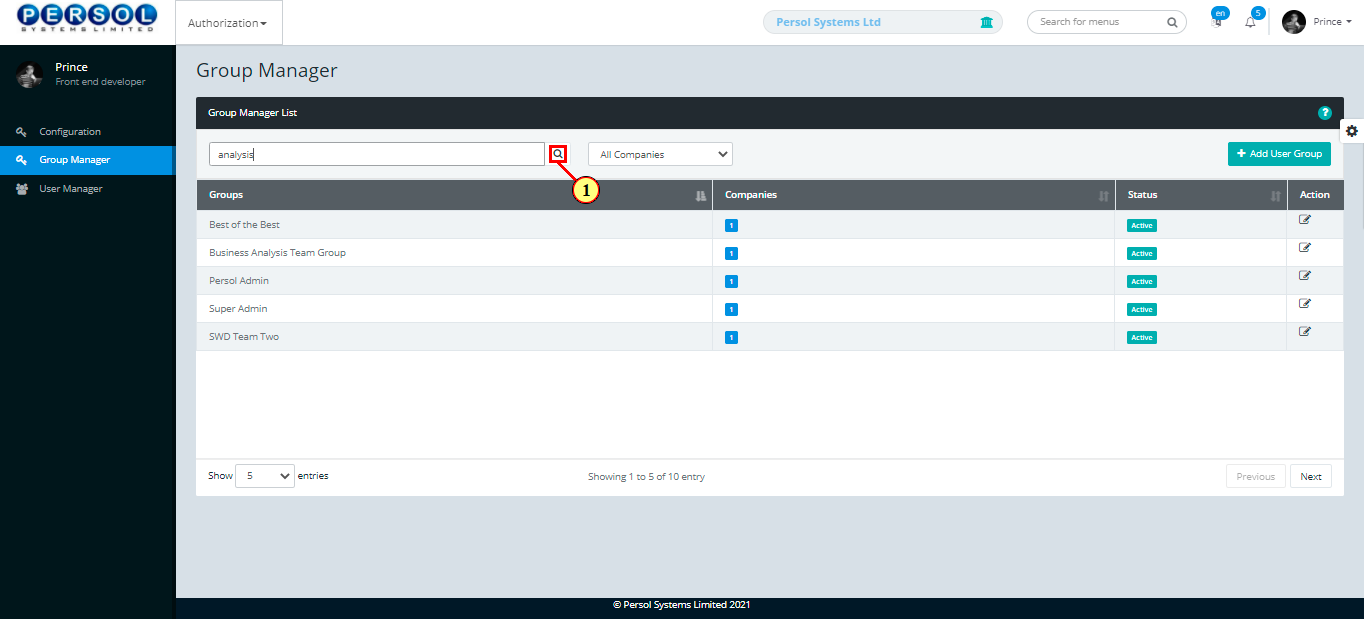
| (1) | To edit a group, enter group name in the seach box |
| Step | Action |
|---|---|
| (1) |
Click on the  icon to search for group icon to search for group
|
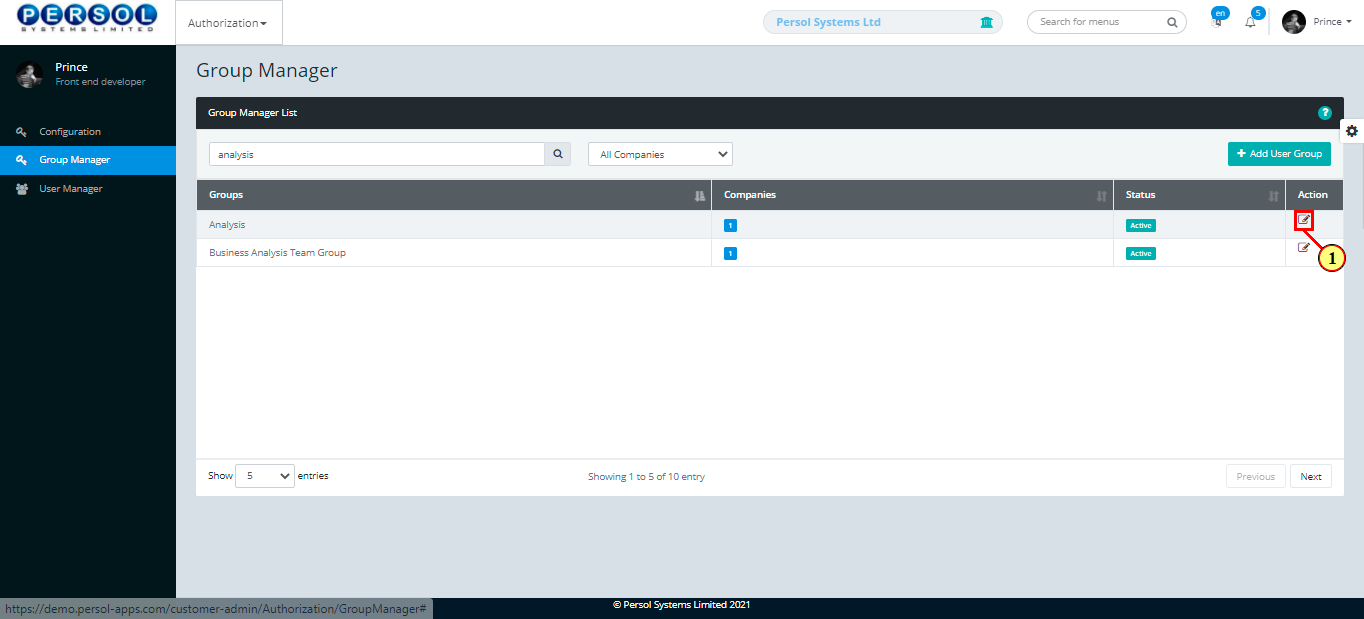
| Step | Action |
|---|---|
| The search result details display in the grid | |
| (1) |
Click on the  icon to edit the group details icon to edit the group details
|
| Step | Action |
|---|---|
| The ‘Edit Group’ modal opens | |
| Edit the details of the group |
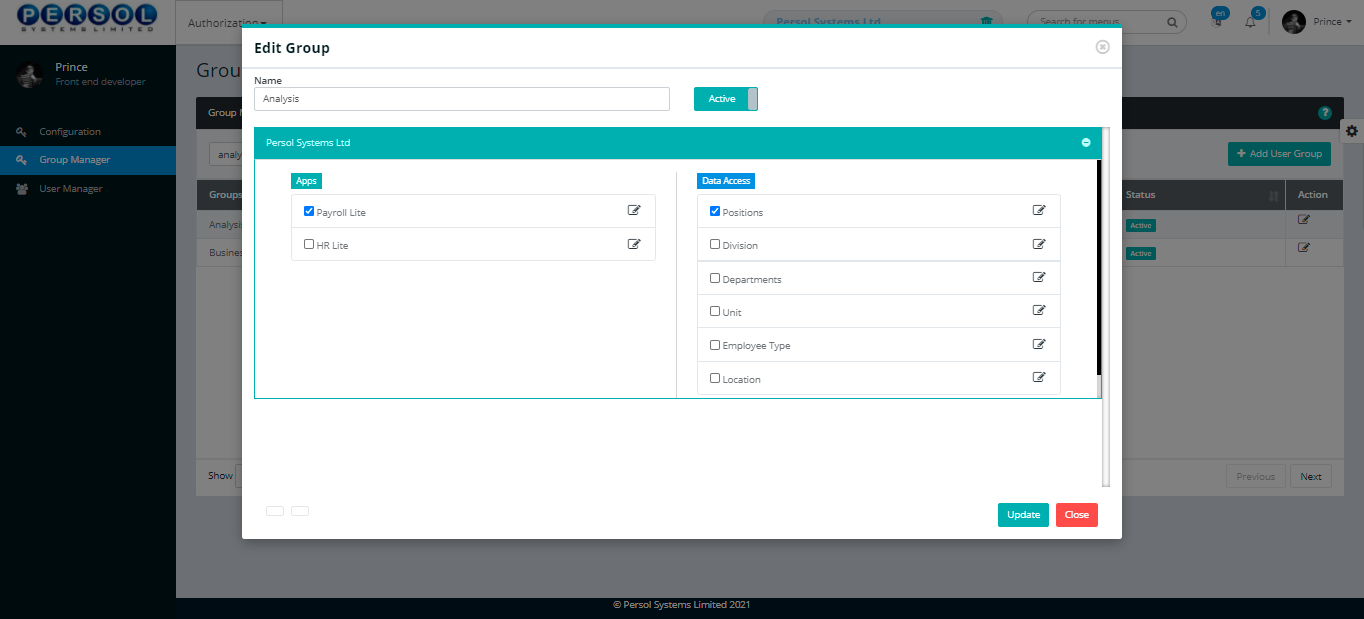
| Step | Action |
|---|---|
| (1) |
Click on the  button to save the changes made button to save the changes made
|

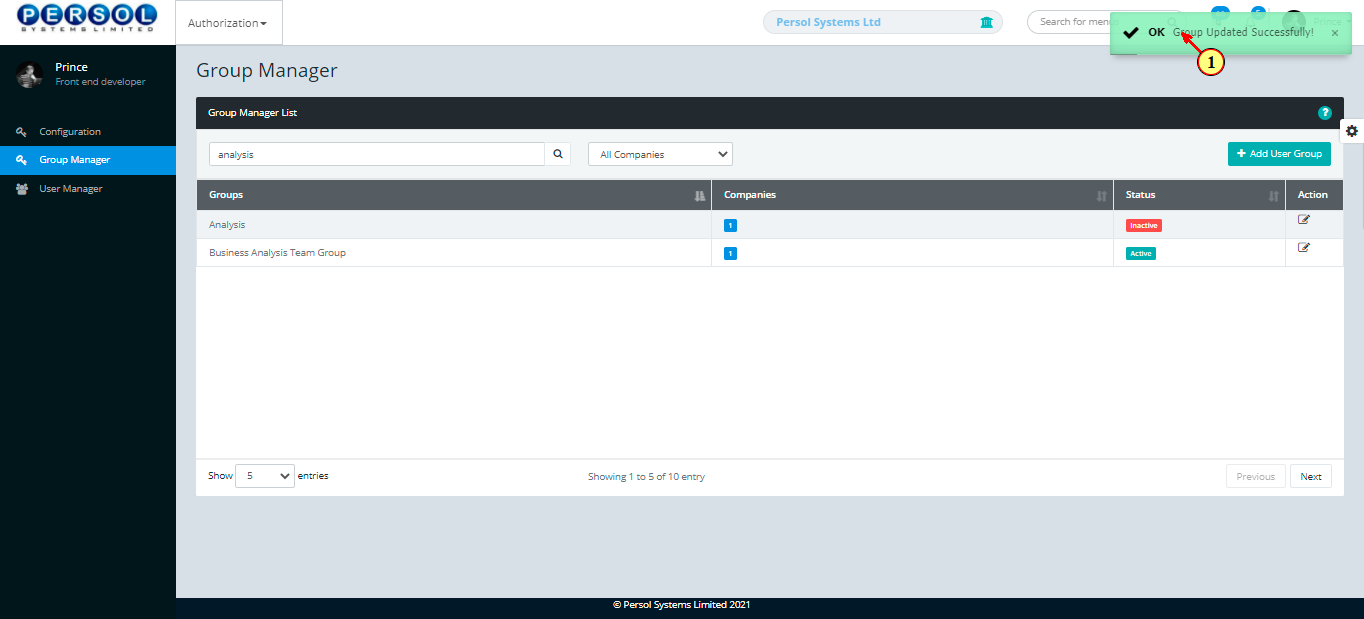
| Step | Action |
|---|---|
| (1) | A notification displays to indicate that the update has been saved successfully |
| Step | Action |
|---|---|
| (1) | On the PersonaX Customer Admin homepage, select the ‘Authorization’ tile |

| Step | Action |
|---|---|
| The ‘Authorization’ submenus page opens | |
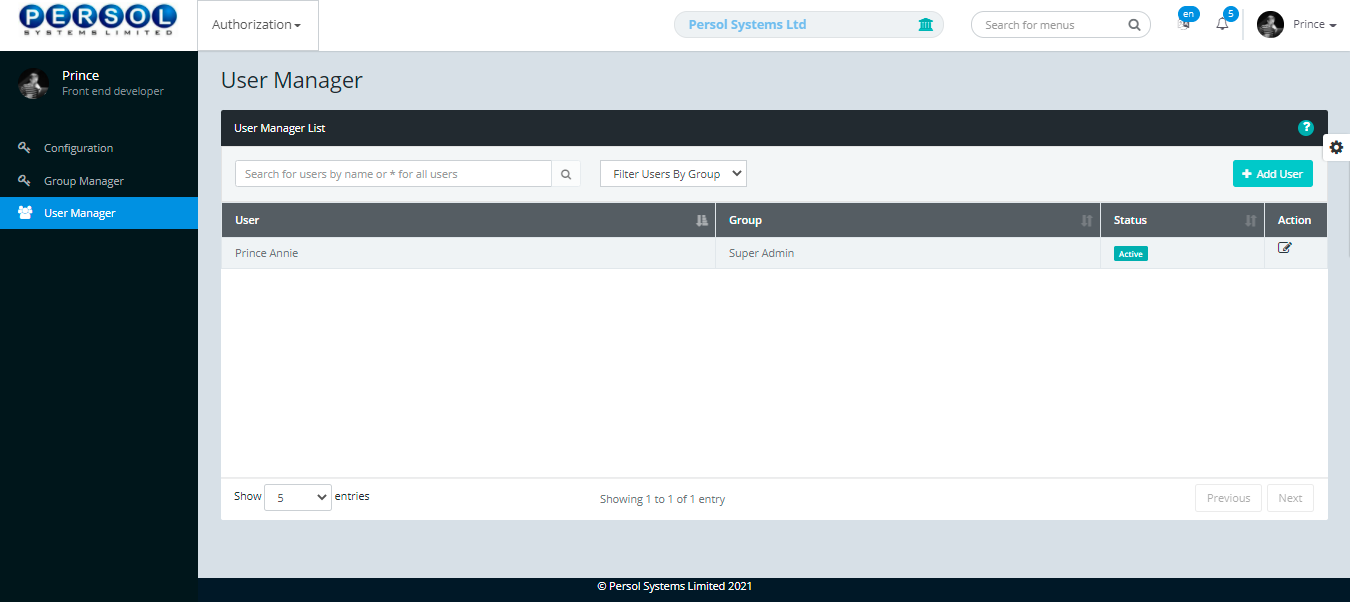
| (1) | Select the ‘User Manager’ tile |
| Step | Action |
|---|---|
| The 'User Manager' page opens showing previously added user records in the grid (if any) |
| Step | Action |
|---|---|
| (1) |
To add a new user, click on the  button button
|
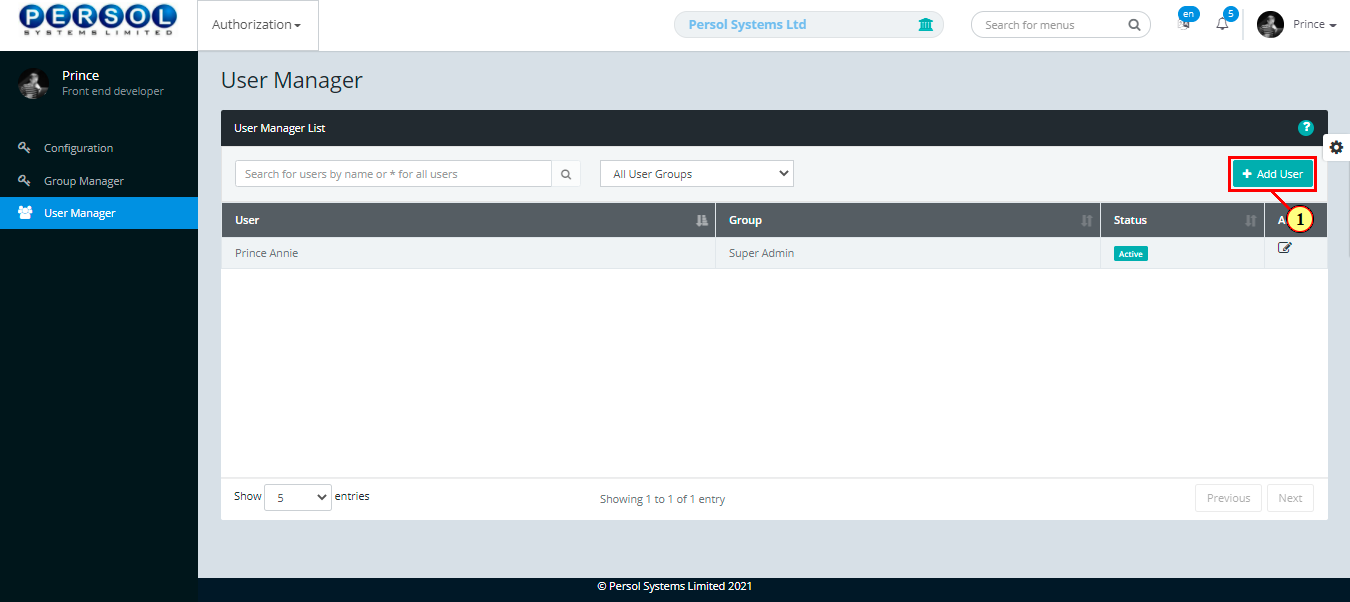
| Step | Action |
|---|---|
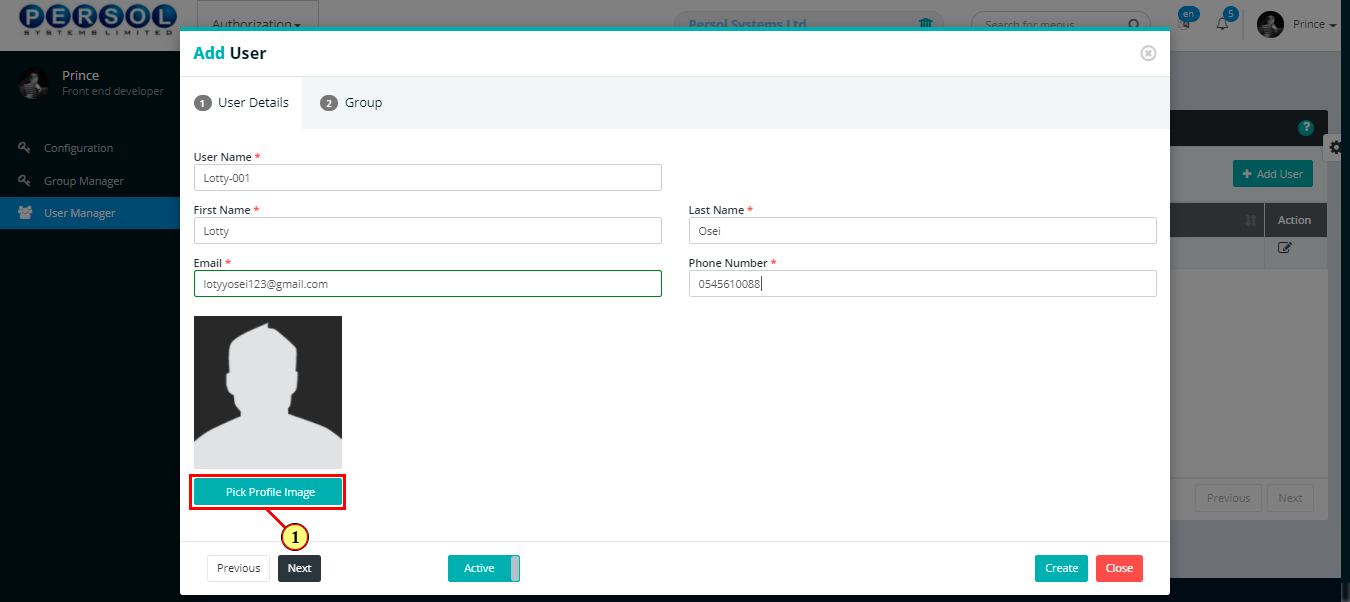
| The 'Add User' modal opens | |
Provide the following details of the user;
|
|
|
All fields marked with * are required |

| Step | Action |
|---|---|
| (1) |
Click on the  button to add a profile image for user button to add a profile image for user
|
| Step | Action |
|---|---|
|
You may click on the button to change status of the user to inactive
|
|
- An active status means the user can have access to the application - An inactive status means the user cannot have access to the application |
| (1) | Click  button to move to the next page button to move to the next page |

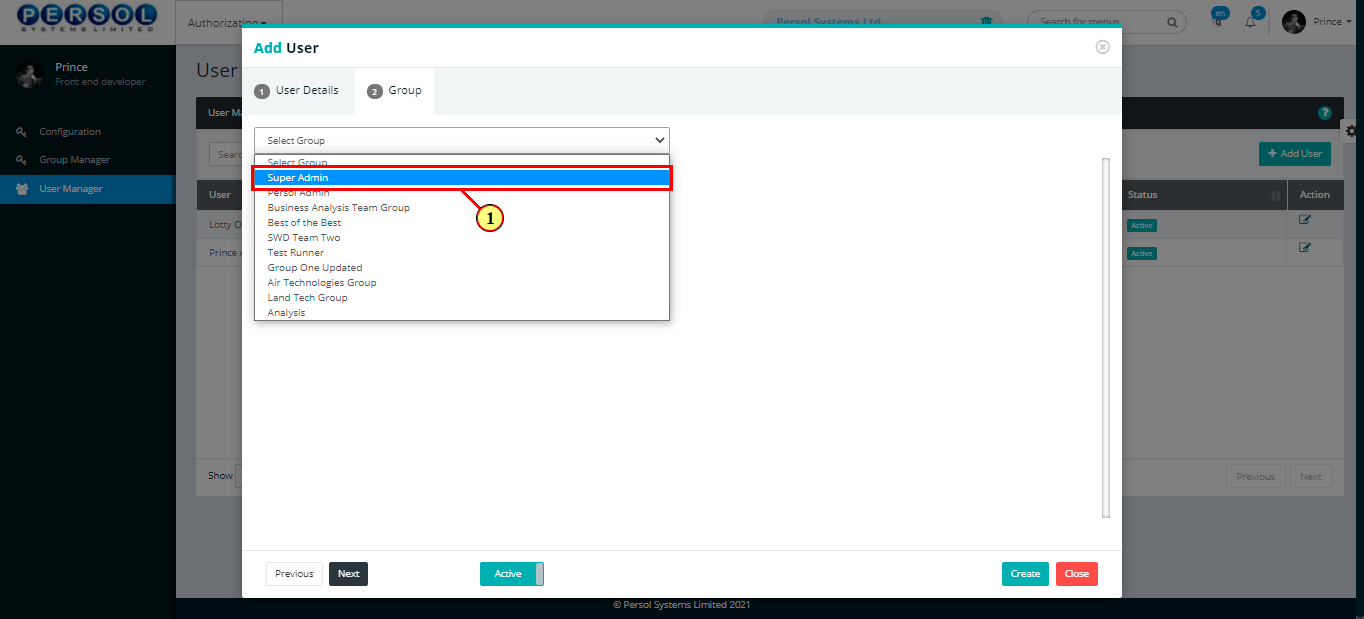
| Step | Action |
|---|---|
| (1) | Select a group the user belongs to |
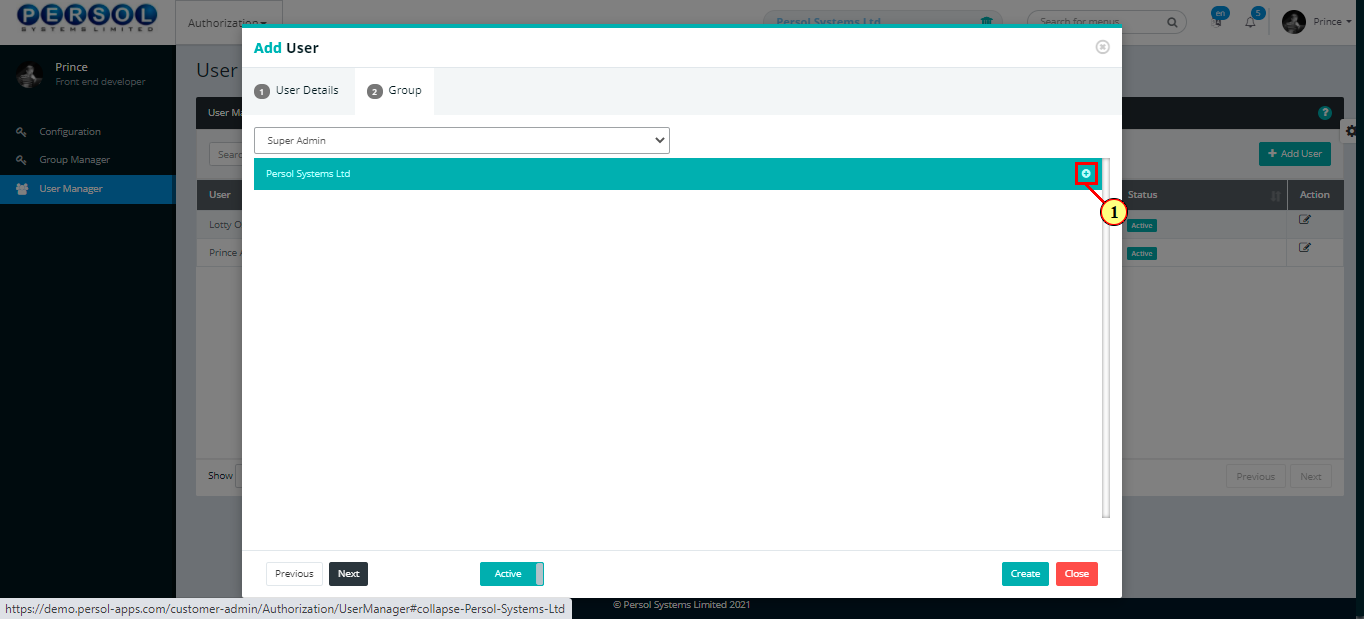
| Step | Action |
|---|---|
| The list of compan(ies) the admin has access to display | |
| (1) |
Click on the button to add applications and data access fields to be accessible to the user
|
| Step | Action |
|---|---|
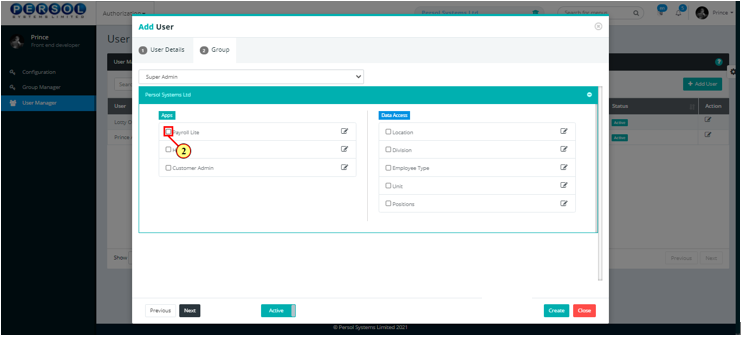
|
The available applications and data access menus for the selected group display |
| (1) | Check box to select the HCM application(s) that the user can have access to |
| Step | Action |
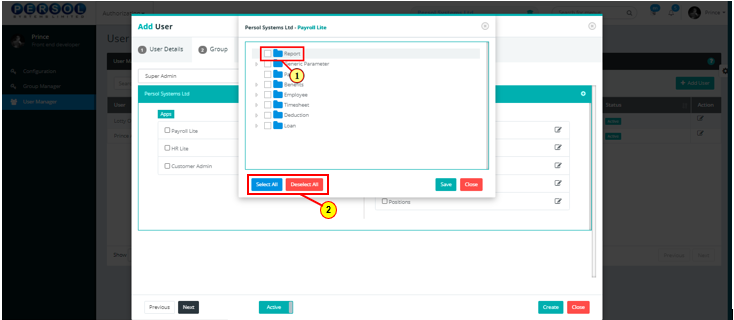
|---|---|
| The menus for the selected application display | |
| (1) | Check box to select the menus within the selected application that the user can have access to |
|
You may click on these buttons to 'Select All' or 'Deselect All' menus |
| Step | Action |
|---|---|
| (1) |
Click on the  button to save selected menus button to save selected menus
|
| Step | Action |
|---|---|
| (1) | Check box to select the data access fields that the user can have access to in the group |
| Step | Action |
|---|---|
| The menus for the selected data access field display | |
| (1) | Check box to select the menus for the data access field that the user can have access to |
| (2) | You may click on these buttons to 'Select All' or 'Deselect All' menus |
| Step | Action |
|---|---|
| (1) |
Click on the button to save selected menus
|
| Step | Action |
|---|---|
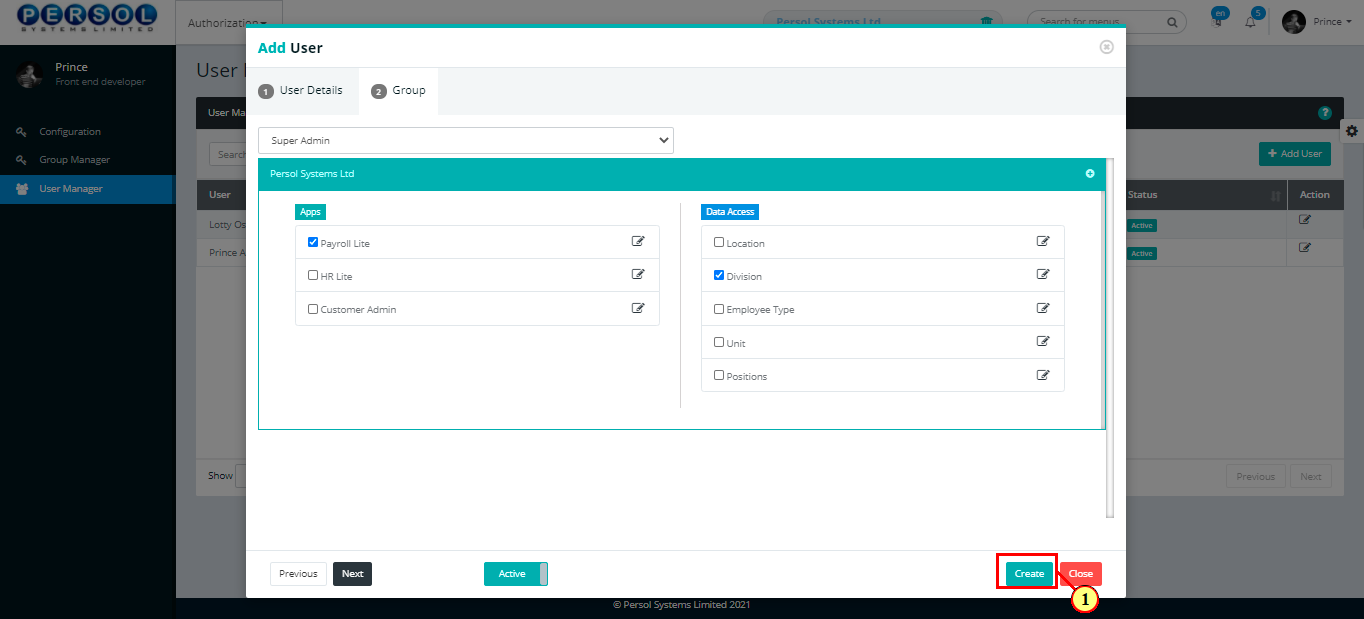
| (1) |
Click on the  button to save user details button to save user details
|
| Step | Action |
|---|---|
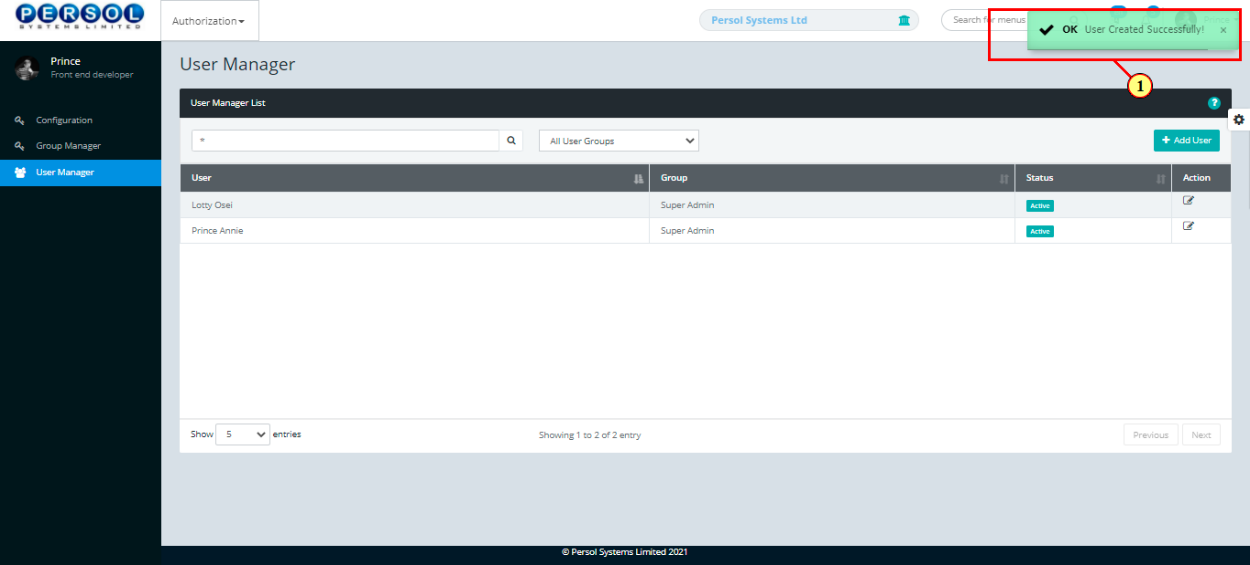
| (1) | A notification displays to indicate that the user has been created successfully |
|
The new user created displays in the grid |
| Step | Action |
|---|---|
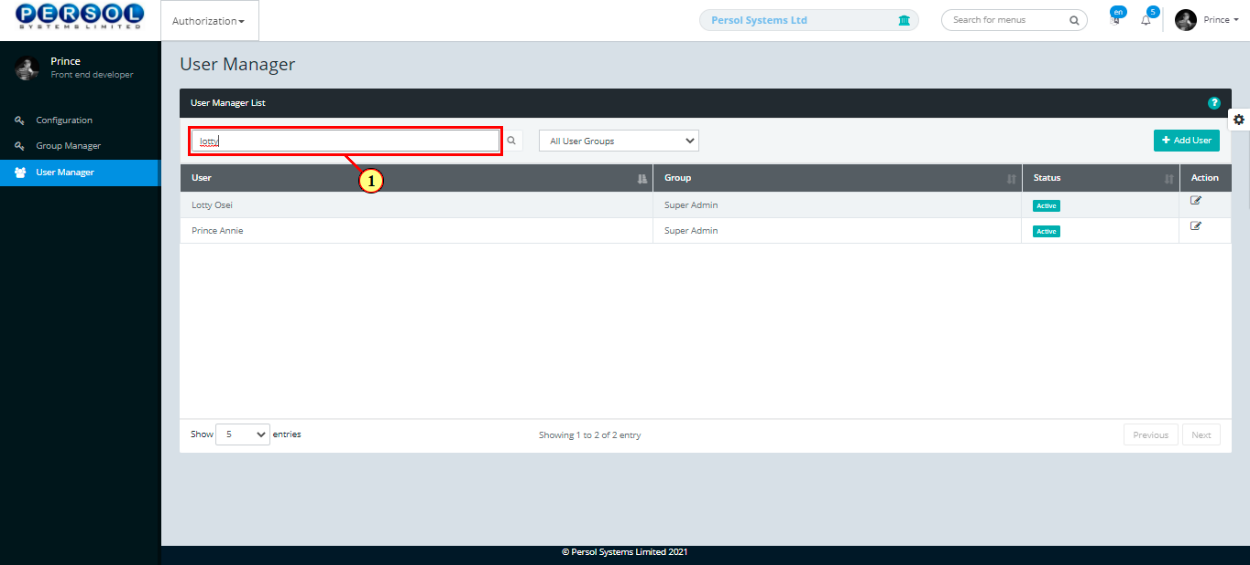
| (1) | To edit a user's details, enter the user's name in the search box |
| Step | Action |
|---|---|
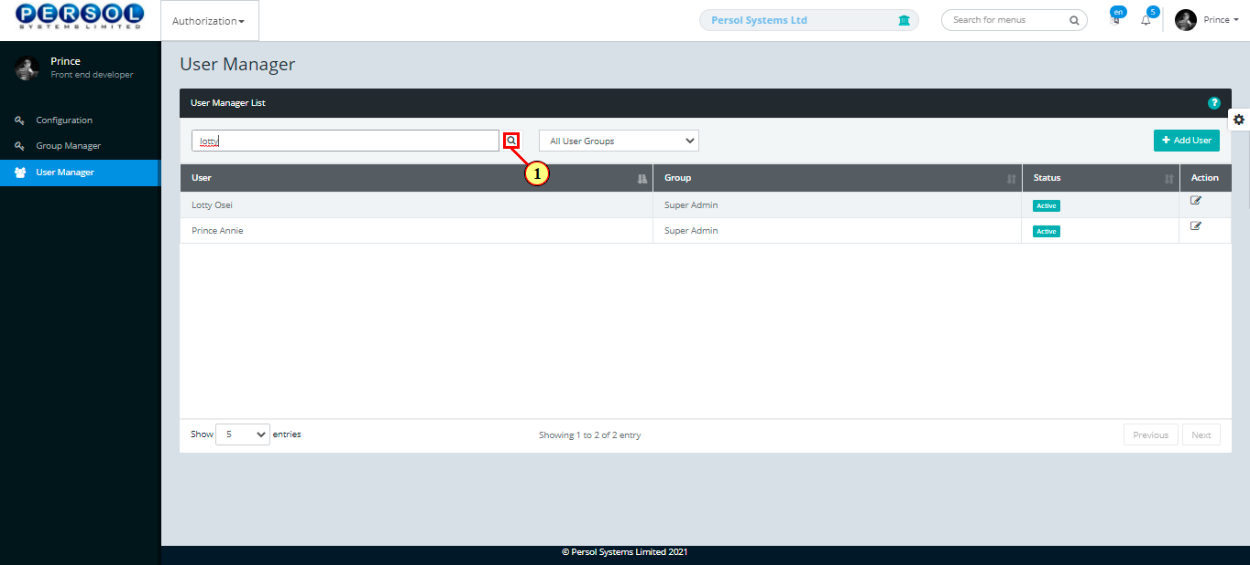
| (1) |
Click on the  icon to search icon to search
|
| Step | Action |
|---|---|
| (1) | You may select a user group to display all users in the group |
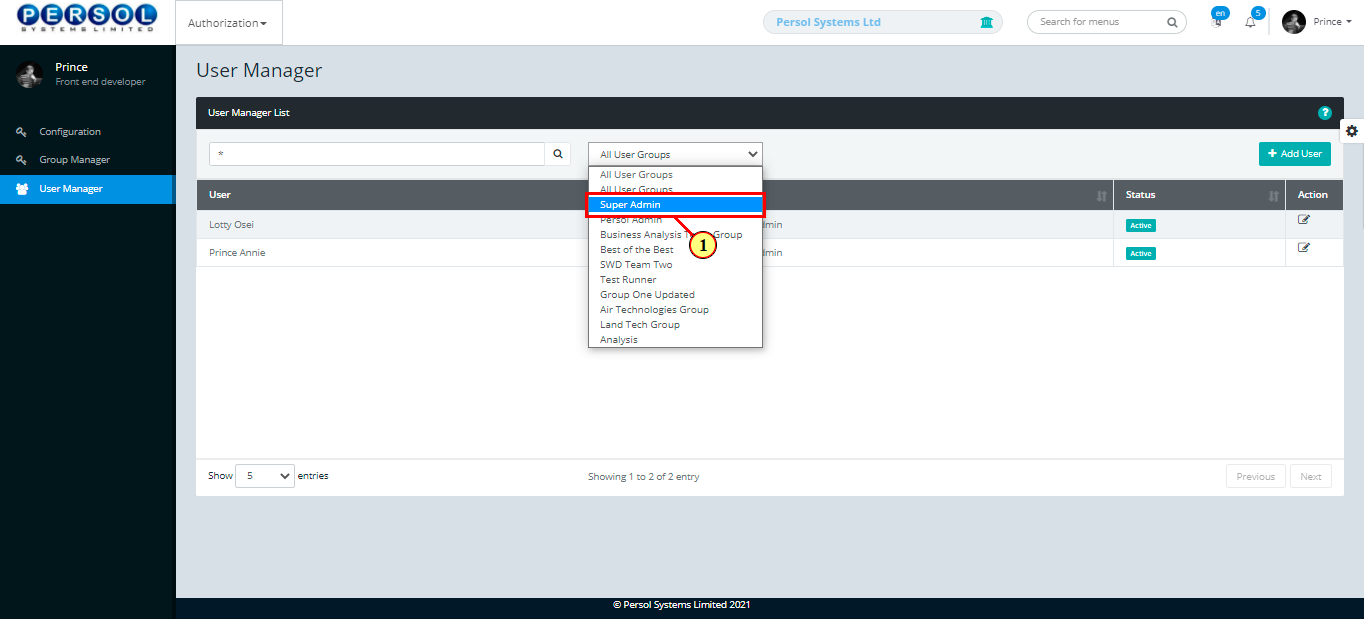
| Step | Action |
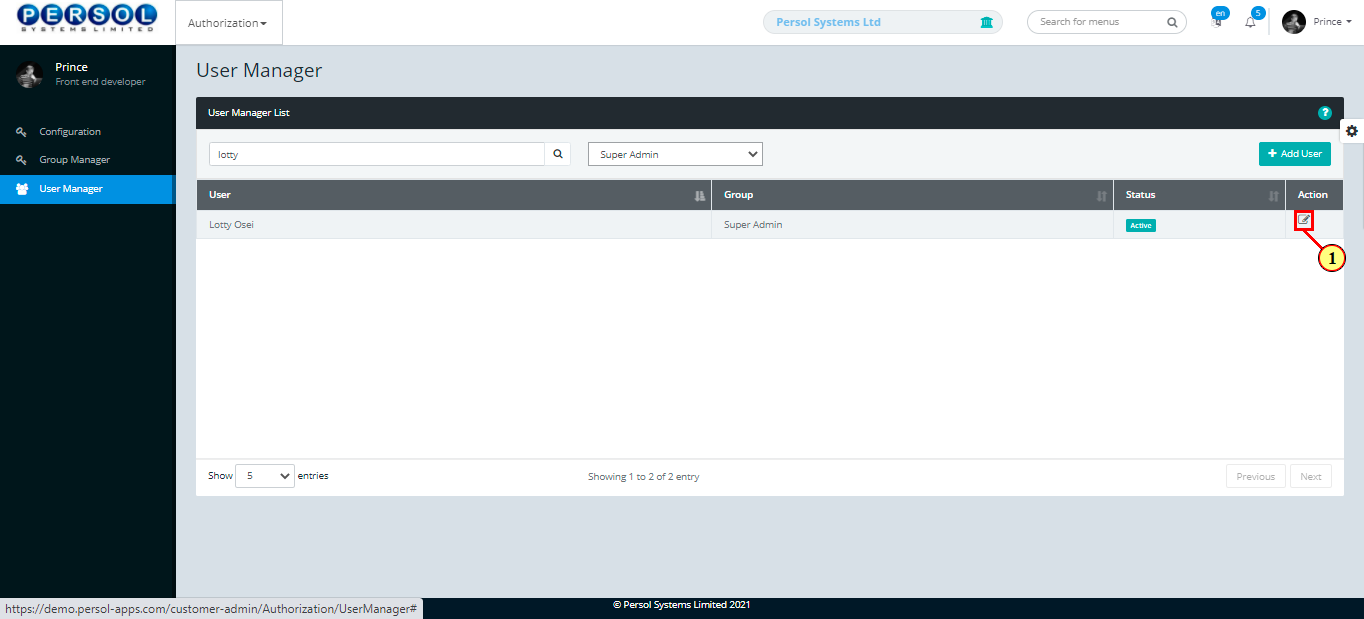
|---|---|
| The search results display in the grid | |
| (1) |
Click on the  icon to edit the user details icon to edit the user details
|
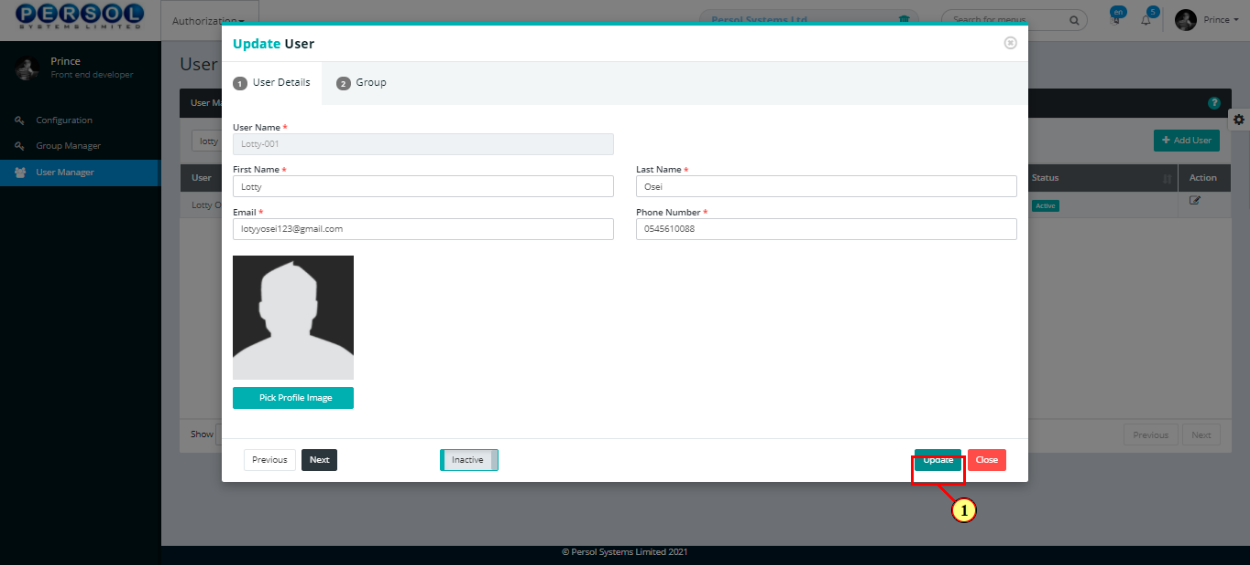
| Step | Action |
|---|---|
| The 'Update User' modal opens | |
| Edit the details of the user |
| Step | Action |
|---|---|
| (1) |
Click on the  button to save changes made button to save changes made
|
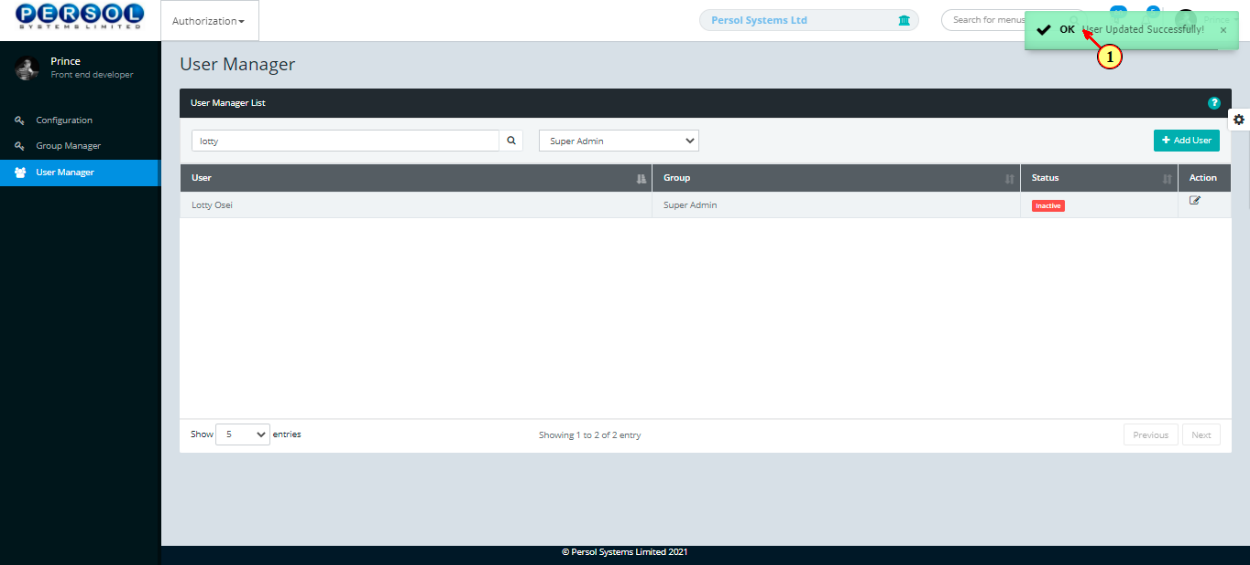
| Step | Action |
|---|---|
| (1) | A notification displays to indicate that the update has been saved successfully |
A deduction is an expense subtracted from an employee’s income eg. TUC dues, welfare dues etc.
| Step | Action |
|---|---|
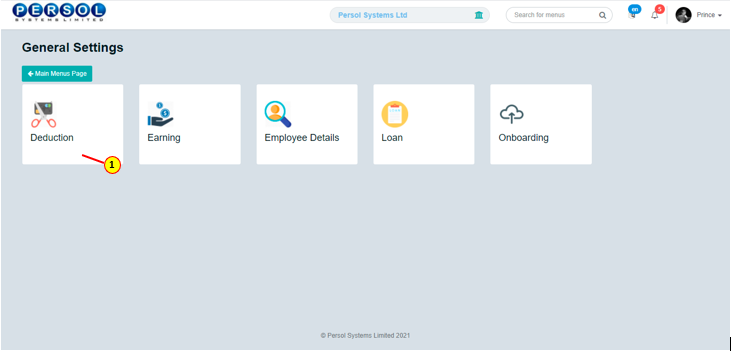
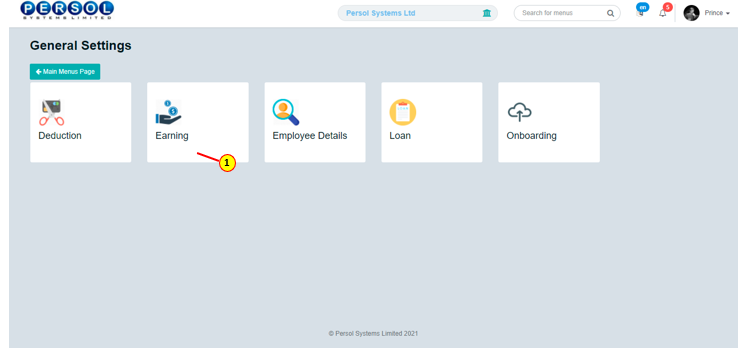
| (1) | On the HCM Customer Admin homepage, select the ‘General Settings’ tile |

| Step | Action |
|---|---|
| The ‘General Settings’ submenus page opens | |
| (1) | Select the ‘Deduction’ tile |
| Step | Action |
|---|---|
| The 'Deduction' page opens |
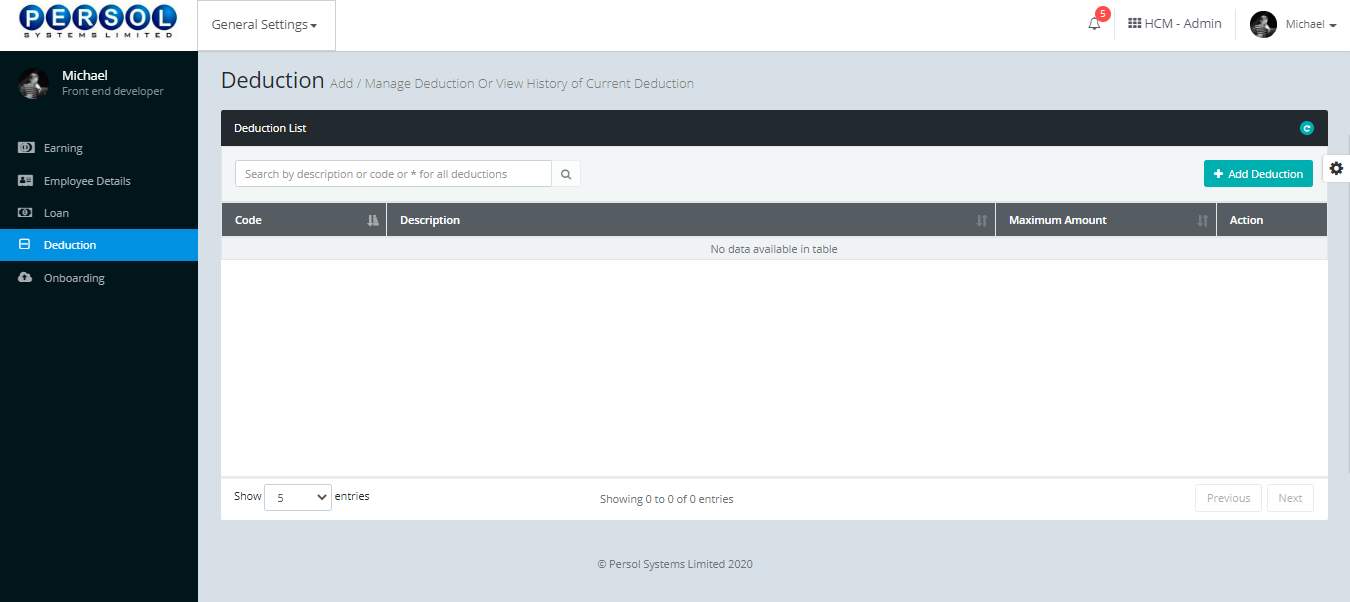
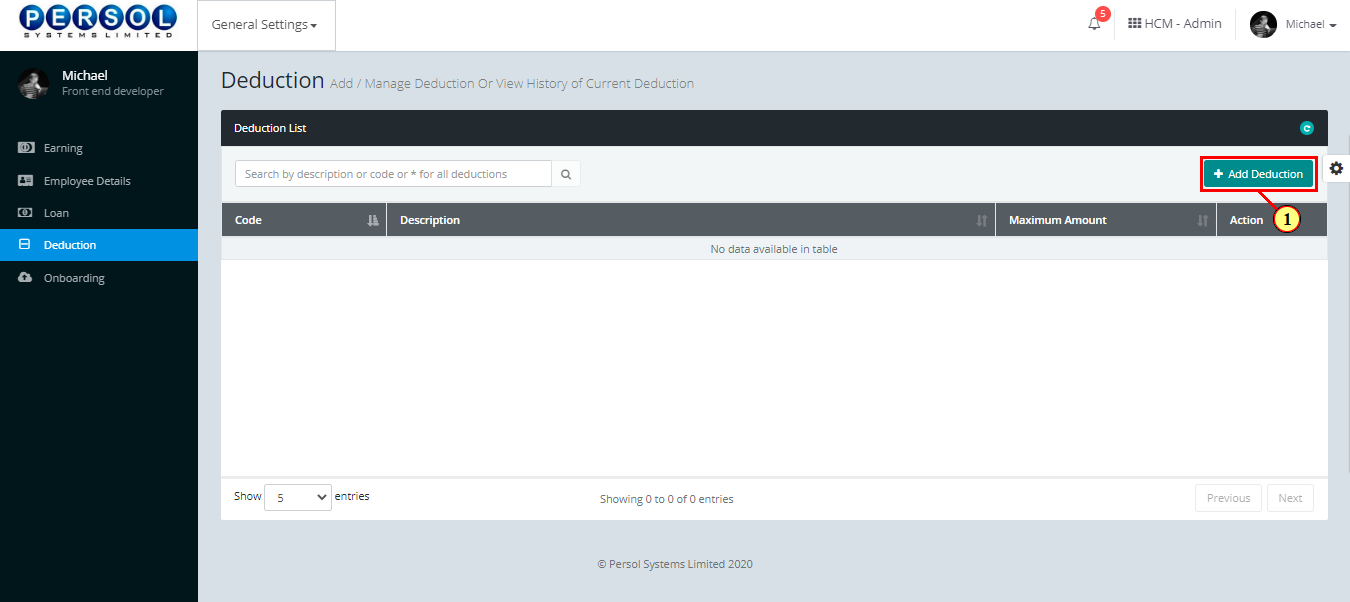
| Step | Action |
|---|---|
| (1) |
To setup a new deduction, click on the  button button
|
| Step | Action |
|---|---|
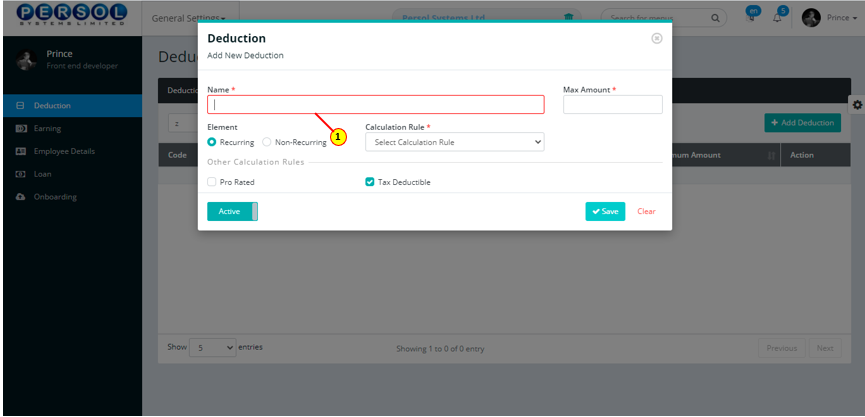
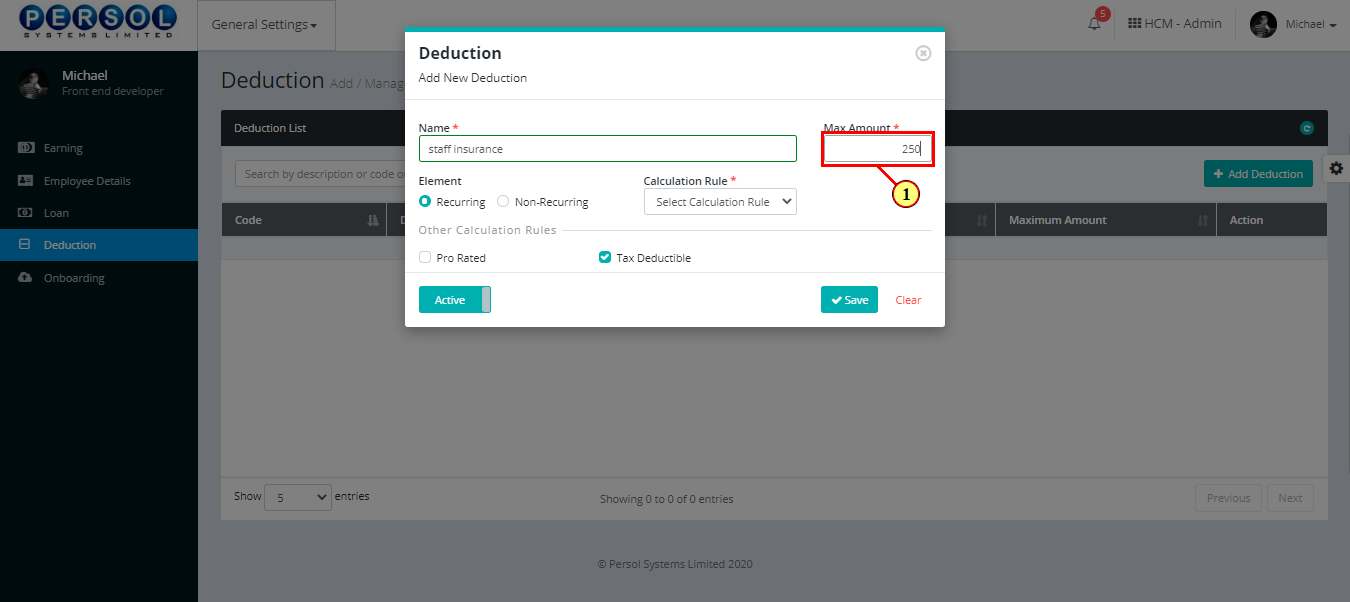
| The ‘Add Deduction’ modal opens | |
| (1) | Enter name of the new deduction |
|
This field is required * |
| Step | Action |
|---|---|
| (1) | Enter the maximum amount that can be deducted from employee’s income for this deduction type |
|
This field is required * |
| Step | Action |
|---|---|
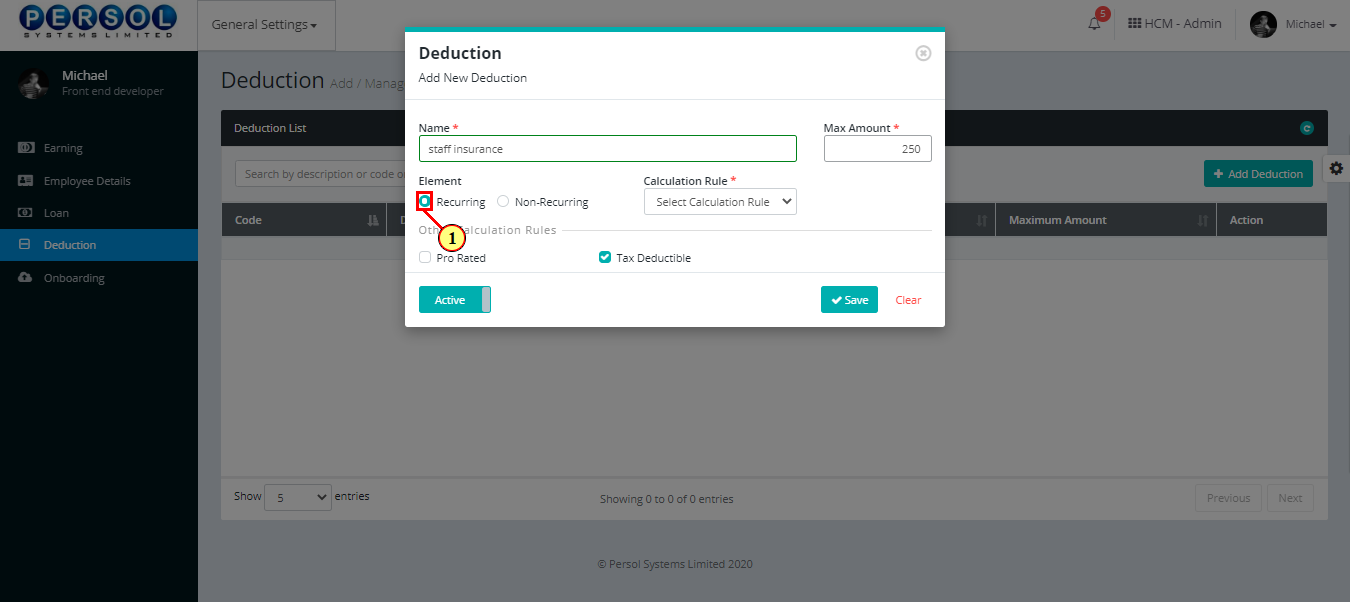
| (1) | Select the element (frequency) of deduction |
|
Only one element option can be selected |
|
Click here to view definition of the elements |
| Step | Action |
|---|---|
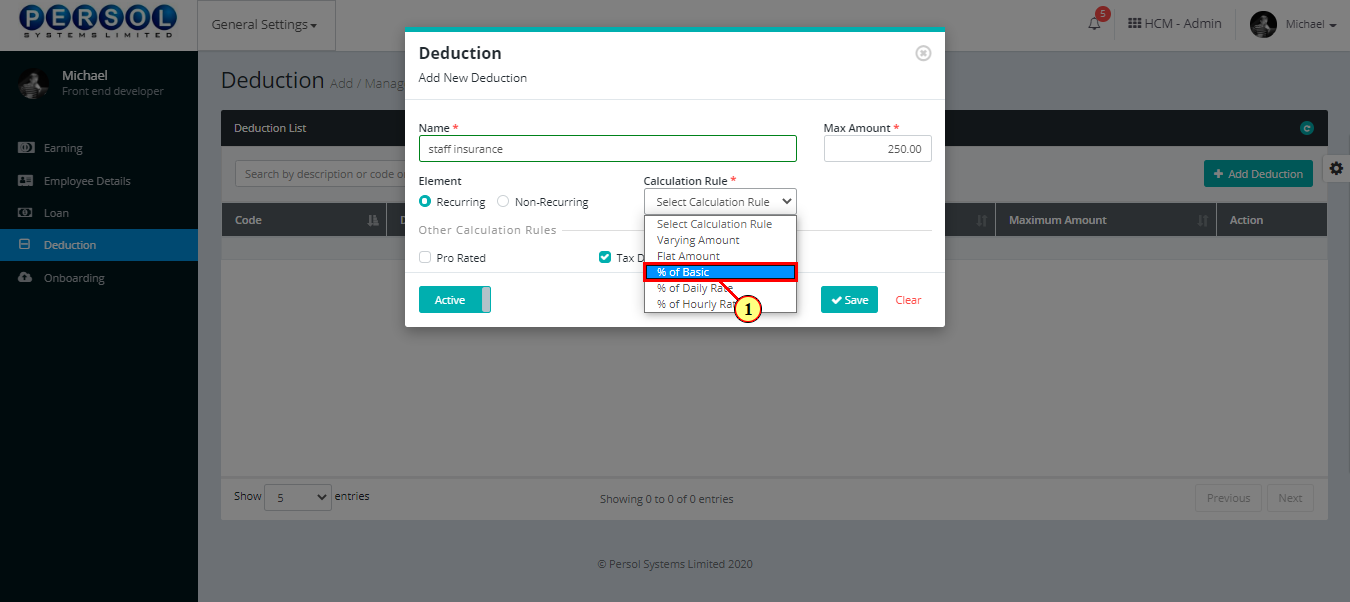
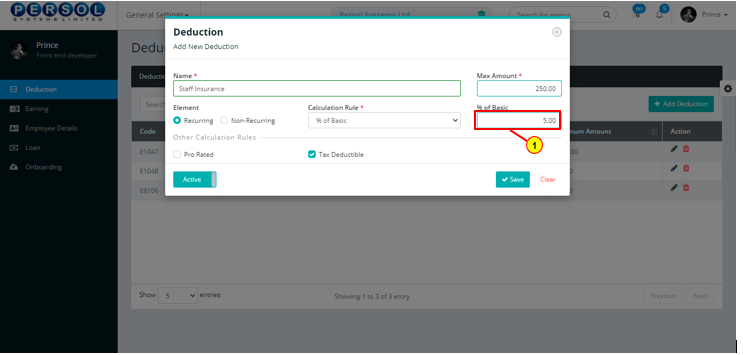
| (1) | Select the deduction’s calculation rule from the dropdown options |
|
This field is required * |
|
Click here to view definition of options for the calculation rule |
| Step | Action |
|---|---|
| (1) | Enter the value that corresponds with the selected calculation rule |
| Step | Action |
|---|---|
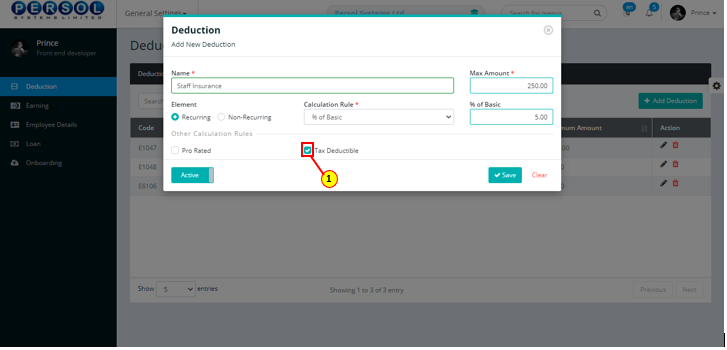
| (1) | Select other calculation rules that apply to the deduction if any |
|
More than one option can be selected |
|
Click here to view definition of options for other calculation rules |
| Step | Action |
|---|---|
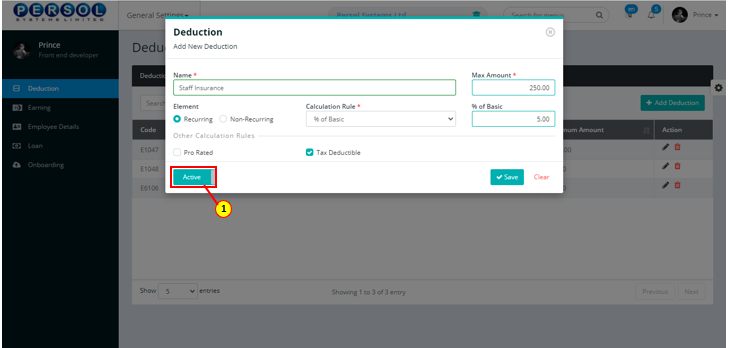
| (1) |
You may click on the button to change status of the deduction to inactive
|
|
- An active status means the deduction can be used in transactions on other pages - An inactive status means the deduction cannot be used in transactions on other pages |
| Step | Action |
|---|---|
|
You may click on the  button to clear all details entered button to clear all details entered
|
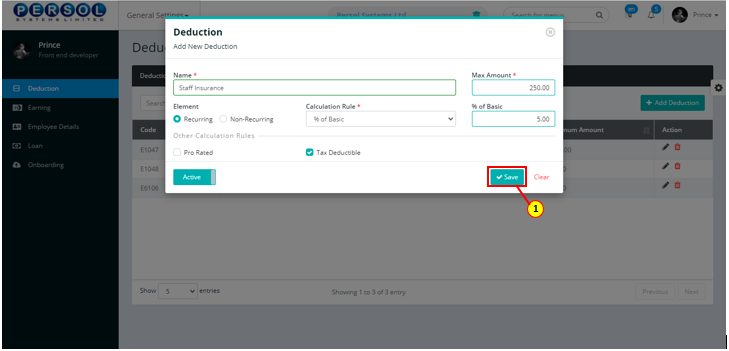
| (1) |
Click on the  button to save details of the newly added deduction button to save details of the newly added deduction
|
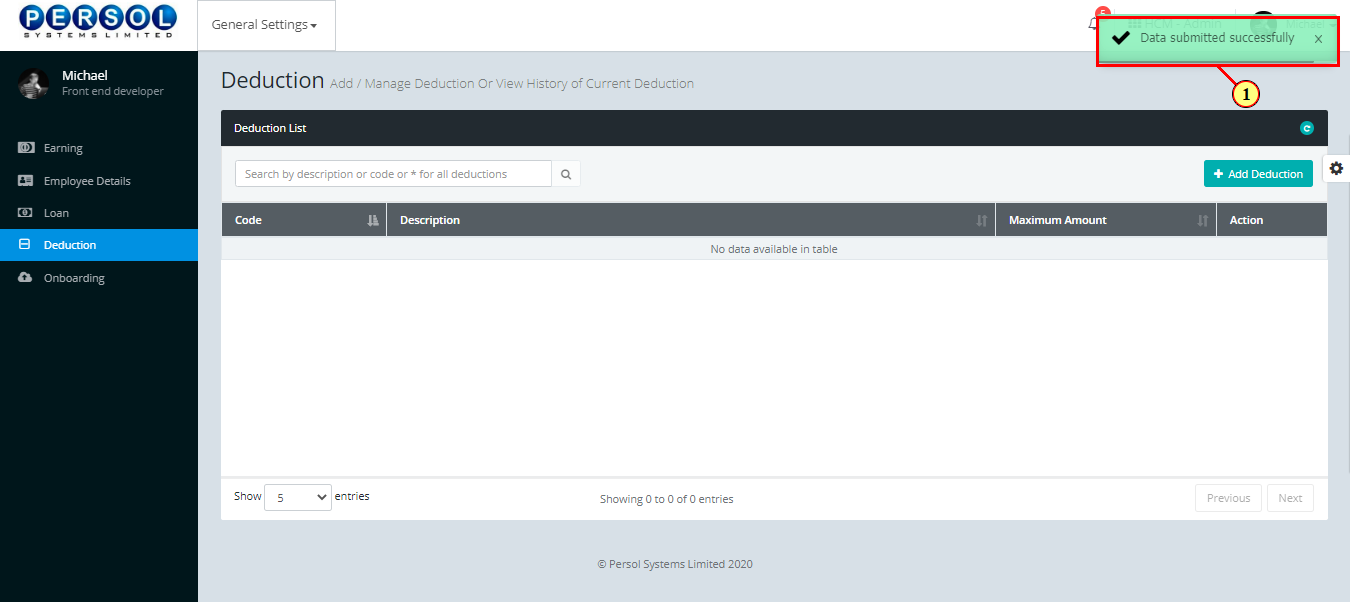
| Step | Action |
|---|---|
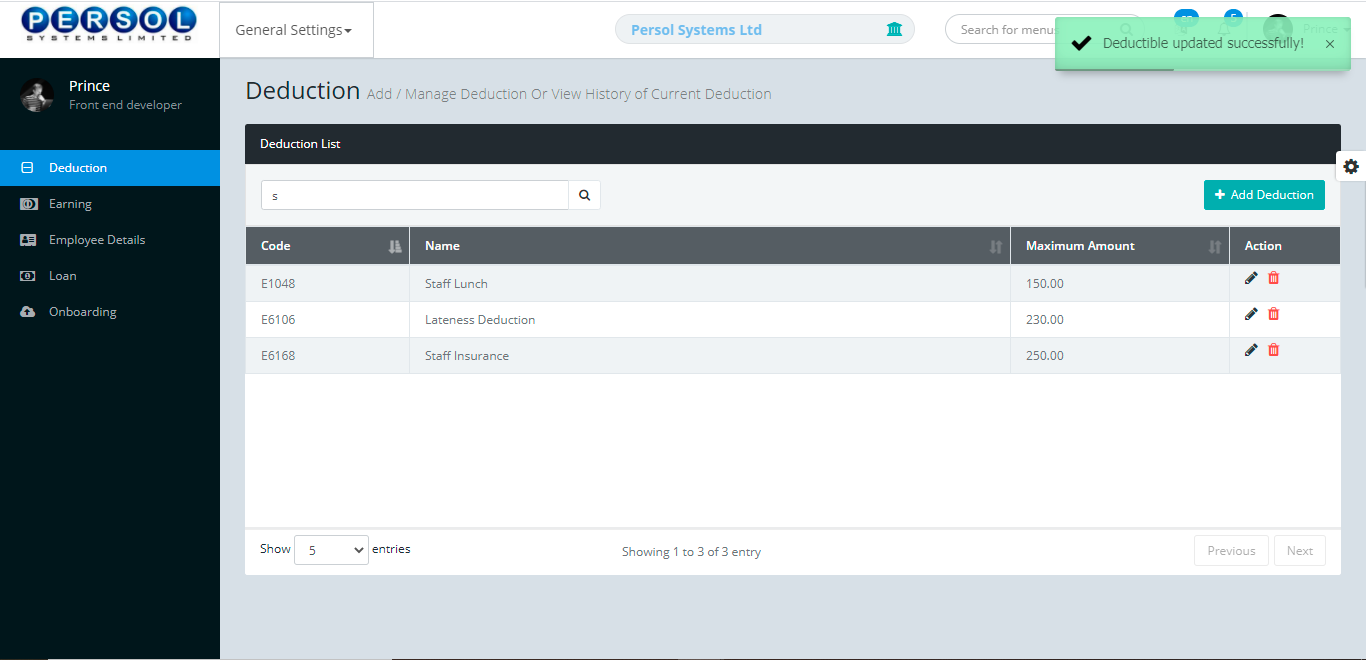
| (1) | A notification displays to indicate that the deduction setup has been saved successfully |
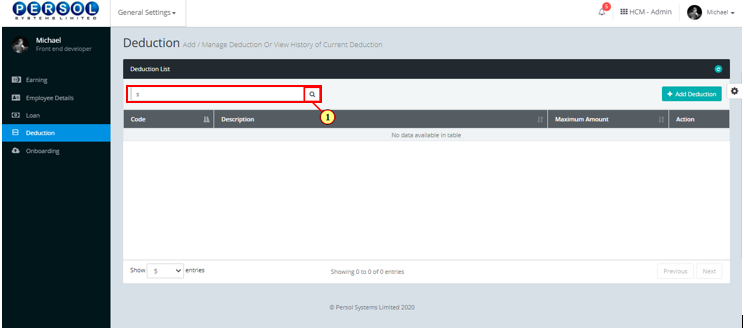
| Step | Action |
|---|---|
| (1) | To edit a deduction, enter the deduction name in the search box and click on the search icon |
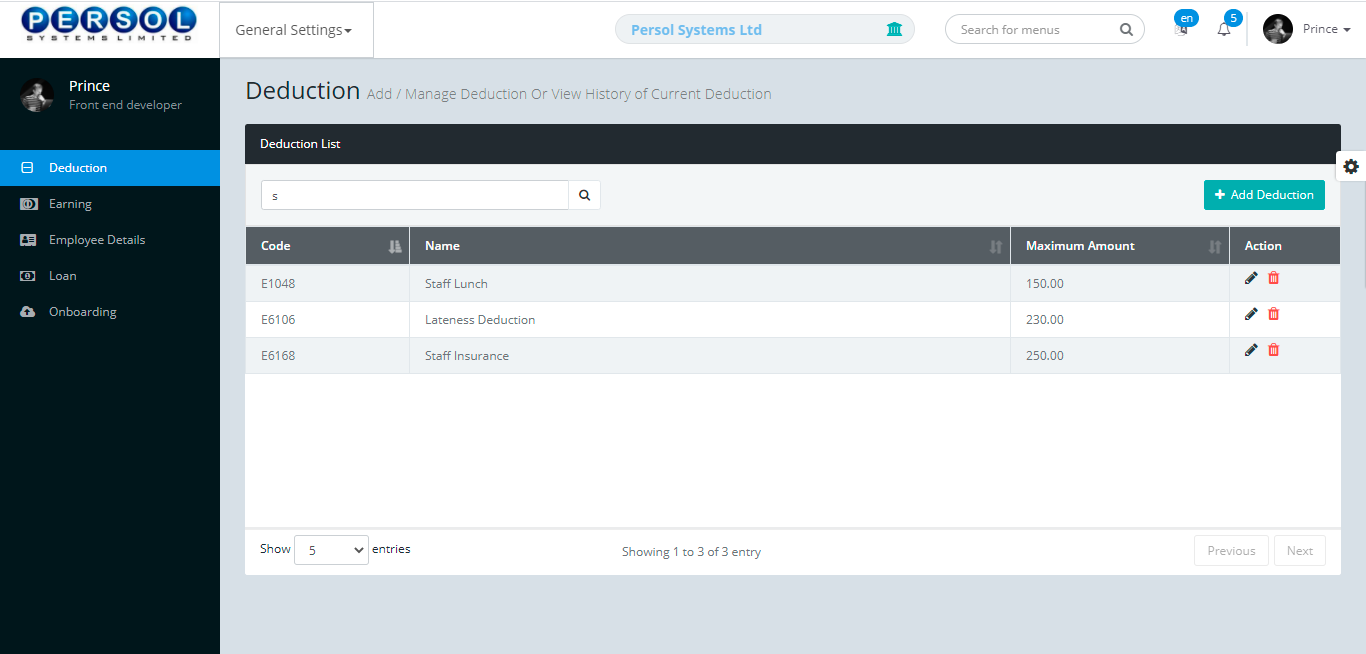
| Step | Action |
|---|---|
| The search result details display in the grid | |
|
The Action column consists of the Edit  and Delete and Delete  action icons action icons
|
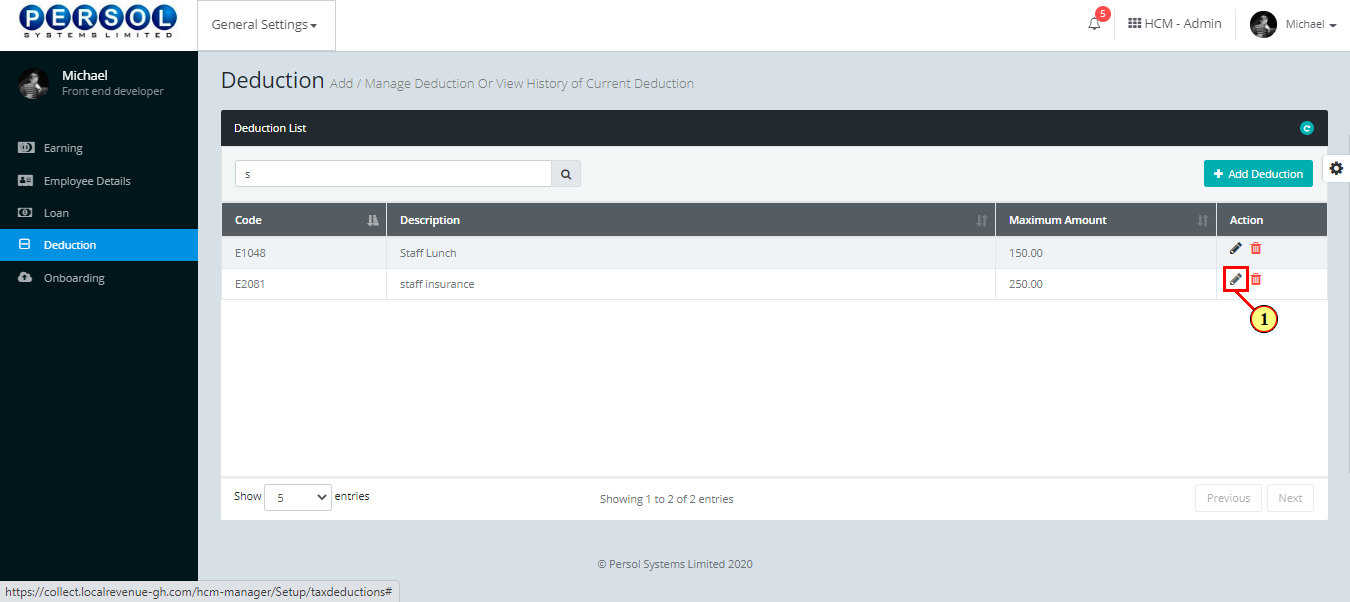
| Step | Action |
|---|---|
| (1) |
Click on the edit icon to edit the deduction
|
|
You may click on the delete icon to delete deduction
|
| Step | Action |
|---|---|
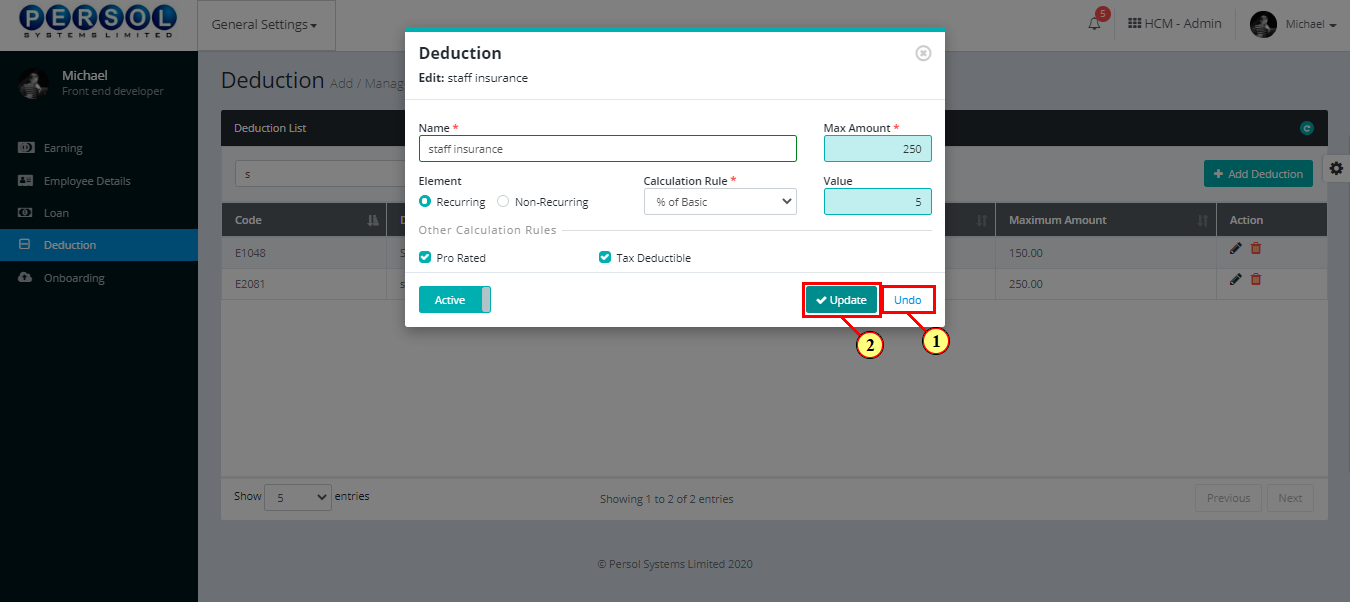
| The ‘Edit Deduction’ modal opens | |
| Edit the details of the deduction |

| Step | Action |
|---|---|
|
You may click on the  button to revert changes made button to revert changes made
|
| (1) |
Click on the  button to save the changes made button to save the changes made
|
| Step | Action |
|---|---|
| (1) | A notification displays to indicate the update has been saved successfully |
| TERM | DEFINITION |
|---|---|
| Recurring element | It is a payroll element with an undefined period of time |
| Non-Recurring element | It is a payroll element that is valid for one pay period |
| Varying amount | This amount differs from employee to employee |
| Flat amount | This amount is fixed for all employees |
| % of basic | This amount is computed based on a percentage of an employee’s basic salary |
| % of daily rate | This amount is computed based on a percentage of an employee's daily wage rate |
| % of hourly rate | This amount is computed based on a percentage of an employee's hourly wage rate |
| Basic | It is an employee's salary prior to any extra payments or deductions. |
| Pro-rated | It is an employee's salary calculated proportionally to the number of hours/days actually worked |
| Tax deductible | Allowed to be subtracted from the total amount of income before calculating the required tax to be paid |
| Severance pay paid | It is the compensation paid to an employee when their employment is terminated |
| Taxable | Subject to taxes |
| Annualized | To convert into an annual rate |
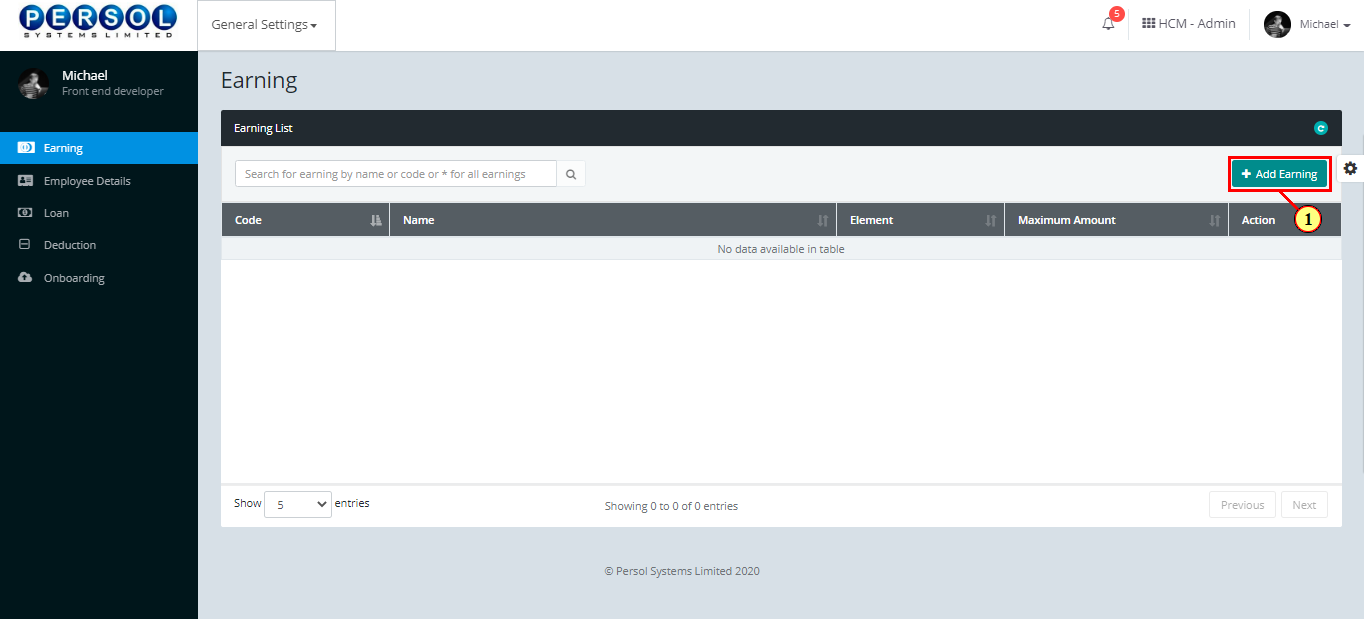
An earning is a cash or non cash benefit given to an employee eg. rent allowance, annual bonus, fuel allowance etc
| Step | Action |
|---|---|
| (1) | On the PersonaX Customer Admin homepage, select the ‘General Settings’ tile |

| Step | Action |
|---|---|
| The ‘General Settings’ submenus page opens | |
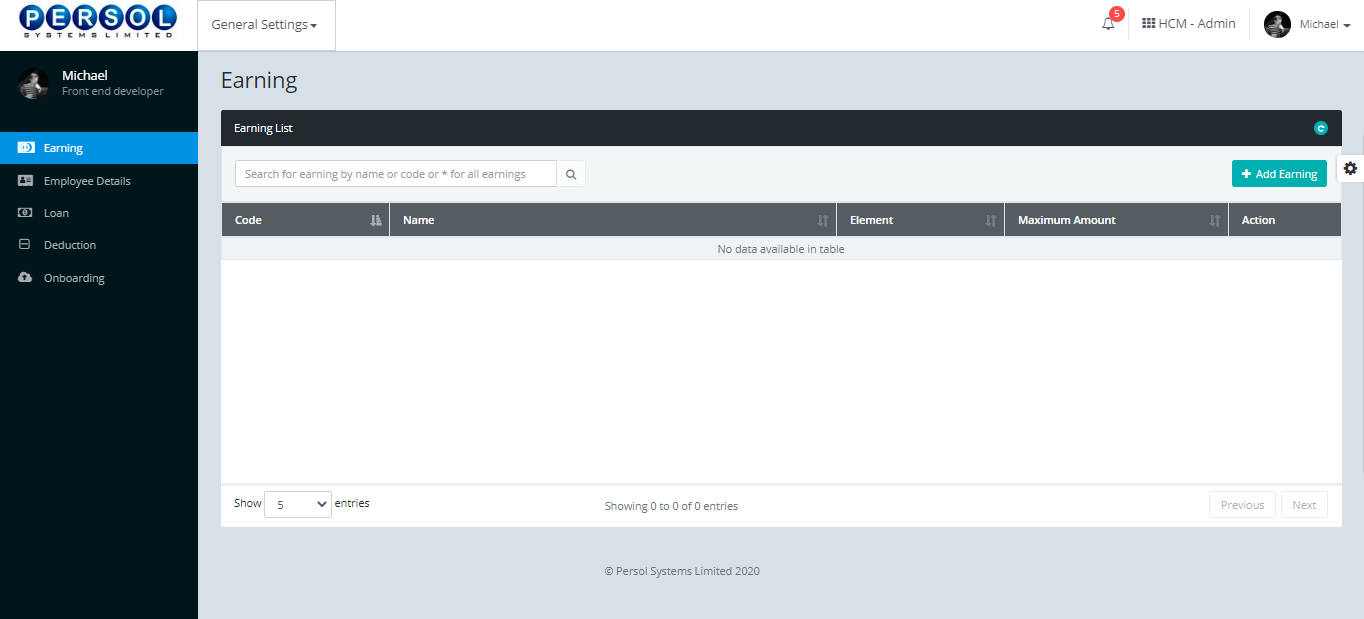
| (1) | Select the ‘Earning’ tile |
| Step | Action |
|---|---|
| The ‘Earning’ page opens |
| Step | Action |
|---|---|
| (1) |
To setup a new earning, click on the 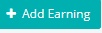 button button
|
| Step | Action |
|---|---|
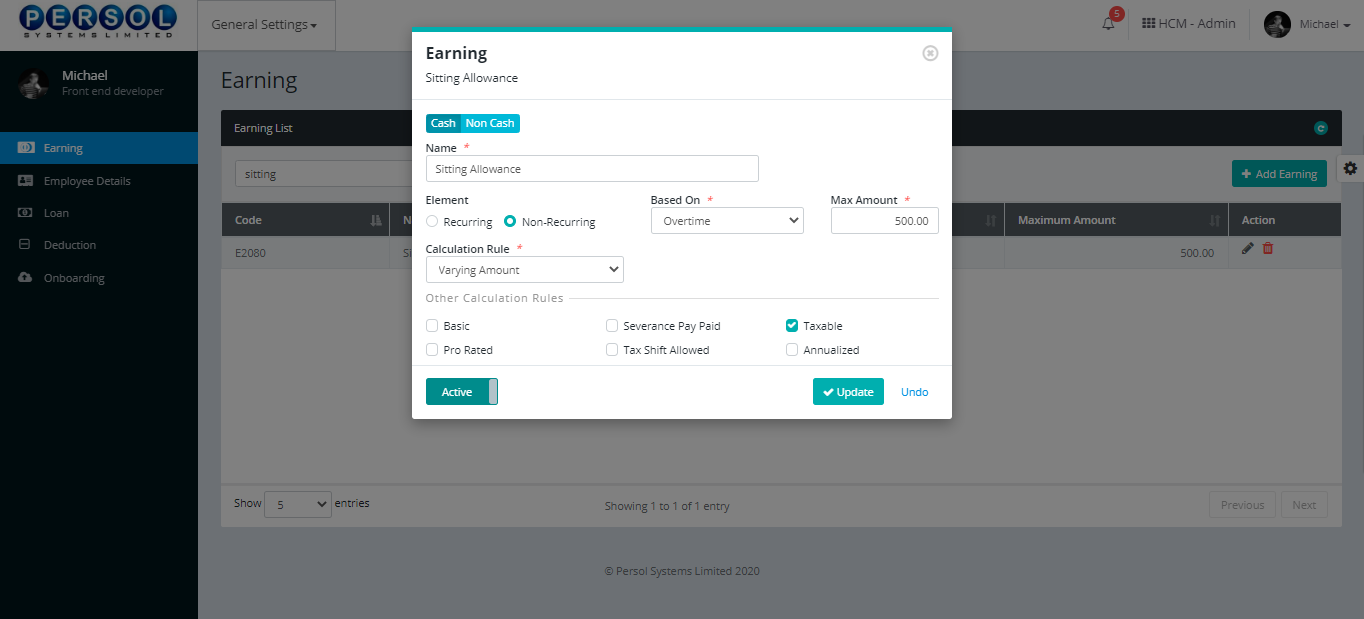
| The ‘Earning’ modal opens | |
| (1) | Click to select the type of earning; cash or non-cash |
|
If non-cash is selected, click here to continue steps |
| Step | Action |
|---|---|
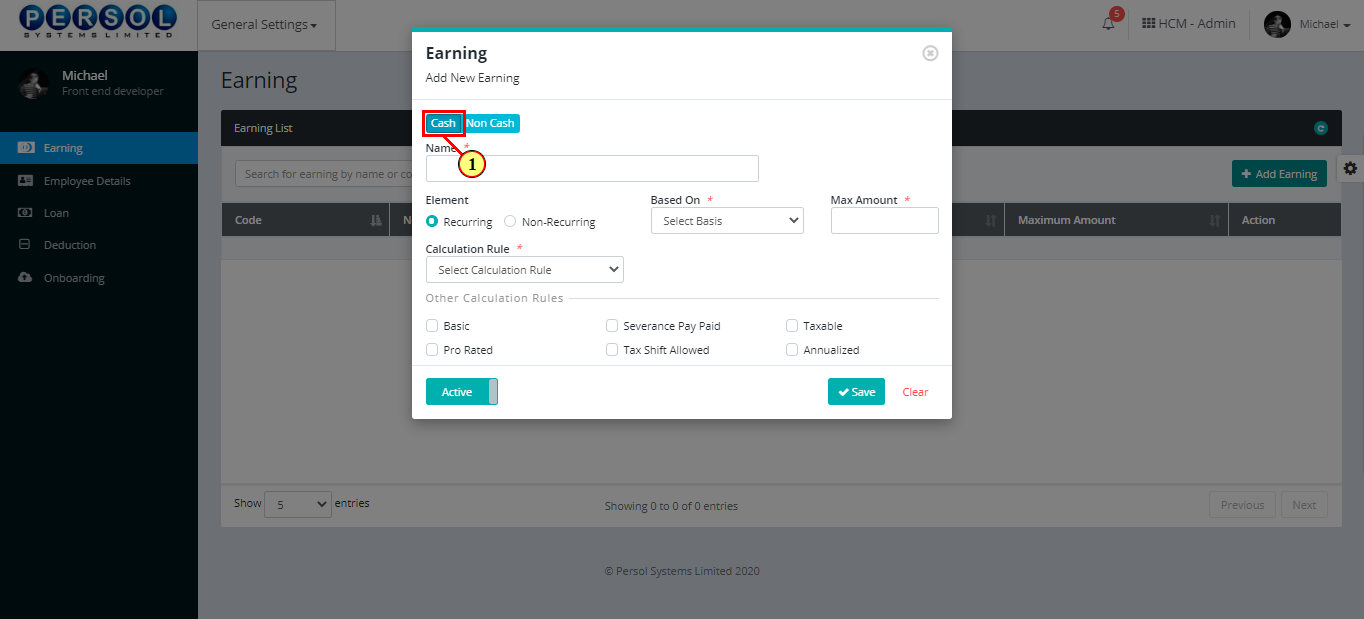
| (1) | If cash is selected, enter name of the new cash earning |
|
This field is required * |
| Step | Action |
|---|---|
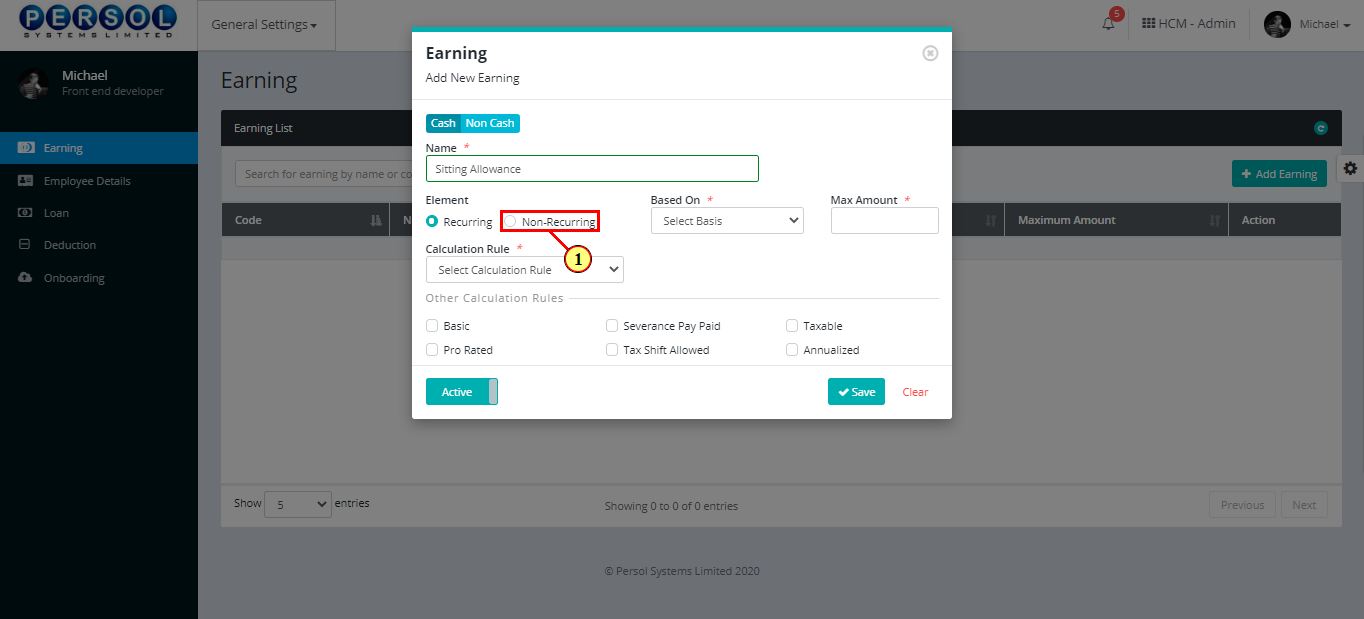
| (1) | Select the element (frequency) of earning |
|
Only one element option can be selected |
|
Click here to view definition of the elements |
| Step | Action |
|---|---|
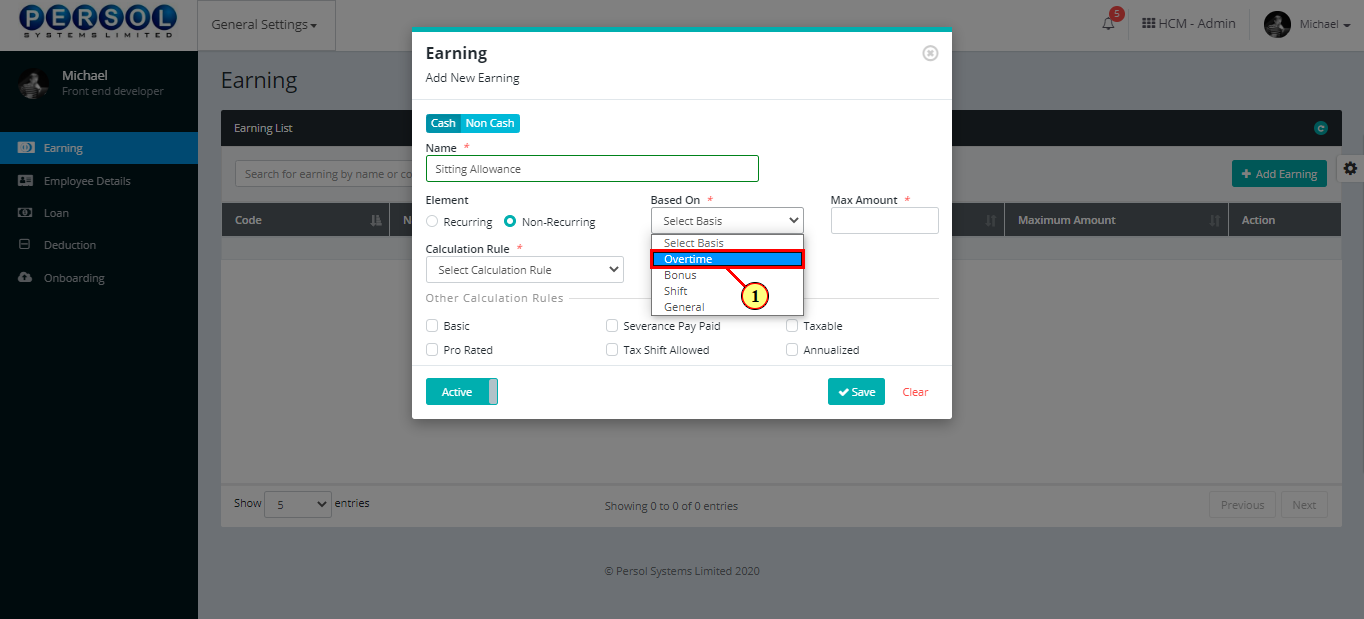
| (1) | Select the basis for calculating the earning from the dropdown options |
|
This field is required * |
| Step | Action |
|---|---|
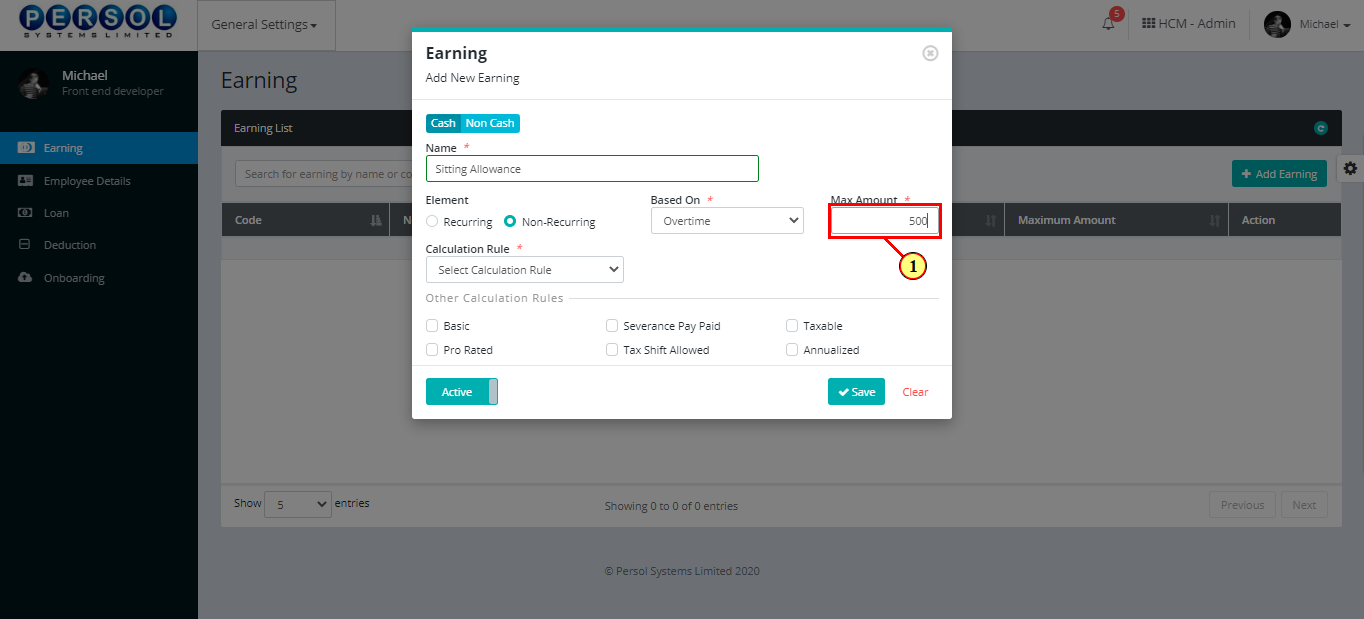
| (1) | Enter the maximum amount that can be earned with the selected basis |
|
This field is required * |
| Step | Action |
|---|---|
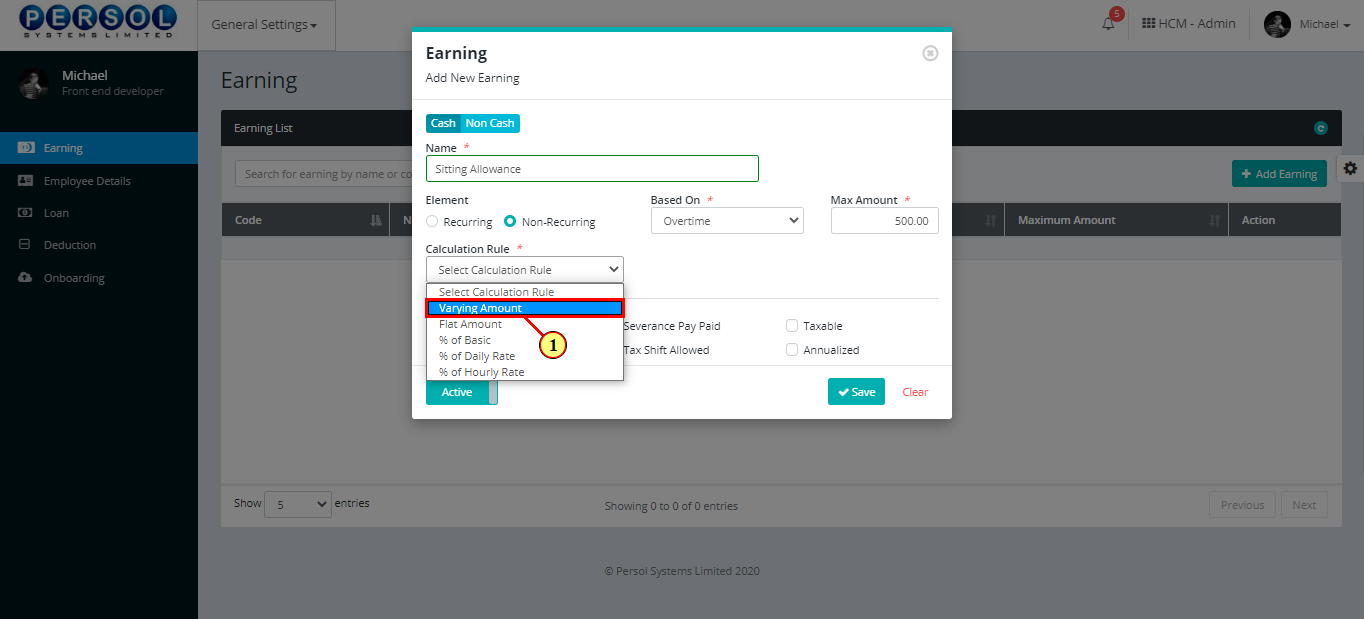
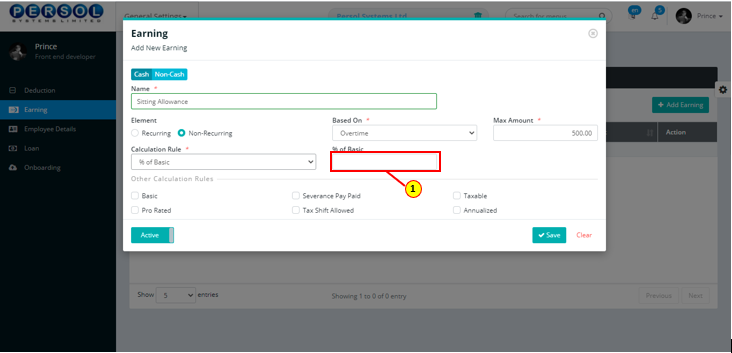
| (1) | Select the earning’s calculation rule from the dropdown options |
|
This field is required * |
|
Click here to view definition of options for the calculation rule |
| Step | Action |
|---|---|
| (1) | Enter the value that corresponds with the selected calculation rule |
| Step | Action |
|---|---|
| (1) | Select other calculation rules that apply to the earning if any |
|
More than one option can be selected |
|
Click here to view definition of options for other calculation rules |

| Step | Action |
|---|---|
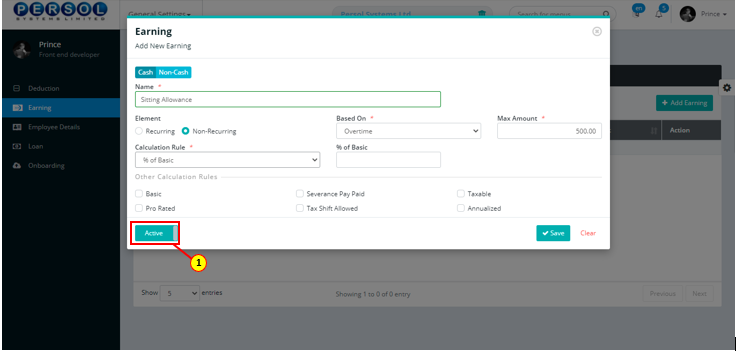
| (1) |
You may click on the button to change status of the earning to inactive
|
|
- An active status means the earning can be used in transactions on other pages - An inactive status means the earning cannot be used in transactions on other pages |
| Step | Action |
|---|---|
|
You may click on the button to clear all details entered
|
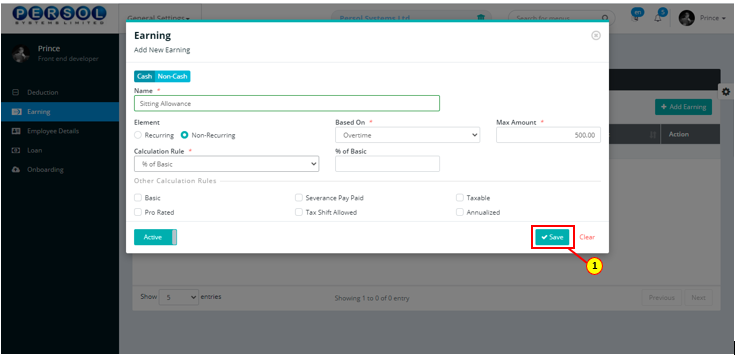
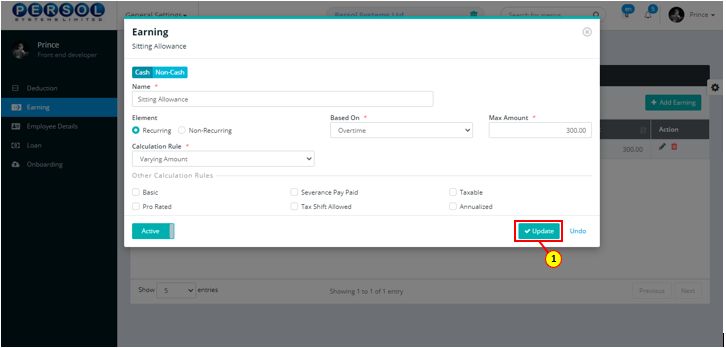
| (1) |
Click on the button to save details of the newly added earning
|
| Step | Action |
|---|---|
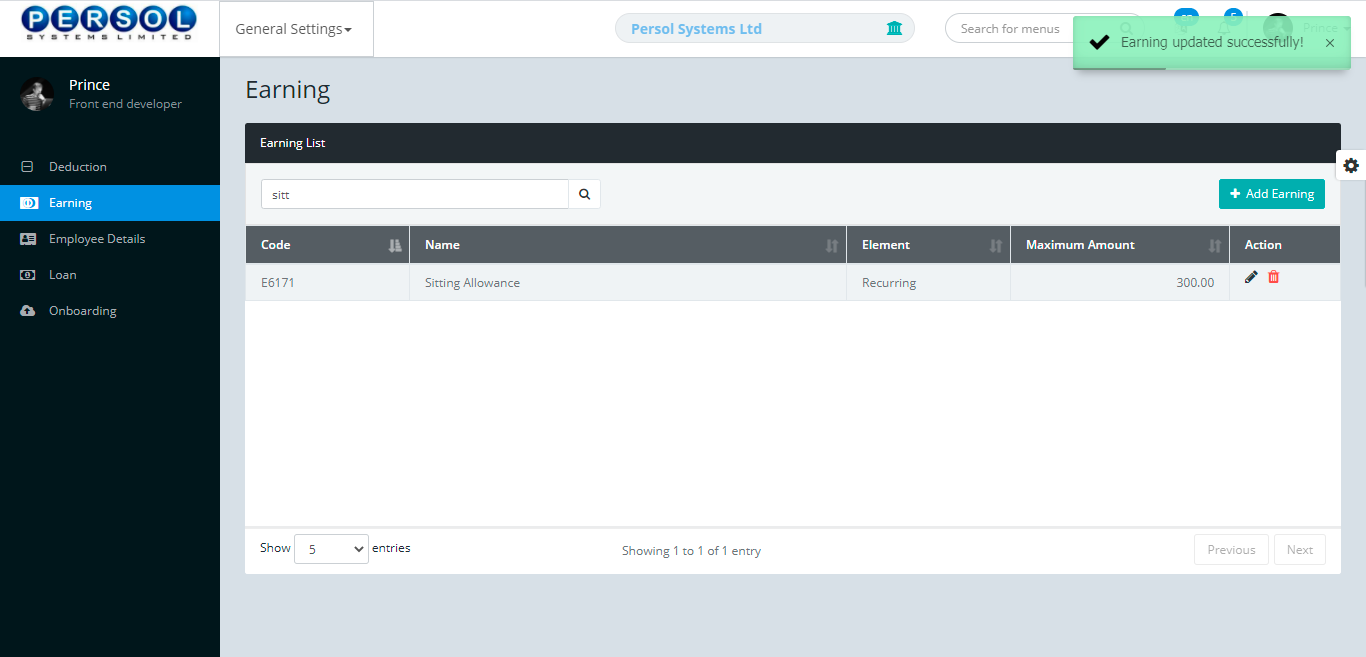
| (1) | A notification displays to indicate that the earning setup has been saved successfully |

| Step | Action |
|---|---|
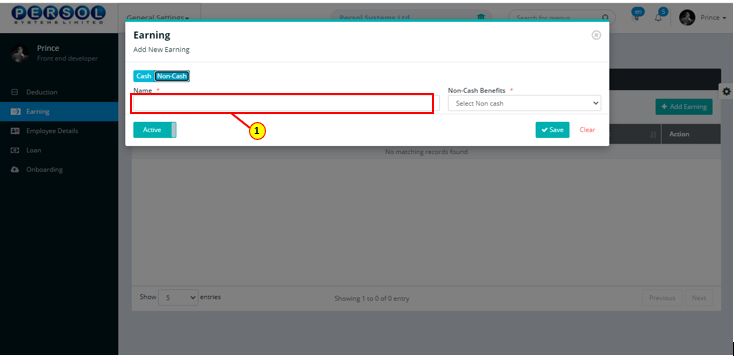
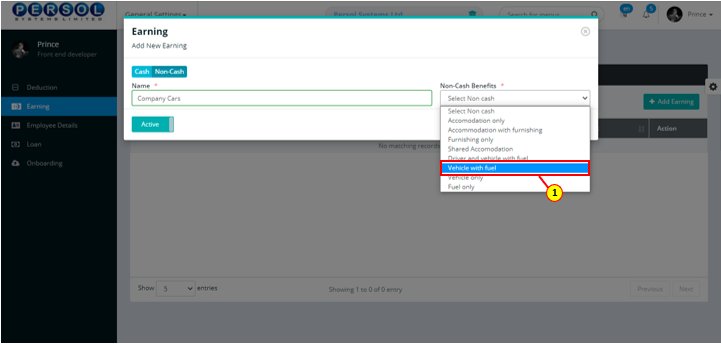
| If non-cash is selected, the details for the non-cash earning display | |
| (1) | Enter name of the new non-cash earning |
|
This field is required * |
| Step | Action |
|---|---|
| (1) | Select the non-cash benefit from the drop-down options |
|
This field is required * |
| Step | Action |
|---|---|
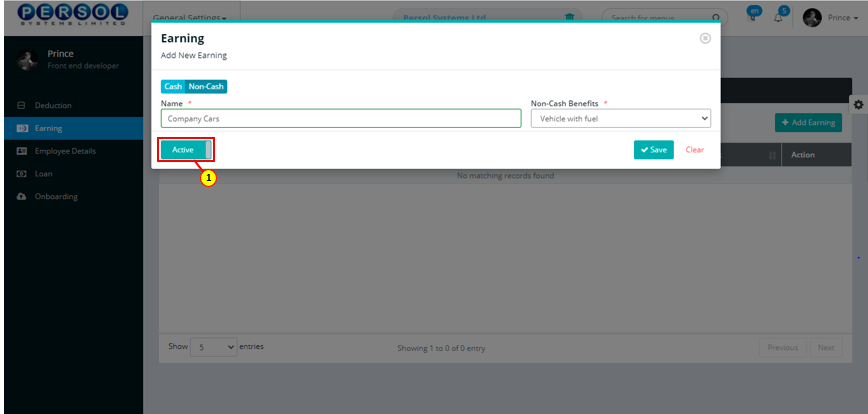
| (1) |
You may click on the button to change status of the earning to inactive
|
|
- An active status means the earning can be used in transactions on other pages - An inactive status means the earning cannot be used in transactions on other pages |
| Step | Action |
|---|---|
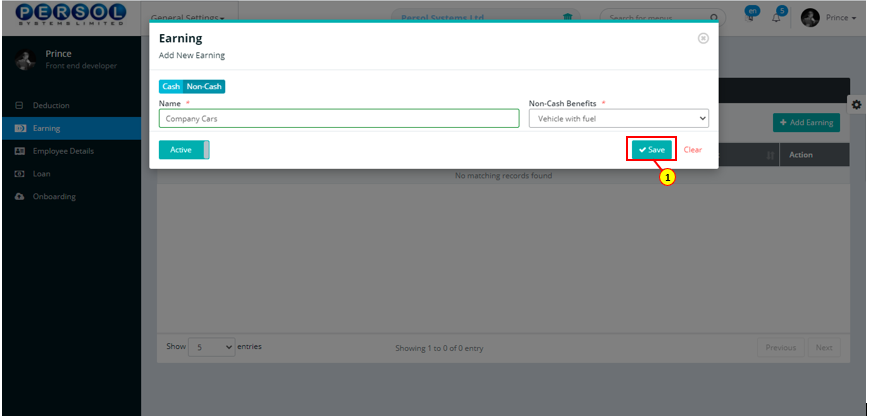
|
You may click on the button to clear all details entered
|
| (1) |
Click on the button to save details of the newly added earning
|
| Step | Action |
|---|---|
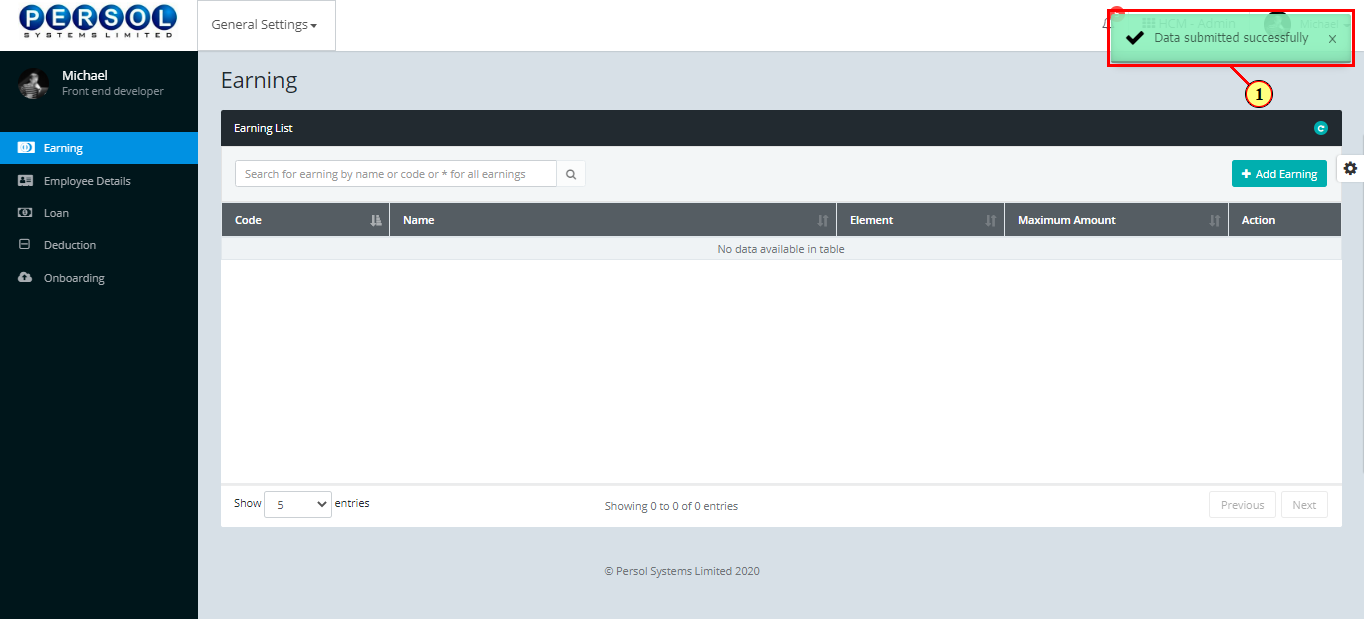
| (1) | A notification displays to indicate that the earning setup has been saved successfully |
| Step | Action |
|---|---|
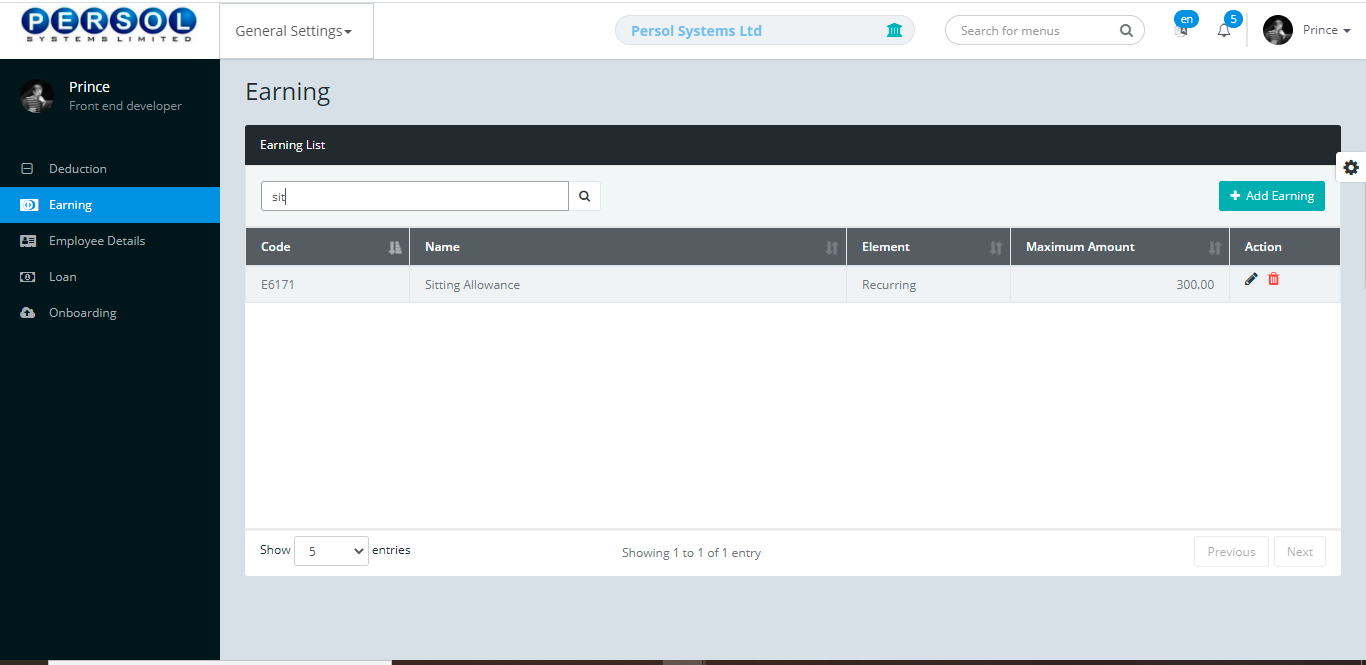
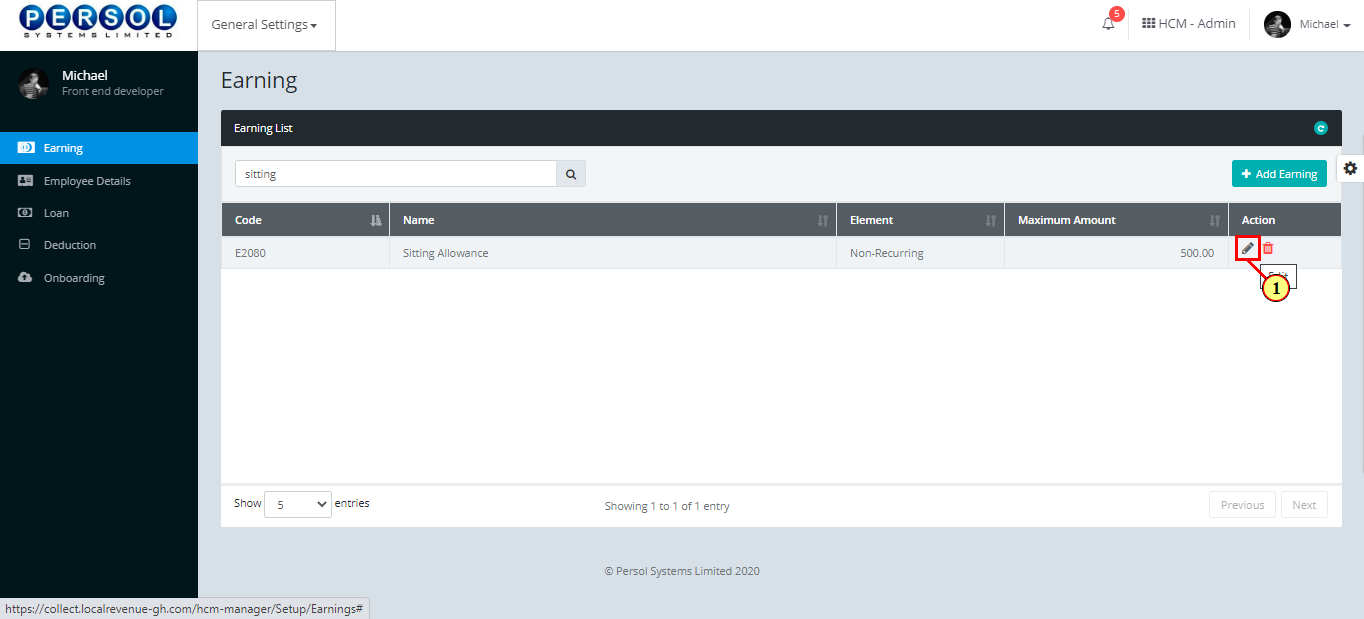
| (1) | To edit an earning, enter the earning name in the search box and click on the search icon |
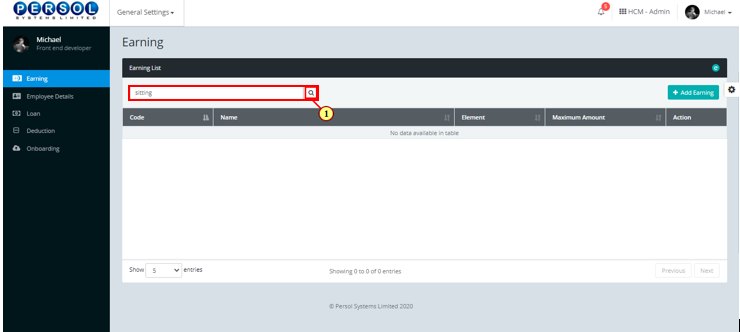
| Step | Action |
|---|---|
| The search result details display in the grid | |
|
The Action column consists of the Edit and Delete action icons
|
| Step | Action |
|---|---|
| (1) |
Click on the edit icon to edit the earning
|
|
You may click on the delete icon to delete the earning
|
| Step | Action |
|---|---|
| The ‘Edit Earning’ modal opens | |
| Edit the details of the earning |
| Step | Action |
|---|---|
|
You may click on the button to revert changes made
|
| (1) |
Click on the button to save the changes made
|
| Step | Action |
|---|---|
| (1) | A notification displays to indicate the update has been saved successfully |
| TERM | DEFINITION |
|---|---|
| Recurring element | It is a payroll element with an undefined period of time |
| Non-Recurring element | It is a payroll element that is valid for one pay period |
| Varying amount | This amount differs from employee to employee |
| Flat amount | This amount is fixed for all employees |
| % of basic | This amount is computed based on a percentage of an employee’s basic salary |
| % of daily rate | This amount is computed based on a percentage of an employee's daily wage rate |
| % of hourly rate | This amount is computed based on a percentage of an employee's hourly wage rate |
| Basic | It is an employee's salary prior to any extra payments or deductions. |
| Pro-rated | It is an employee's salary calculated proportionally to the number of hours/days actually worked |
| Tax deductible | Allowed to be subtracted from the total amount of income before calculating the required tax to be paid |
| Severance pay paid | It is the compensation paid to an employee when their employment is terminated |
| Taxable | Subject to taxes |
| Annualized | To convert into an annual rate |
| Step | Action |
|---|---|
| (1) | On the Personax Customer Admin homepage, select the ‘General Settings’ tile |

| Step | Action |
|---|---|
| The ‘General Settings’ submenus page opens | |
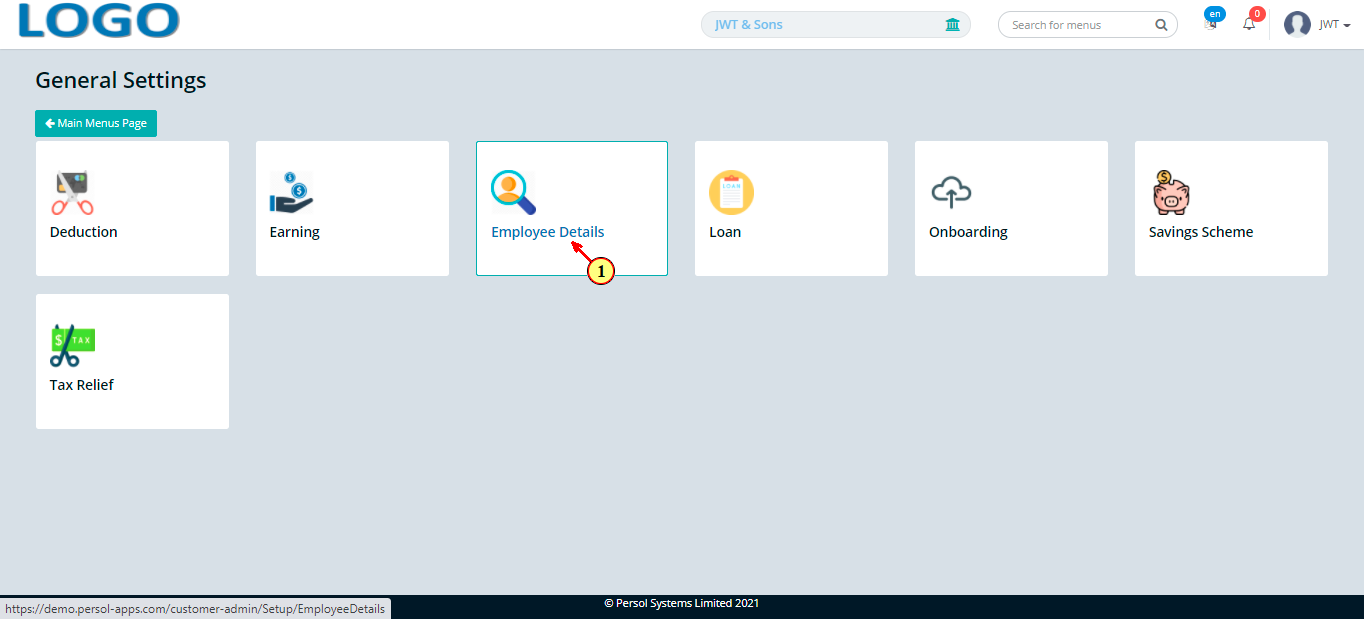
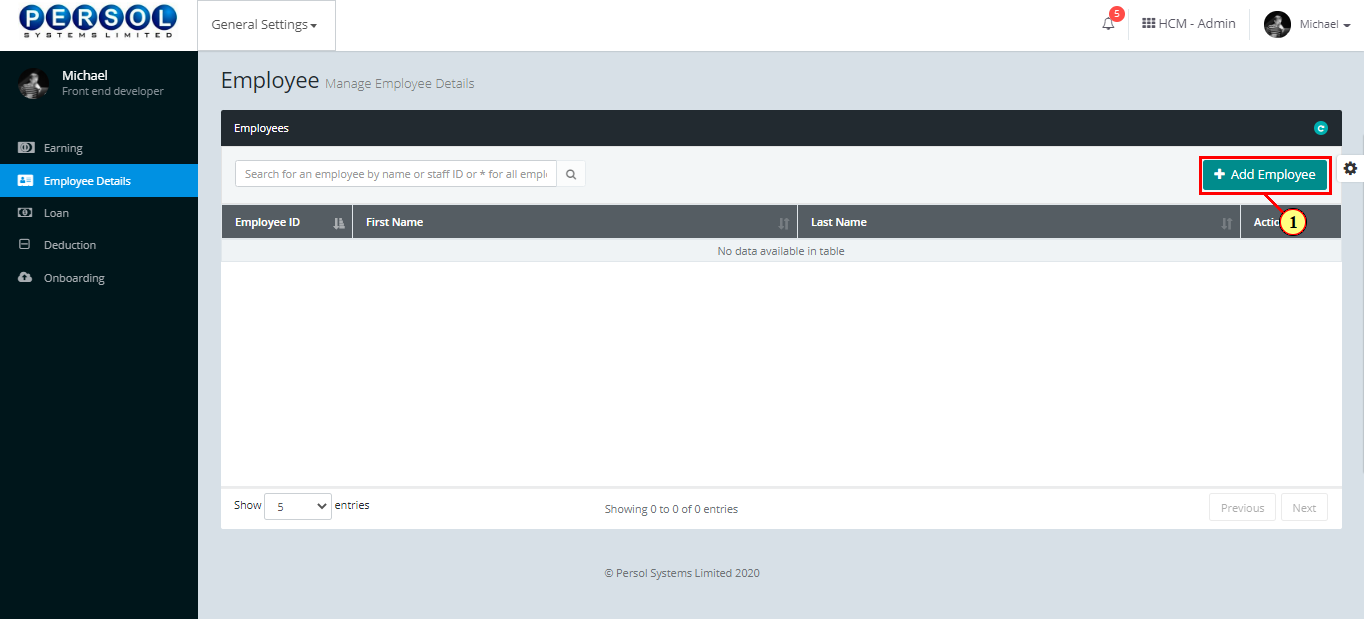
| (1) | Select the ‘Employee Details’ tile |
| Step | Action |
|---|---|
| The ‘Employee’ page opens | |
| (1) |
To setup the details of an employee, click on the  button button
|
| Step | Action |
|---|---|
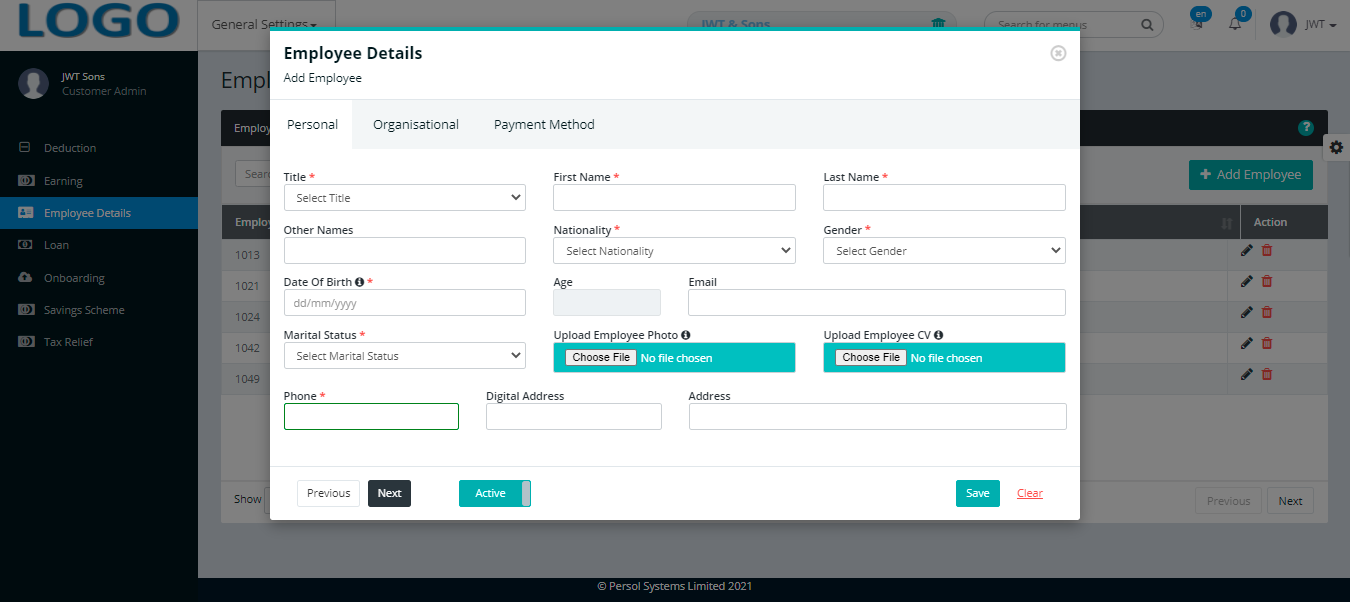
| The 'Employee Details' modal opens showing the 'Personal' details fields |
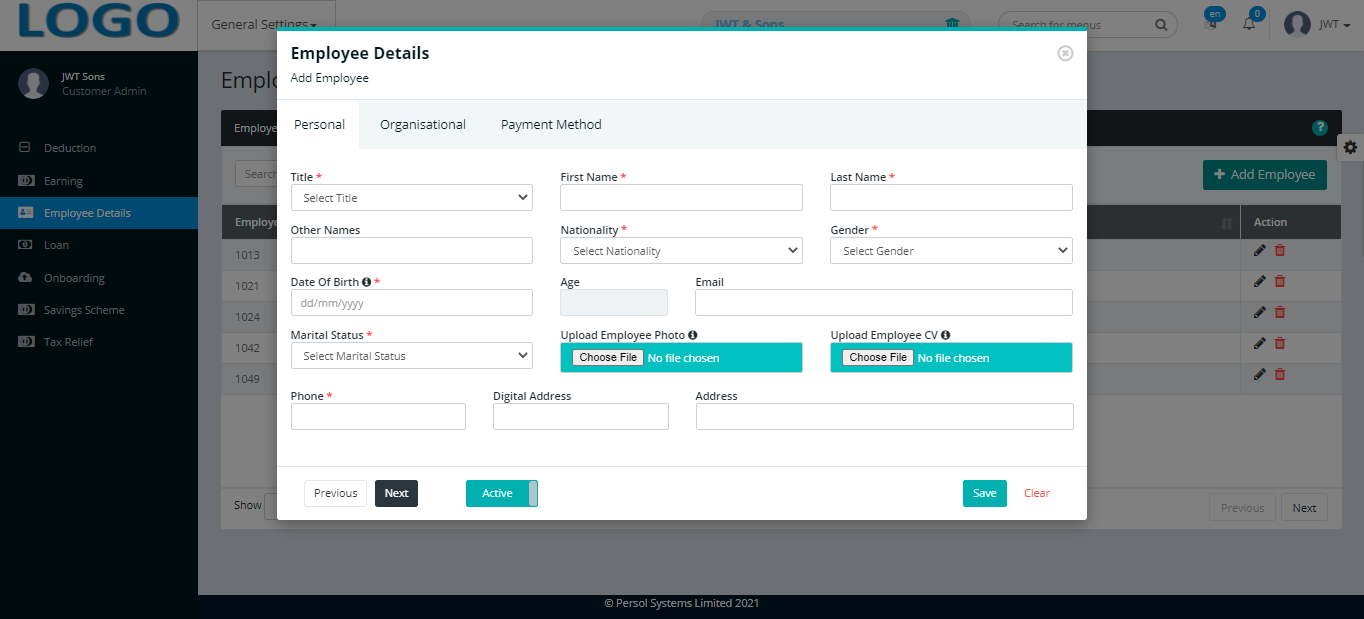
| Step | Action |
|---|---|
Provide the following personal details of the employee
|
|
|
All required fields are marked with an asterisk * |
|
You may click on the  button to change employee's status to ‘Inactive’ button to change employee's status to ‘Inactive’ |
| Step | Action |
|---|---|
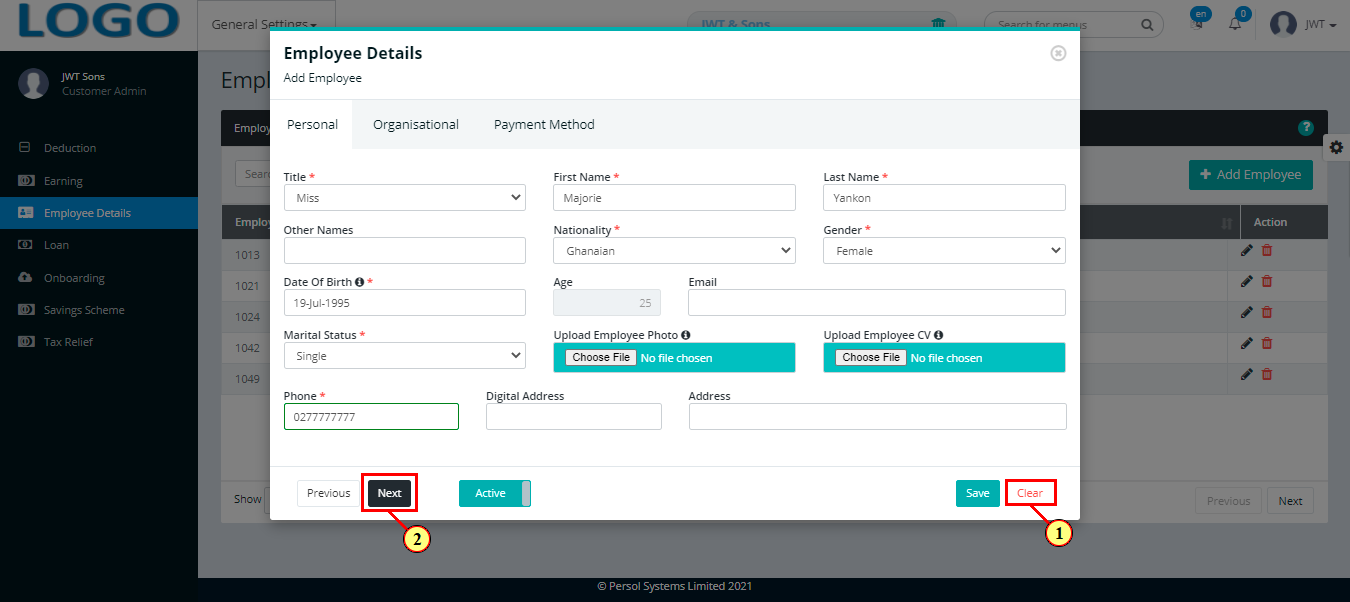
|
NB: 1. The age of the employee automatically displays after entering the date of birth 2. Dates of birth below the country’s legal working age have been greyed out and cannot be selected 3. A face must be detected in the uploaded employee photo |
| (1) |
You may click on the  button to clear all details entered button to clear all details entered
|
| (2) |
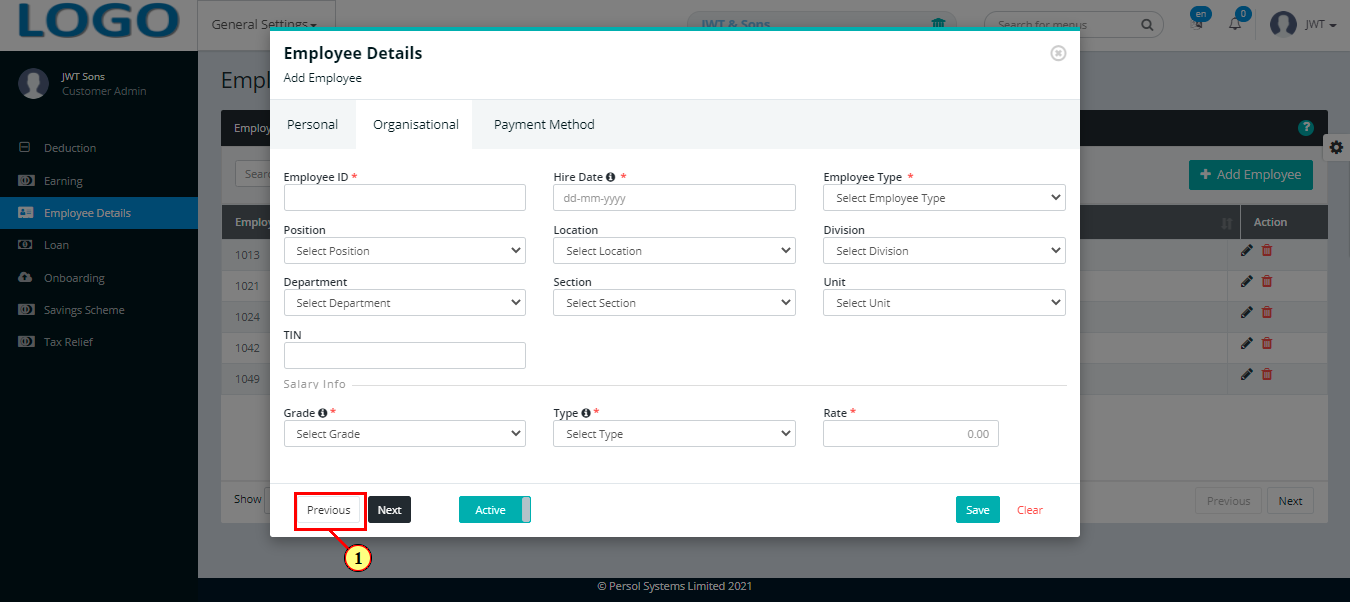
Click on the  button to move to the next tab button to move to the next tab
|
| Step | Action |
|---|---|
Provide the following personal details of the employee
|
|
| (1) |
You may click on the  button to move to the previous tab button to move to the previous tab
|
| (2) |
Click on the button to move to the next tab
|
| Step | Action |
|---|---|
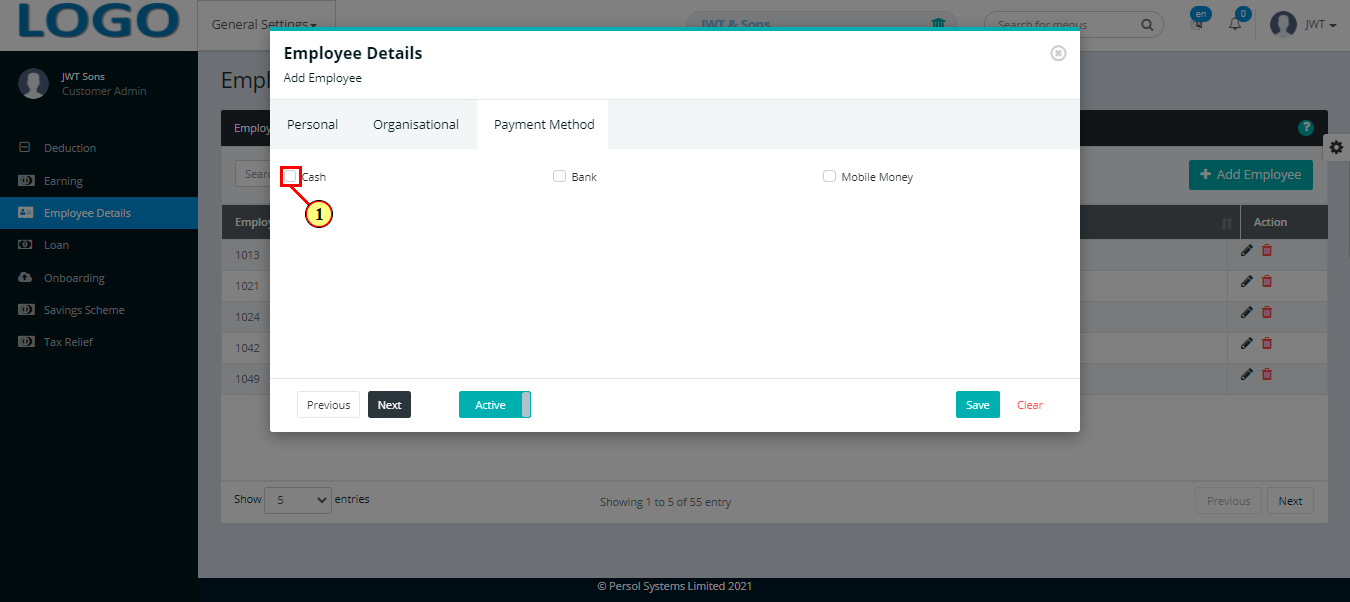
| (1) | Select the payment method that applies to the employee by checking a box |
| |
|
| Step | Action |
|---|---|
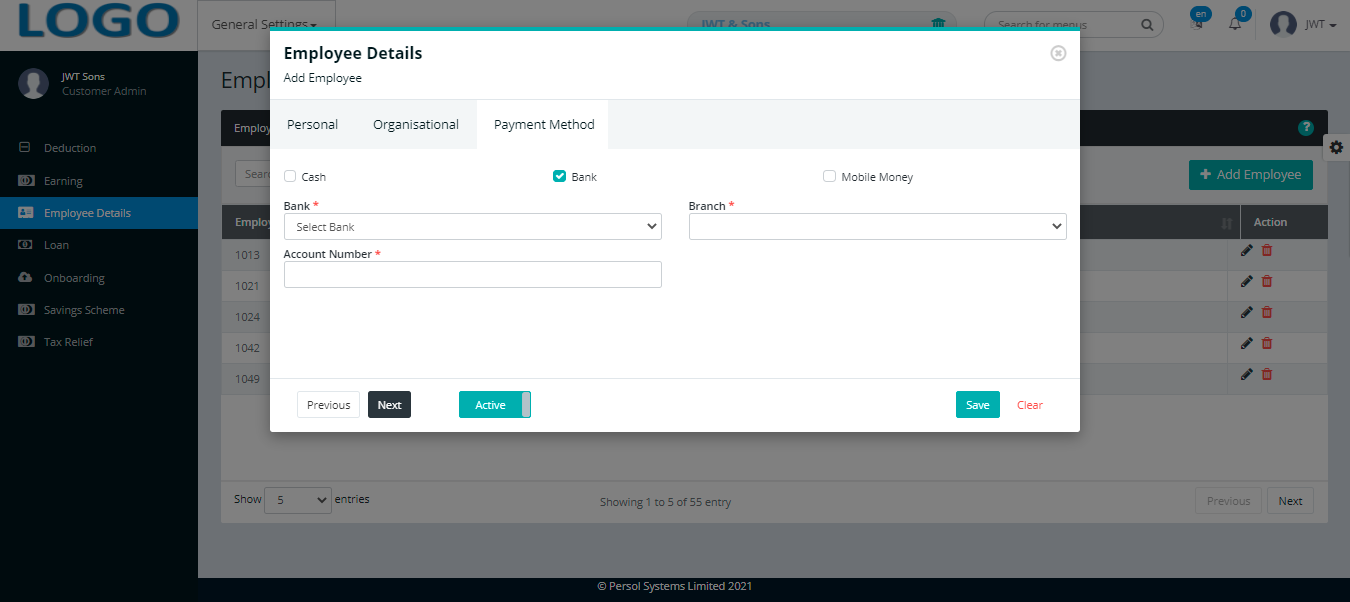
If Bank is selected, provide the following bank details of the employee
|
|
|
Click here to continue steps |
| Step | Action |
|---|---|
If Mobile Money is selected, provide the following mobile money details of the employee
|
|
|
Click here to continue steps |

| Step | Action |
|---|---|
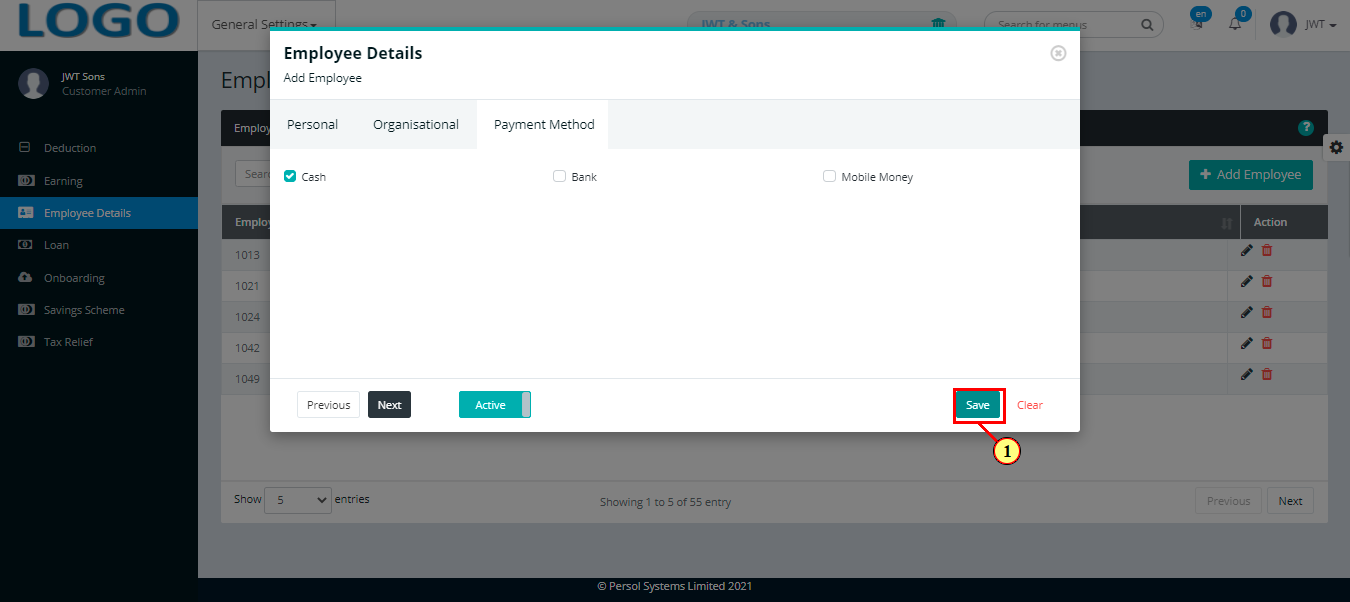
| (1) |
Click on the  button to save the employee details button to save the employee details
|
| Step | Action |
|---|---|
| (1) | A notification displays to indicate that the employee details has been saved successfully |

| Step | Action |
|---|---|
| (1) | To edit an employee’s details, search for the employee by name or ID |
| Step | Action |
|---|---|
| The search result details display in the grid | |
| (1) |
You may click on the delete icon  to delete the employee’s details to delete the employee’s details
|
| (2) |
Click on edit icon  to edit an employee’s details to edit an employee’s details
|
| Step | Action |
|---|---|
| A modal opens to edit the employee's details | |
|
Edit the details of the employee (ie. personal, organizational and payment method details) |

| Step | Action |
|---|---|
| (1) | You may click on the Undo button to revert changes made |
| (2) |
Click on the  button to save the changes made button to save the changes made
|
| Step | Action |
|---|---|
| A notification displays to indicate that the update has been saved successfully |
| Step | Action |
|---|---|
| (1) | On the PersonaX Customer Admin homepage, select the ‘General Settings’ tile |

| Step | Action |
|---|---|
| The ‘General Settings’ submenus page opens | |
| (1) | Select the ‘Loan’ tile |
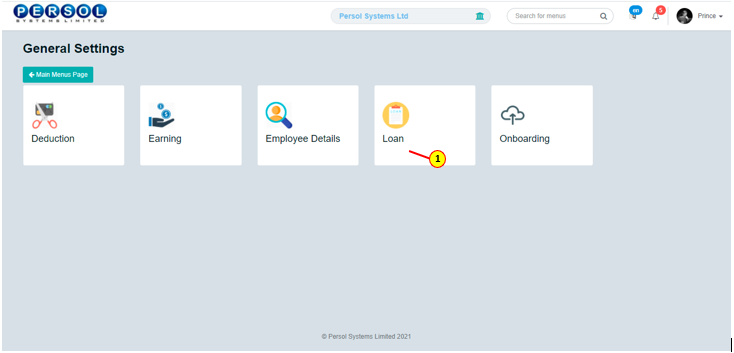
| Step | Action |
|---|---|
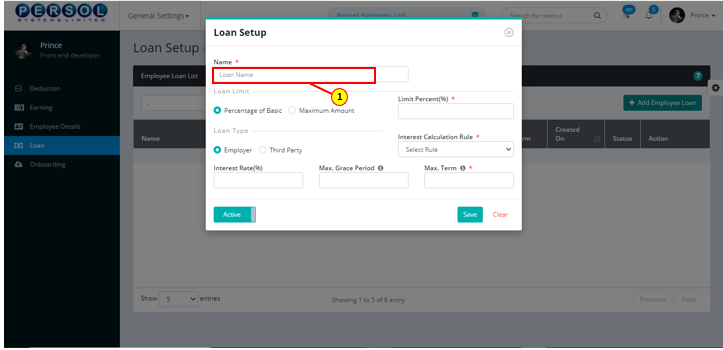
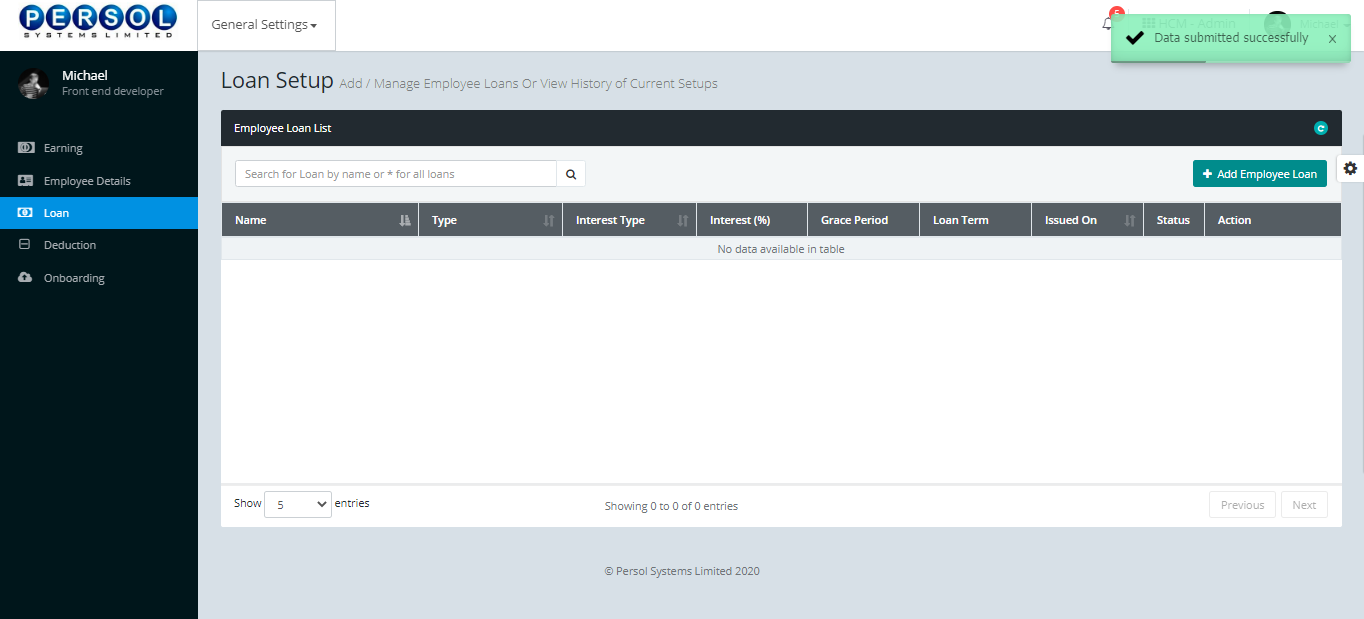
| The ‘Loan Setup’ page opens |
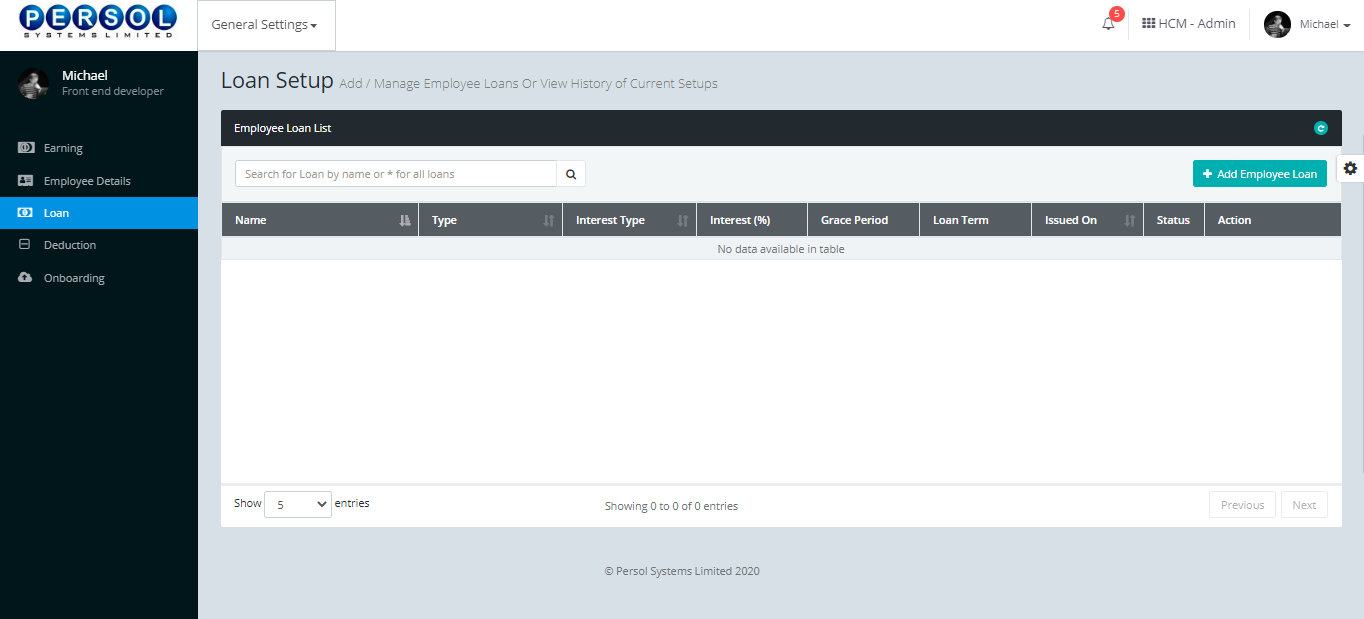
| Step | Action |
|---|---|
| (1) |
To setup a new employee loan, click on the 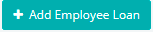 button button
|
| Step | Action |
|---|---|
| The ‘Loan Setup’ modal opens | |
| (1) | Enter name of the new loan setup |
|
The field is required * |
| Step | Action |
|---|---|
| (1) | Select the loan limit type |
|
Only one option can be selected |
|
Click here to view definition of the loan limit types |

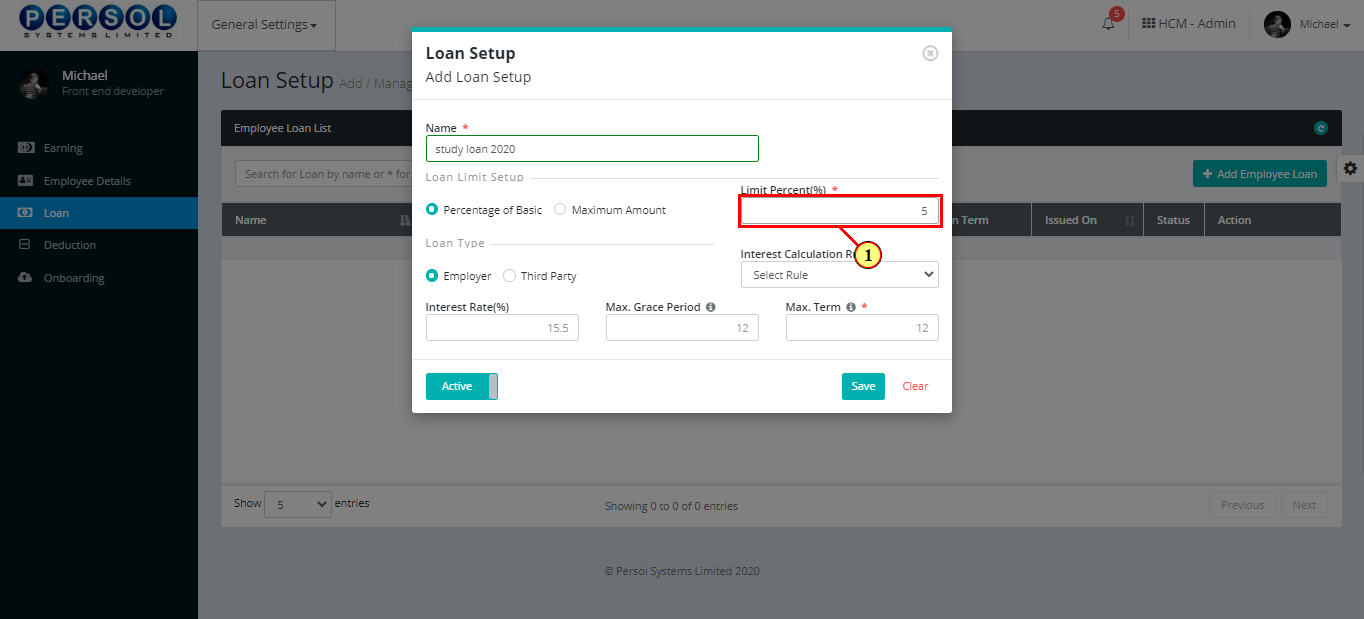
| Step | Action |
|---|---|
| (1) | Enter the value that corresponds with the selected loan limit type |
|
This field is required * |
| Step | Action |
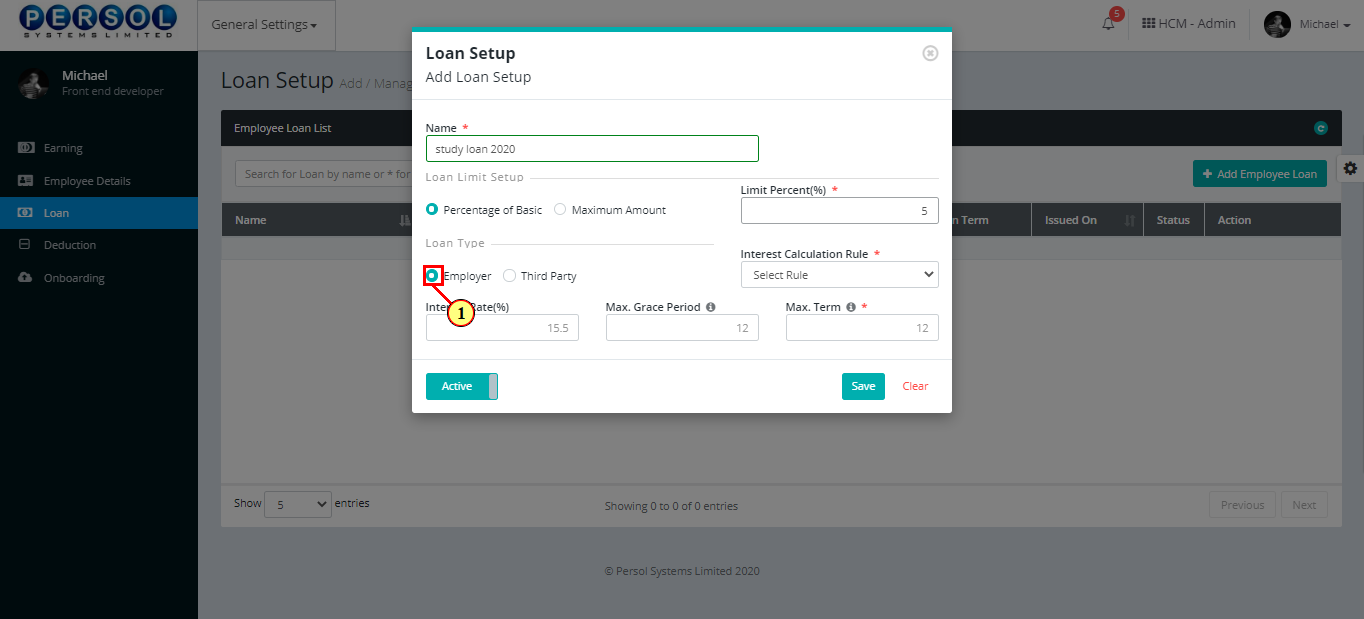
|---|---|
| (1) | Select the loan type |
|
Only one option can be selected |
| Step | Action |
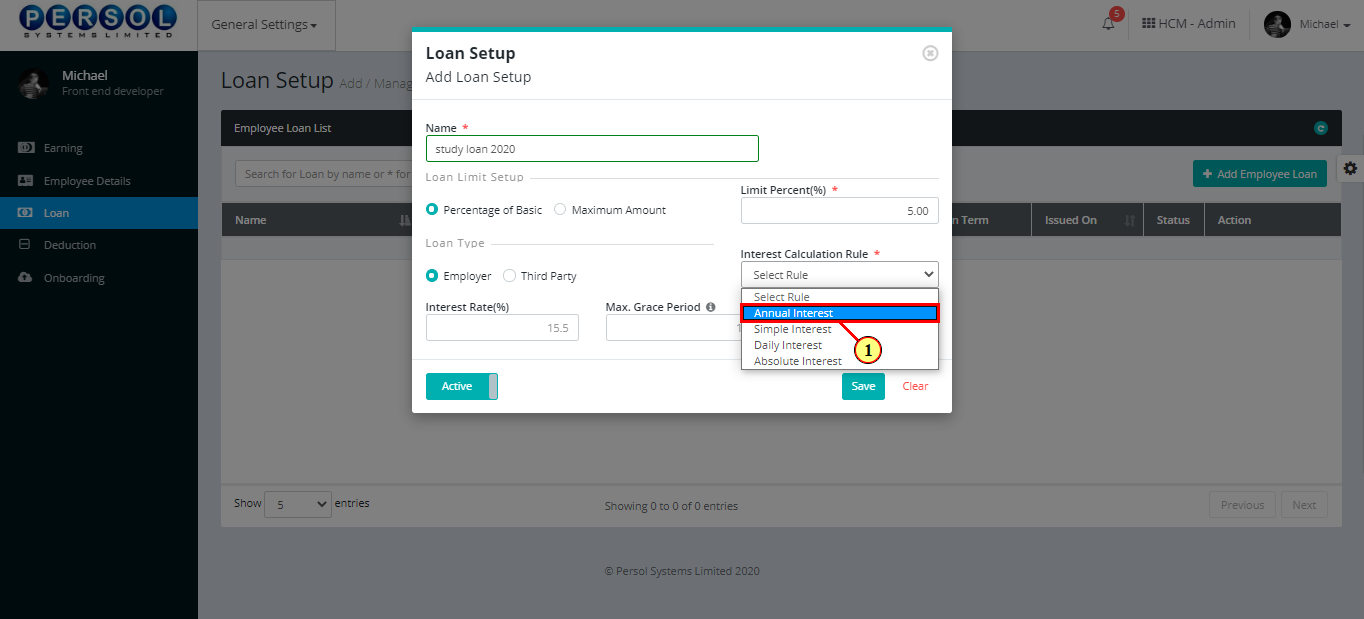
|---|---|
| (1) | Select the loan's interest calculation rule from the dropdown options |
|
This field is required * |
|
Click here to view definition of the interest calculation rule options |
| Step | Action |
|---|---|
| (1) | Enter the interest rate (percentage) value |
|
Click here to view definition of term |

| Step | Action |
|---|---|
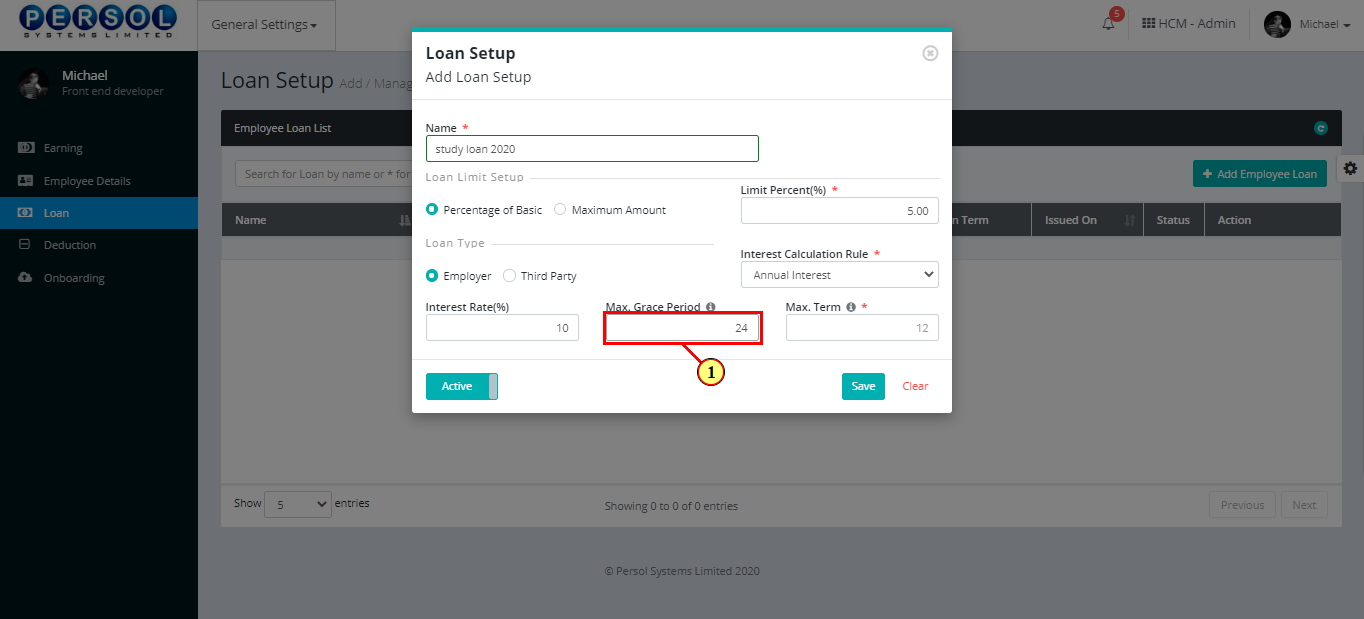
| (1) | Enter the maximum grace period for the loan (in months) |
|
Click here to view definition of term |
| Step | Action |
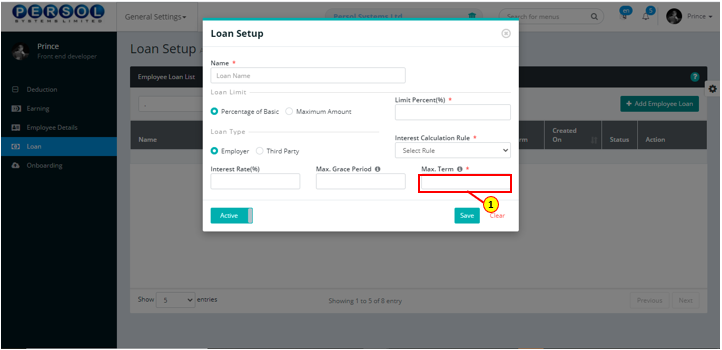
|---|---|
| (1) | Enter the maximum term for the loan (in months) |
|
This field is required * |
|
Click here to view definition of the term |
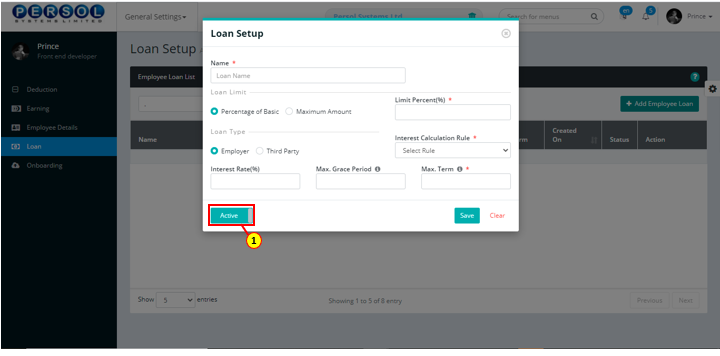
| Step | Action |
|---|---|
| (1) |
You may click on the  button to change status of the loan setup to inactive button to change status of the loan setup to inactive
|
|
- An active status means the loan setup can be used in transactions on other pages - An inactive status means the loan setup cannot be used in transactions on other pages |
| Step | Action |
|---|---|
|
You may click on the |
| (1) |
click on the  button to save the details of the newly added loan setup button to save the details of the newly added loan setup
|
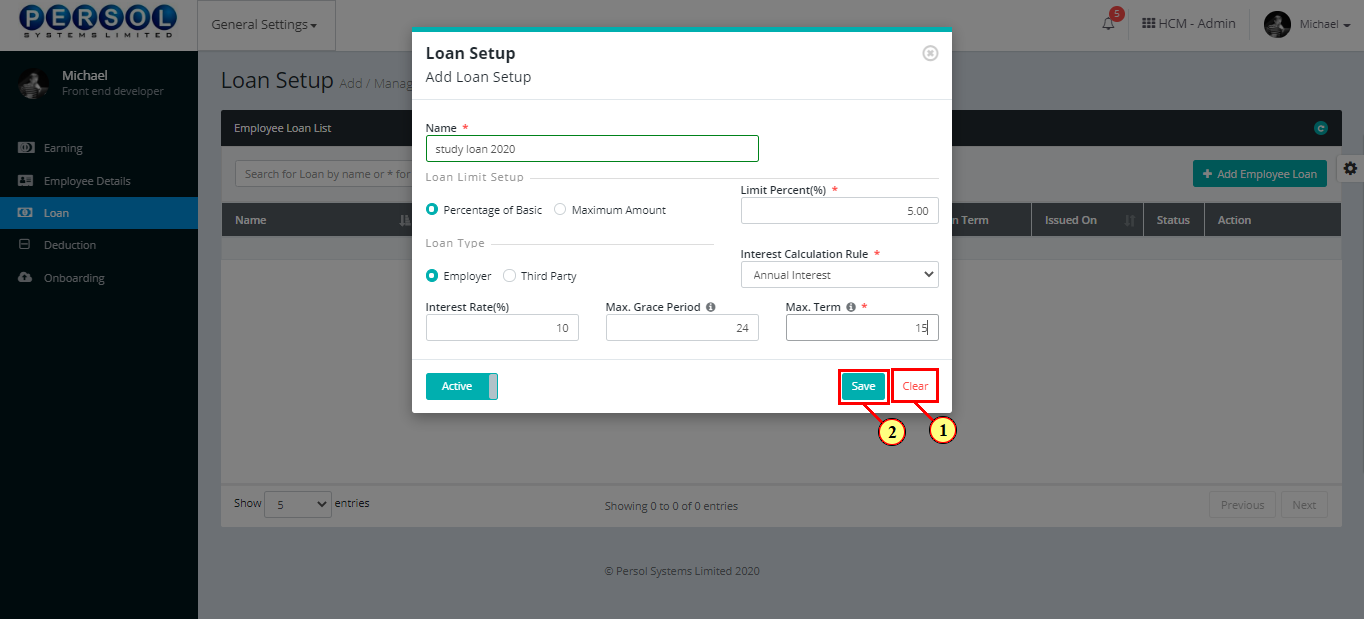
| Step | Action |
|---|---|
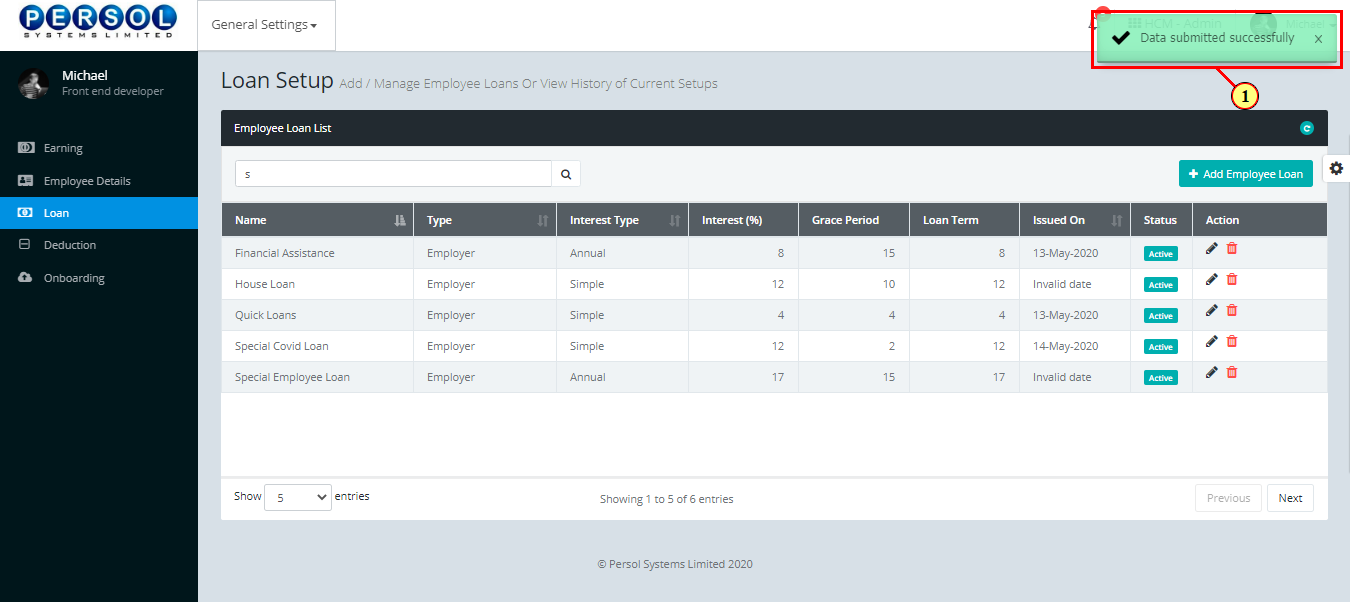
| (1) | A notification displays to indicate that the loan setup has been saved successfully |
| Step | Action |
|---|---|
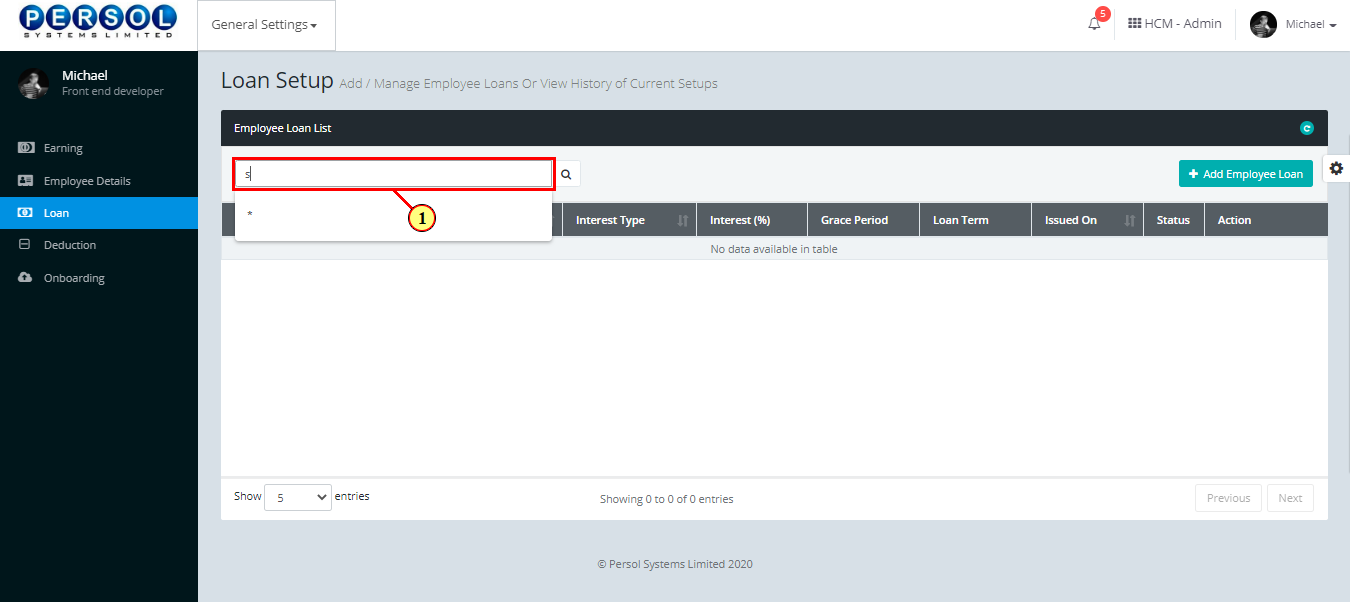
| (1) | To edit a loan setup, enter the loan name in the search box and click on the search icon |
| Step | Action |
|---|---|
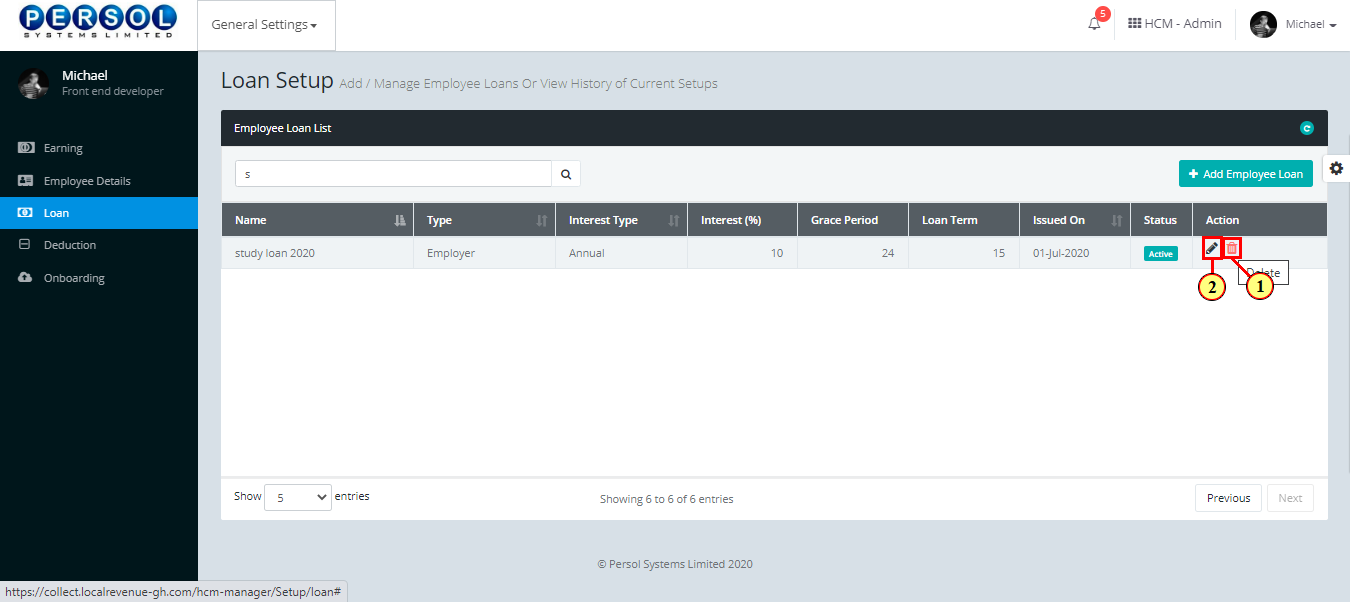
| The search result details display in the grid | |
|
The Action column consists of the Edit  and Delete and Delete  icons icons
|

| Step | Action |
|---|---|
|
You may click on the delete icon to delete the loan
|
| (1) |
Click on the edit icon to edit the loan
|
| Step | Action |
|---|---|
| The 'Loan Setup' modal opens | |
| Edit the details of the loan |

| Step | Action |
|---|---|
|
You may click on the  button to revert changes made button to revert changes made
|
| (1) |
Click on the  button to save the changes made button to save the changes made
|

| Step | Action |
|---|---|
| (1) | A notification displays to indicate that the update has been saved successfully |
| TERM | DEFINITION |
|---|---|
| Percentage of basic | Percentage of an employee's basic salary prior to any extras or deduction of payments |
| Annual interest | It’s the rate of interest charged on a loan that is calculated on an annual (yearly) basis |
| Simple interest | It is the interest calculated on the principal portion of a loan. It doesn't take into account the effect of compounding |
| Daily interest | It is the interest calculated daily on a loan's outstanding principal balance |
| Absolute Interest | It is a flat interest amount on a loan that is not percentage based |
| Max grace period | It is the maximum period that a borrower can delay payment for a loan beyond the due date without penalty |
| Max term | Refers to the maximum length of time for a loan to be repaid |
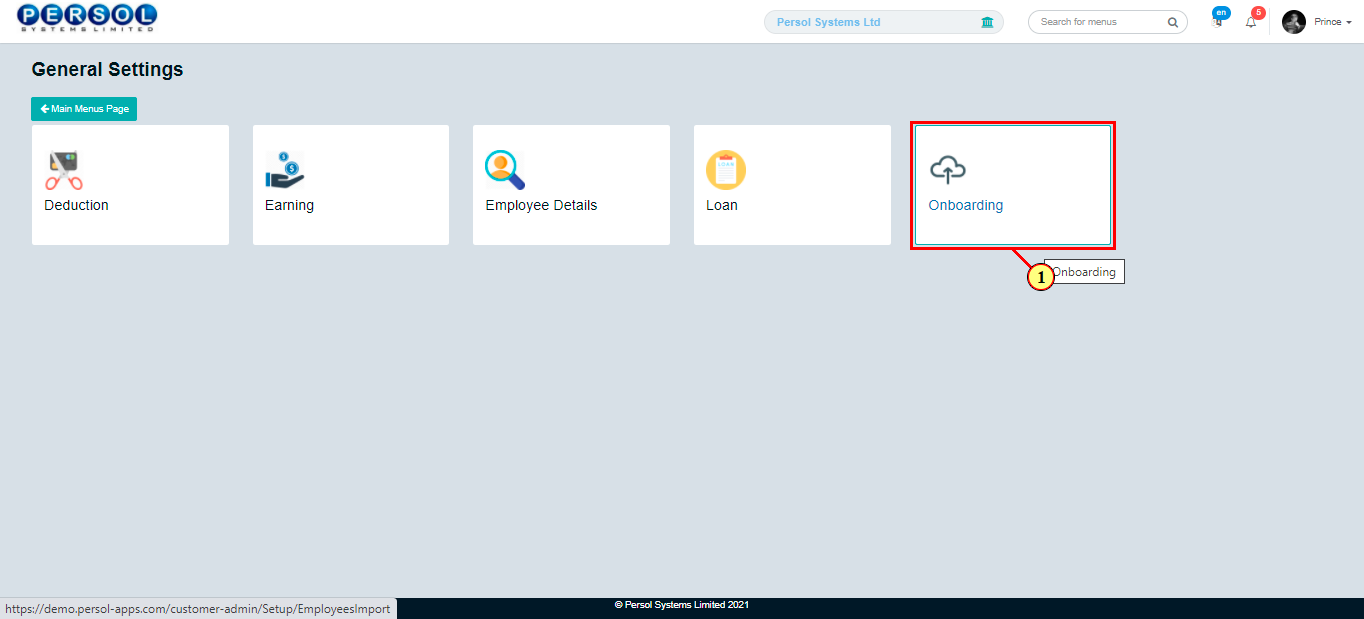
| Step | Action |
|---|---|
| (1) | On the PersonaX Customer Admin homepage, select the ‘General Settings’ tile |

| Step | Action |
|---|---|
| The ‘General Settings’ submenus page opens | |
| (1) | Select the 'Onboarding' tile |
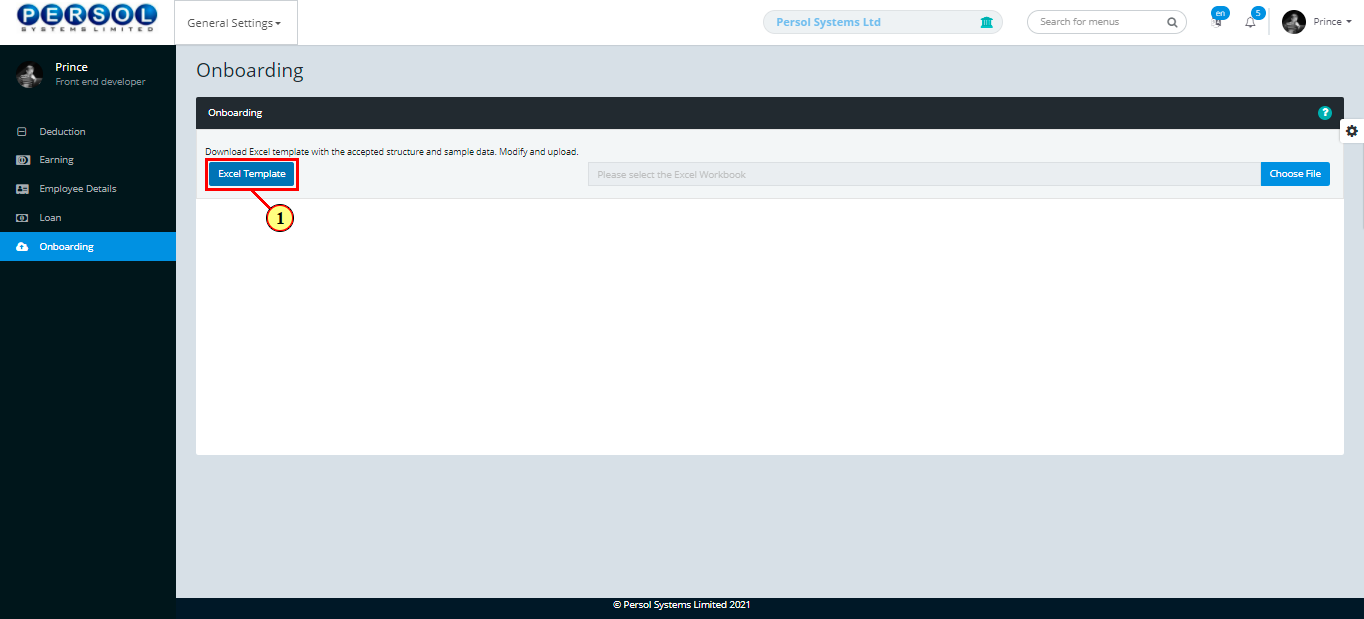
| Step | Action |
|---|---|
| The ‘Onboarding’ page opens | |
| (1) |
To onboard the company's organizational & employee details, click on the  button to download excel file button to download excel file
|
|
The excel file contains sample data to serve as a guide for completing it |
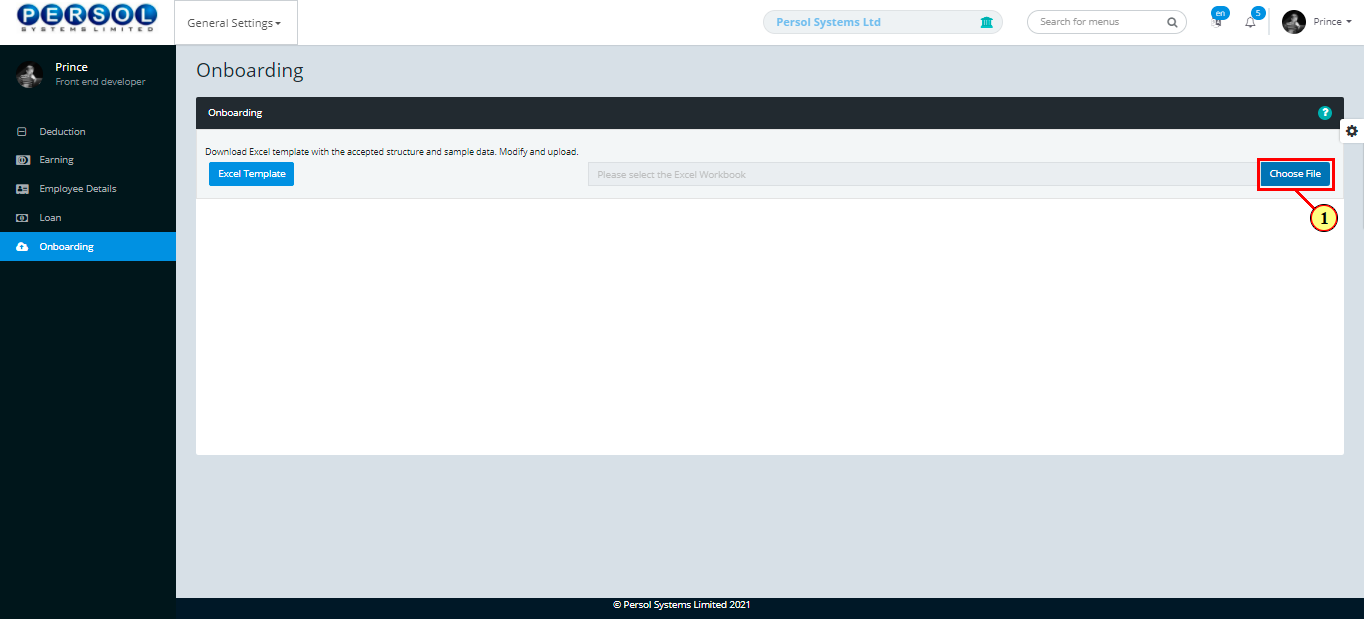
| Step | Action |
|---|---|
| To Fill the excel document with the various organizational & employee details shown on each sheet | |
|
|
- Each sheet contains sample data to guide the user in filling it (delete and refill) - All required columns (*) must be filled |

| Step | Action |
|---|---|
| (1) |
Click on the  button to upload the completed excel document button to upload the completed excel document
|
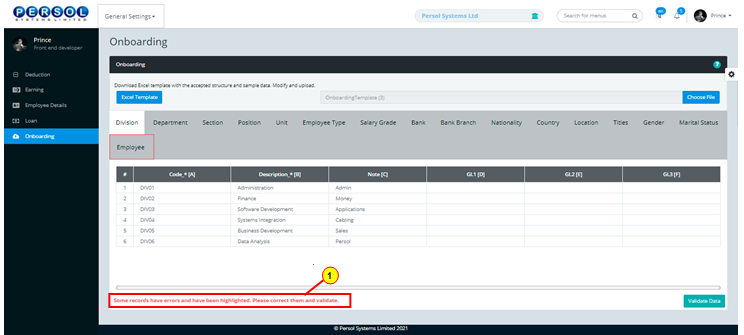
| Step | Action |
|---|---|
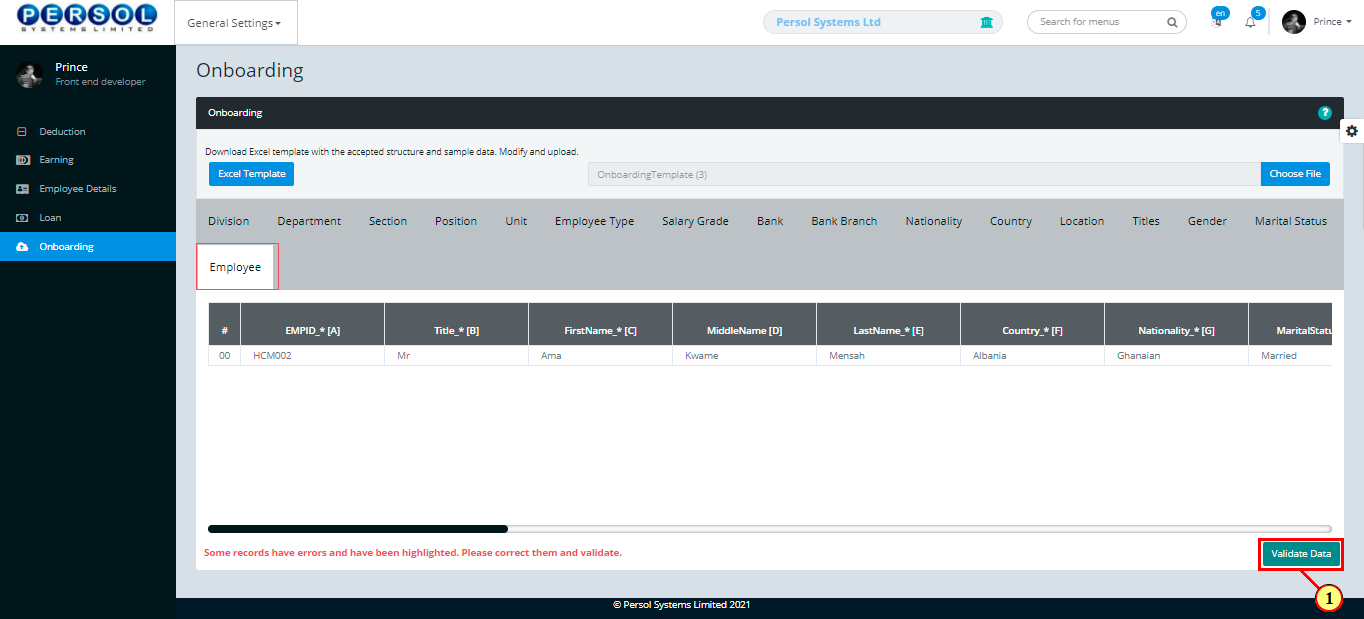
| The details of the uploaded excel document display in the grid under the various sheet titles | |
| (1) | User is notified of any errors in the excel document |
|
|
Click here to continue steps if no error is detected Click here to continue steps if error is detected |
| Step | Action |
|---|---|
| (1) | In the case of an error, click on the sheet title where the error occurs (highlighted in red) to view details |
|
If more than one sheet title contains errors, repeat process to resolve for all |
| Step | Action |
|---|---|
| The details of the selected sheet with error(s) display | |
| (1) | Scroll through the columns to find the error field(s) highlighted in red |
| Step | Action |
|---|---|
| (1) |
Click on the  icon on each row to edit & correct error(s) made icon on each row to edit & correct error(s) made
|
| Step | Action |
|---|---|
| The details of the selected error row display | |
| Edit all error fields that were highlighted in the grid |

| Step | Action |
|---|---|
| (1) |
Click on the  button to save changes made button to save changes made
|

| Step | Action |
|---|---|
| (1) |
Click on the  button to check data for any errors button to check data for any errors
|
| Step | Action |
|---|---|
| (1) |
Click on the  button to save the onboarding details button to save the onboarding details
|
| Step | Action |
|---|---|
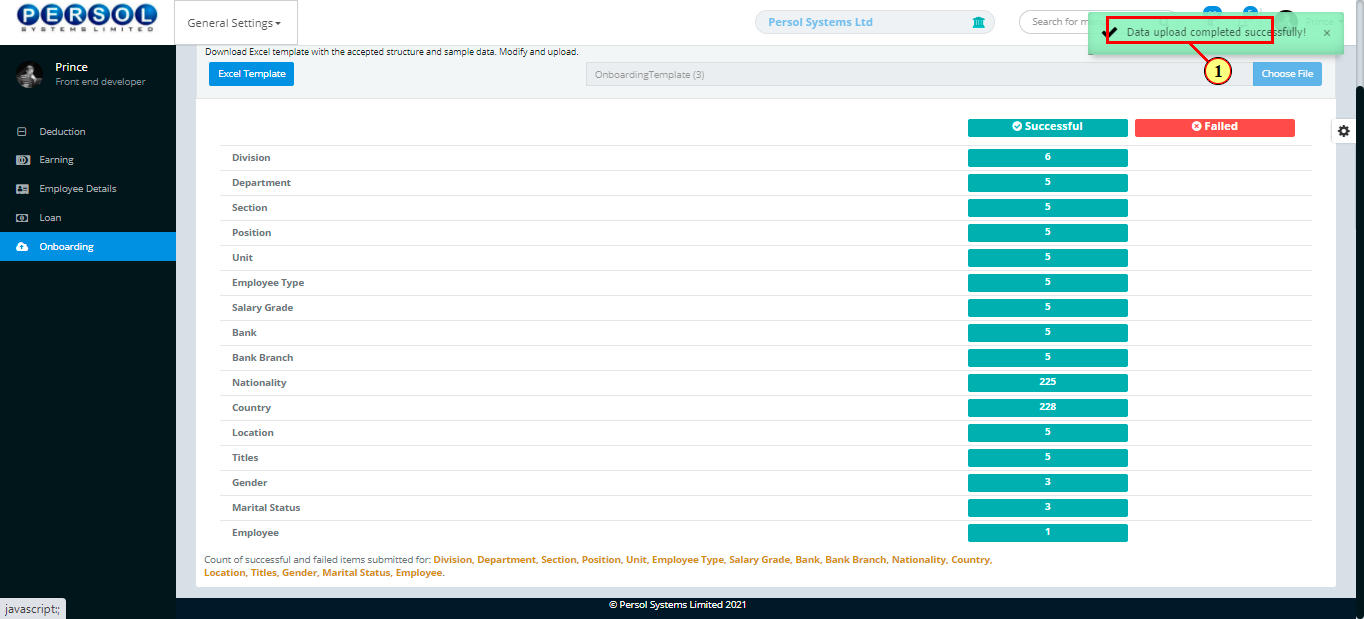
| (1) | A notification displays to indicate that the data has been saved successfully |
|
A count of the successful and failed uploads for each sheet's details display in the grid |
| Step | Action |
|---|---|
| (1) | On the HCM Customer Admin homepage, select the ‘General Settings’ tile |
| Step | Action |
|---|---|
| The ‘General Settings’ submenus page opens | |
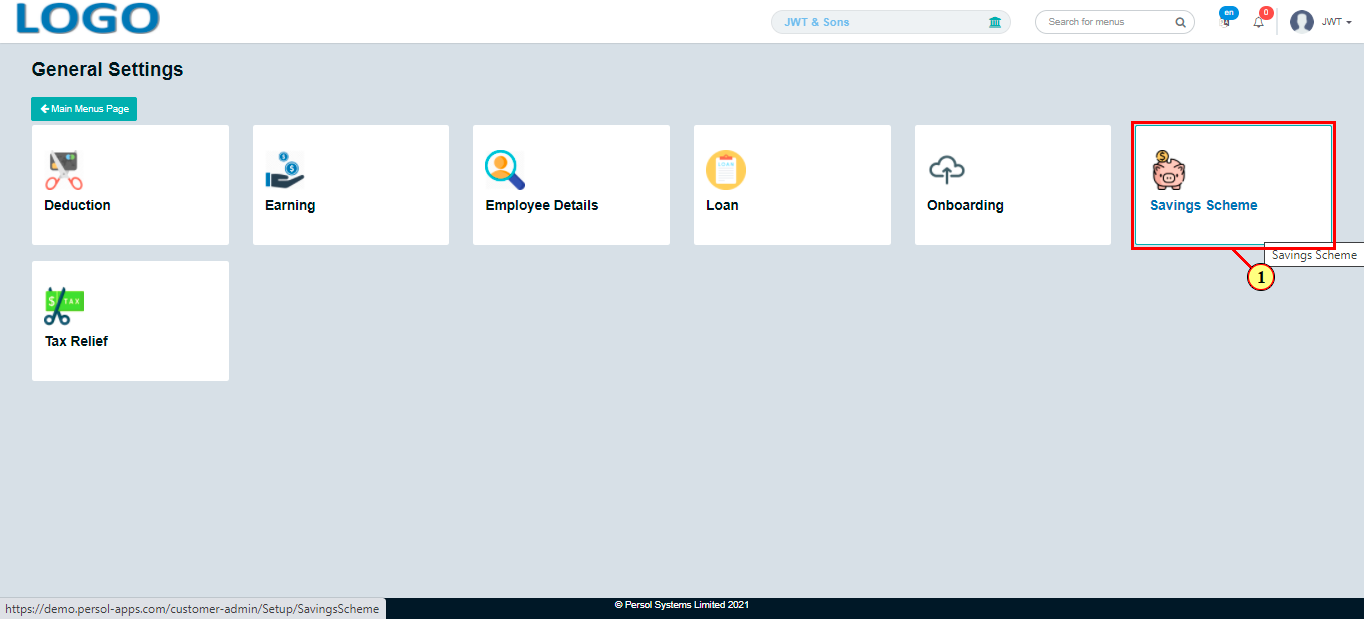
| (1) | Select the 'Savings Scheme' tile |
| Step | Action |
|---|---|
| The ‘Savings Scheme’ page opens | |
| (1) |
To setup a savings scheme, click on the 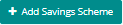 button button
|
| Step | Action |
|---|---|
| To Fill the excel document with the various organizational & employee details shown on each sheet | |
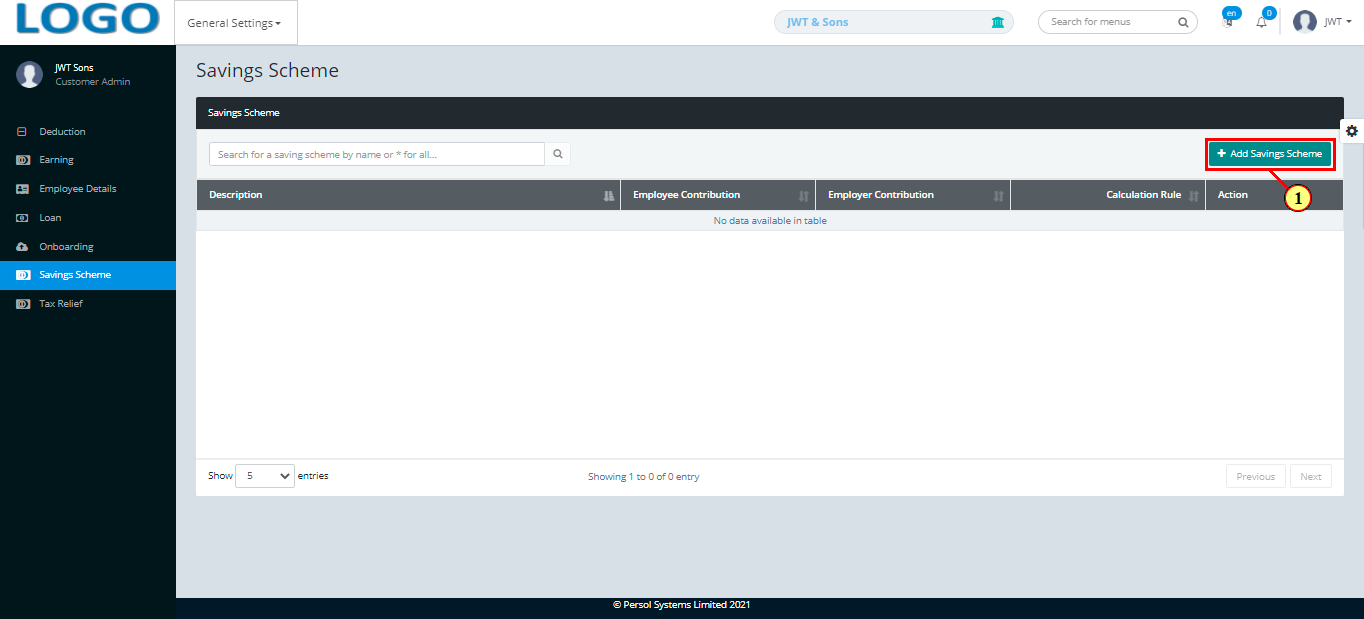
| (1) | The ‘Saving Scheme Setup’ modal opens |
|
This field is required * |
| Step | Action |
|---|---|
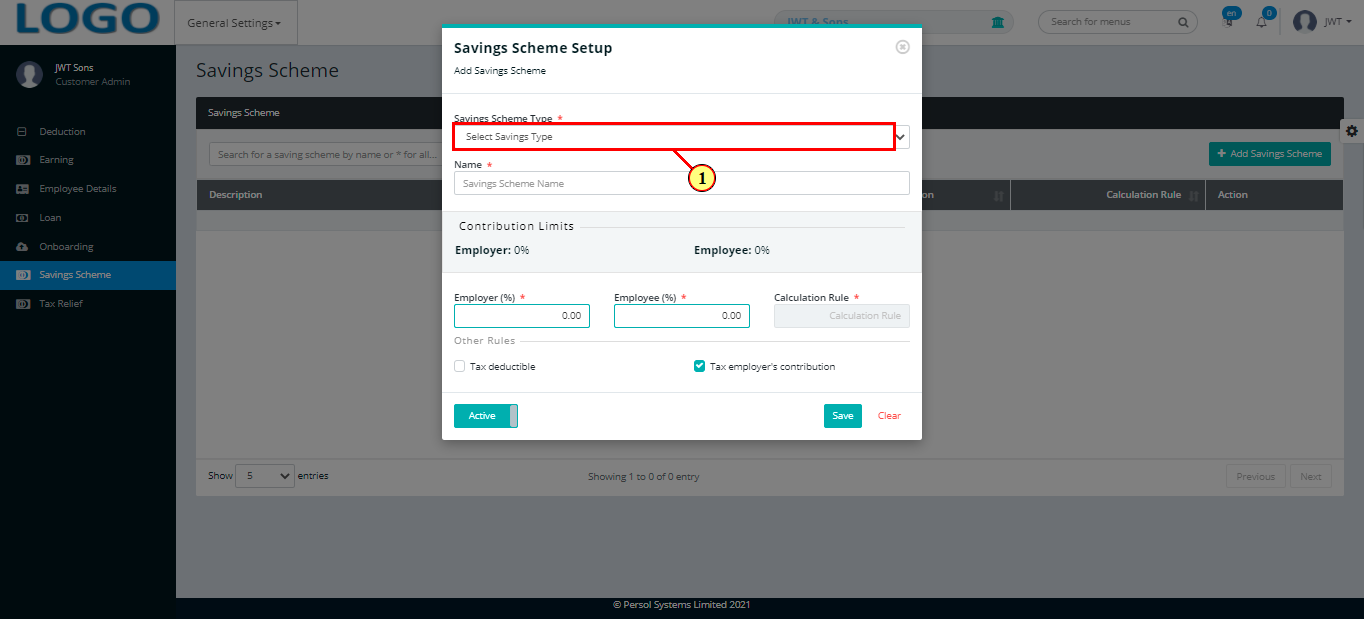
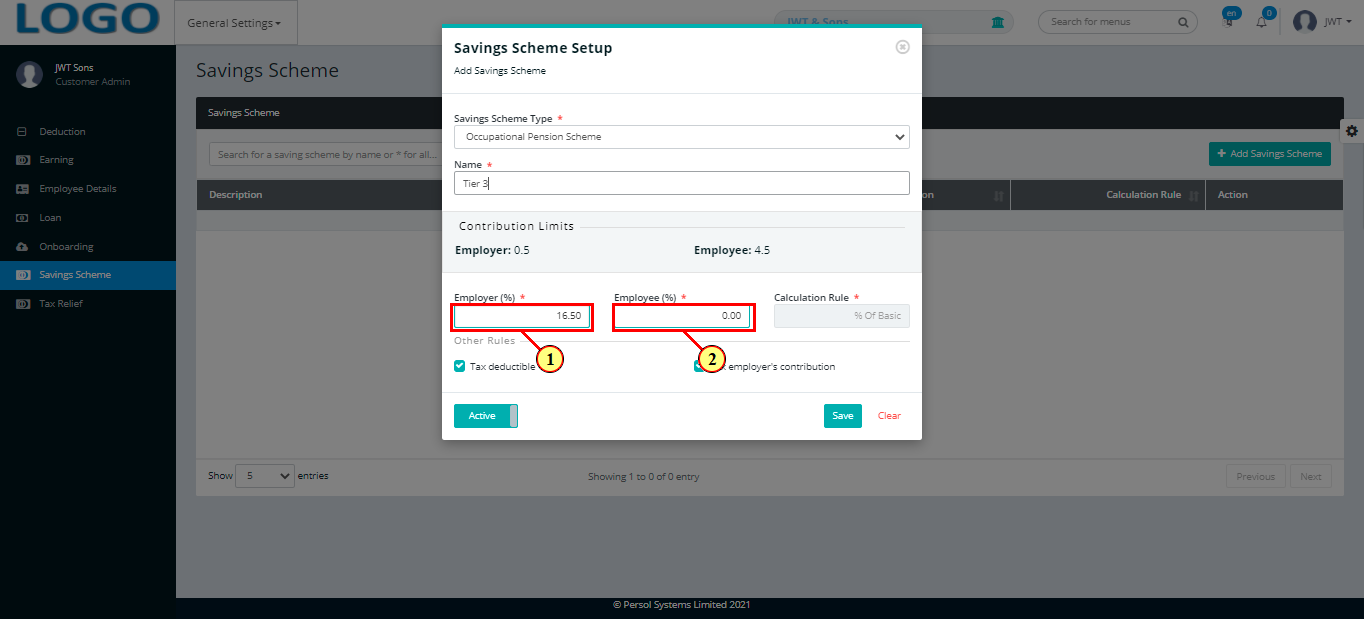
| (1) | Enter name of the savings scheme |
| (2) | The (employee & employer) contribution limits for the selected scheme type display |
| (3) | The calculation rule for the selected scheme type displays |
| Step | Action |
|---|---|
| (1) | Enter the employer contribution rate |
| (2) | Enter the employee contribution rate |
|
These fields are required * |
| Step | Action |
|---|---|
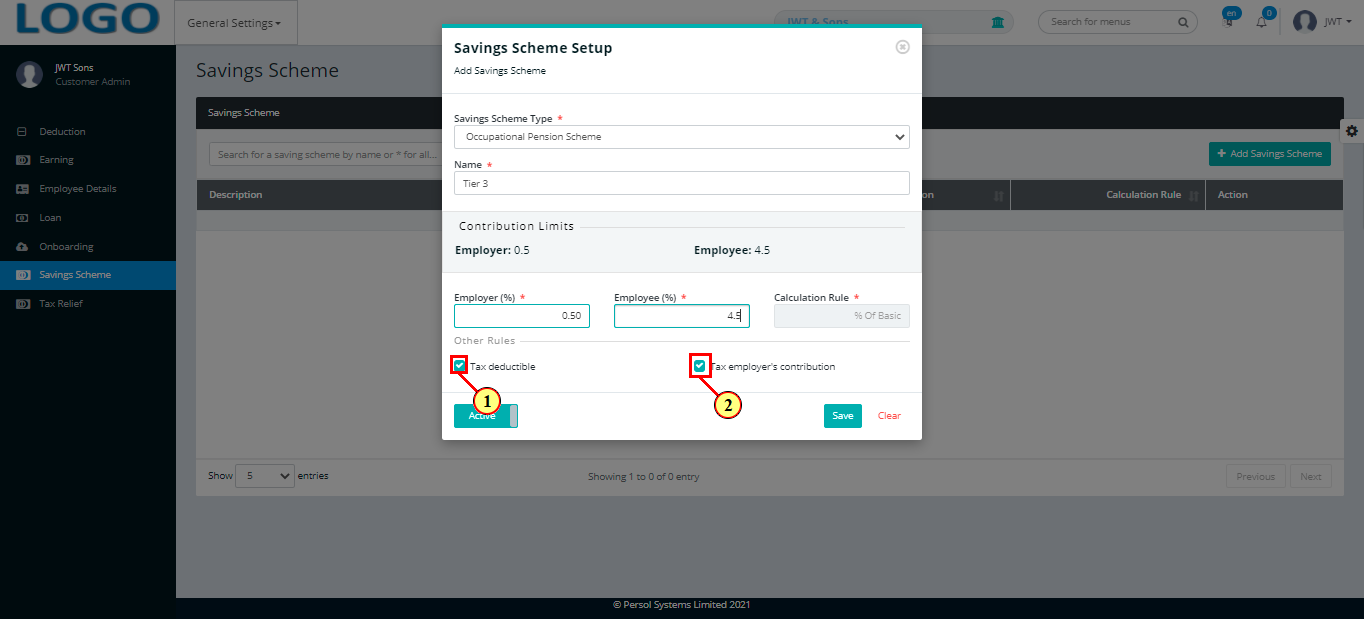
| (1) | Check / uncheck box to indicate whether the savings scheme is tax deductible or not |
| (2) | Check / uncheck box to indicate whether the employer's contribution is taxable or not |
| Step | Action |
|---|---|
| (1) |
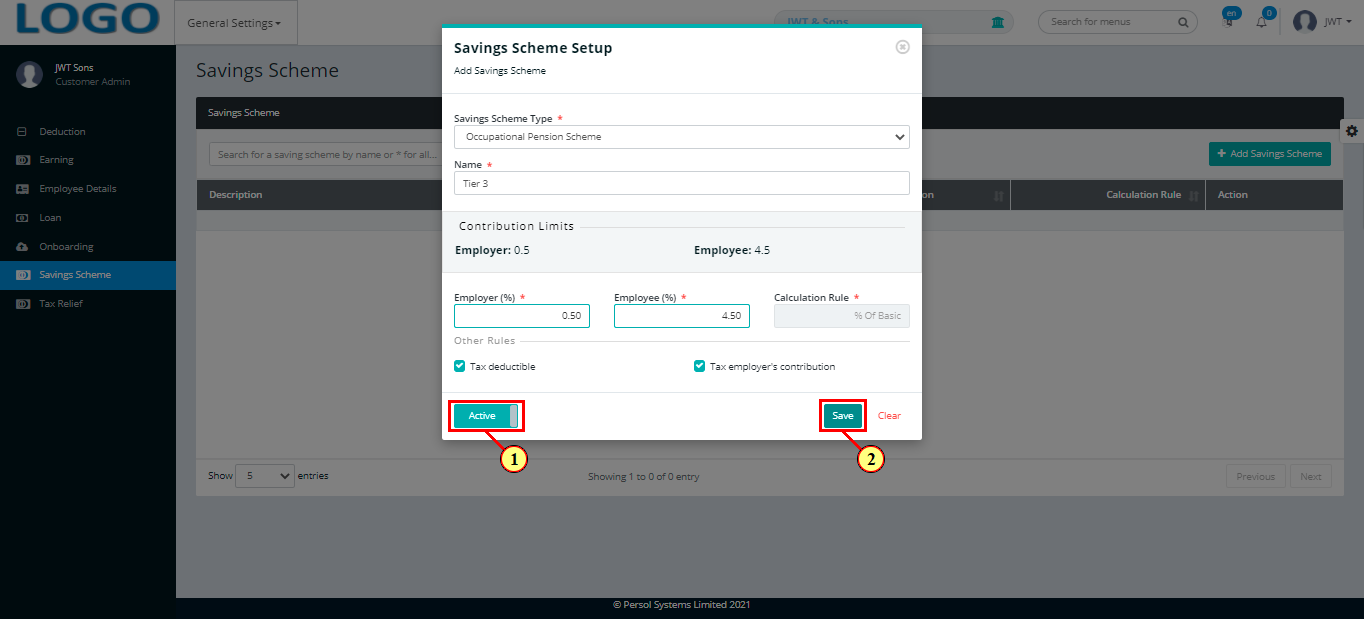
You may click on the  button to change the status of the savings scheme to active or inactive button to change the status of the savings scheme to active or inactive
|
| (2) |
Click on the  button to save the savings scheme setup button to save the savings scheme setup
|
| Step | Action |
|---|---|
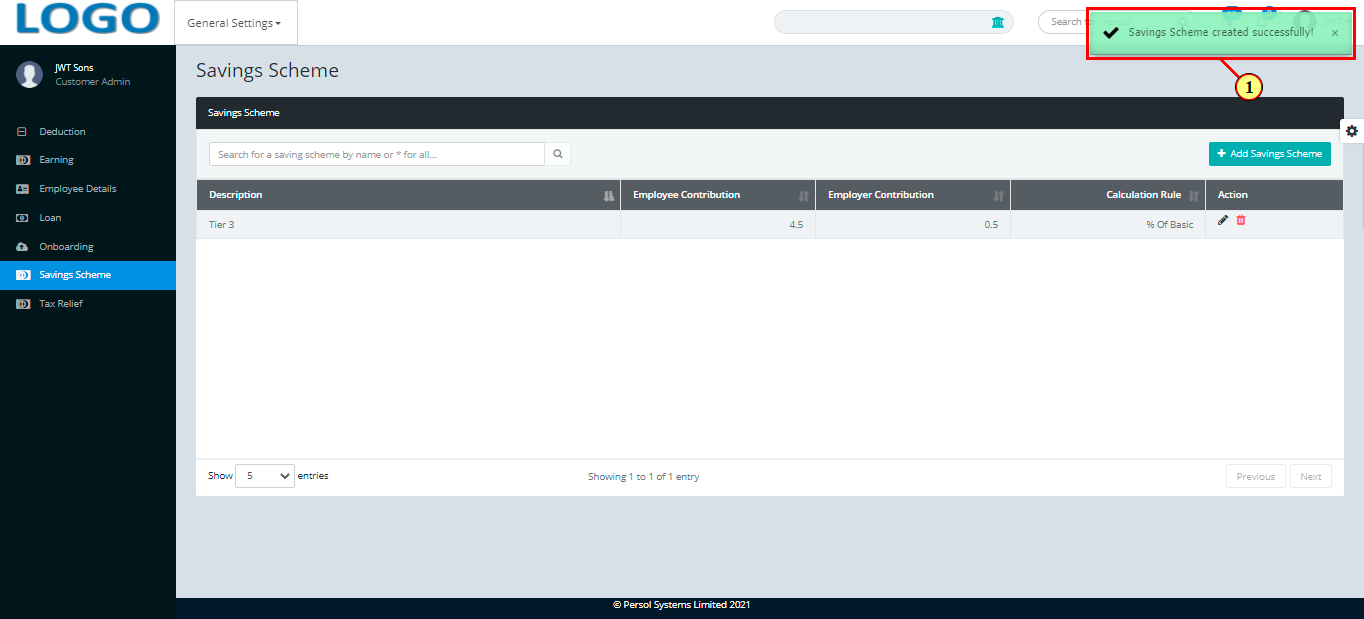
| (1) | A notification displays to indicate that the savings scheme setup has been saved successfully |
| Step | Action |
|---|---|
| To edit a savings scheme setup, search for the scheme by name |
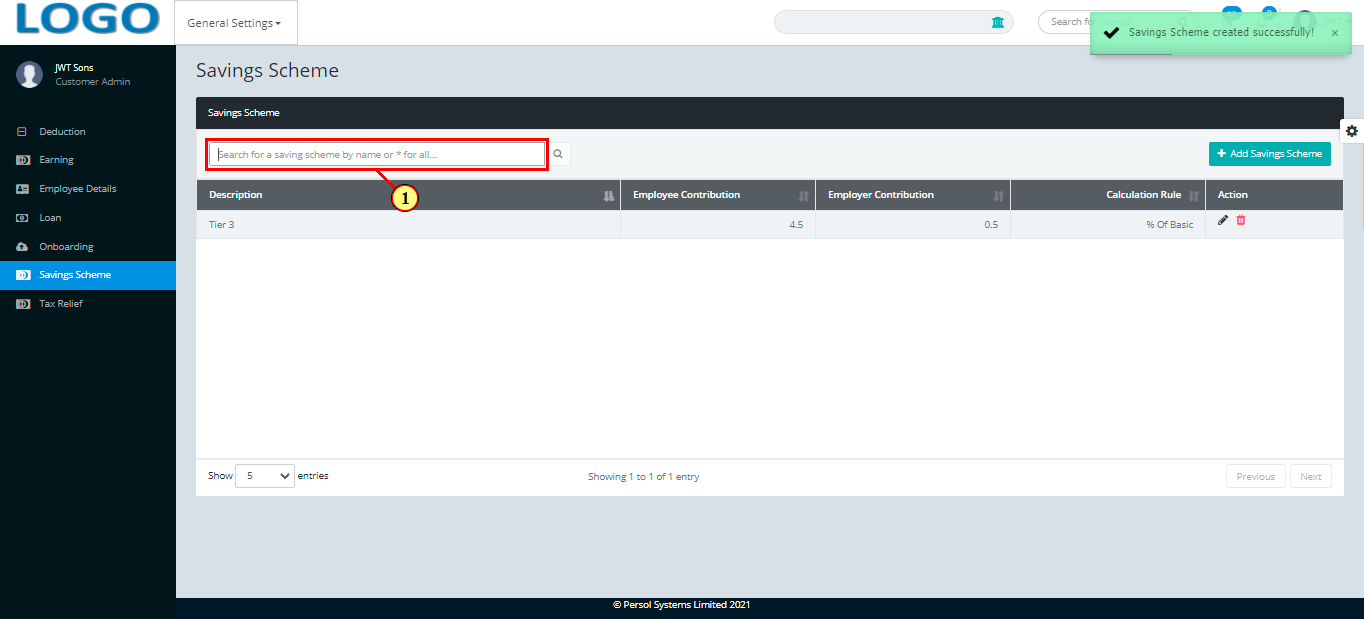
| Step | Action |
|---|---|
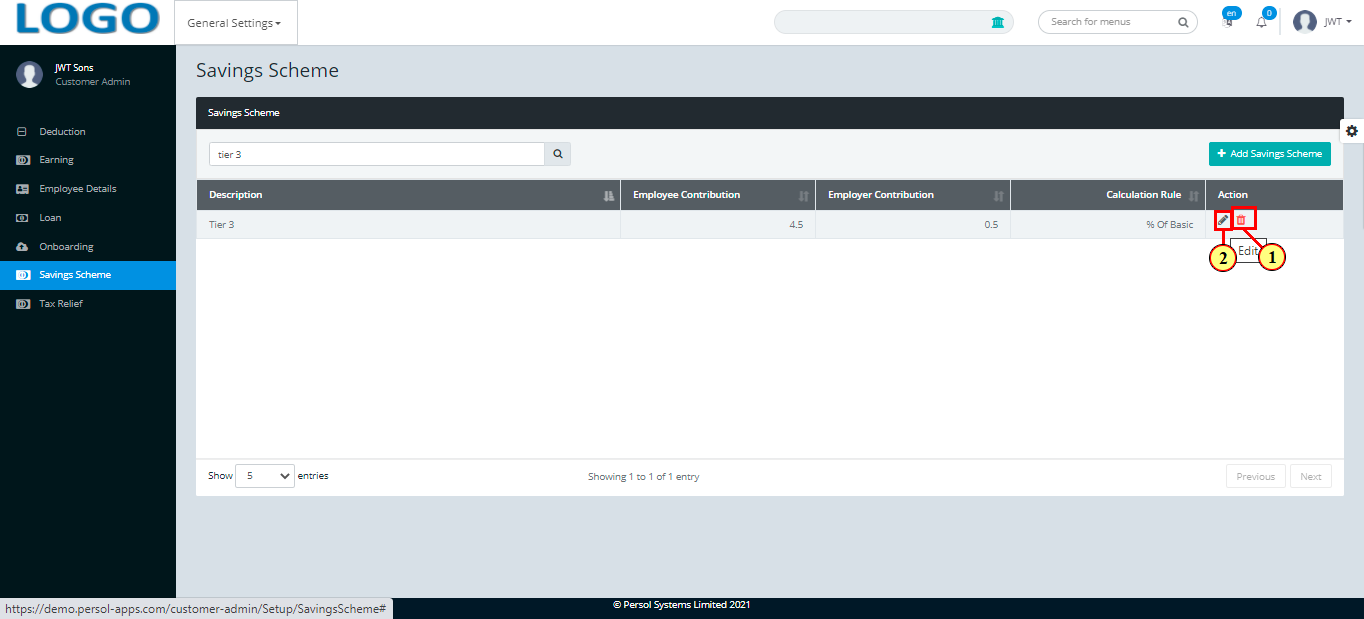
| The search result details display in the grid | |
| (1) |
You may click on the  icon to delete the savings scheme icon to delete the savings scheme
|
| (2) |
Click on the  icon to edit savings scheme icon to edit savings scheme
|
| Step | Action |
|---|---|
| Edit the details of the savings scheme setup |
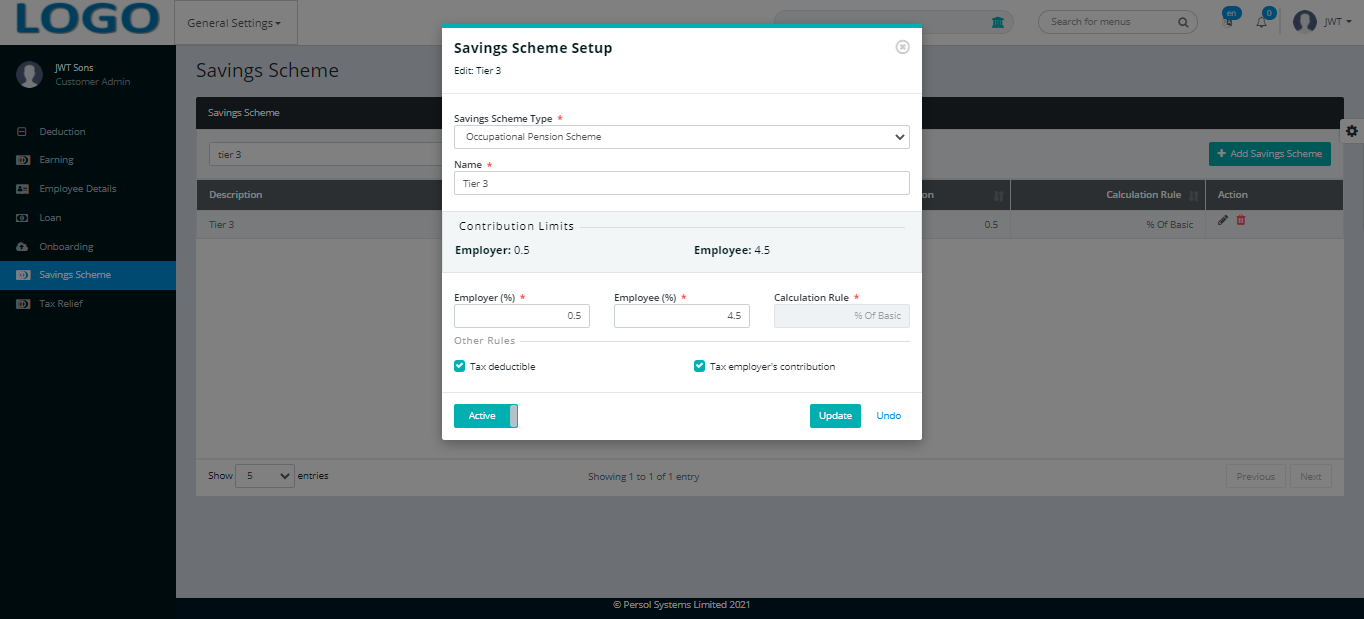
| Step | Action |
|---|---|
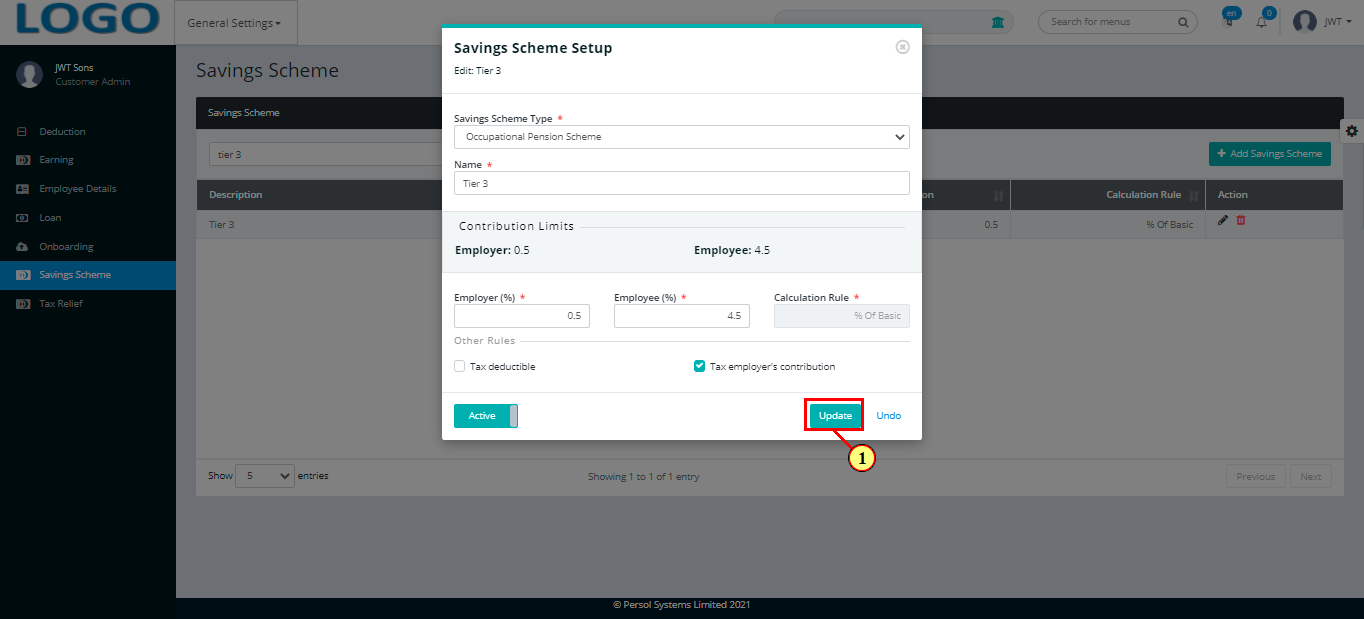
| (1) |
Click on the  button to save the changes made button to save the changes made
|
| Step | Action |
|---|---|
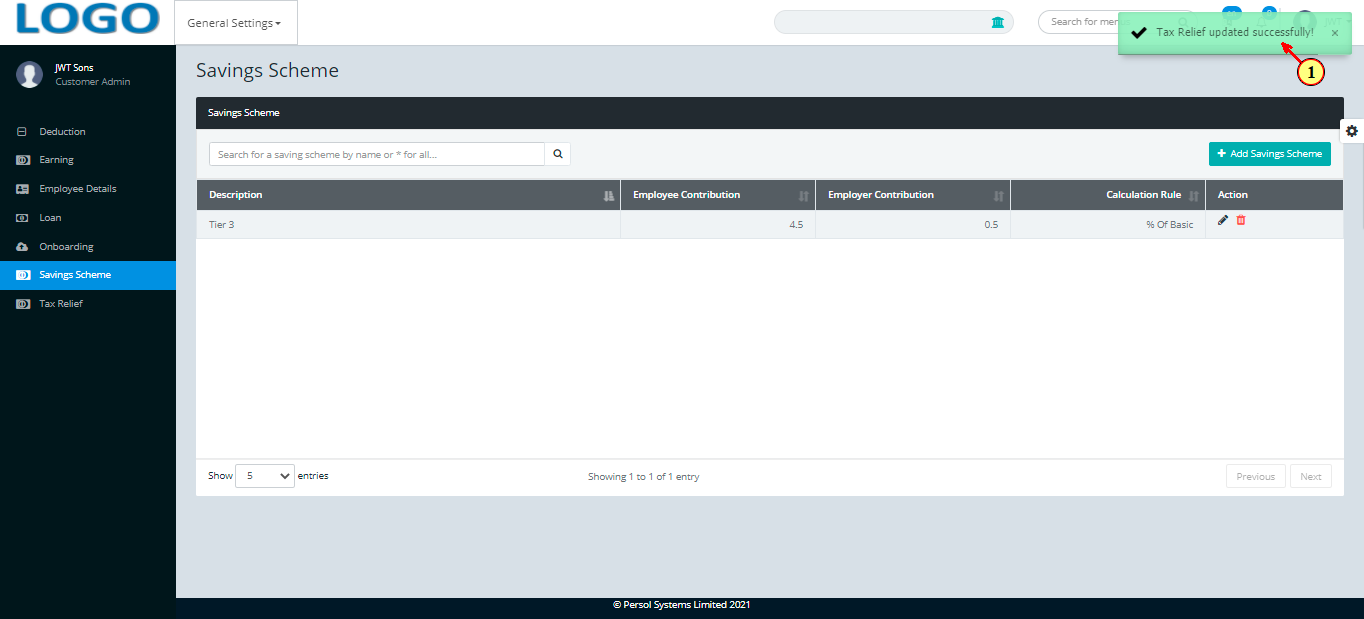
| (1) | A notification displays to indicate that the update has been saved successfully |
| Step | Action |
|---|---|
| (1) | On the Personax Customer Admin homepage, select the ‘General Settings’ tile |

| Step | Action |
|---|---|
| The ‘General Settings’ submenus page opens | |
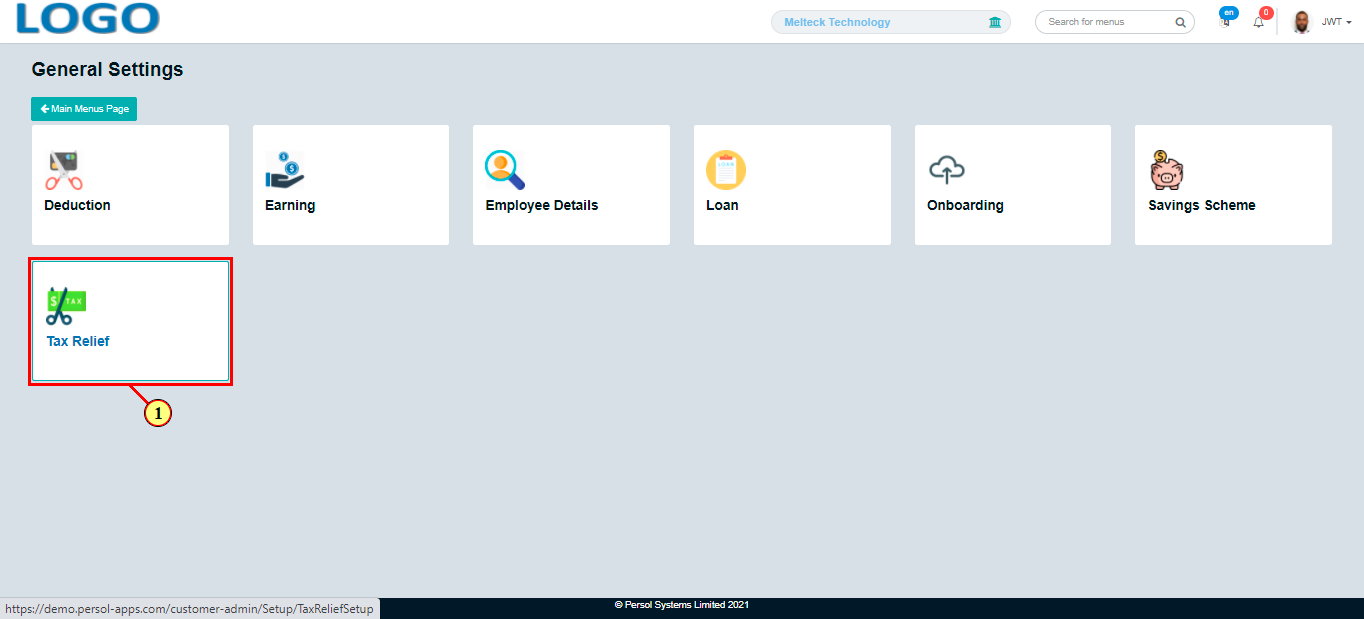
| (1) | Select the ‘Tax Relief’ tile |
| Step | Action |
|---|---|
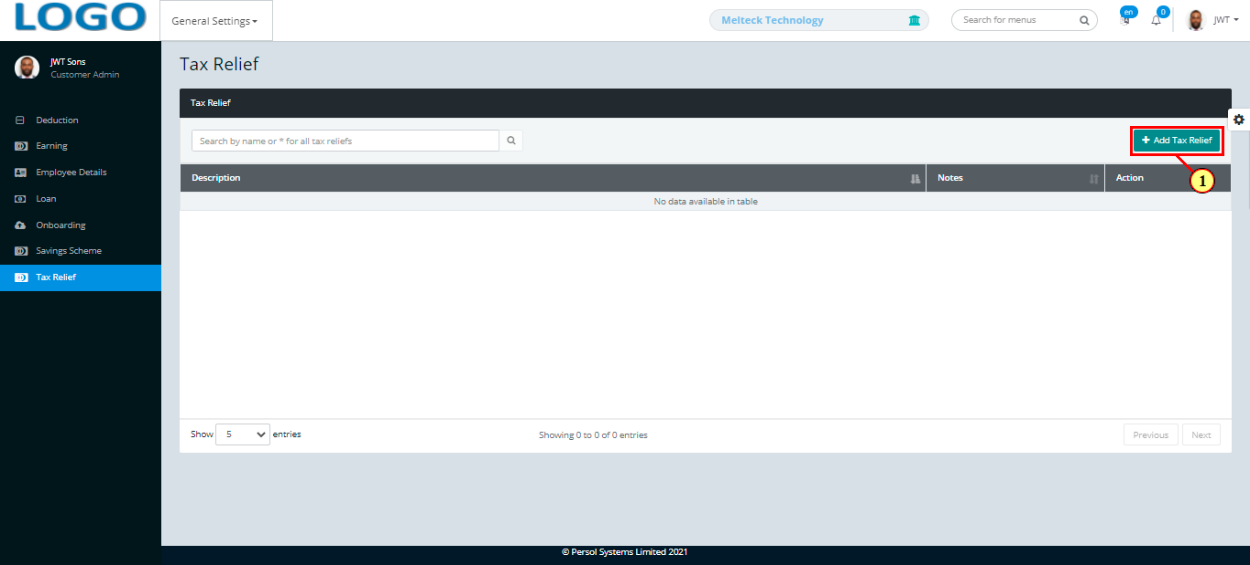
| The 'Tax Relief' page opens | |
| (1) |
To setup a tax relief, click on the  button button
|
| Step | Action |
|---|---|
| The ‘Add Tax Relief Setup’ modal opens | |
| (1) | Enter name of the tax relief |
|
This field is required * |
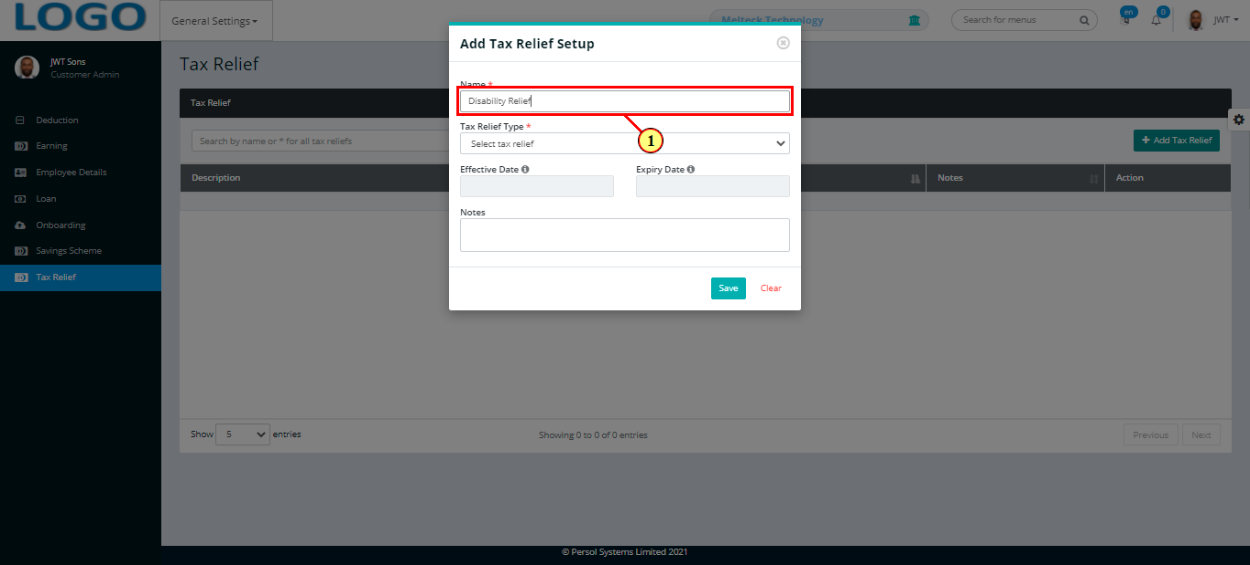
| Step | Action |
|---|---|
| (1) | Select the tax relief type |
|
This field is required * |

| Step | Action |
|---|---|
| (1) | The date ranges (effective & expiry dates) for the selected tax relief type display |
| (2) | Enter any additional info on the tax relief in the ‘Notes’ section |
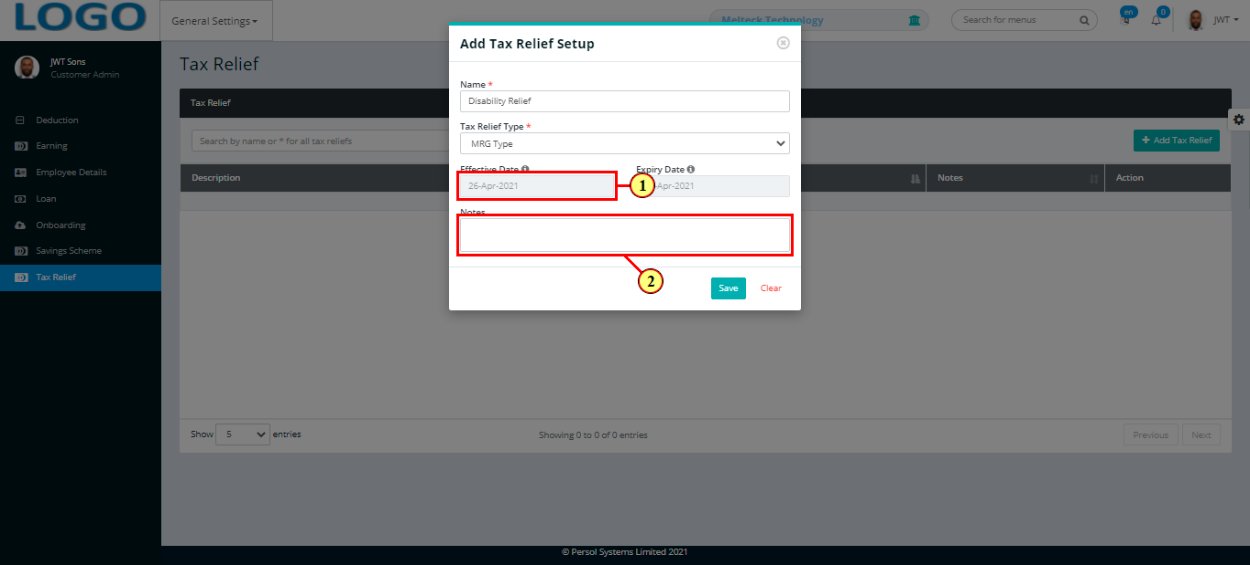
| Step | Action |
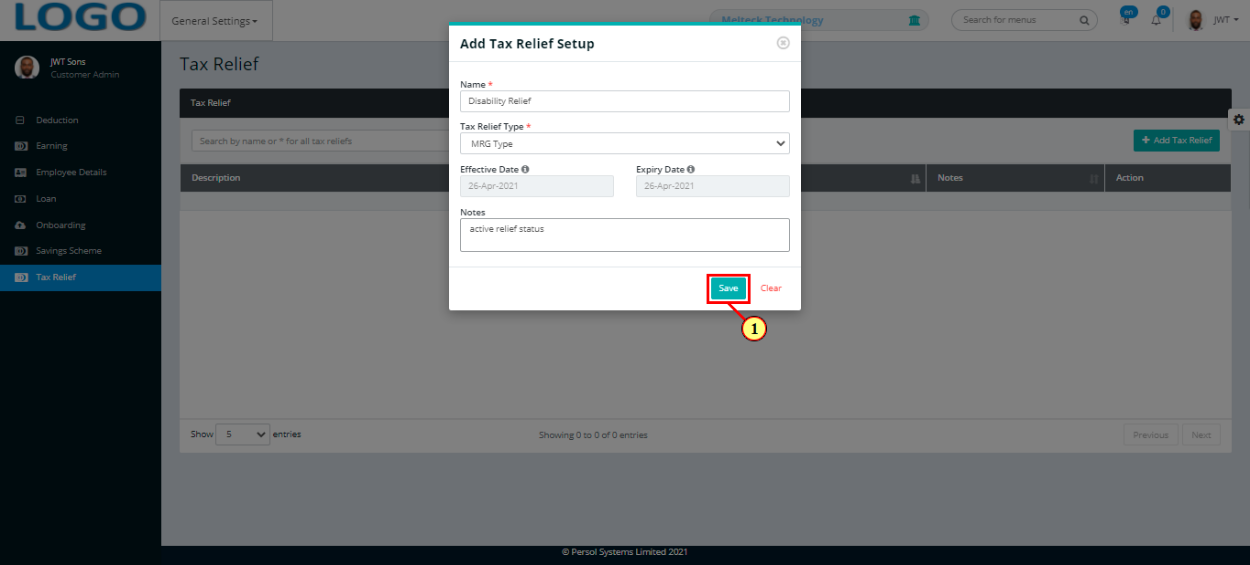
|---|---|
|
You may click on the  button to clear all details entered button to clear all details entered
|
| (1) |
Click on the  button to save the tax relief setup button to save the tax relief setup
|
| Step | Action |
|---|---|
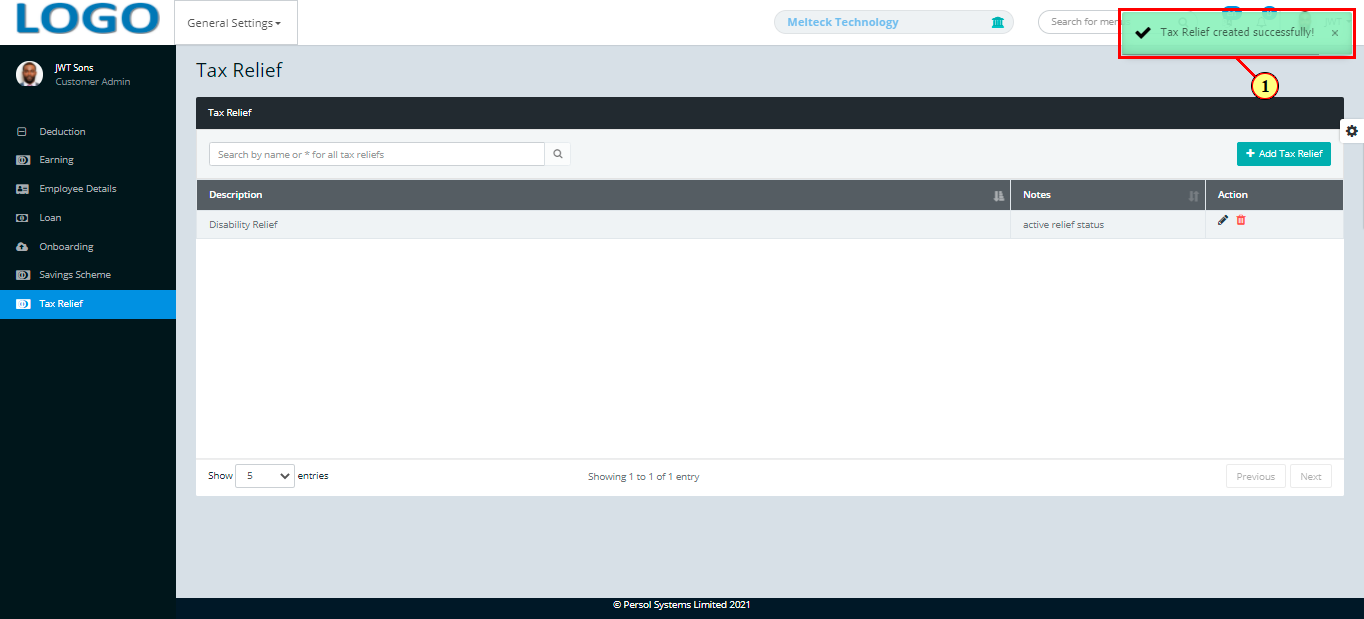
| (1) | A notification displays to indicate that the tax relief setup has been saved successfully |
| Step | Action |
|---|---|
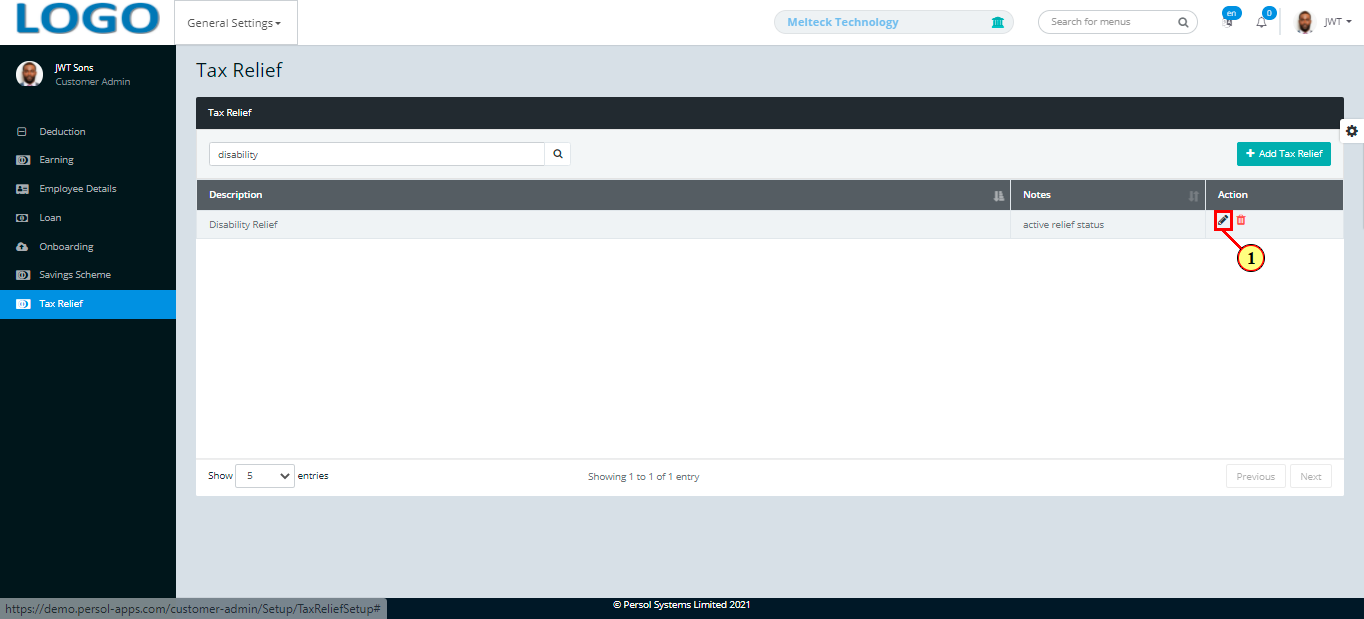
| (1) | To edit a tax relief setup, search for the relief by name |
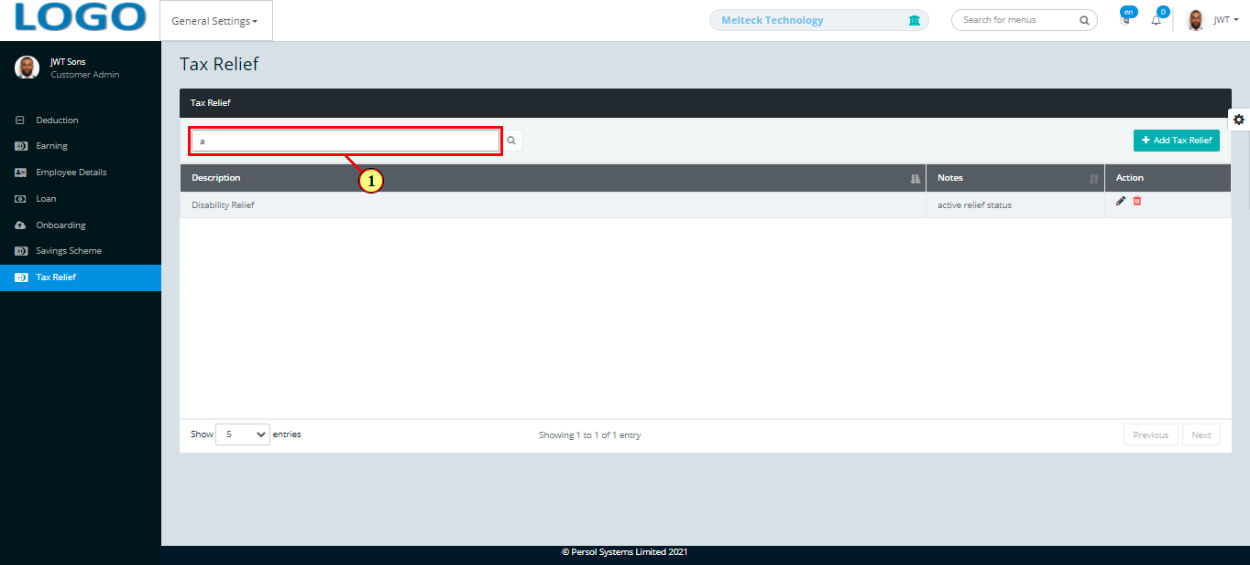
| Step | Action |
|---|---|
| The search result details display in the grid | |
|
The Action column consists of the Edit  and Delete and Delete  icons icons
|
| (1) |
Click on the  icon to edit tax relief icon to edit tax relief
|
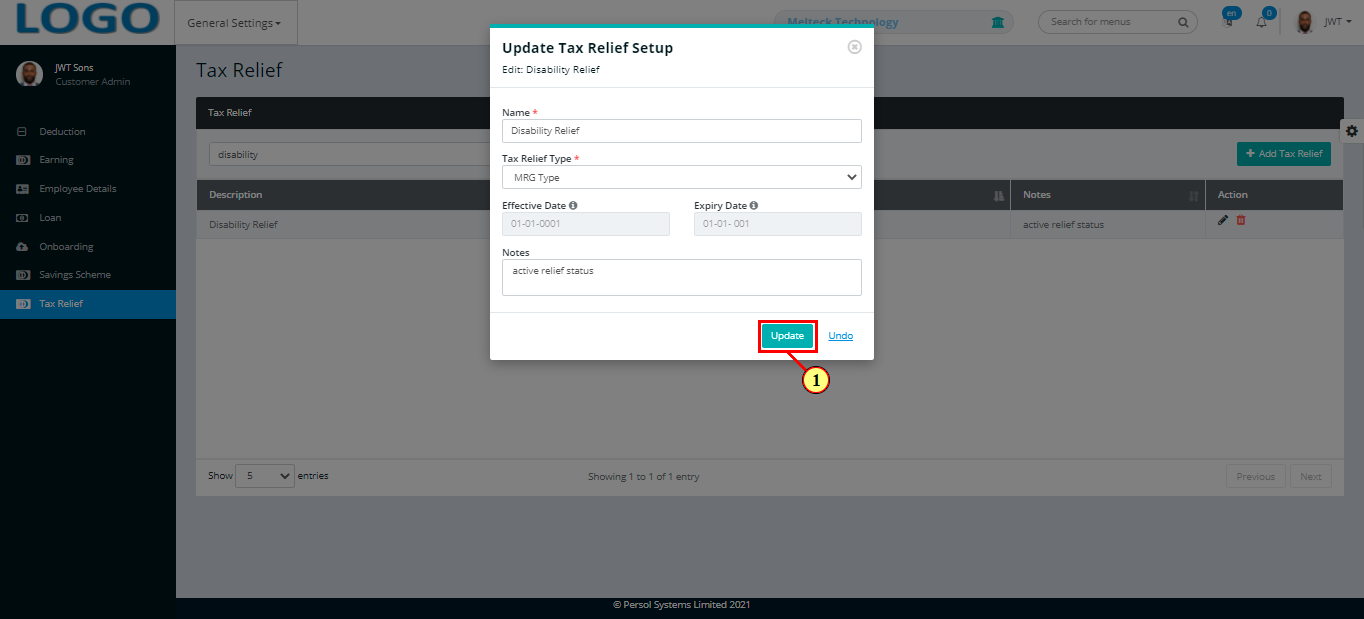
| Step | Action |
|---|---|
| Edit the details of the tax relief setup |

| Step | Action |
|---|---|
|
You may click on the  button to revert changes made button to revert changes made
|
| (1) |
Click on the  button to save the changes made button to save the changes made
|
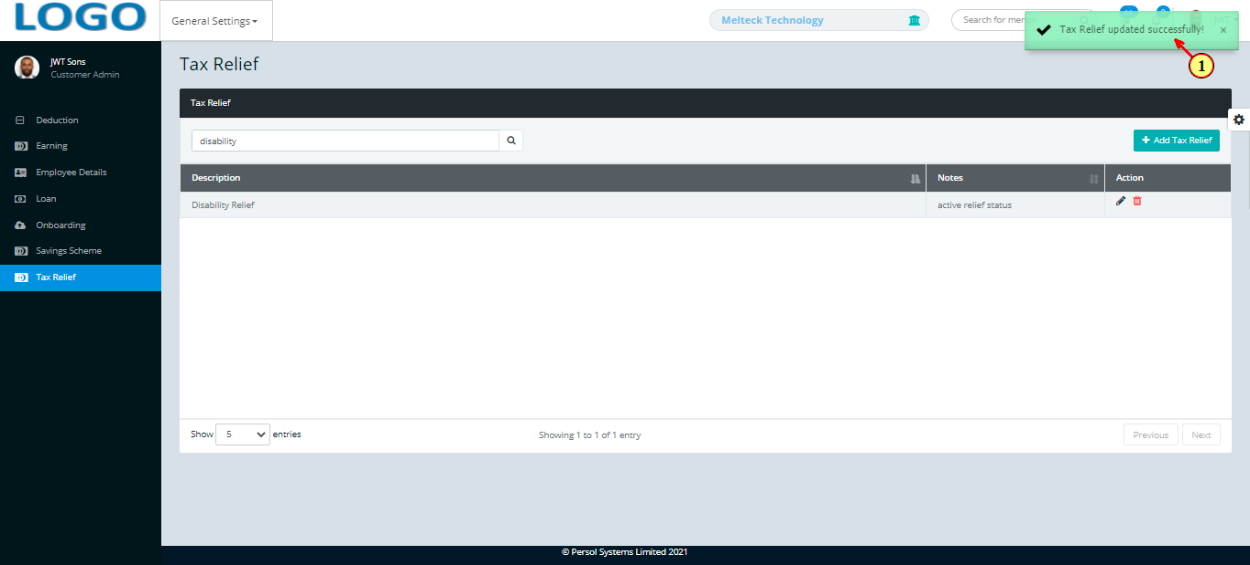
| Step | Action |
|---|---|
| (1) | A notification displays to indicate that the update has been saved successfully |
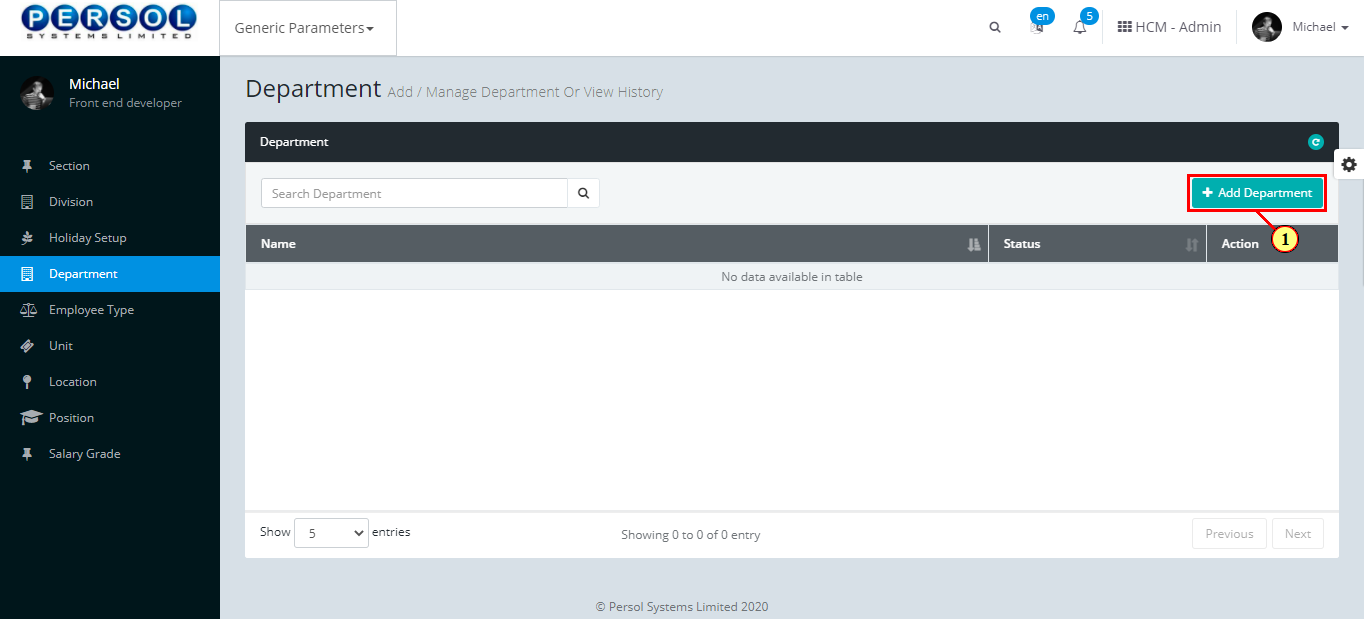
A department is a defined business segment provided by the company admin into the system. Eg: finance, sales etc.
| Step | Action |
|---|---|
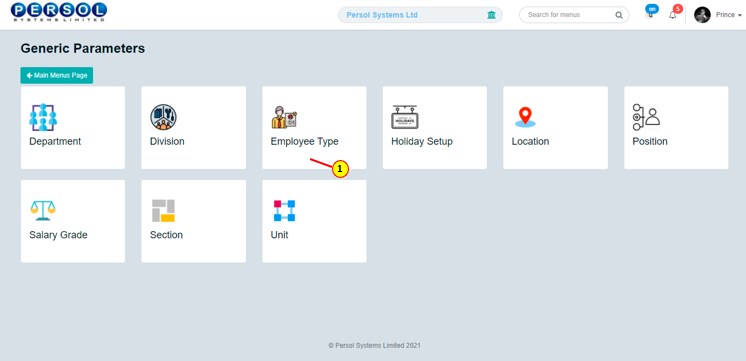
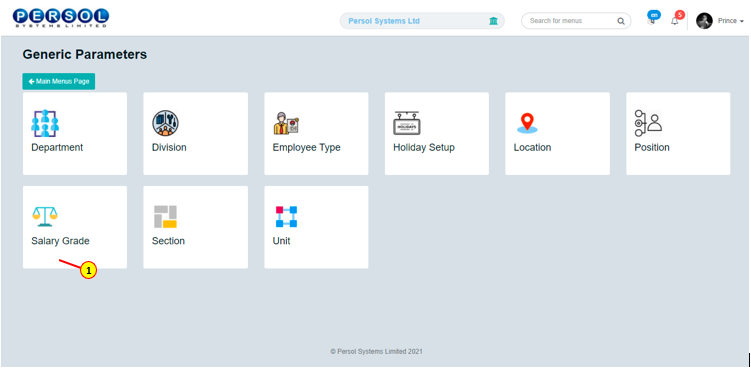
| (1) | On the Personax Customer Admin homepage, select the ‘Generic Parameters’ tile |
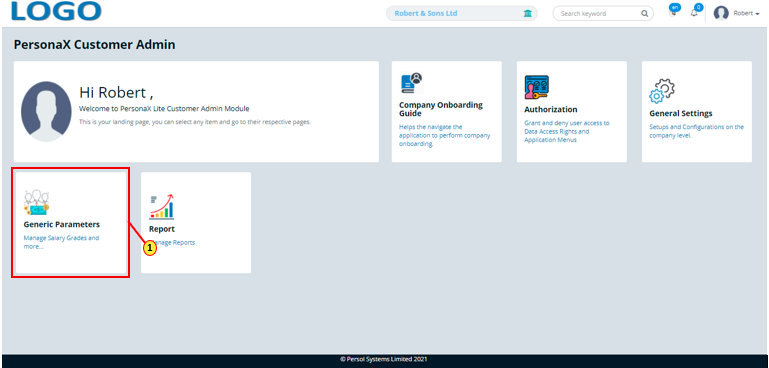
| Step | Action |
|---|---|
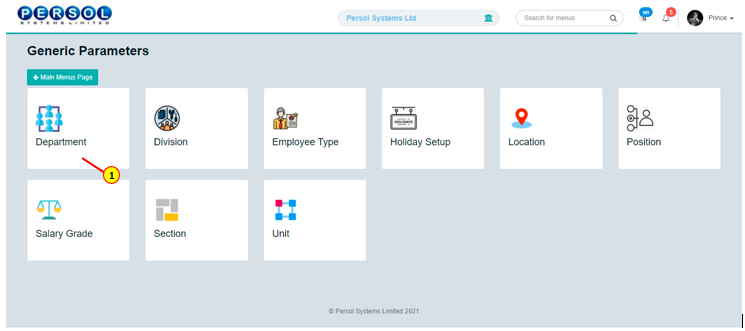
| The ‘Generic Parameters’ submenus page opens | |
| (1) | Select the ‘Department’ tile |
| Step | Action |
|---|---|
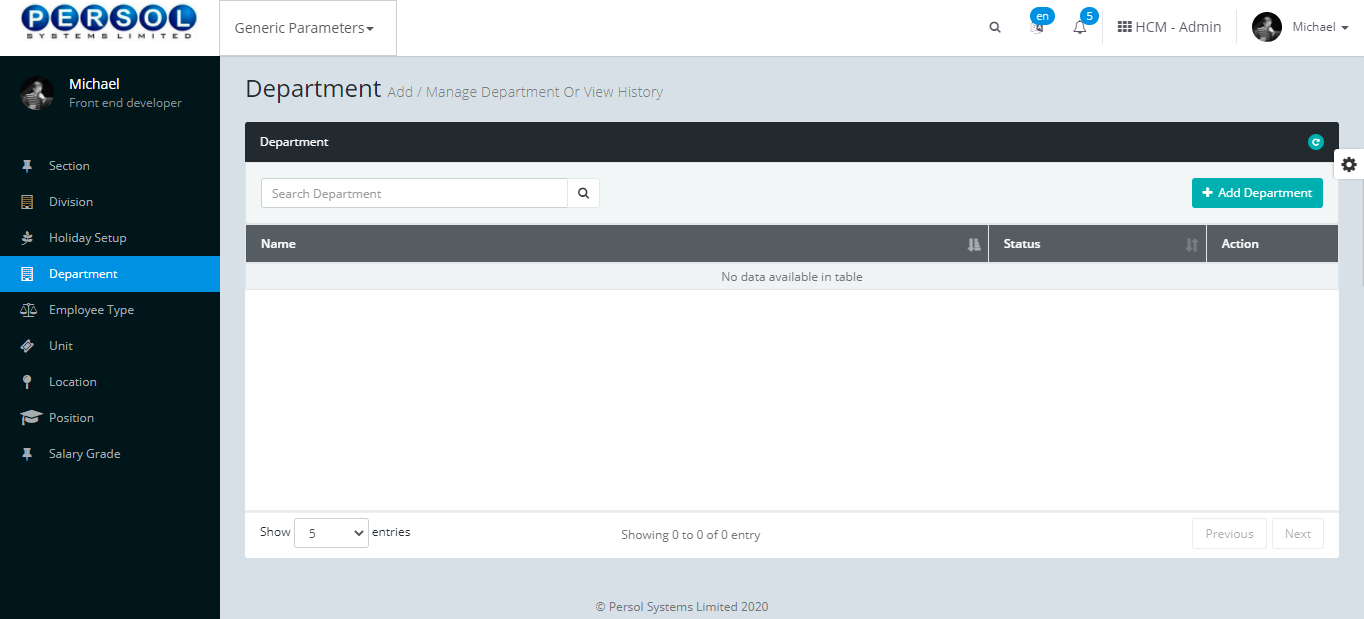
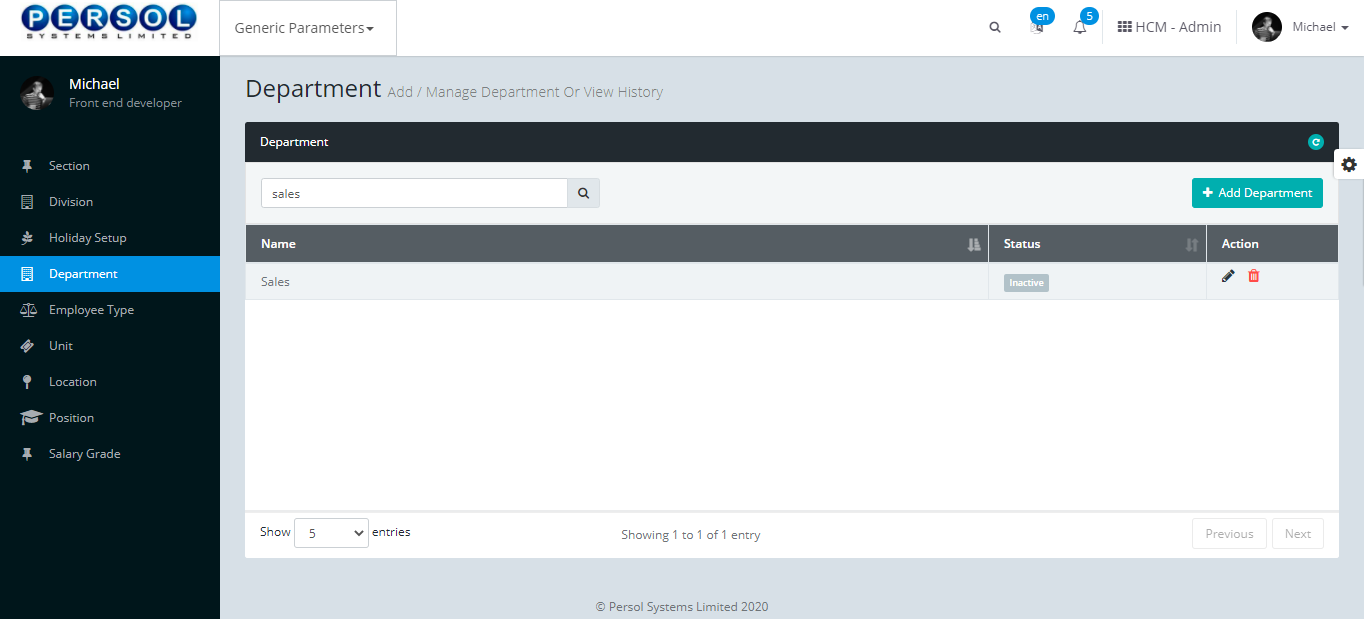
| The ‘Department’ page opens |
| Step | Action |
|---|---|
| (1) |
To setup a new Department, click on the  button button
|
| Step | Action |
|---|---|
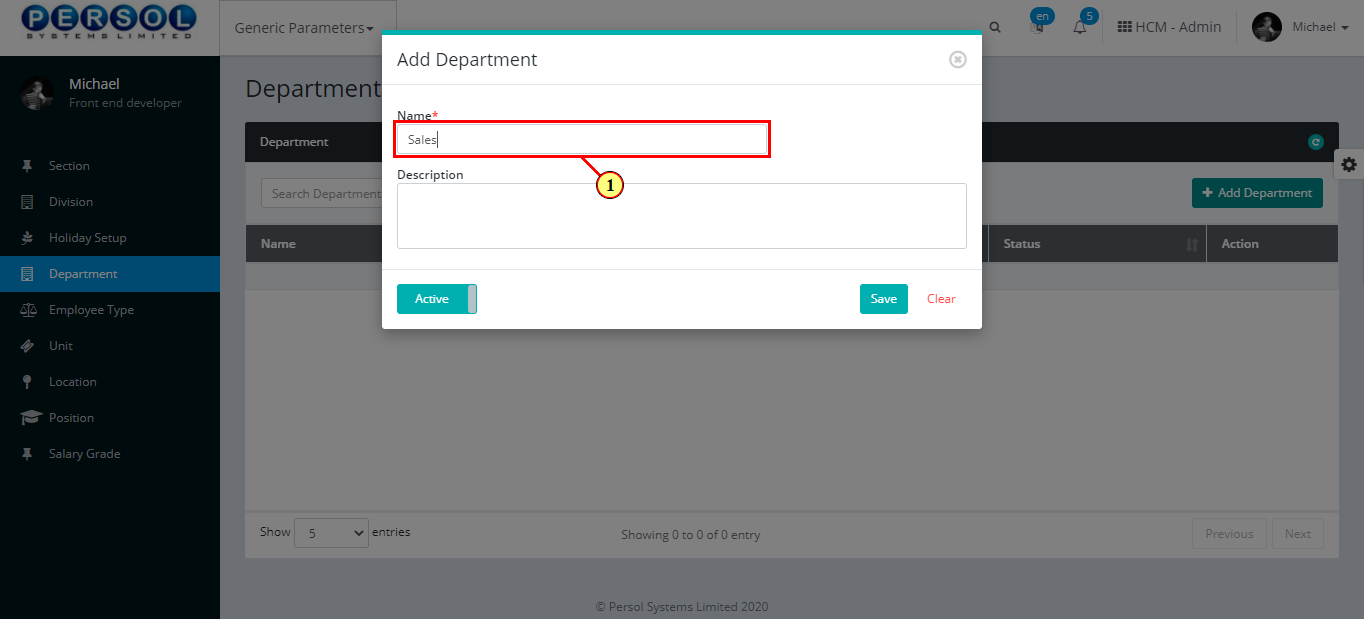
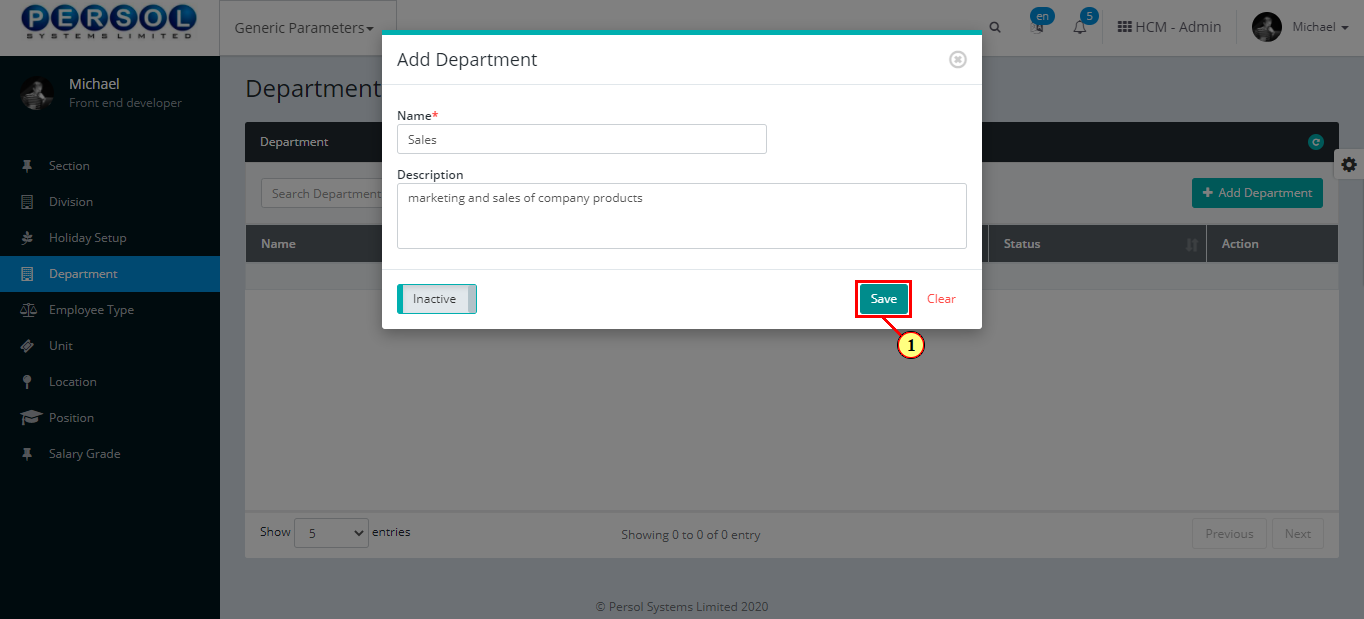
| The ‘Add Department’ modal opens | |
| (1) | Enter name of the new department |
|
This field is required * |
| Step | Action |
|---|---|
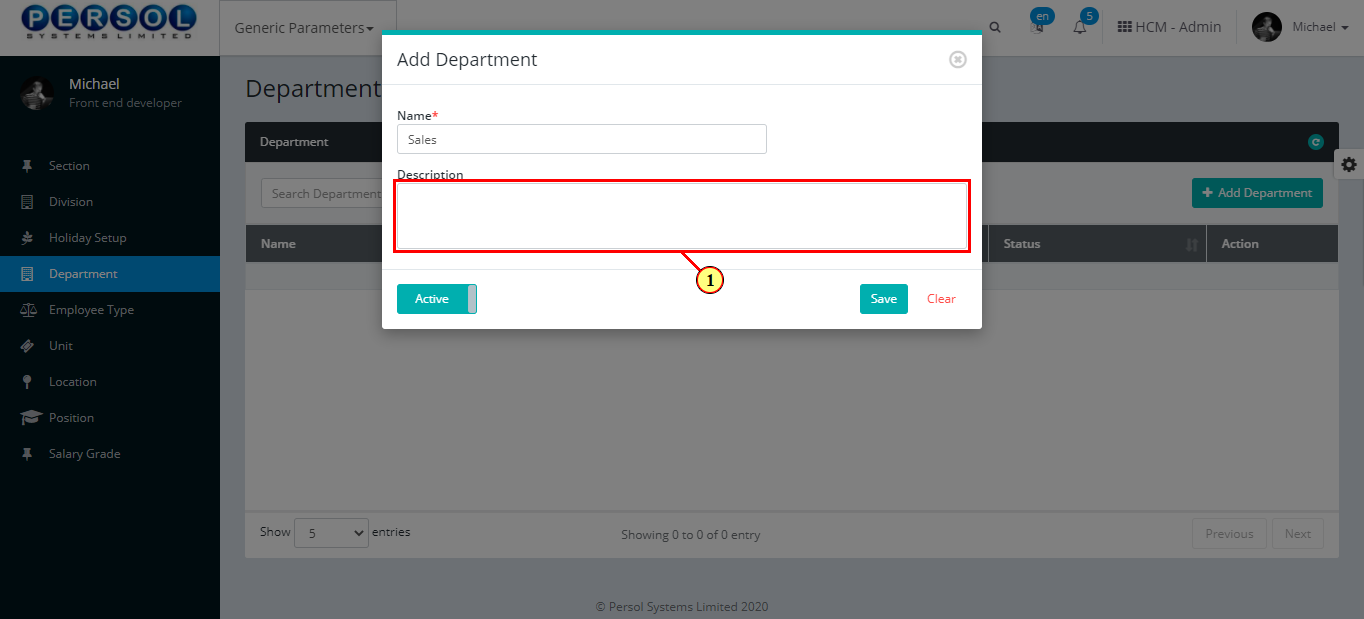
| (1) | Add a description to provide more details on the department |
| Step | Action |
|---|---|
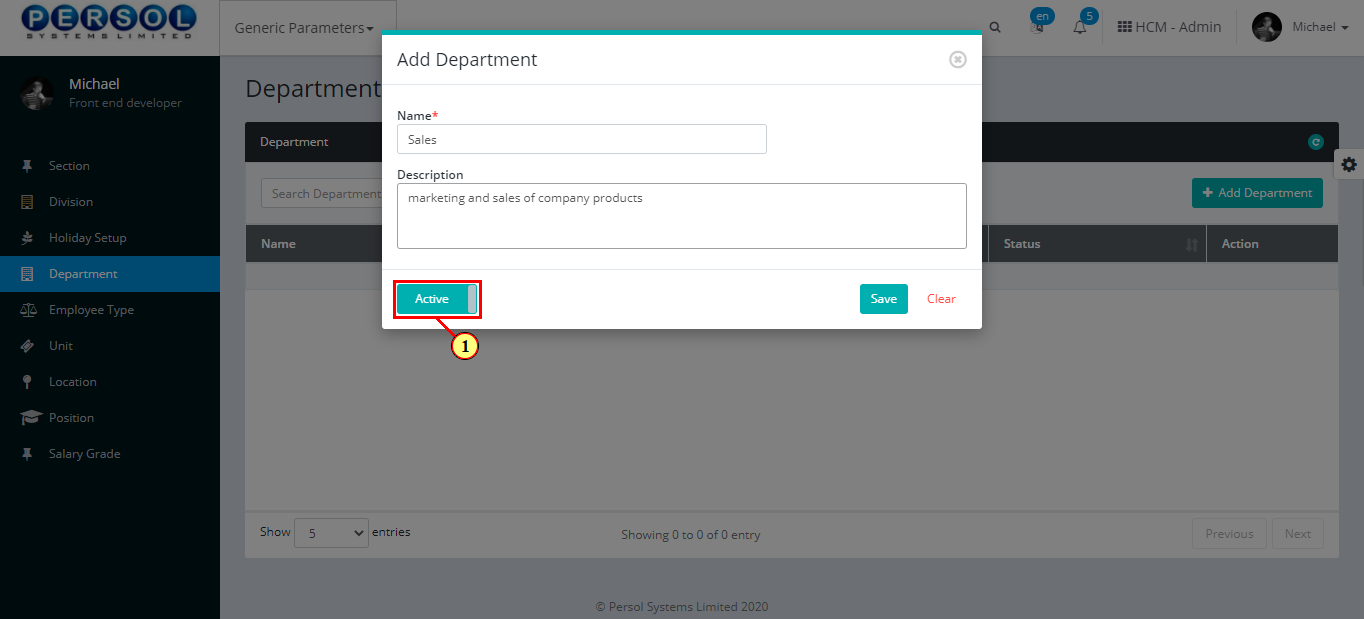
| (1) |
You may click on the button to change status of the department to inactive
|
|
- An active status means the department can be used in transactions on other pages - An inactive status means the department cannot be used in transactions on other pages |
| Step | Action |
|---|---|
|
You may click on the button to clear all details entered
|
| (1) |
Click on the button to save details of the newly added department
|
| Step | Action |
|---|---|
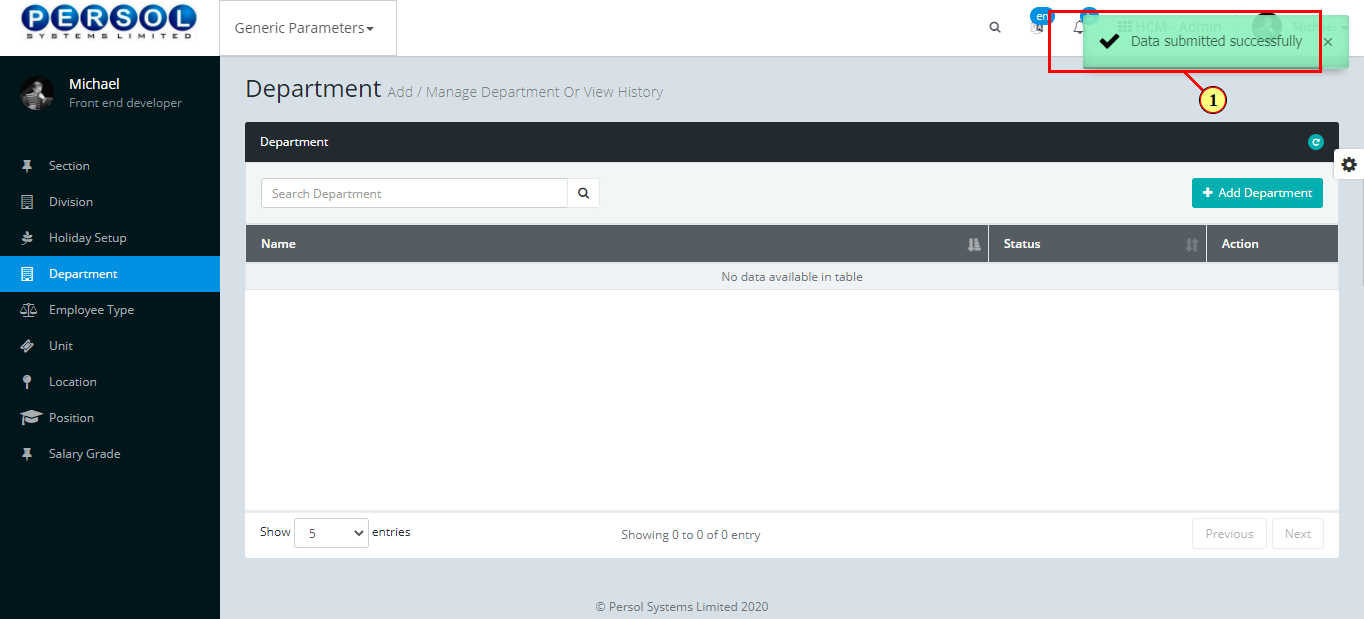
| (1) | A notification displays to indicate that the department setup has been saved successfully |
| Step | Action |
|---|---|
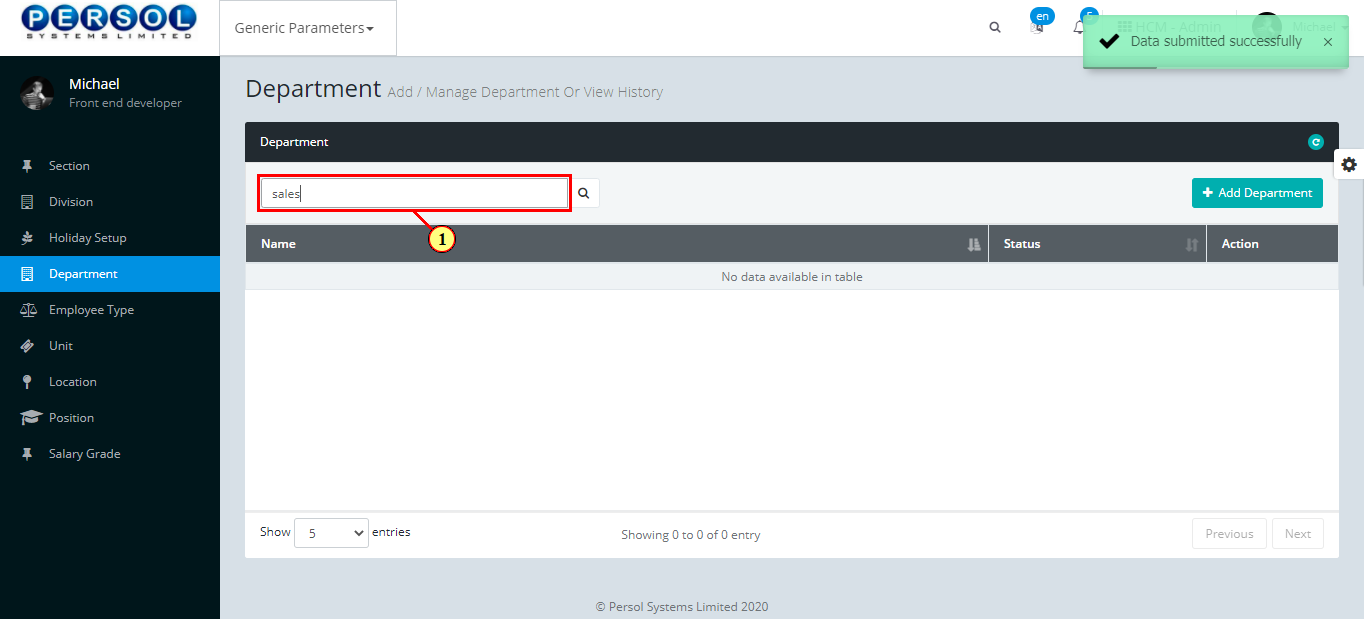
| (1) | To edit a department, enter the department name in the search box |
| Step | Action |
|---|---|
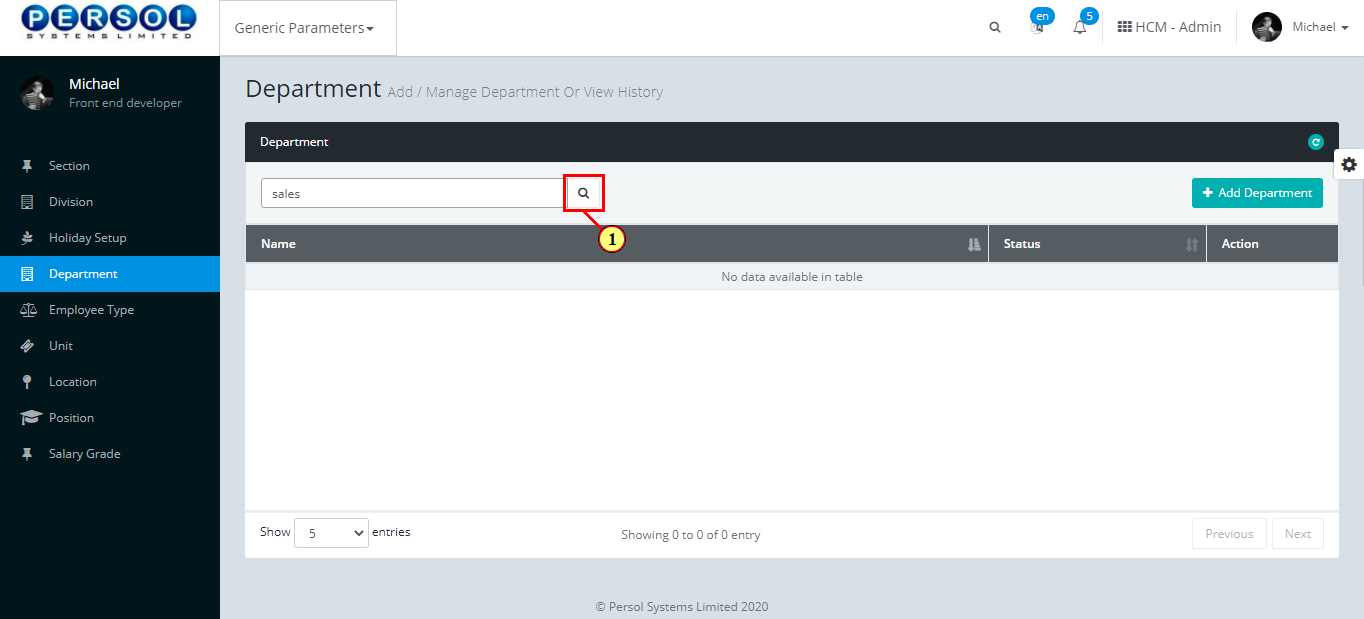
| (1) |
Click on the  icon to search for department icon to search for department
|
| Step | Action |
|---|---|
| (1) | The search result details display in the grid |
|
The Action column consists of the Edit and Delete action icons
|
| Step | Action |
|---|---|
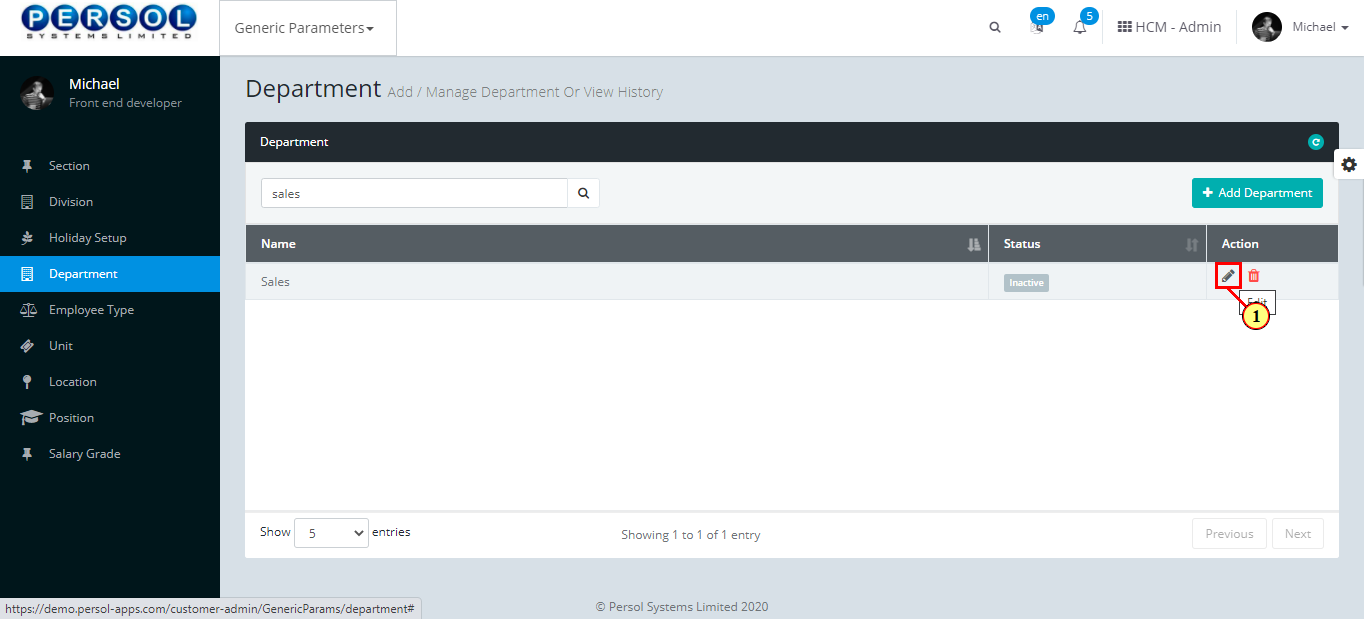
| (1) |
Click on the edit icon to edit the department
|
|
You may click on the delete icon to delete department
|
| Step | Action |
|---|---|
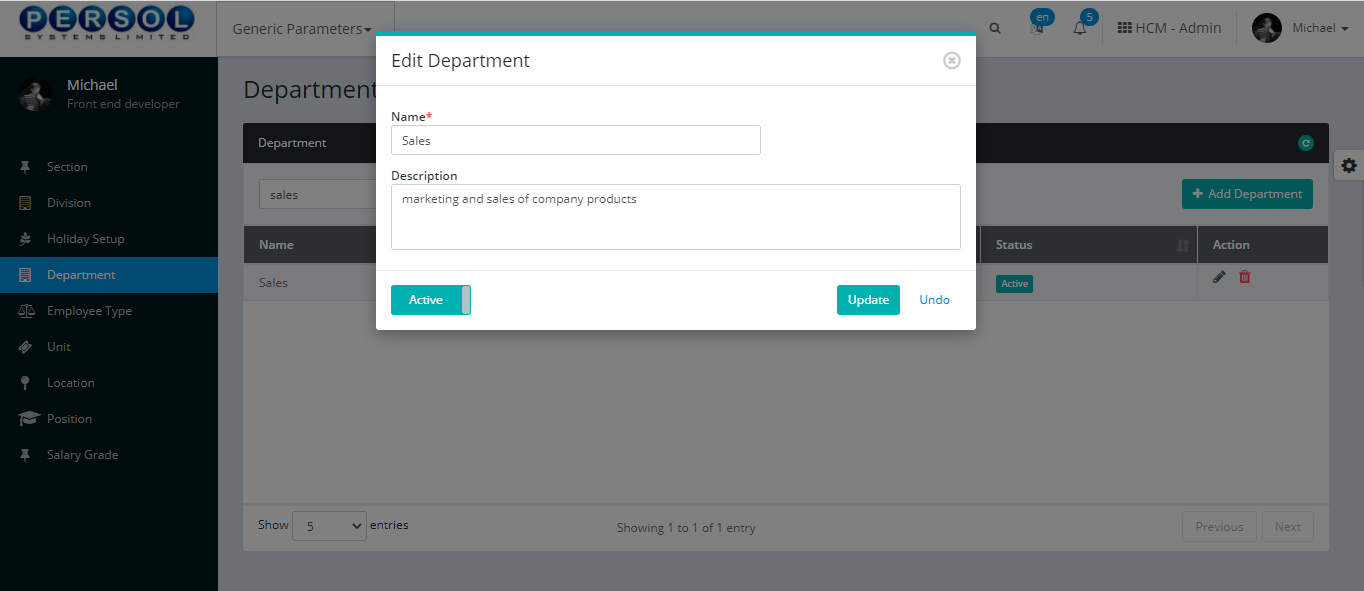
| The ‘Edit department’ modal opens | |
| Edit the name, description or status of the Department |
| Step | Action |
|---|---|
|
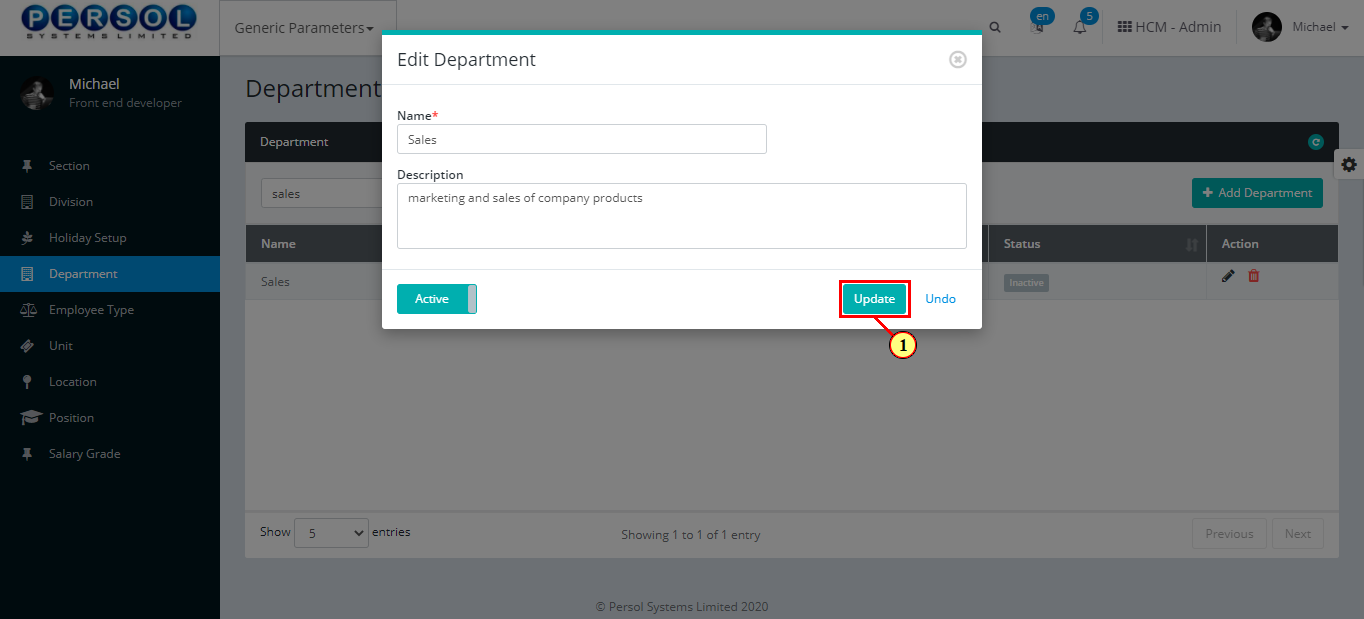
You may click on the button to revert changes made
|
| (1) |
Click on the button to save the changes made
|
| Step | Action |
|---|---|
| (1) | A notification displays to indicate that the update has been saved successfully |

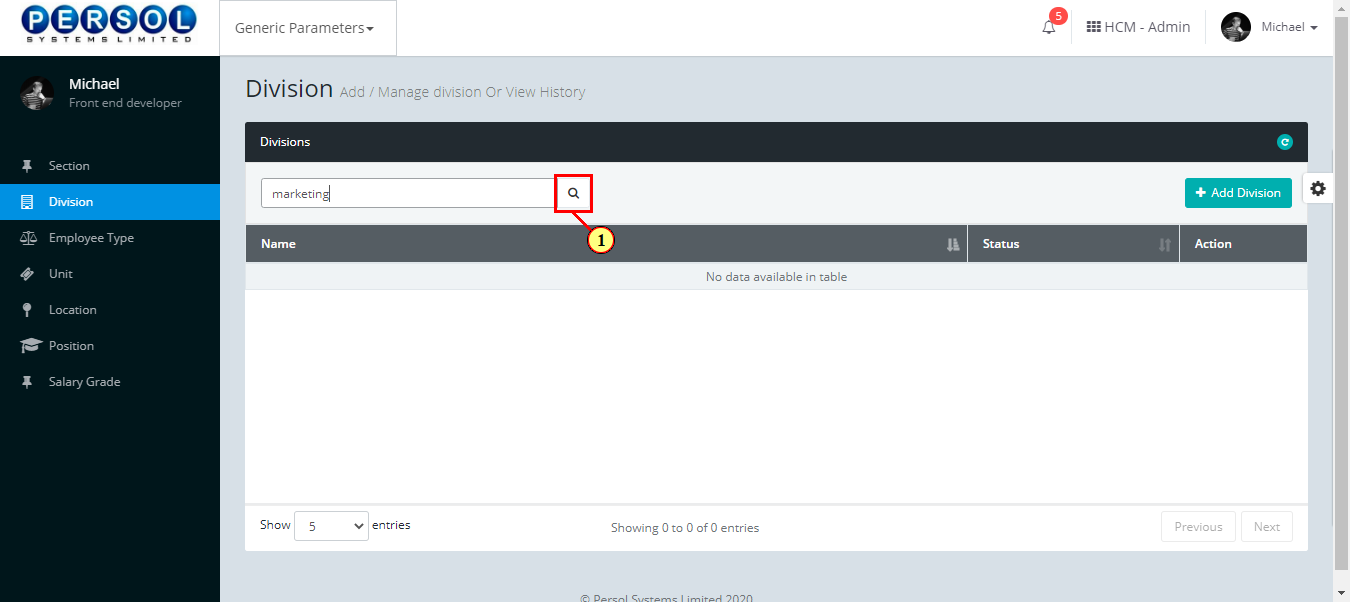
Division is a defined business segment provided by the company admin into the sysytem Eg: administration, business development etc.
| Step | Action |
|---|---|
| (1) | On the Personax Customer Admin homepage, select the ‘Generic Parameters’ tile |
| Step | Action |
|---|---|
| The ‘Generic Parameters’ submenus page opens | |
| (1) | Select the ‘Division’ tile |

| Step | Action |
|---|---|
| The ‘Division’ page opens |
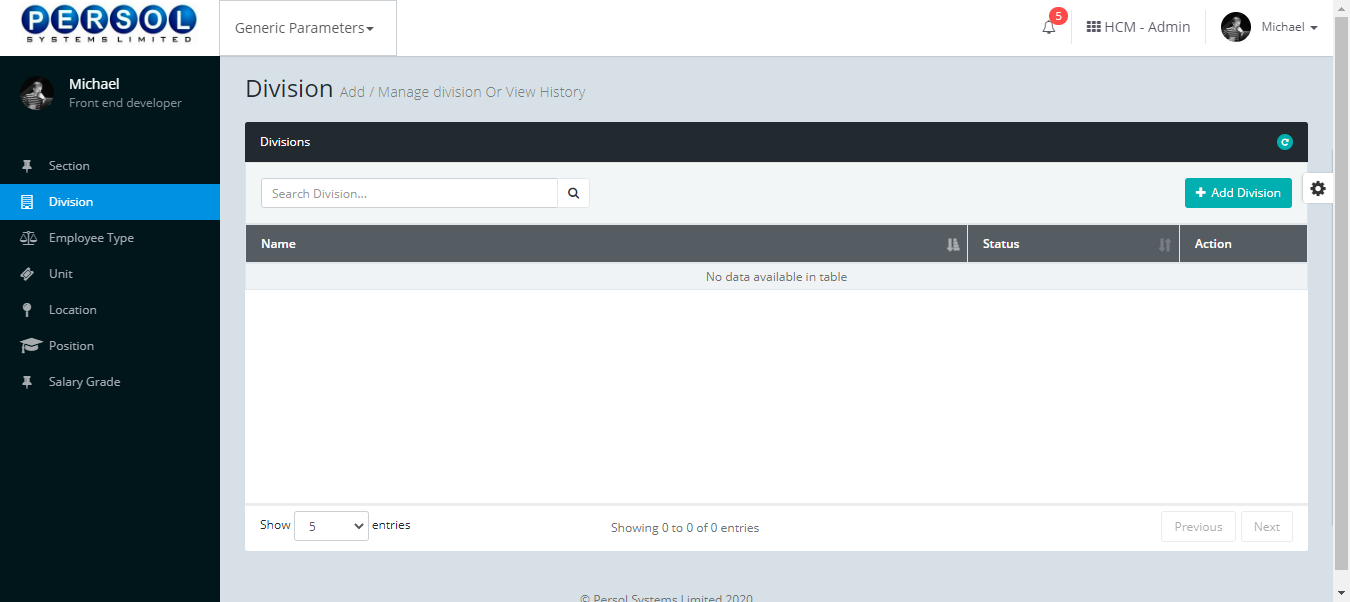
| Step | Action |
|---|---|
| (1) |
To setup a new Division, click on the 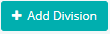 button button
|
| Step | Action |
|---|---|
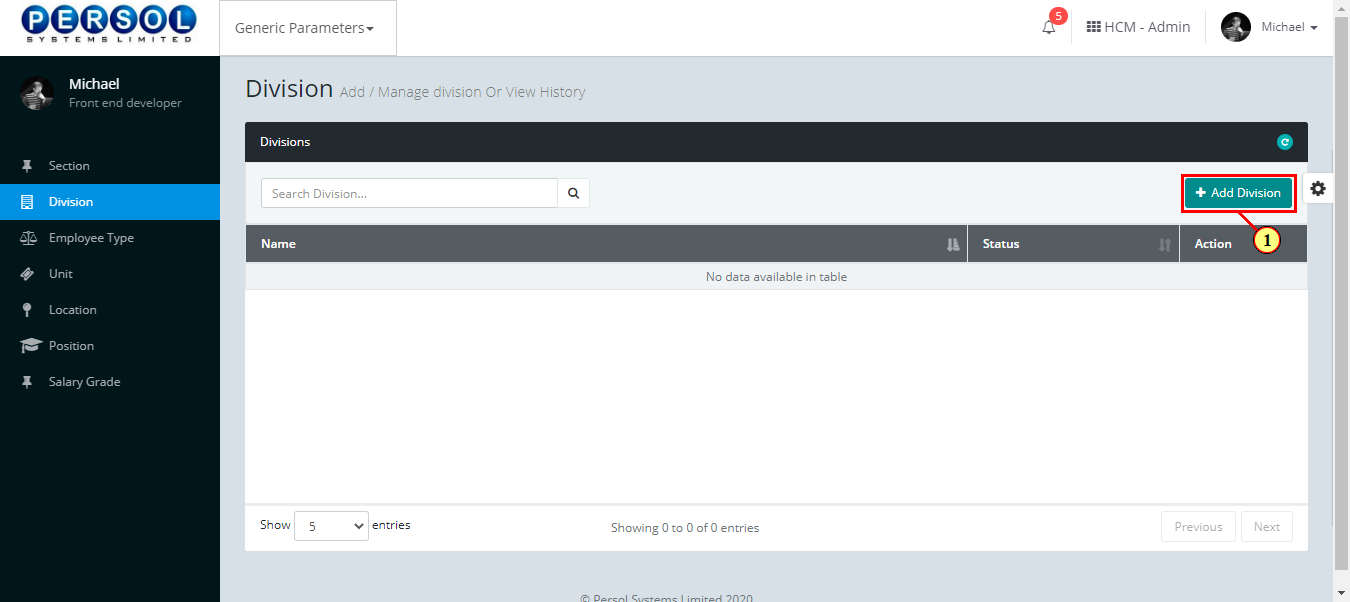
| The ‘Add Division’ modal opens | |
| (1) | Enter name of the new division |
|
This field is required * |
| Step | Action |
|---|---|
| (1) | Add a description to provide more details on the division |
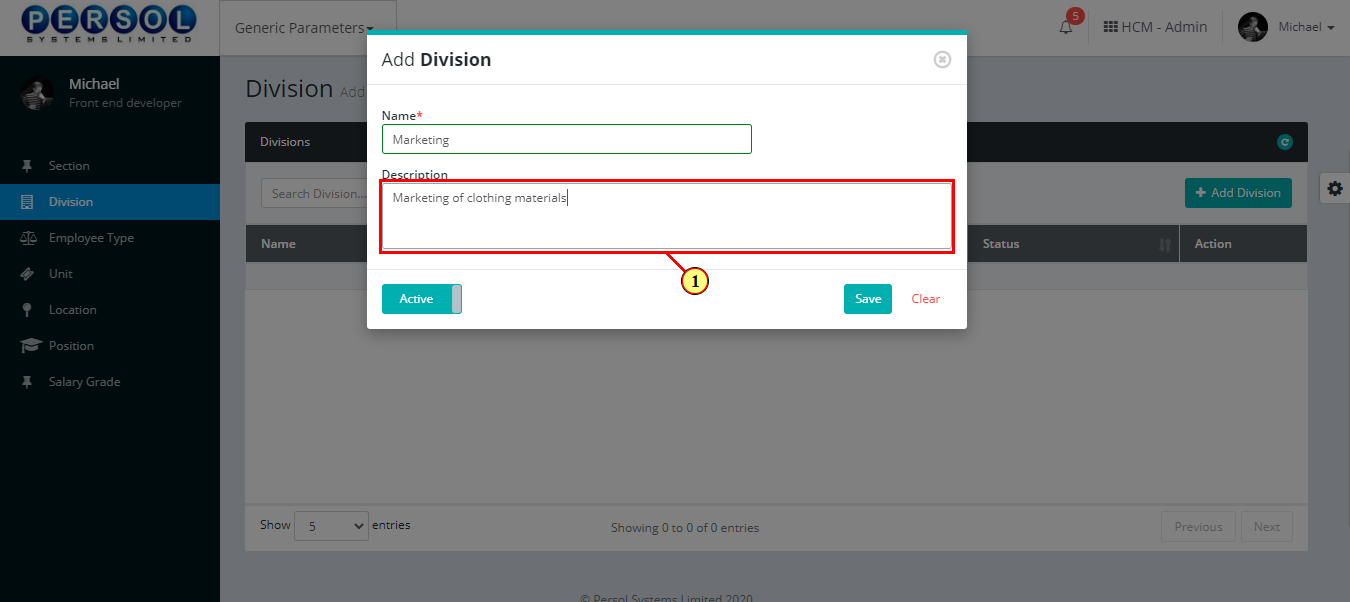
| Step | Action |
|---|---|
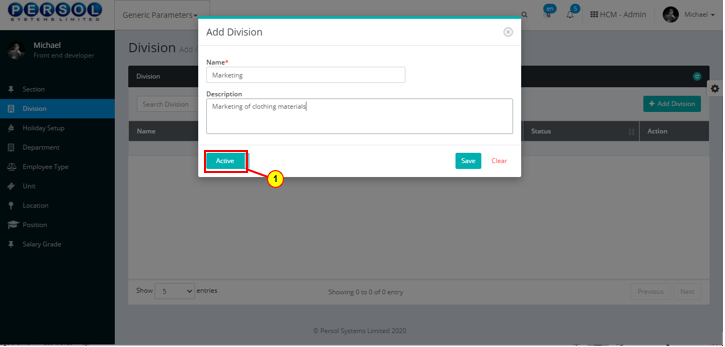
| (1) |
You may click on the button to change status of the division to inactive
|
|
- An active status means the division can be used in transactions on other pages - An inactive status means the division cannot be used in transactions on other pages |
| Step | Action |
|---|---|
|
You may click on the button to clear all details entered
|
| (1) |
Click on the button to save details of the newly added division
|

| Step | Action |
|---|---|
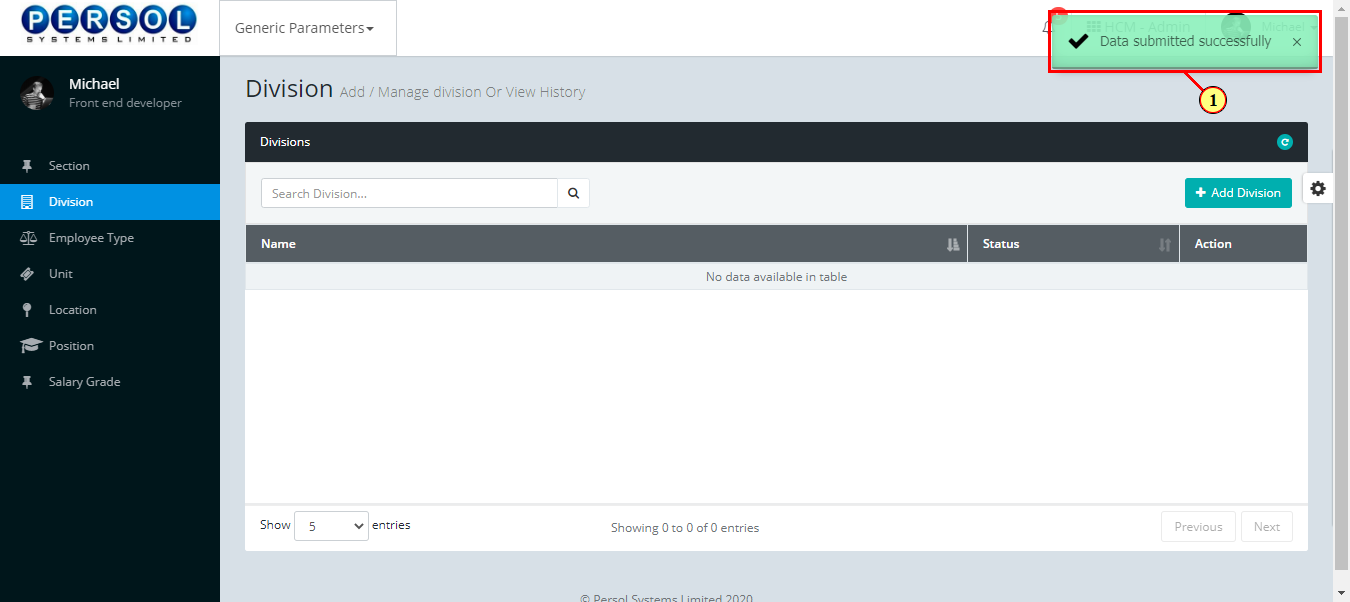
| (1) | A notification displays to indicate that the division setup has been saved successfully |
| Step | Action |
|---|---|
| (1) | A notification displays to indicate that the division setup has been saved successfully |
| Step | Action |
|---|---|
| (1) | A notification displays to indicate that the division setup has been saved successfully |
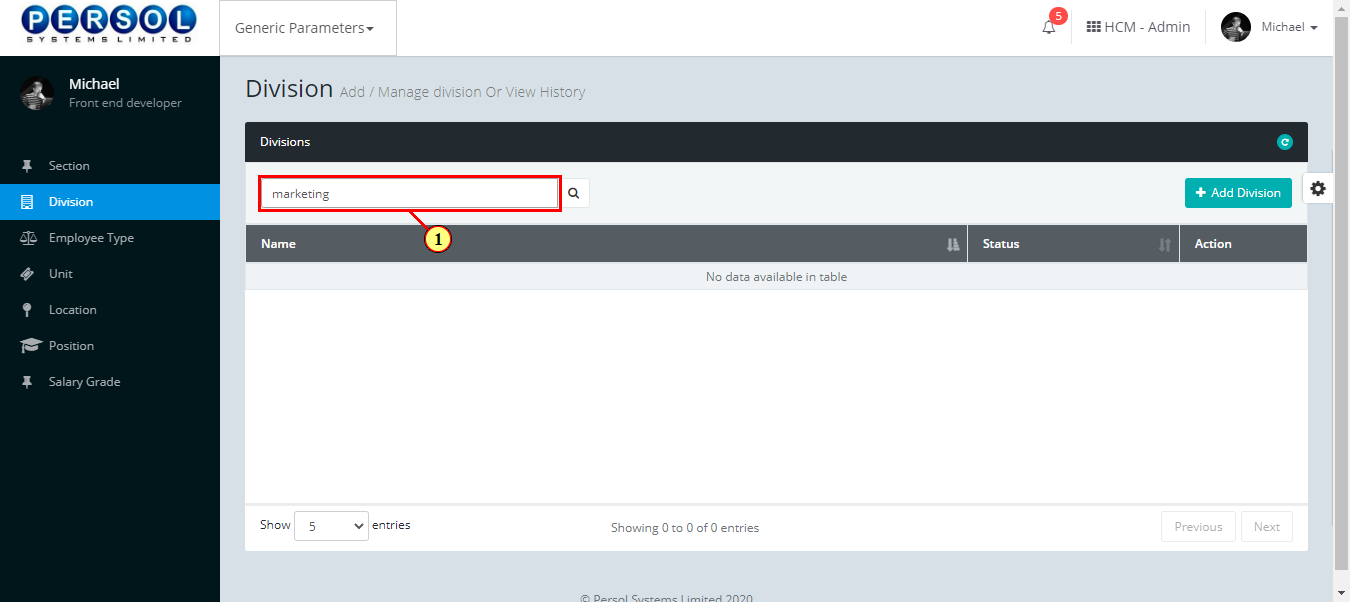
| Step | Action |
|---|---|
| (1) | The search result details display in the grid |
|
The Action column consists of the Edit and Delete action icons
|
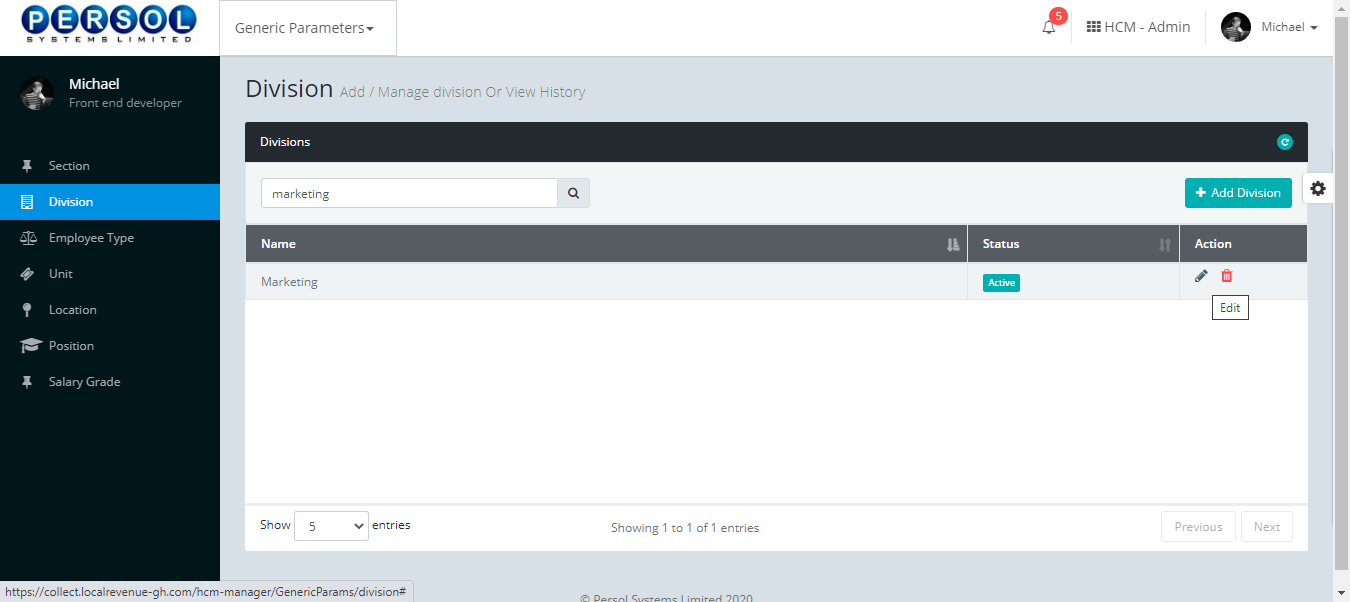
| Step | Action |
|---|---|
| (1) |
Click on the edit icon to edit the division
|
|
You may click on the delete icon to delete the division
|

| Step | Action |
|---|---|
| The ‘Edit Division’ modal opens | |
| Edit the name, description or status of the division’ |
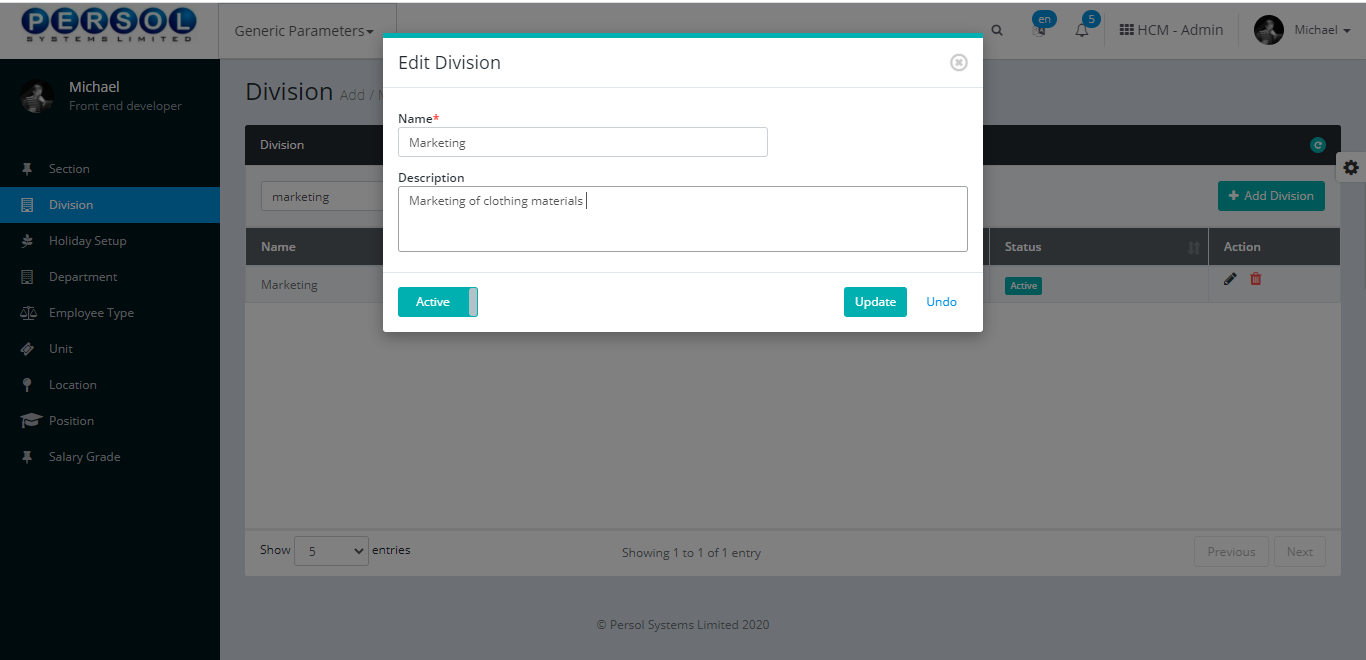
| Step | Action |
|---|---|
|
You may click on the button to revert changes made
|
| (1) |
Click on the button to save the changes made
|

| Step | Action |
|---|---|
| (1) | A notification displays to indicate that the division setup has been saved successfully |

Employee Type is a defined employee group provided by the company admin into the system Eg: general staff, contract staff, part-time staff etc.
| Step | Action |
|---|---|
| (1) | On the Personax Customer Admin homepage, select the ‘Generic Parameters’ tile |

| Step | Action |
|---|---|
| The ‘Generic Parameters’ submenus page opens | |
| (1) | Select the ‘Employee Type’ tile |
| Step | Action |
|---|---|
| The ‘Employee Type’ page opens |

| Step | Action |
|---|---|
| (1) |
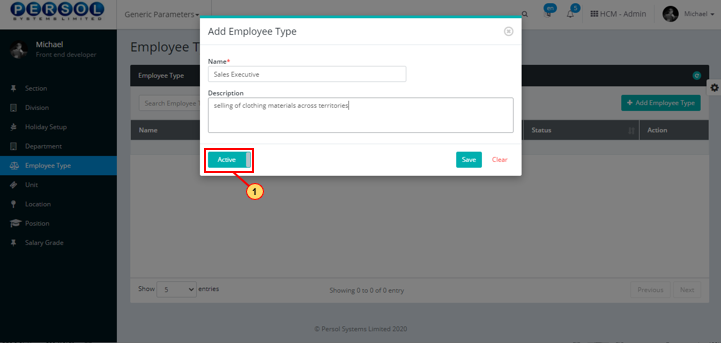
To setup a new Employee Type, click on the 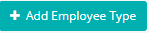 button button
|
| Step | Action |
|---|---|
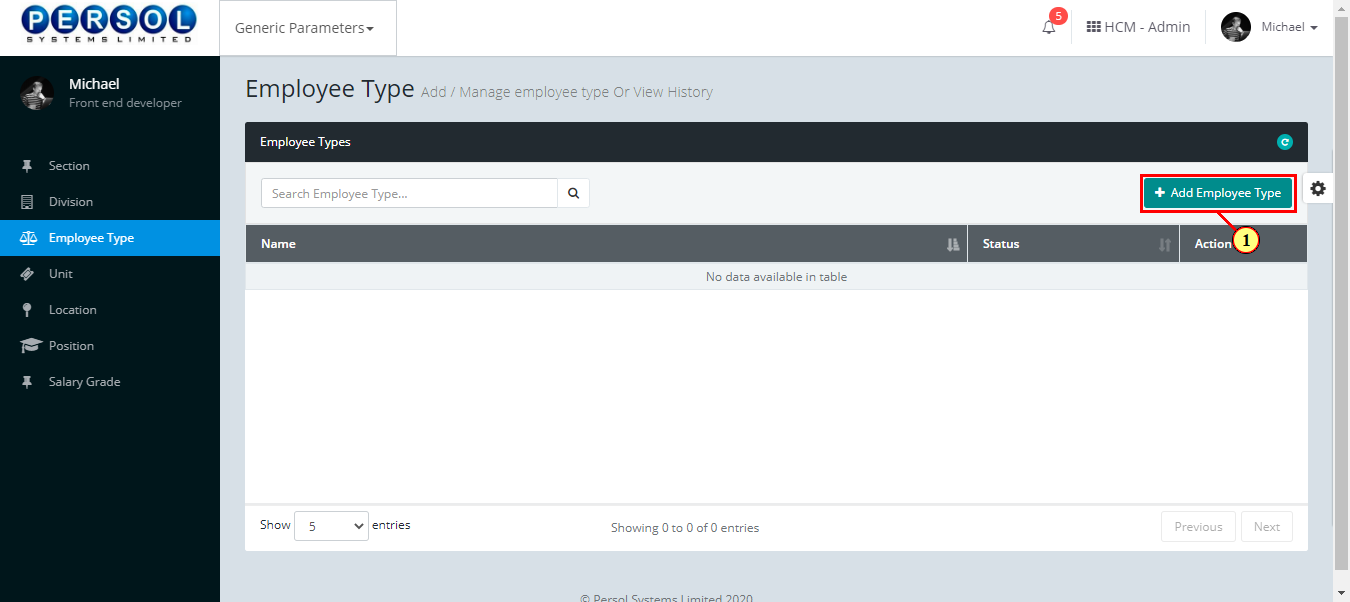
| The ‘Add Employee Type’ modal opens | |
| (1) | Enter name of the new employee type |
|
This field is required * |
| Step | Action |
|---|---|
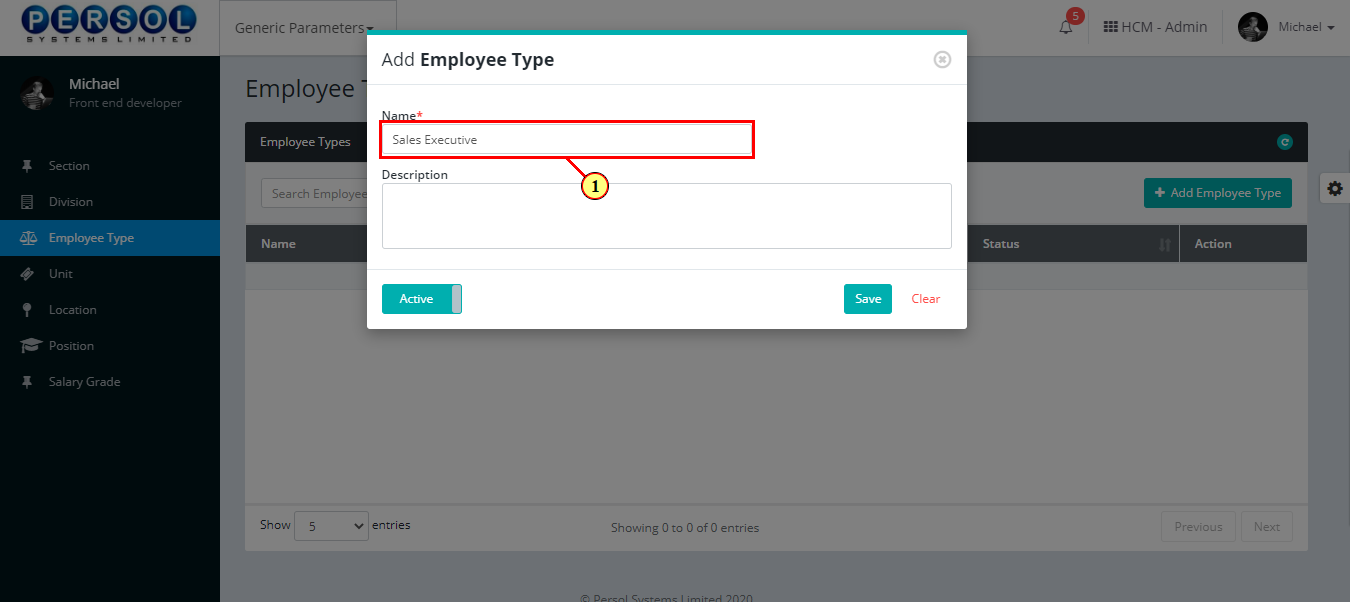
| (1) | Add a description to provide more details on the employee type |
| Step | Action |
|---|---|
| (1) |
You may click on the button to change status of the employee type to inactive
|
|
- An active status means the employee type can be used in transactions on other pages - An inactive status means the employee type cannot be used in transactions on other pages |
| Step | Action |
|---|---|
|
You may click on the button to clear all details entered
|
| (1) |
Click on the button to save details of the newly added division
|

| Step | Action |
|---|---|
| (1) | A notification displays to indicate that the employee type setup has been saved successfully |

| Step | Action |
|---|---|
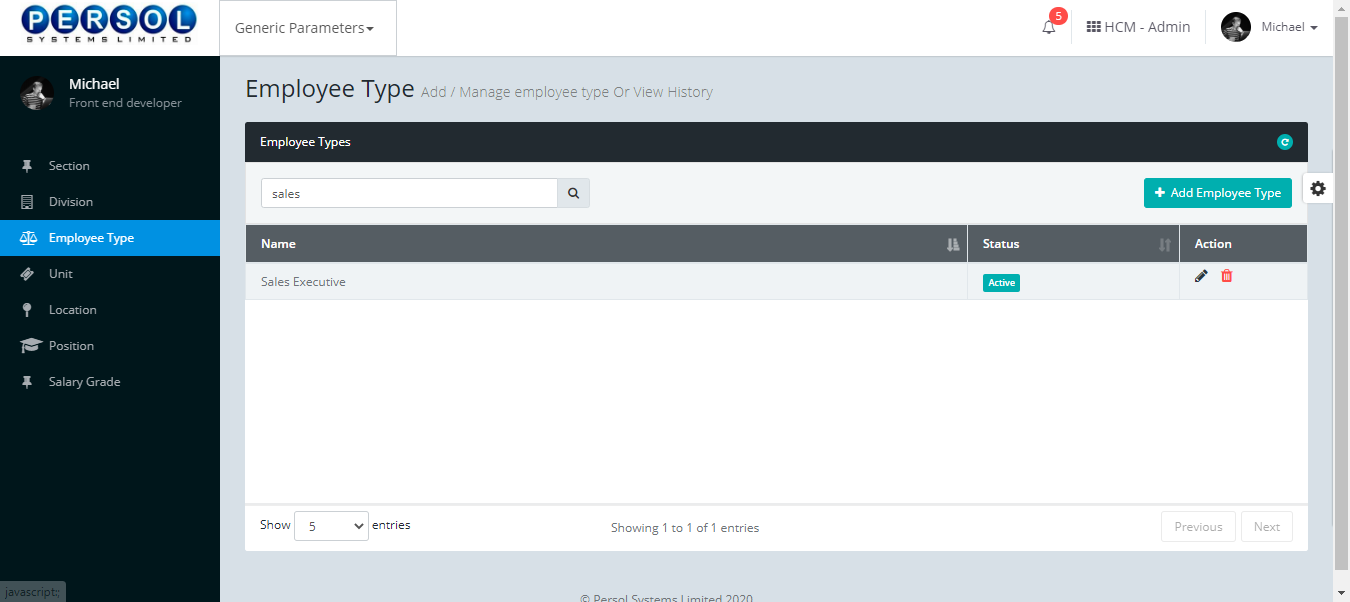
| (1) | To edit an employee type, enter the employee type name in the search box |
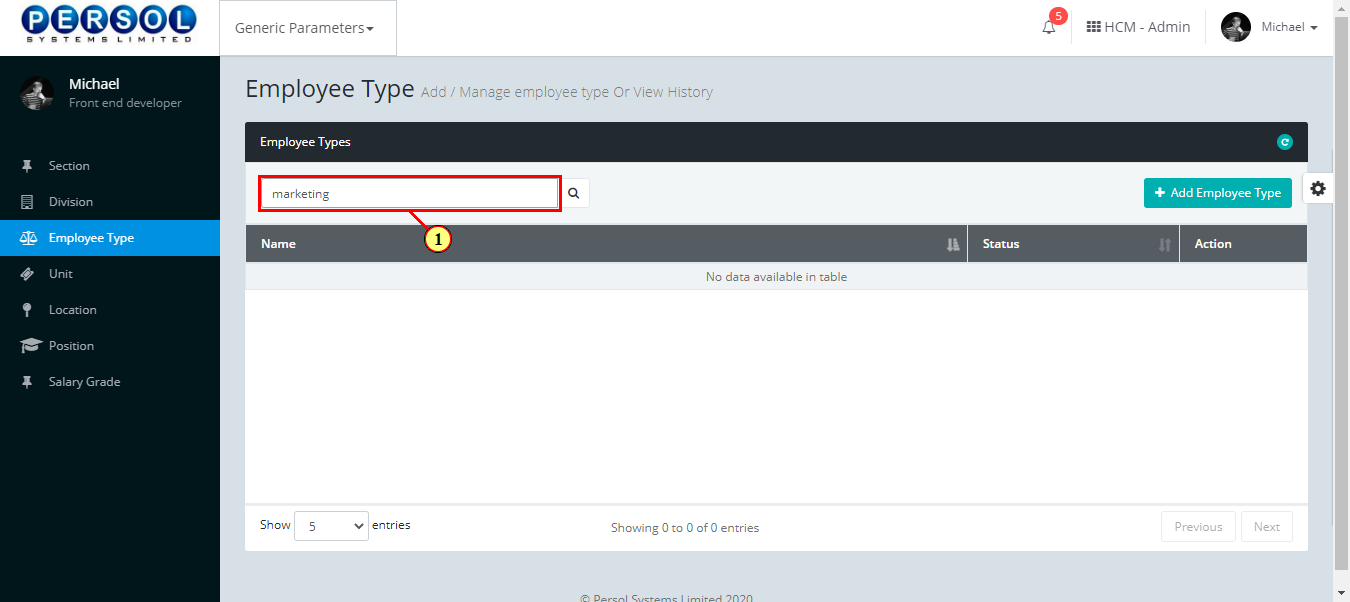
| Step | Action |
|---|---|
| (1) |
Click on the icon to search for the employee type
|
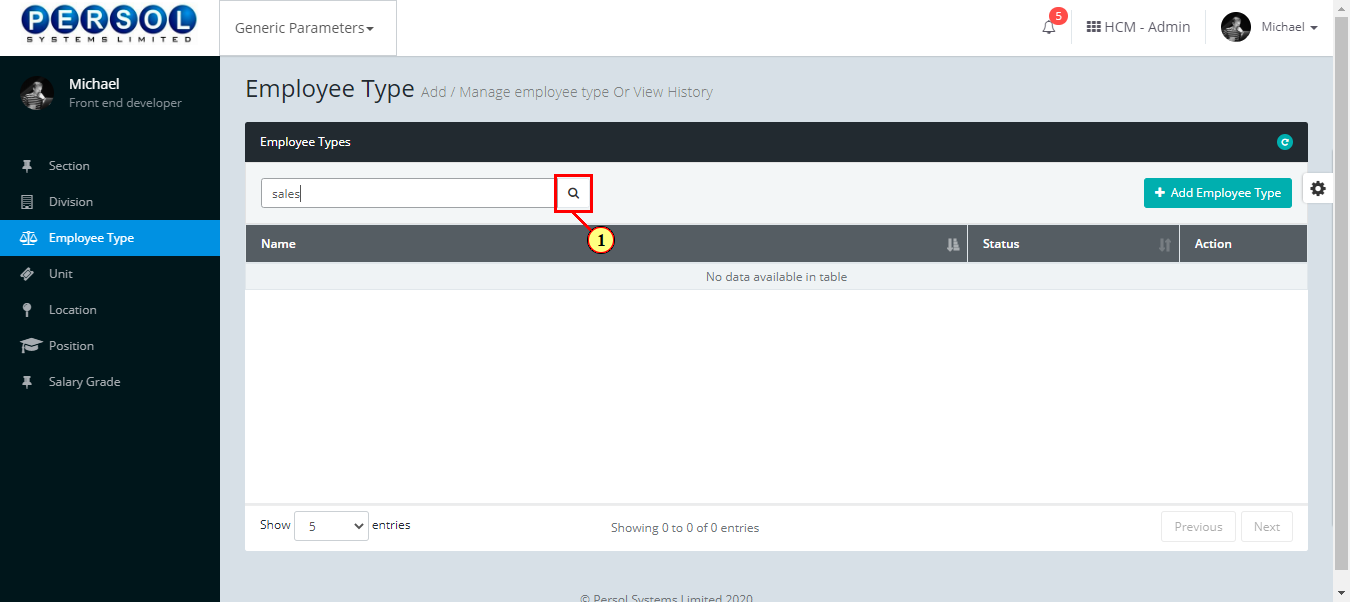
| Step | Action |
|---|---|
| (1) | The search result details display in the grid |
|
The Action column consists of the Edit and Delete action icons
|
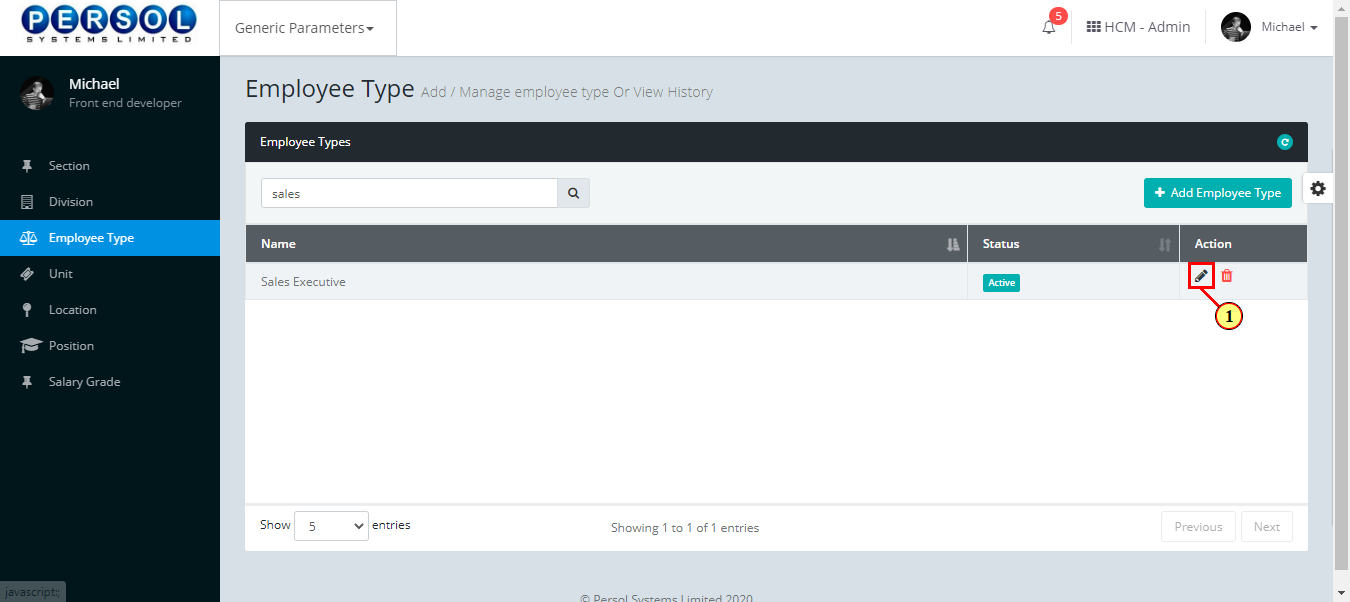
| Step | Action |
|---|---|
| (1) |
Click on the edit icon to edit the employee type
|
|
You may click on the delete icon to delete the employee type
|
| Step | Action |
|---|---|
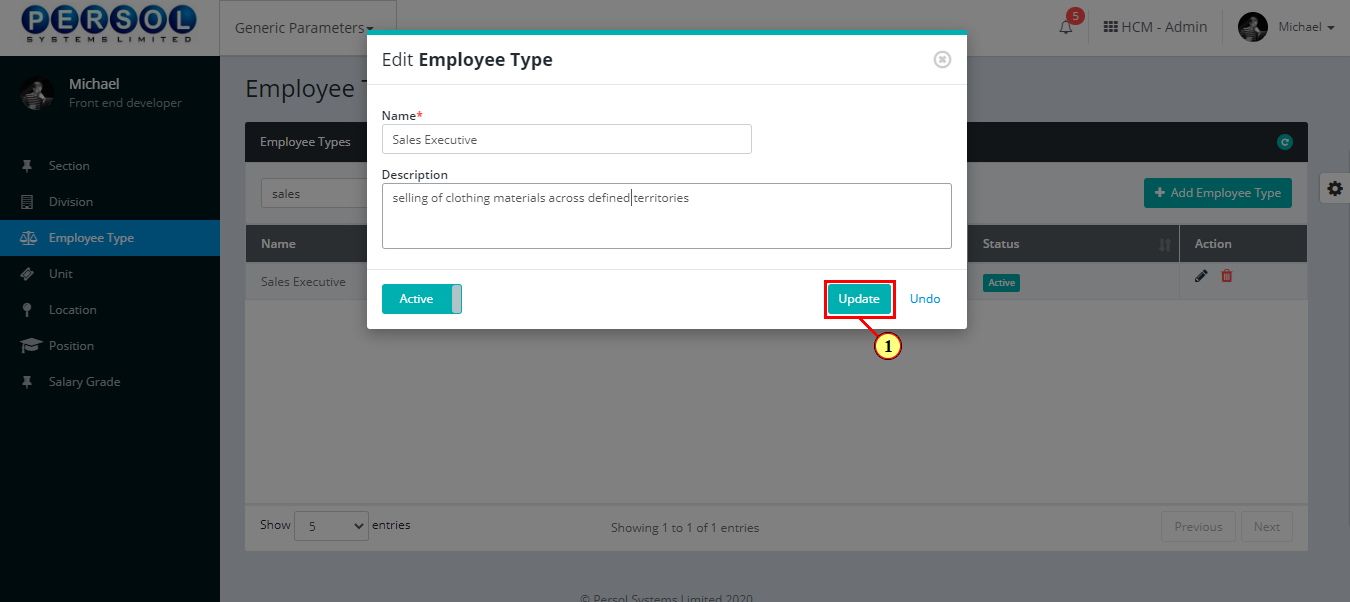
| The ‘Edit Employee Type’ modal opens | |
| Edit the name, description or status of the employee type |

| Step | Action |
|---|---|
|
You may click on the button to revert changes made
|
| (1) |
Click on the button to save the changes made
|
| Step | Action |
|---|---|
| (1) | A notification displays to indicate the update has been saved successfully |

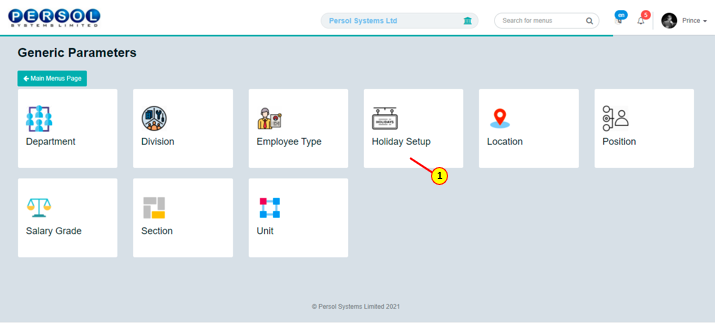
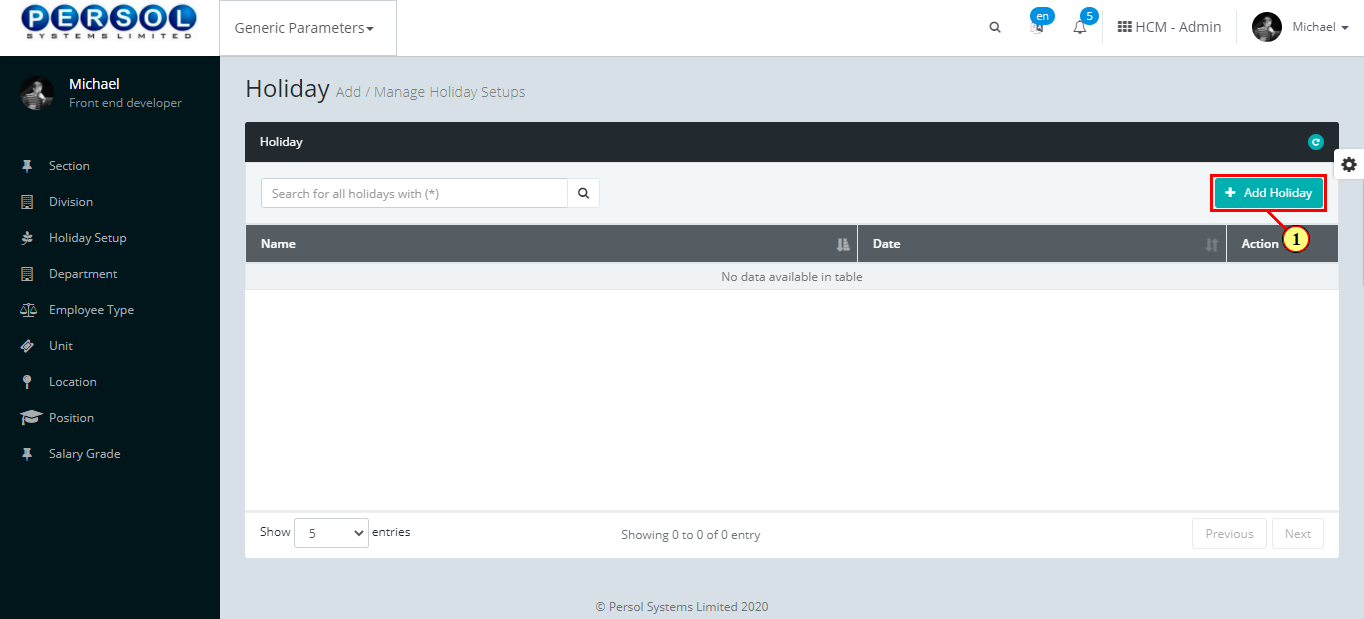
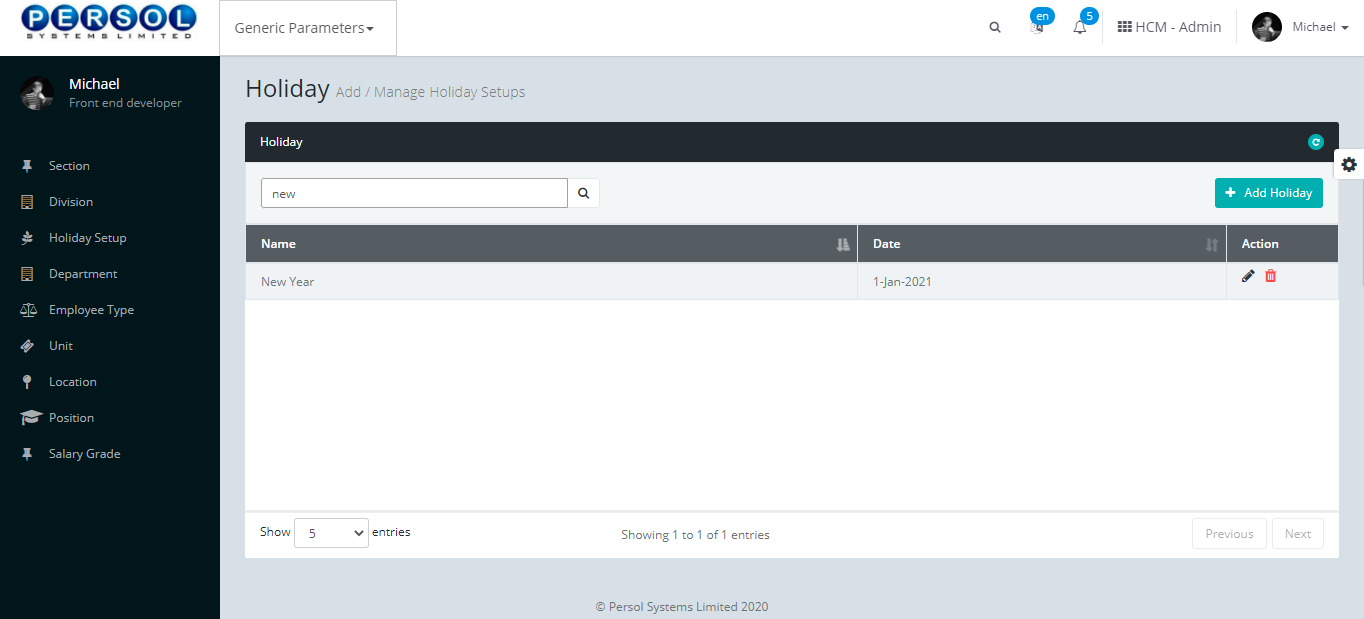
Holiday setup is created by the company admin into the system eg: New Year’s day, Christmas day, etc
| Step | Action |
|---|---|
| (1) | On the Personax Customer Admin homepage, select the ‘Generic Parameters’ tile |
| Step | Action |
|---|---|
| The ‘Generic Parameters’ submenus page opens | |
| (1) | Select the ‘Holiday’ tile |
| Step | Action |
|---|---|
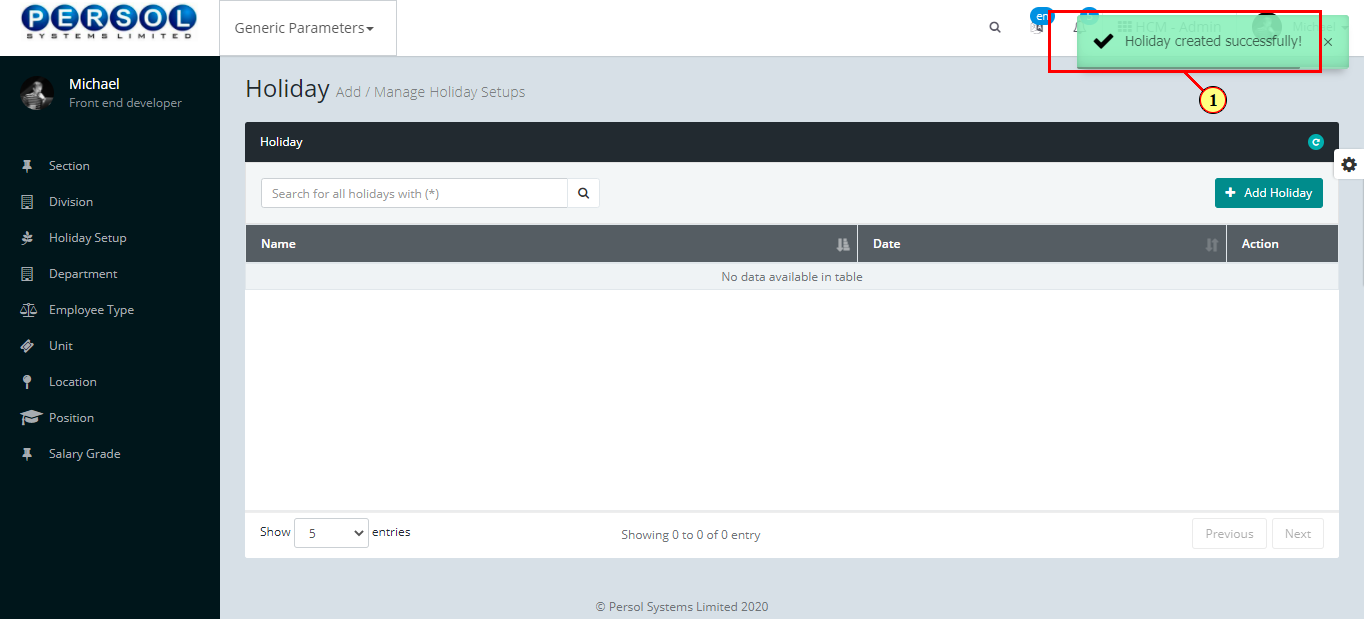
| The ‘Holiday’ page opens |
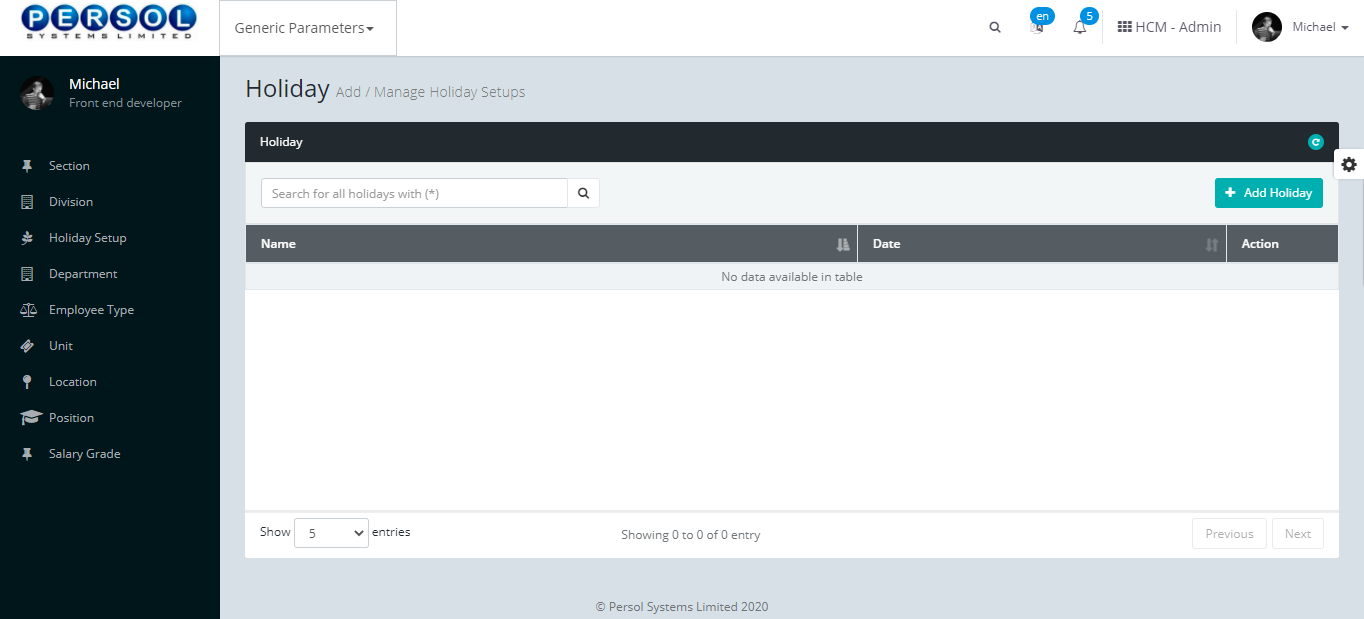
| Step | Action |
|---|---|
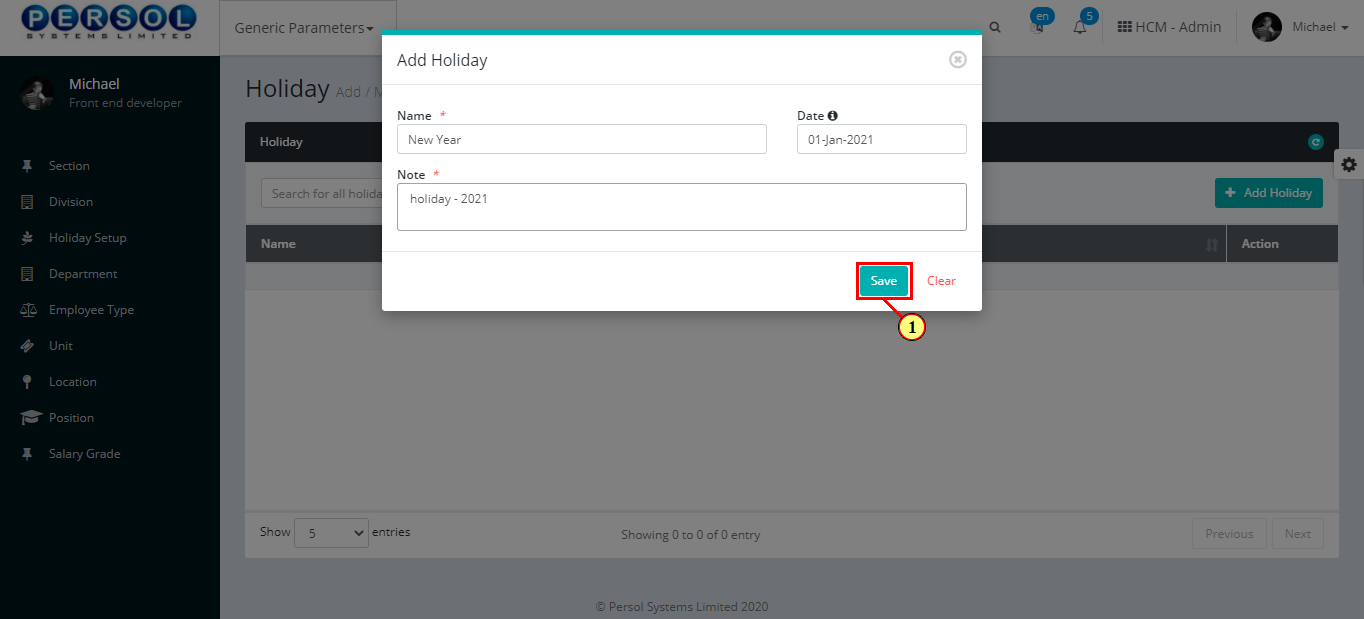
| (1) |
To setup a holiday, click on the  button button
|
| Step | Action |
|---|---|
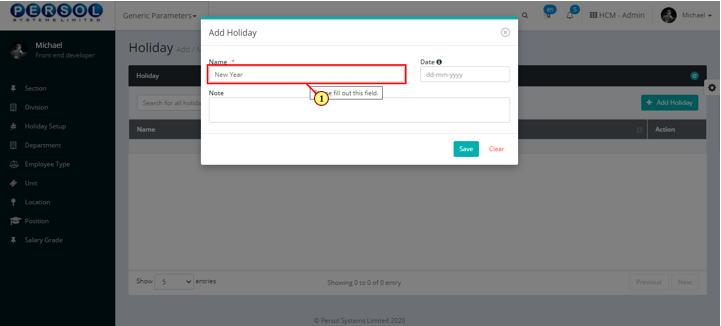
| The ‘Add Holiday’ modal opens | |
| (1) | Enter name of the holiday |
|
This field is required * |
| Step | Action |
|---|---|
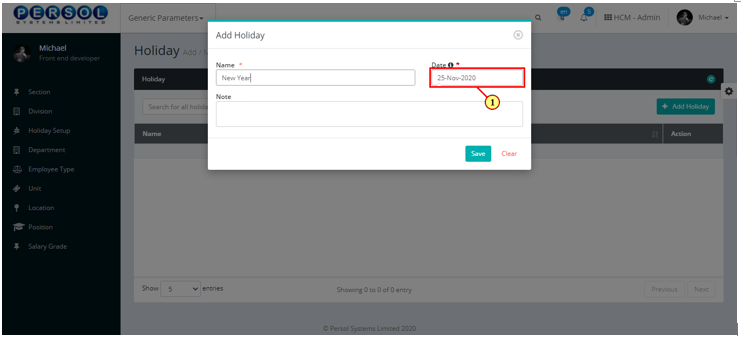
| (1) | Select the date of the holiday |
| Step | Action |
|---|---|
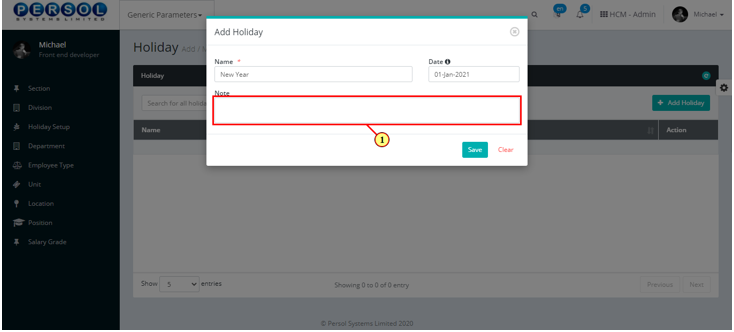
| (1) | Enter additional info on holiday in the notes section |
| Step | Action |
|---|---|
| (1) |
Click on the button to save details of the newly added Holiday
|
| Step | Action |
|---|---|
| (1) | A notification displays to indicate that the holiday setup has been saved successfully |
| Step | Action |
|---|---|
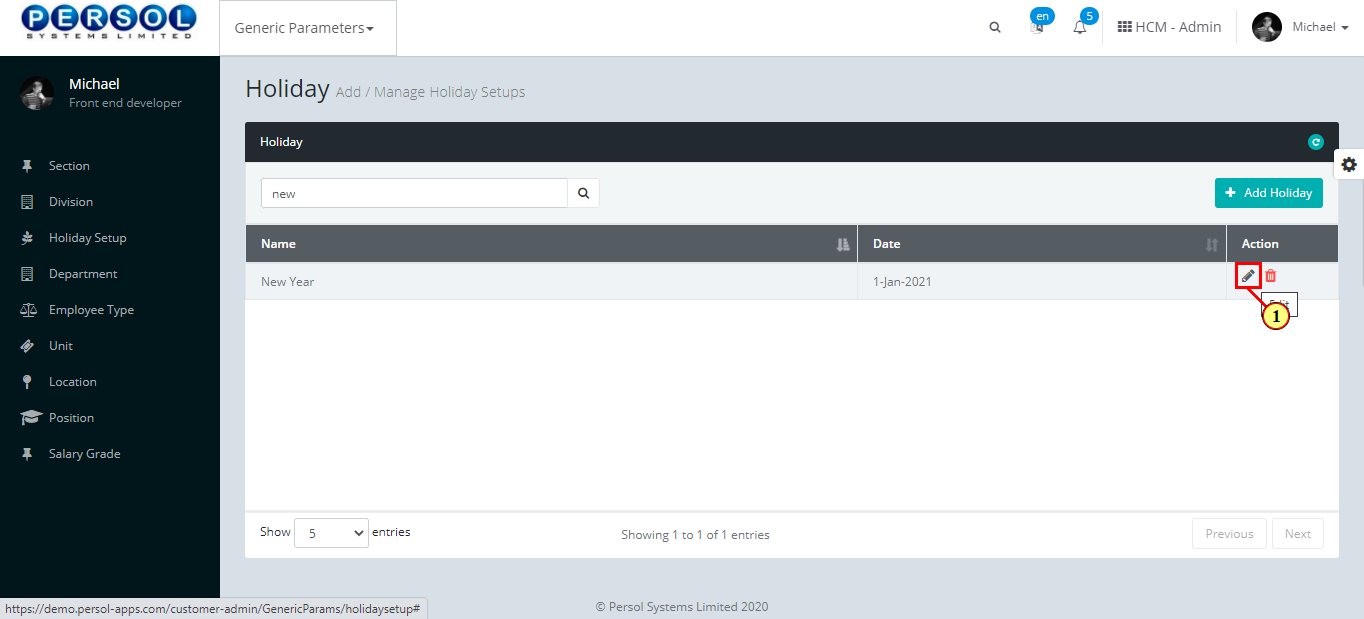
| (1) | To edit a holiday, enter the holiday name in the search box |
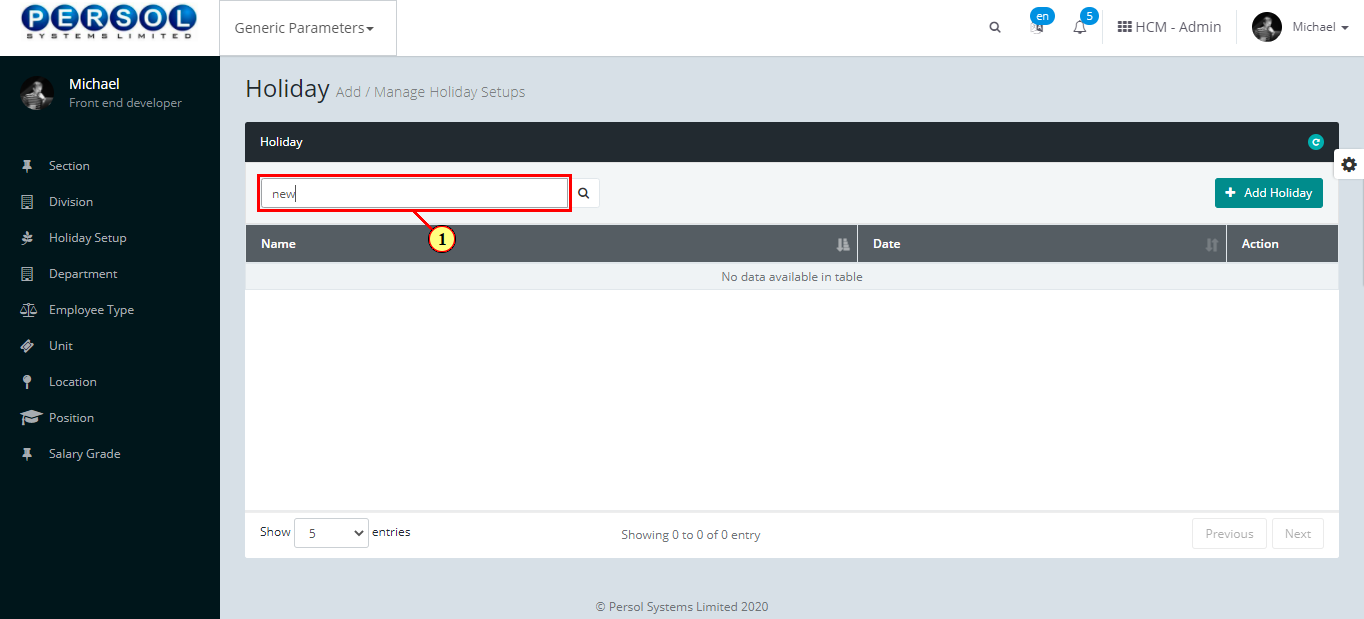
| Step | Action |
|---|---|
| (1) |
Click on the icon to search for holiday
|
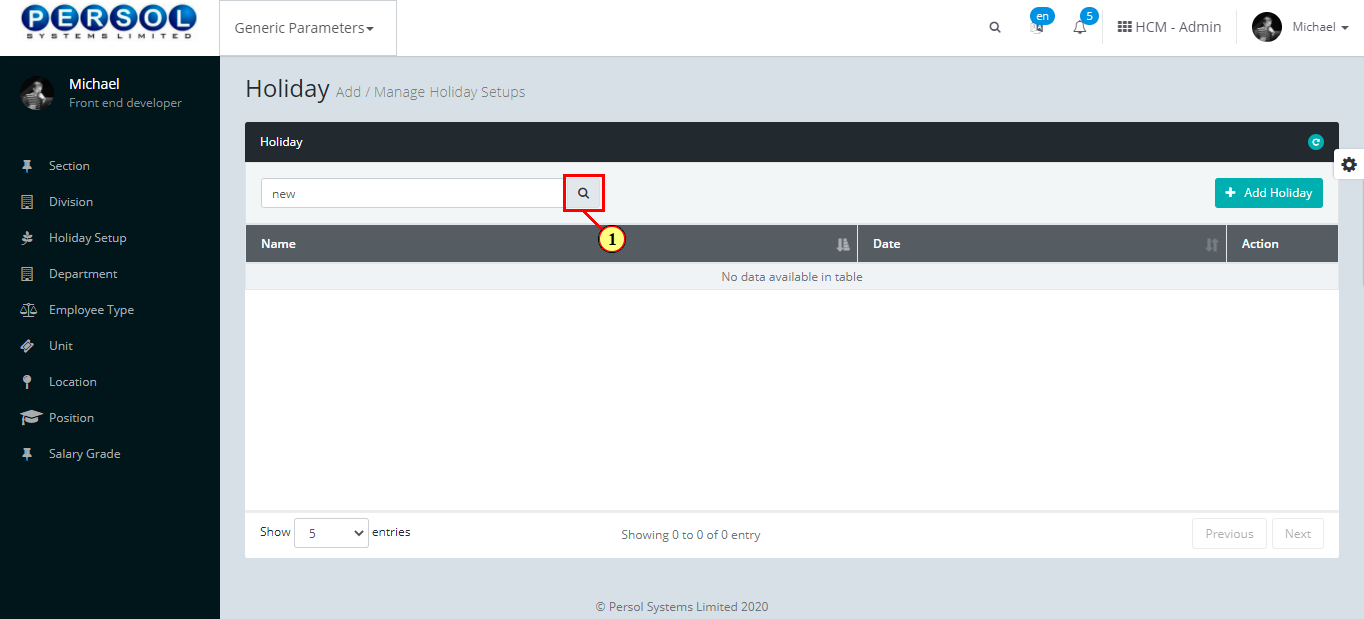
| Step | Action |
|---|---|
| (1) | The search result display in the grid |
|
The Action column consists of the Edit and Delete action icons
|
| Step | Action |
|---|---|
| (1) |
Click on the edit icon to edit the holiday
|
|
You may click on the delete icon to delete the holiday
|
| Step | Action |
|---|---|
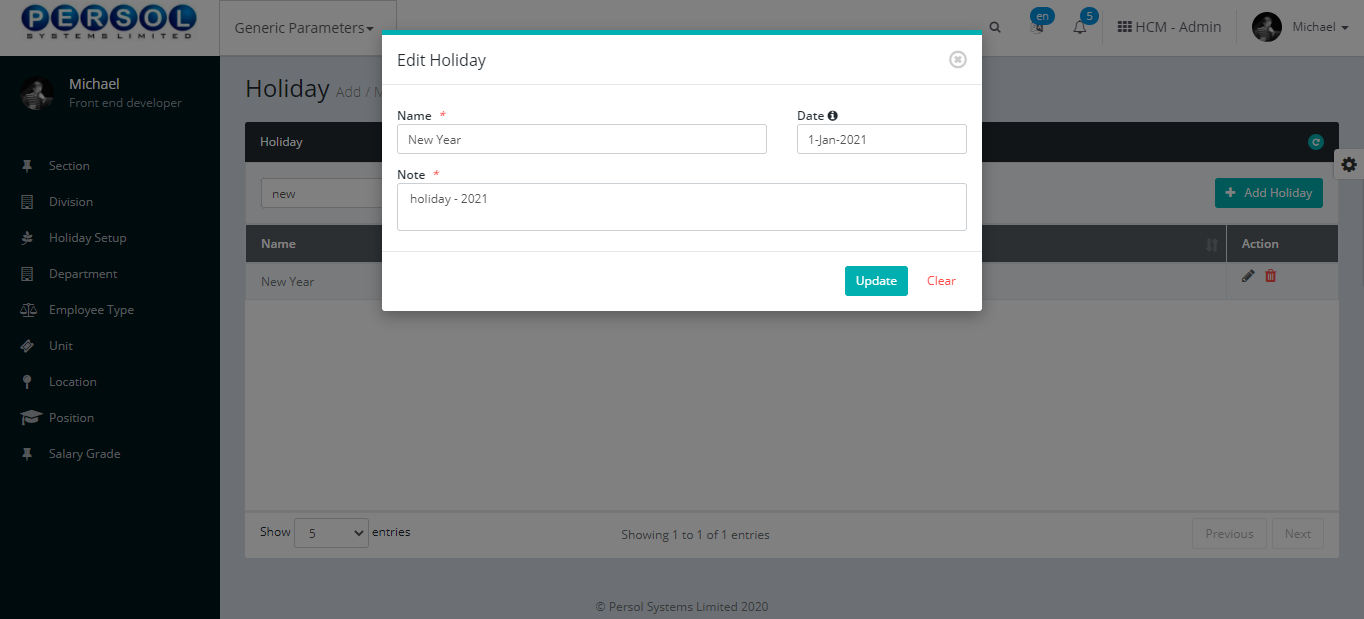
| The ‘Edit Holiday’ modal opens | |
| Edit the details of the holiday setup |
| Step | Action |
|---|---|
|
You may click on the button to revert changes made
|
| (1) |
Click on the button to save the changes made
|

| Step | Action |
|---|---|
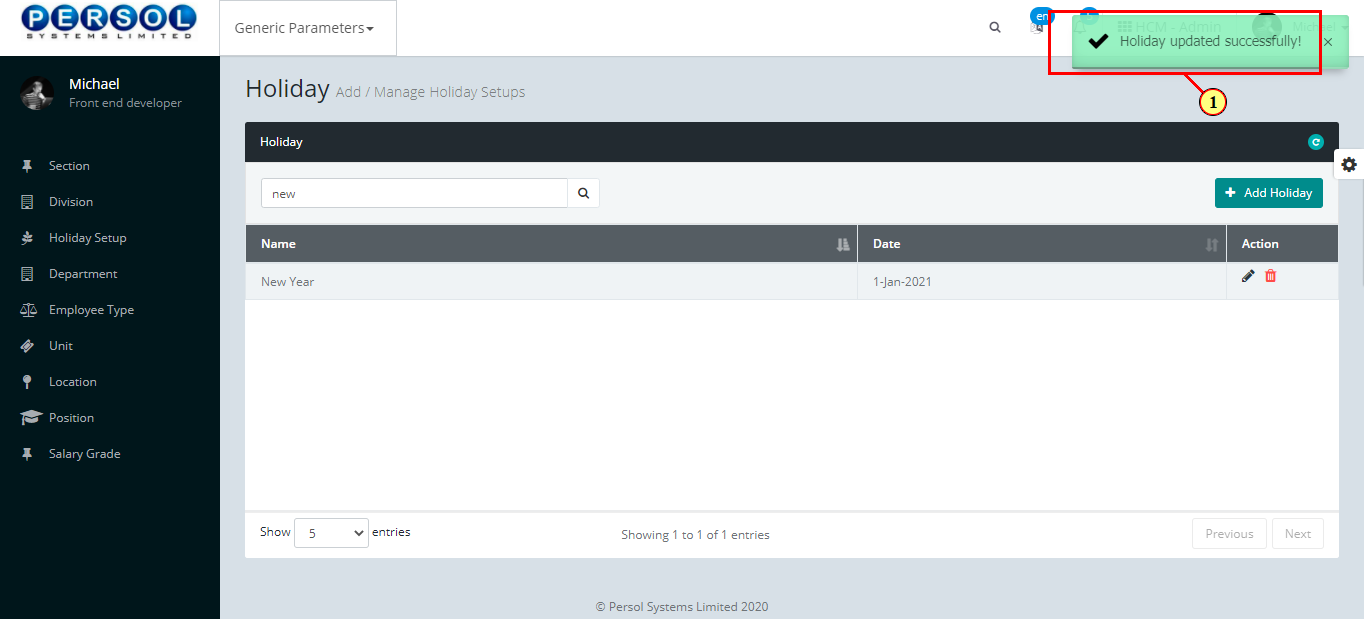
| (1) | A notification displays to indicate the update has been saved successfully |
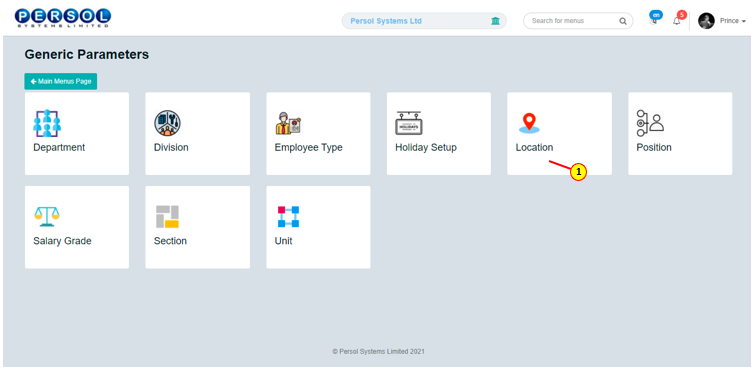
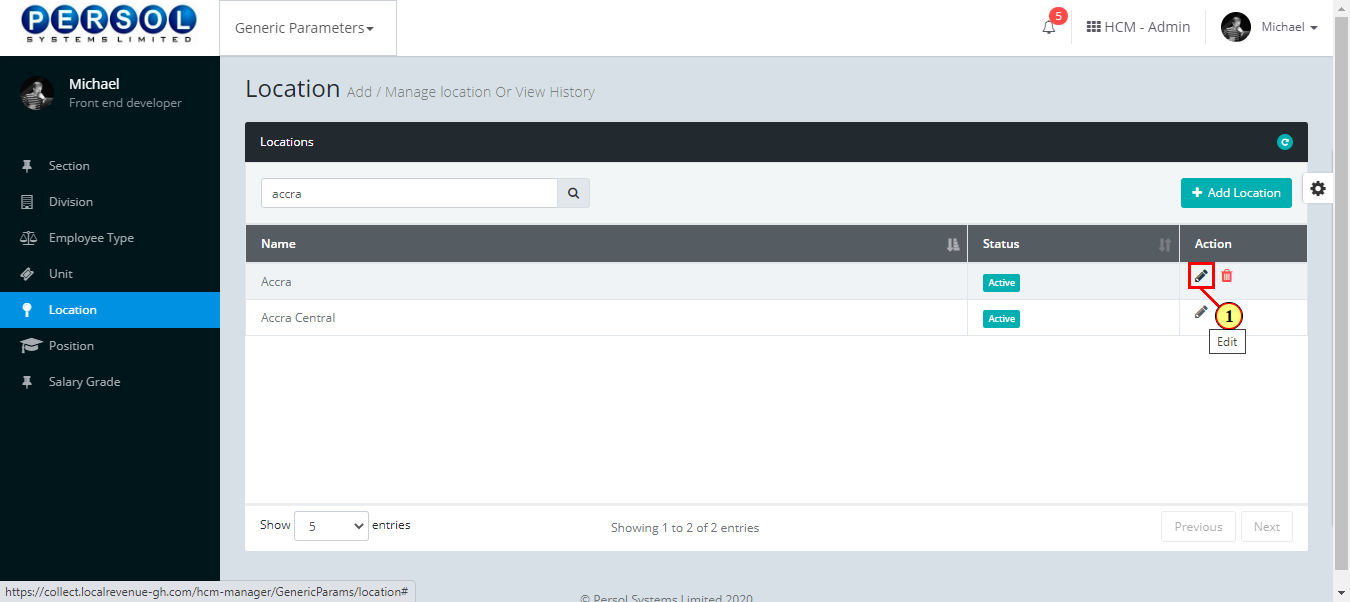
Location is a defined area provided by the company admin into the system. eg: Accra, Los Angeles, Lagos etc.
| Step | Action |
|---|---|
| (1) | On the Personax Customer Admin homepage, select the ‘Generic Parameters’ tile |
| Step | Action |
|---|---|
| The ‘Generic Parameters’ submenus page opens | |
| (1) | Select the ‘Location’ tile |
| Step | Action |
|---|---|
| The ‘Location’ page opens |

| Step | Action |
|---|---|
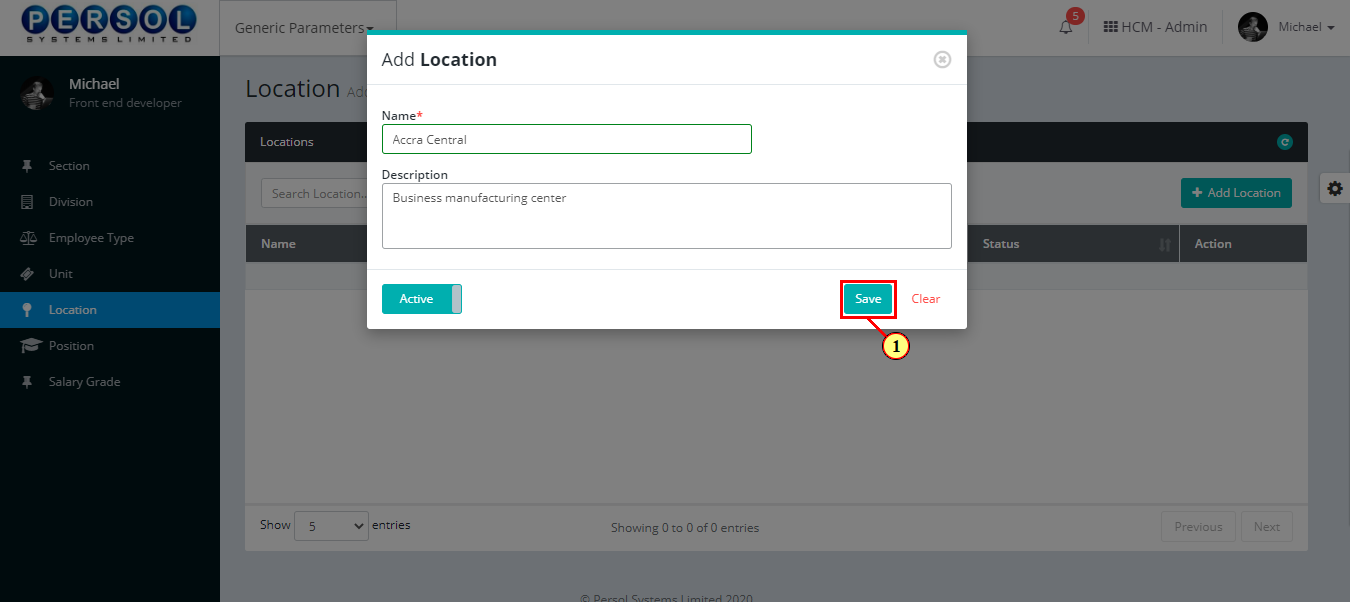
| (1) |
To setup a new location, click on the 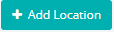 button button
|

| Step | Action |
|---|---|
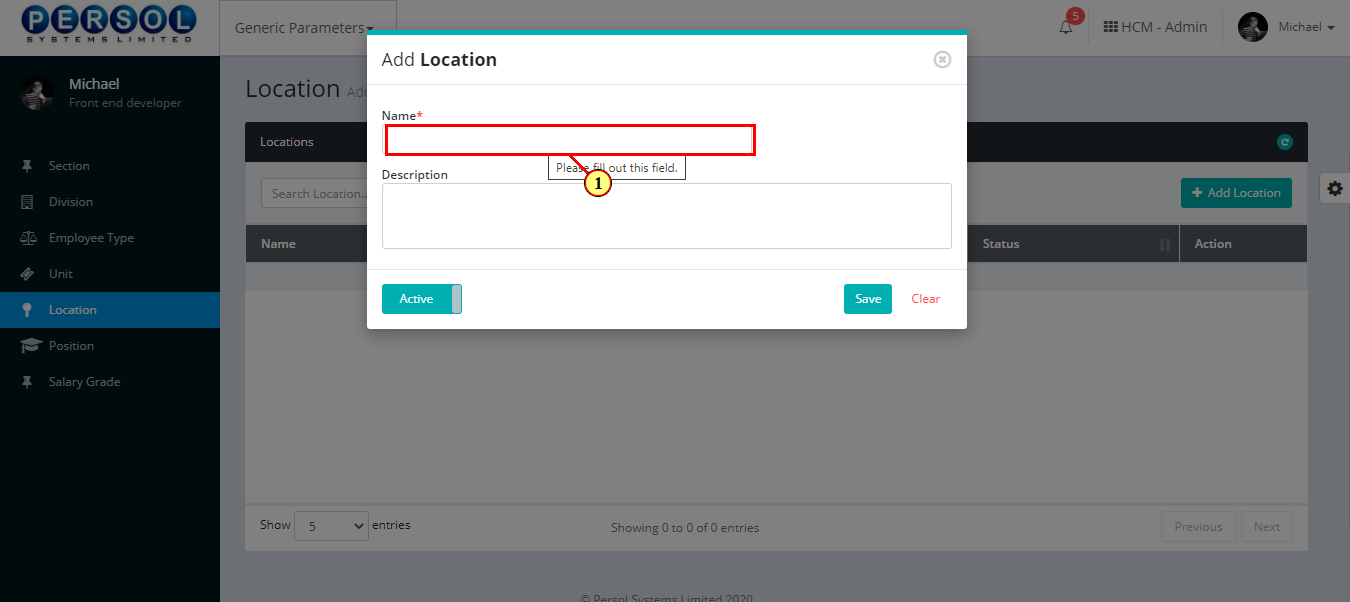
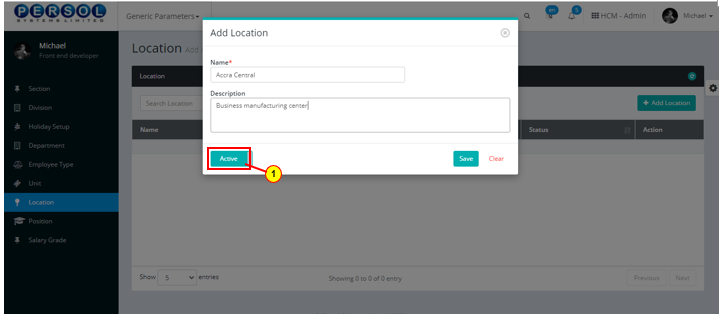
| The ‘Add Location’ modal opens | |
| (1) | Enter name of the location |
|
This field is required * |
| Step | Action |
|---|---|
| (1) | Add a description to provide more details on the location |

| Step | Action |
|---|---|
| (1) |
You may click on the button to change status of the location to inactive
|
|
- An active status means the location can be used in transactions on other pages - An inactive status means the location cannot be used in transactions on other pages |
| Step | Action |
|---|---|
|
You may click on the button to clear all details entered
|
| (1) |
Click on the button to save details of the newly added Location
|
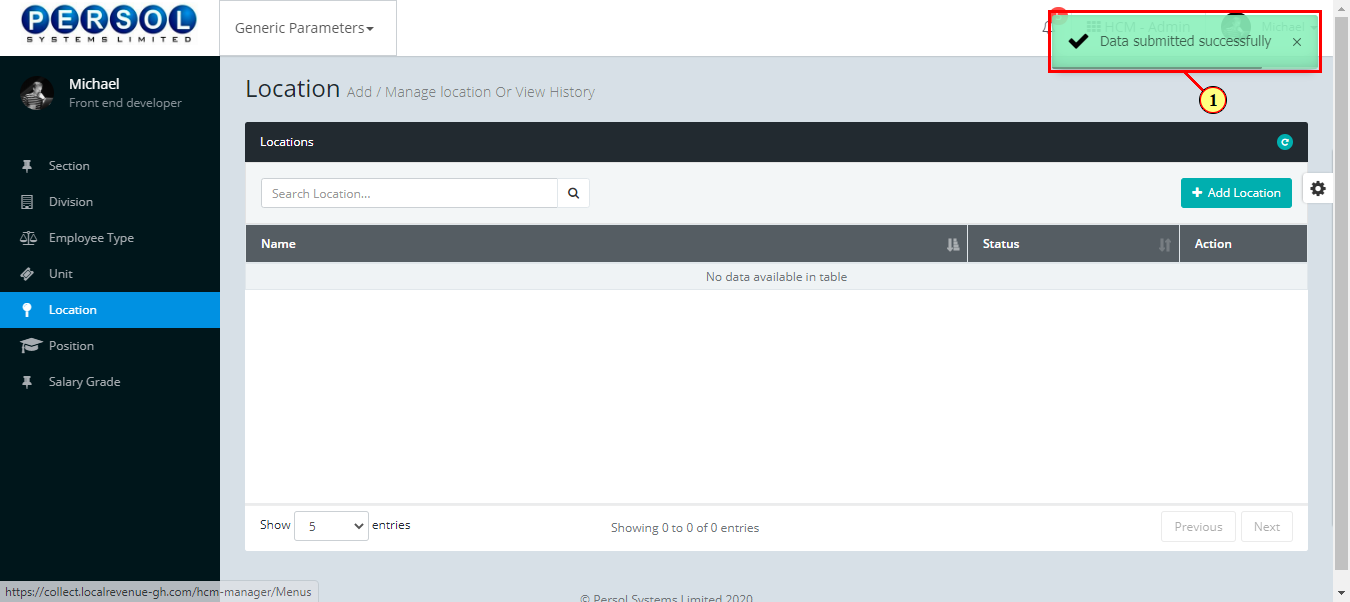
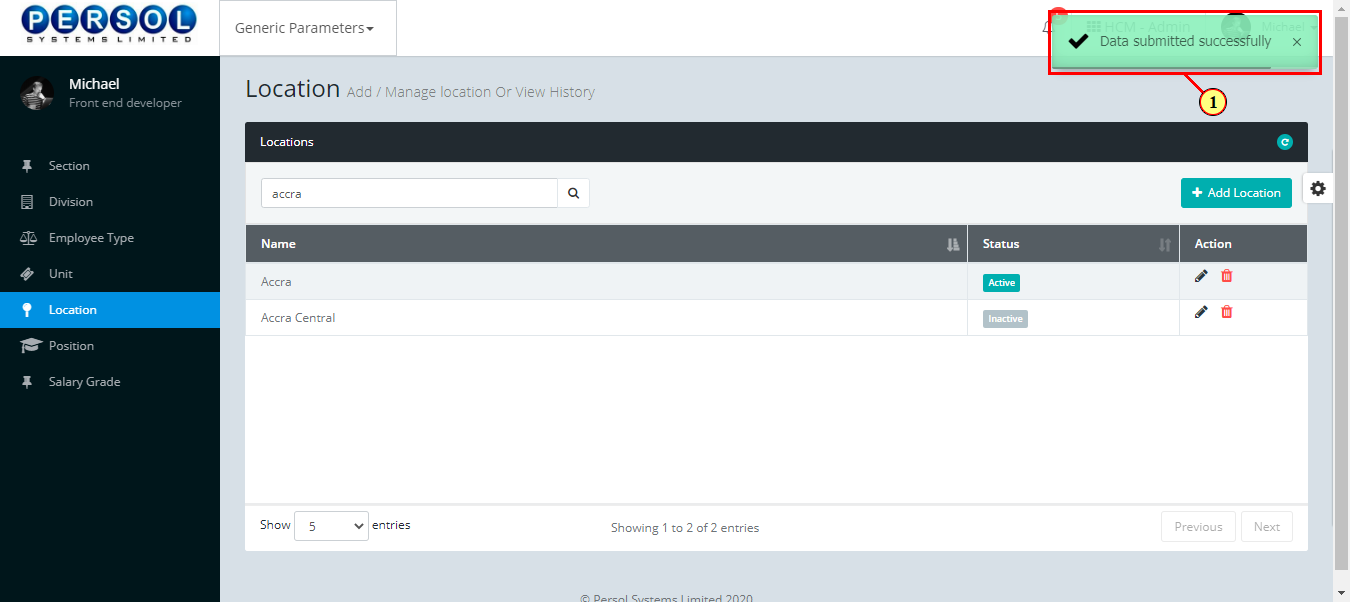
| Step | Action |
|---|---|
| (1) | A notification displays to indicate that the location setup has been saved successfully |
| Step | Action |
|---|---|
| (1) | To edit a location, enter the location name in the search box |
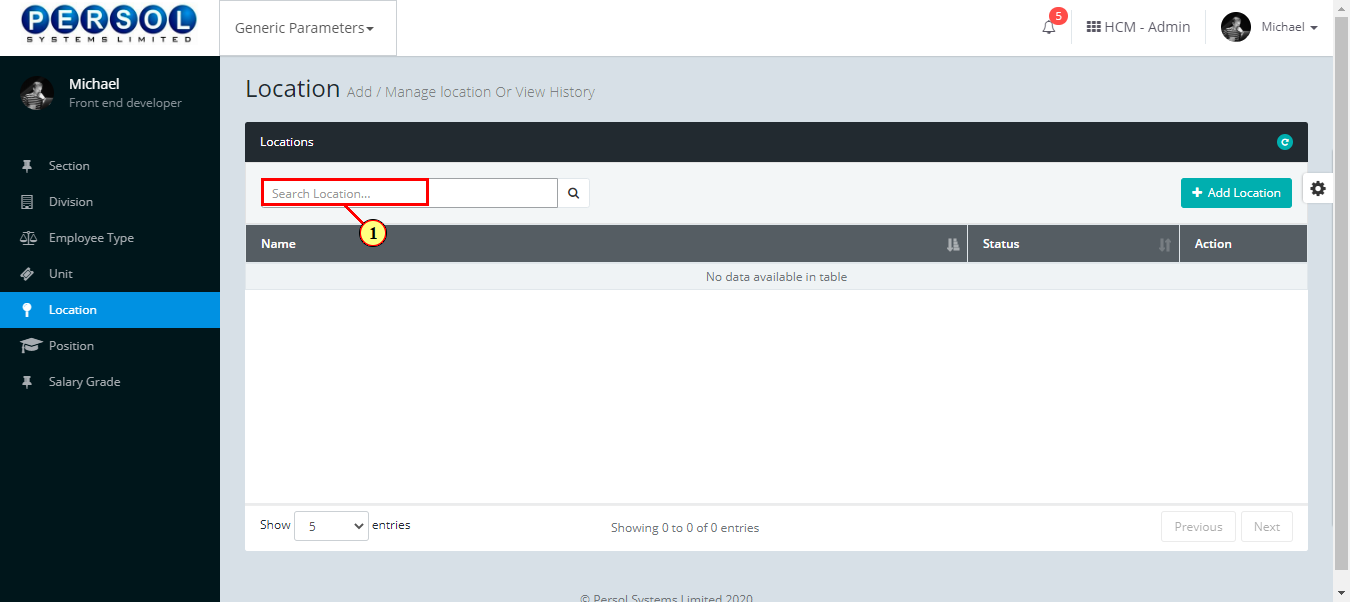
| Step | Action |
|---|---|
| (1) |
Click on the icon to search for location
|

| Step | Action |
|---|---|
| (1) | The search result details display in the grid |
|
The Action column consists of the Edit and Delete action icons
|
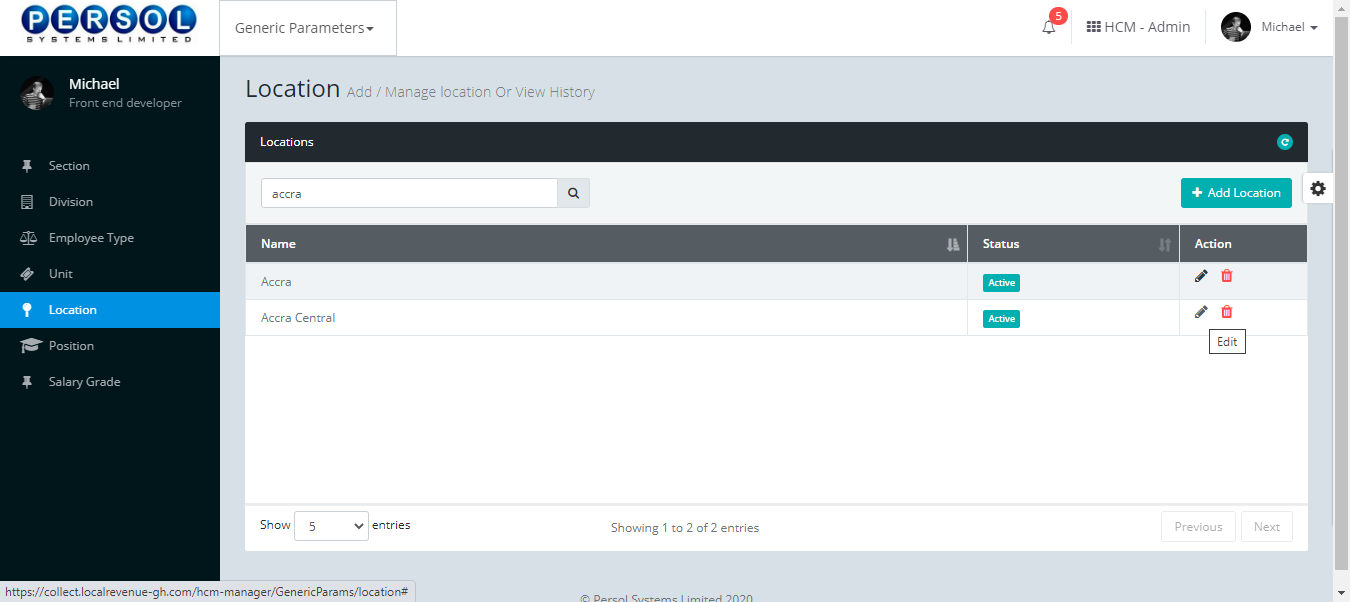
| Step | Action |
|---|---|
| (1) |
Click on the edit icon to edit the location
|
|
You may click on the delete icon to delete location
|
| Step | Action |
|---|---|
| The ‘Edit Location’ modal opens | |
| Edit the name, description or status of the location |
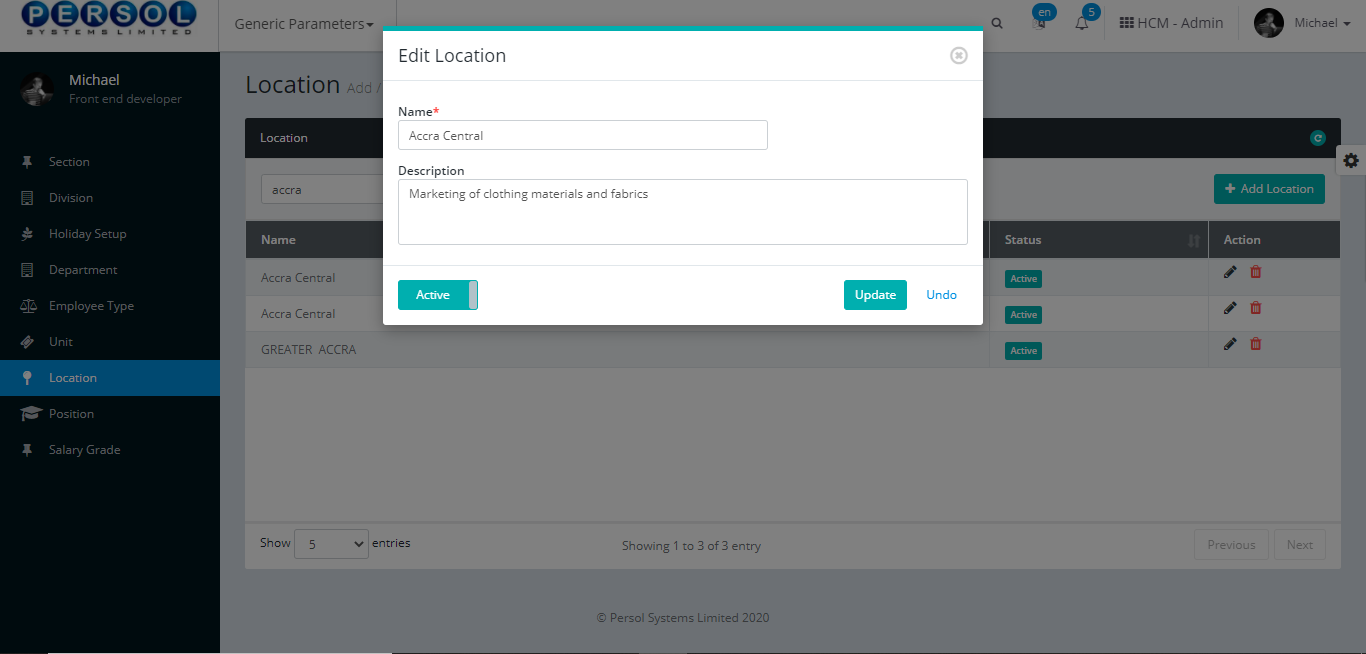
| Step | Action |
|---|---|
|
You may click on the button to revert changes made
|
| (1) |
Click on the button to save the changes made
|
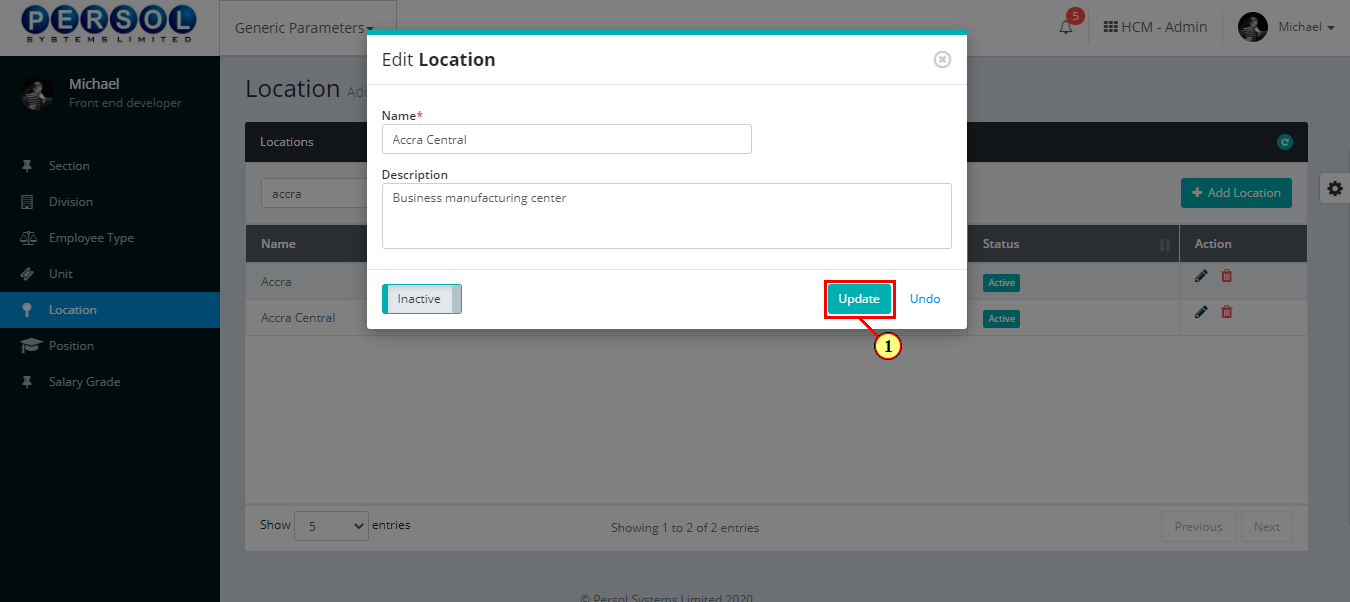
| Step | Action |
|---|---|
| (1) | A notification displays to indicate the update has been saved successfully |
Position is a defined job title provided by the company admin into the system. eg: HR Manager, Sales Officer, Systems Engineer etc.
| Step | Action |
|---|---|
| (1) | On the Personax Customer Admin homepage, select the ‘Generic Parameters’ tile |
| Step | Action |
|---|---|
| The ‘Generic Parameters’ submenus page opens | |
| (1) | Select the ‘Position’ tile |
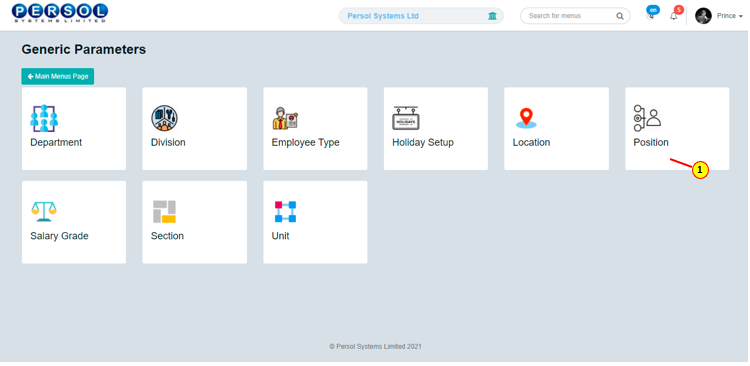
| Step | Action |
|---|---|
| The ‘Position’ page opens |

| Step | Action |
|---|---|
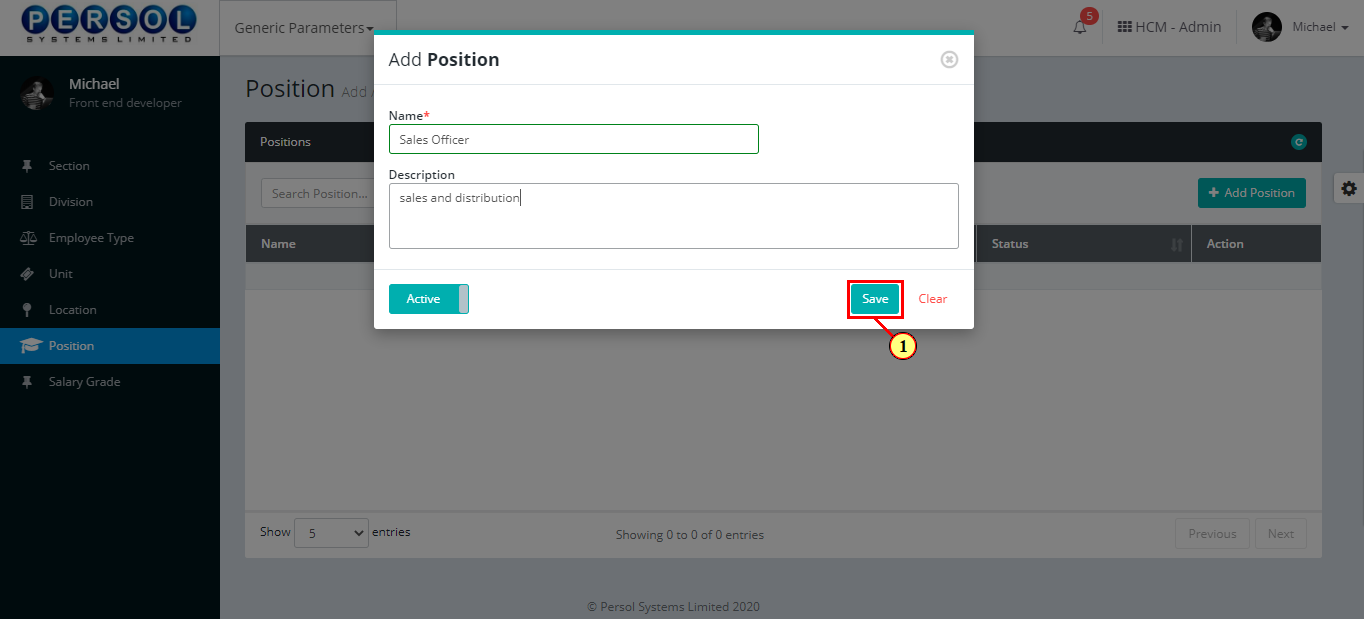
| (1) |
To setup a new position, click on the  button button
|

| Step | Action |
|---|---|
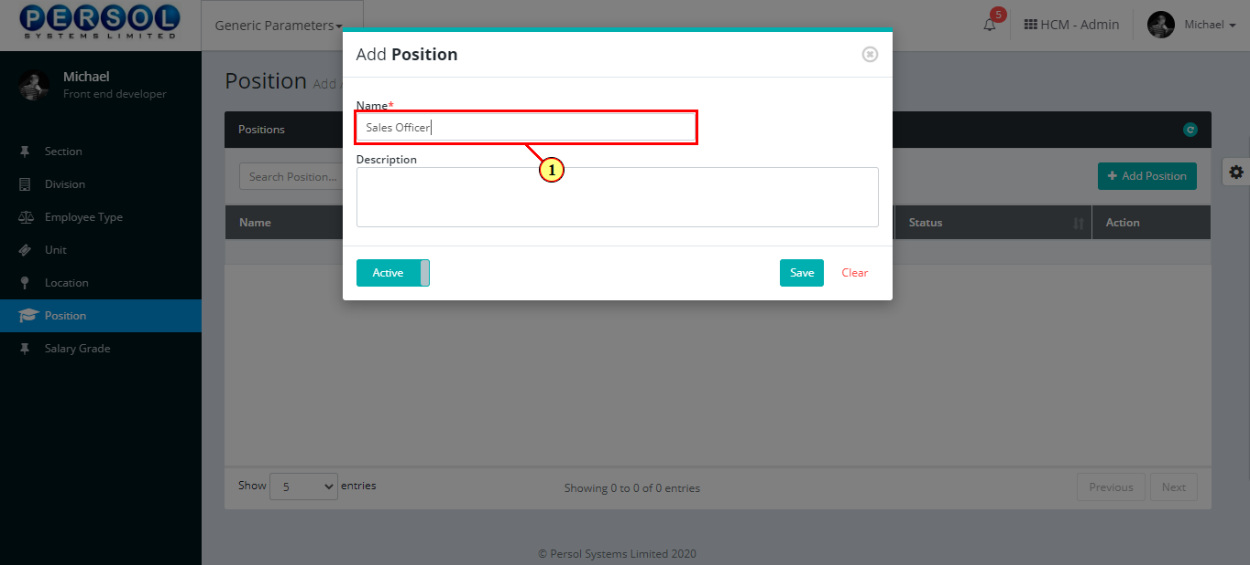
| The ‘Add Position’ modal opens | |
| (1) | Enter name of the new Position |
|
This field is required * |
| Step | Action |
|---|---|
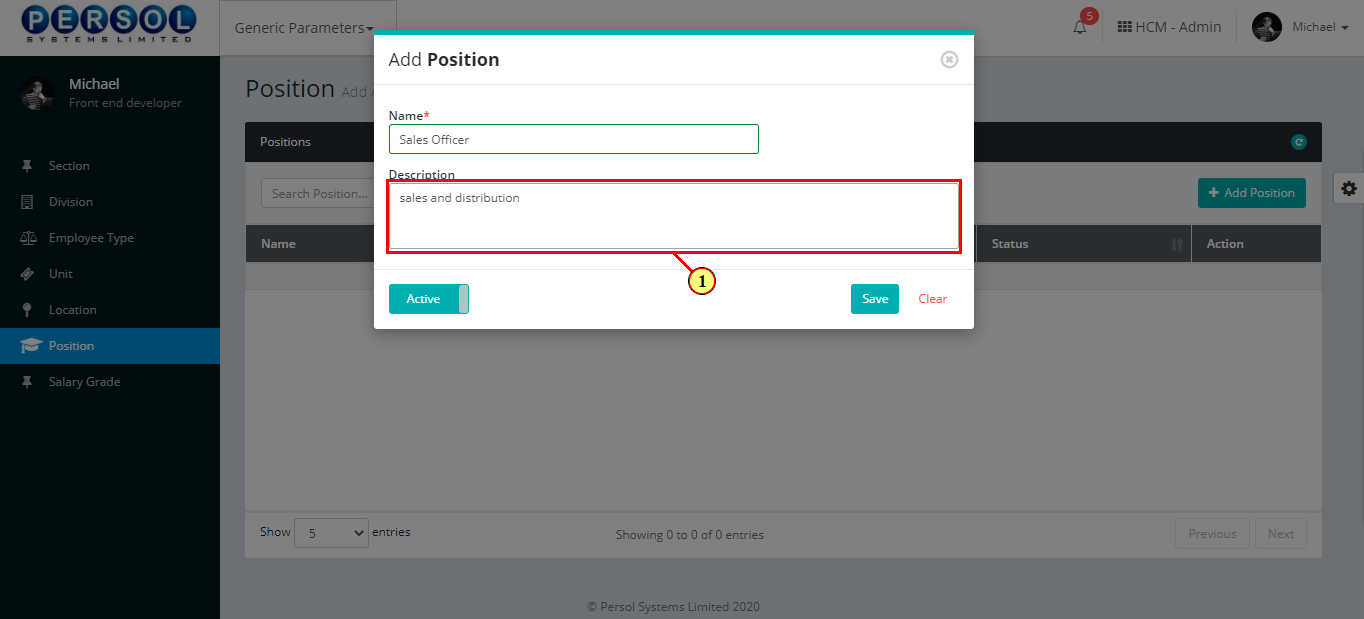
| (1) | Add a description to provide more details on the position |
| Step | Action |
|---|---|
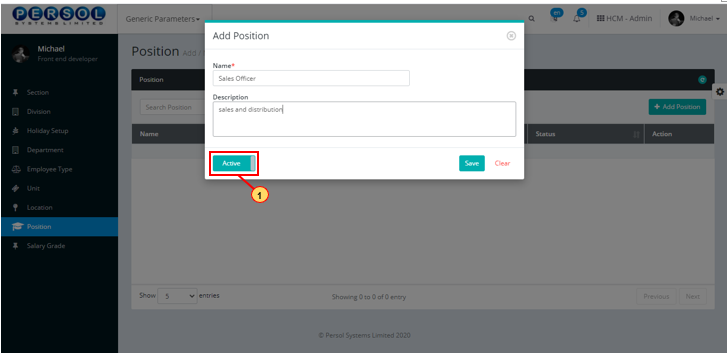
| (1) |
You may click on the button to change status of the position to inactive
|
|
- An active status means the position can be used in transactions on other pages - An inactive status means the position cannot be used in transactions on other pages |
| Step | Action |
|---|---|
|
You may click on the button to clear all details entered
|
| (1) |
Click on the button to save details of the newly added Position
|
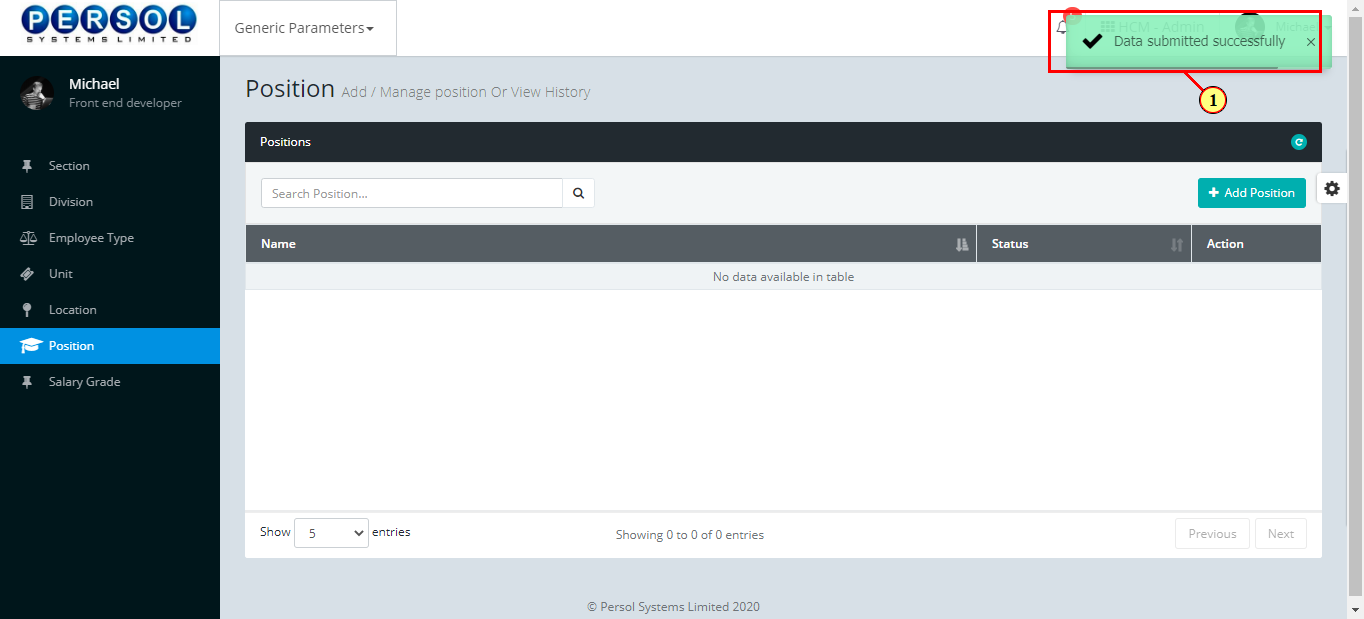
| Step | Action |
|---|---|
| (1) | A notification displays to indicate that the position setup has been saved successfully |
| Step | Action |
|---|---|
| (1) | To edit a position, enter the position name in the search box |

| Step | Action |
|---|---|
| (1) |
Click on the icon to search for position
|

| Step | Action |
|---|---|
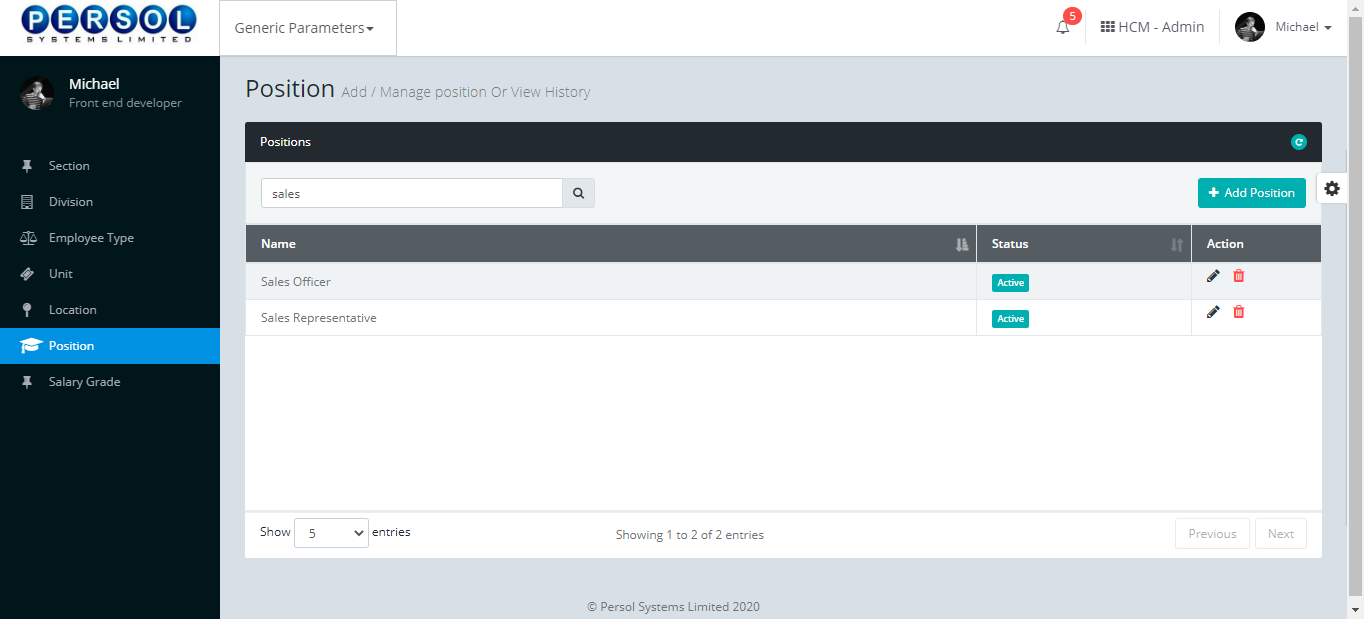
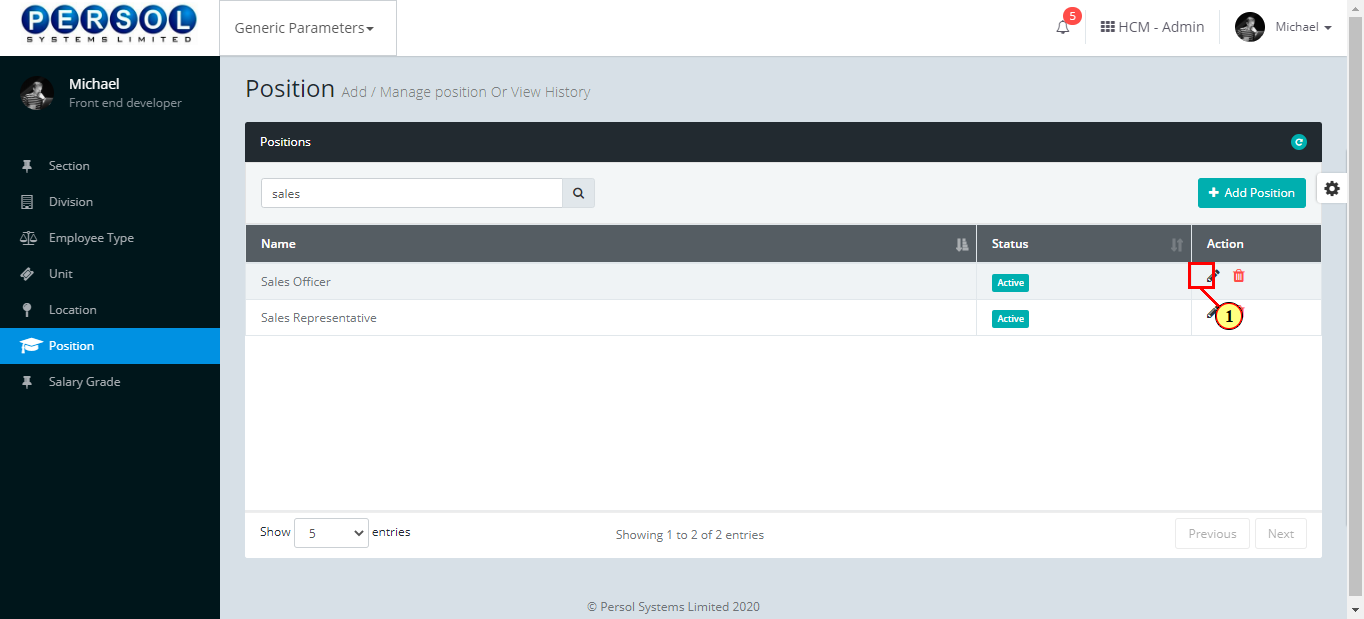
| (1) | The search result details display in the grid |
|
The Action column consists of the Edit and Delete action icons
|
| Step | Action |
|---|---|
| (1) |
Click on the edit icon to edit the position
|
|
You may click on the delete icon to delete position
|
| Step | Action |
|---|---|
| The ‘Edit position’ modal opens | |
| Edit the name, description or status of the position |
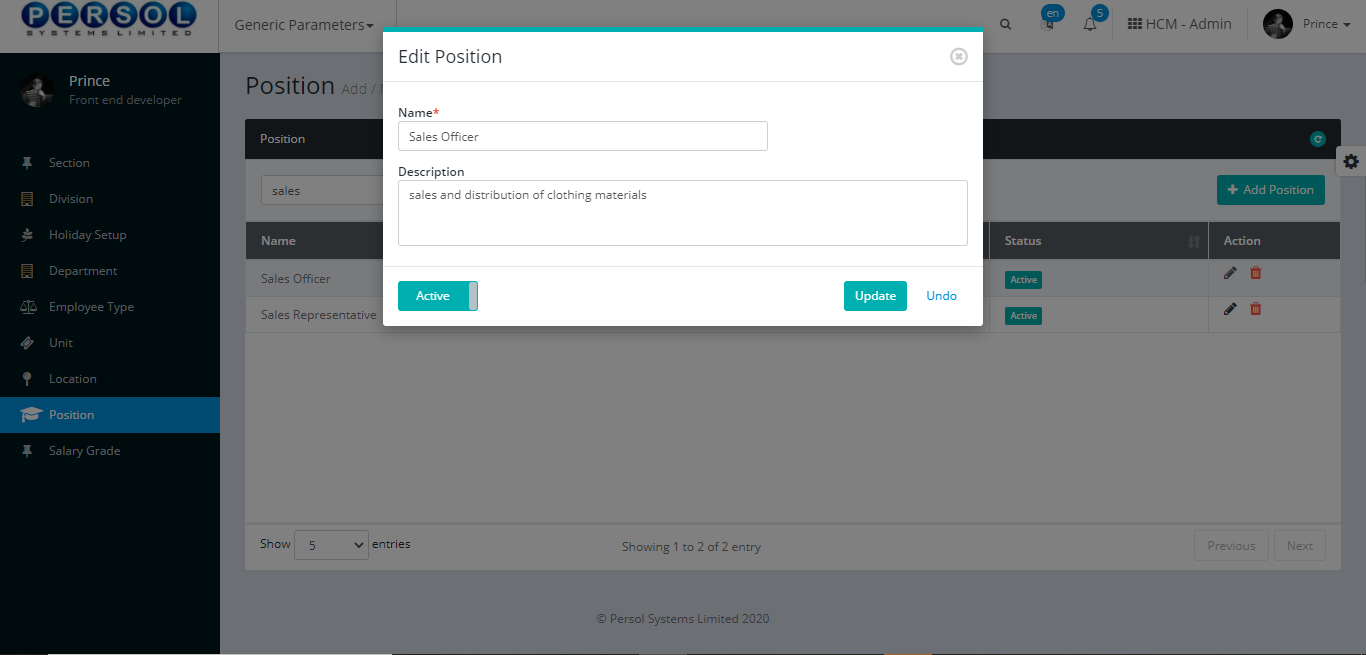
| Step | Action |
|---|---|
|
You may click on the button to revert changes made
|
| (1) |
Click on the button to save the changes made
|
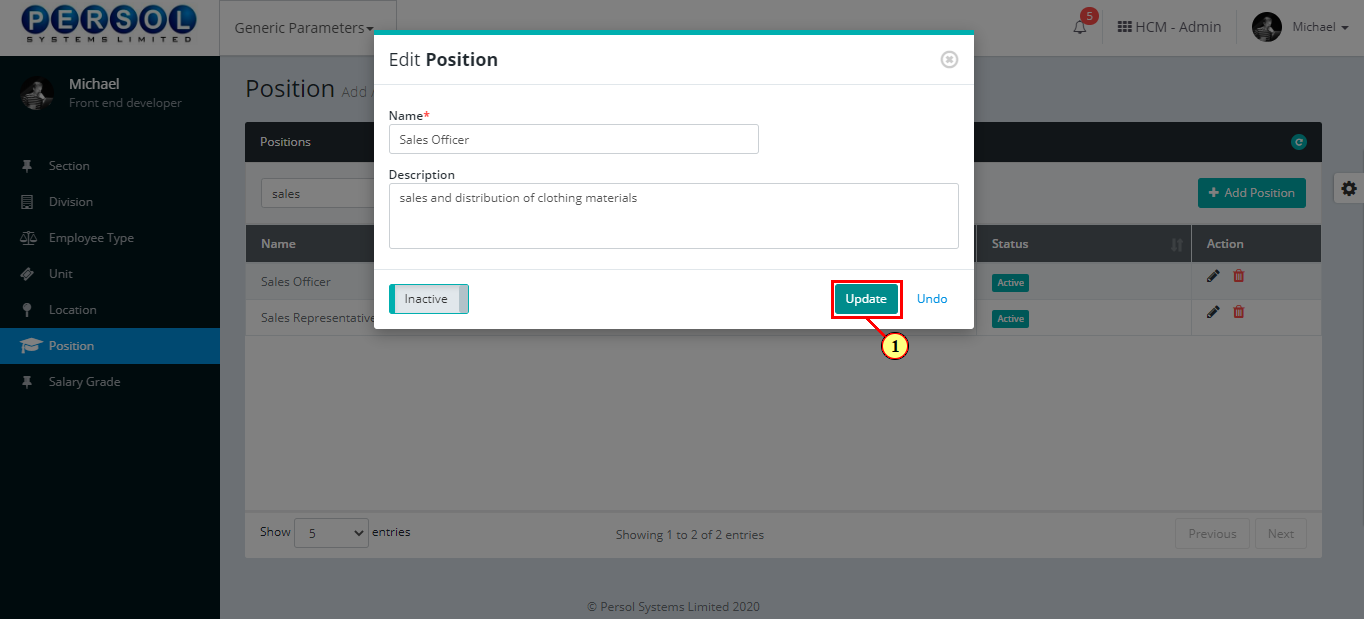
| Step | Action |
|---|---|
| (1) | A notification displays to indicate the update has been saved successfully |

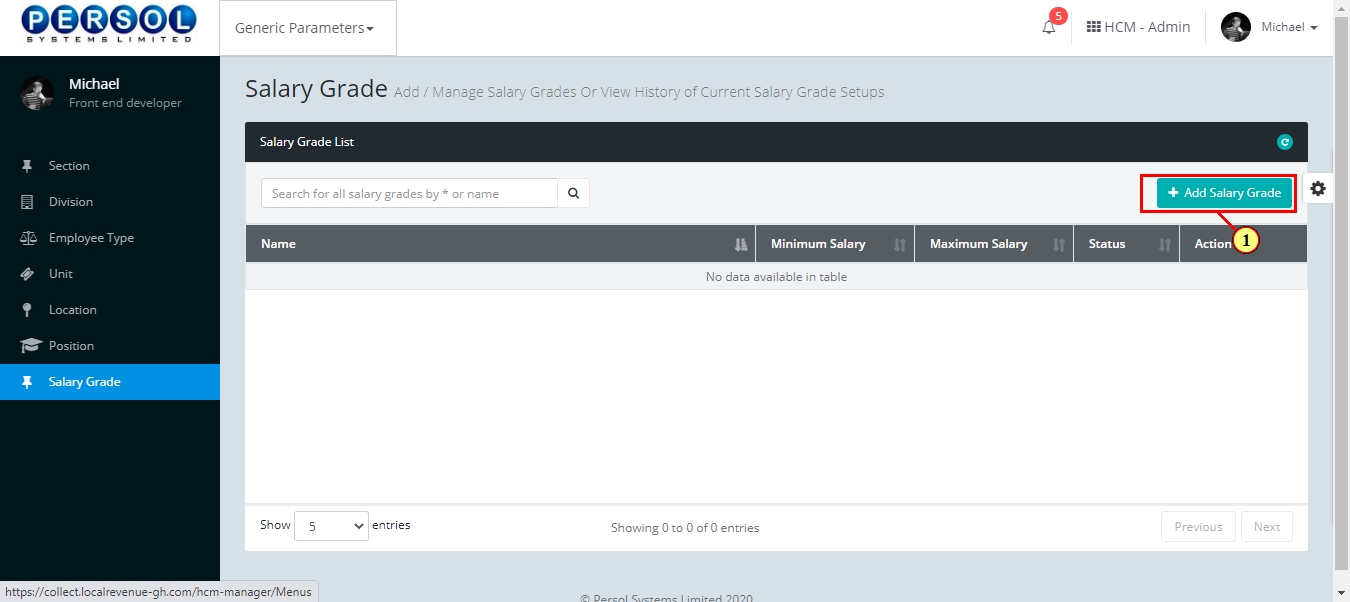
Salary Grade is a defined pay level or salary range provided by the company admin into the system
| Step | Action |
|---|---|
| (1) | On the Personax Customer Admin homepage, select the ‘Generic Parameters’ tile |
| Step | Action |
|---|---|
| The ‘Generic Parameters’ submenus page opens | |
| (1) | Select the ‘Salary Grade’ tile |
| Step | Action |
|---|---|
| The ‘Salary Grade’ page opens |

| Step | Action |
|---|---|
| (1) |
To setup a new salary grade, click on the 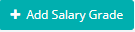 button button
|
| Step | Action |
|---|---|
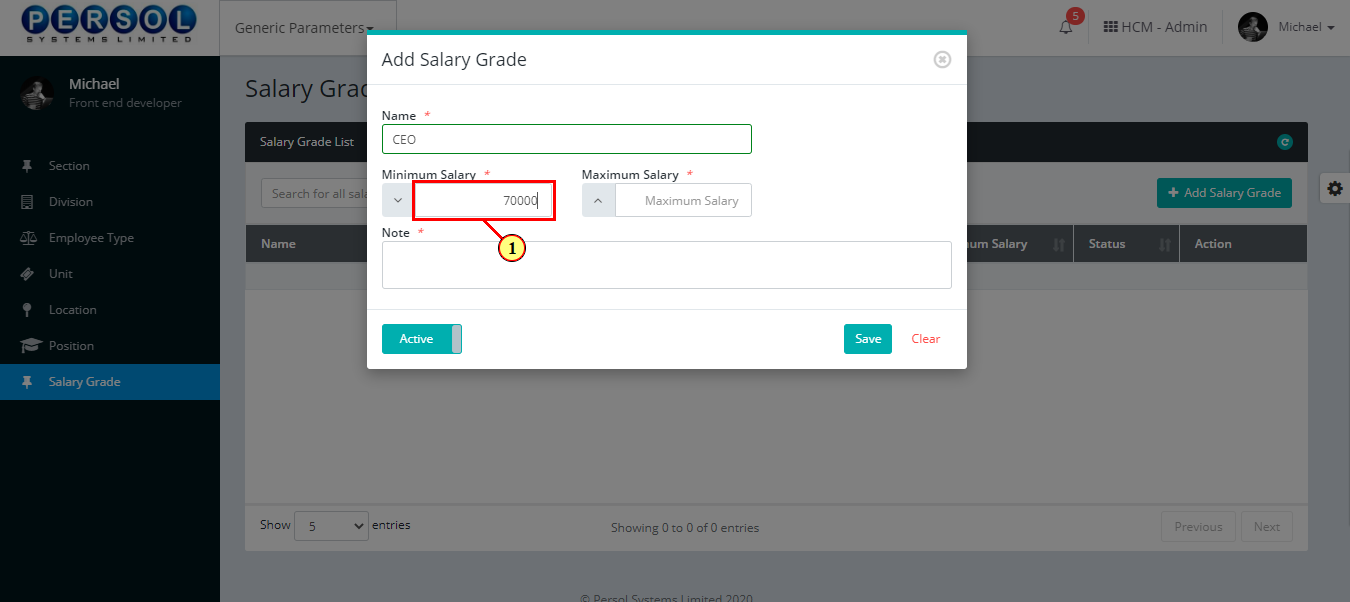
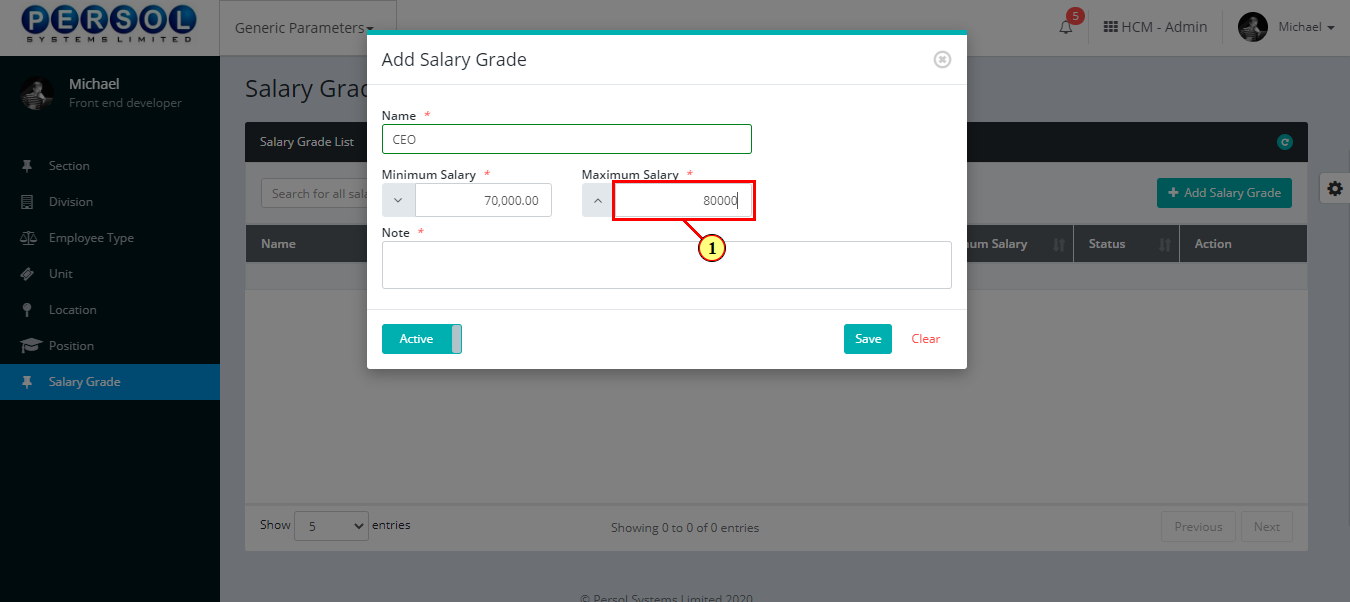
| The ‘Add Salary Grade’ modal opens | |
| (1) | Enter name of the new salary grade |
|
This field is required * |
| Step | Action |
|---|---|
| (1) | Enter the Minimum Salary amount for this grade |
|
The minimum salary amount cannot be greater than the maximum salary amount |
|
This field is required * |
| Step | Action |
|---|---|
| (1) | Enter the Maximum Salary amount for this grade |
|
The maximum salary amount must be greater than the minimum salary amount |
|
This field is required * |
| Step | Action |
|---|---|
| (1) | Provide more details on the salary grade in the Notes section |
|
This field is required * |
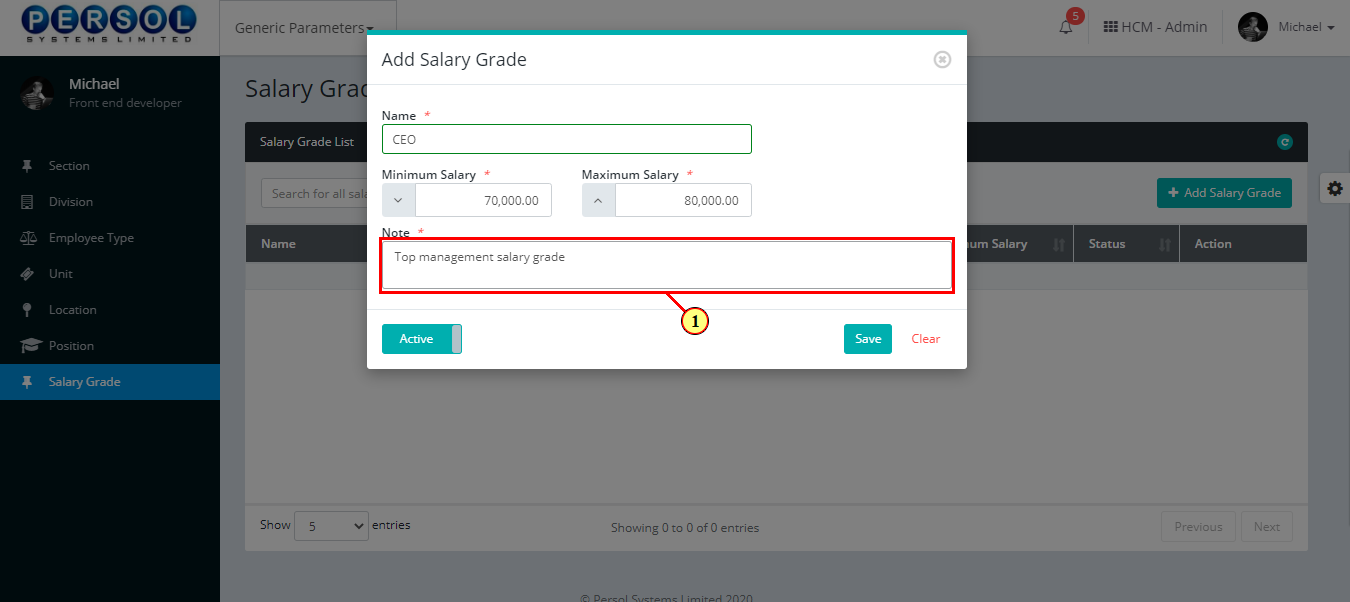
| Step | Action |
|---|---|
| (1) |
You may click on the button to change status of the salary grade to inactive
|
|
- An active status means the salary grade can be used in transactions on other pages - An inactive status means the salary grade cannot be used in transactions on other pages |

| Step | Action |
|---|---|
|
You may click on the button to clear all details entered
|
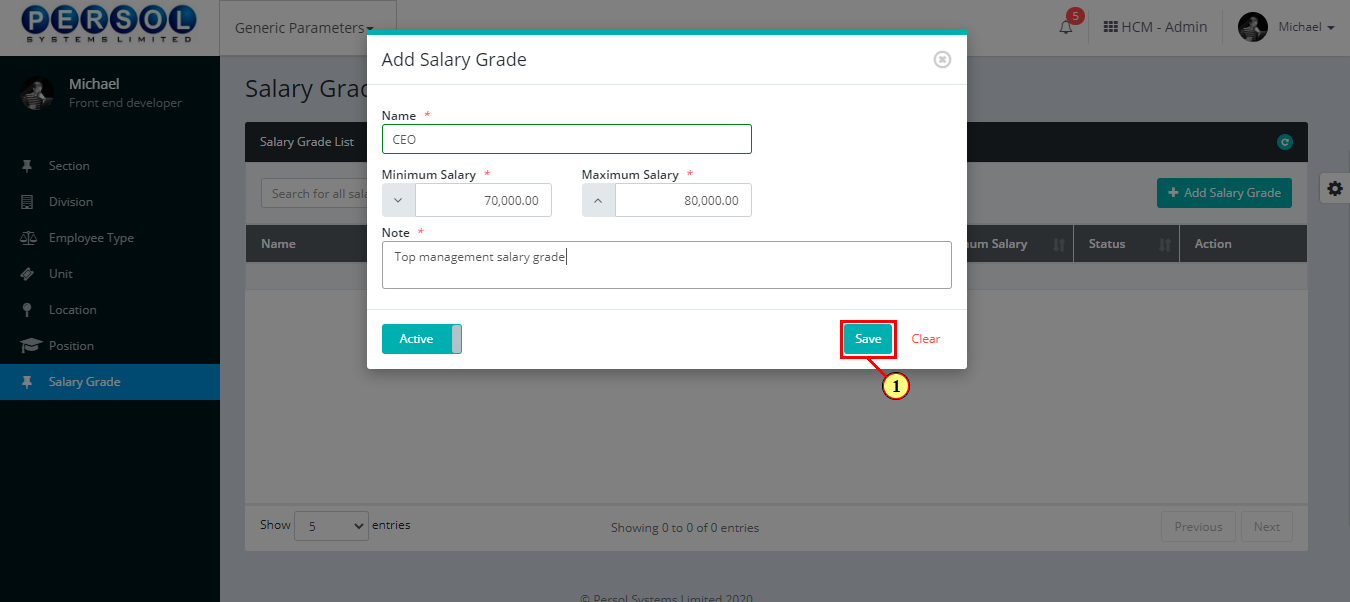
| (1) |
Click on the button to save details of the newly added salary grade
|
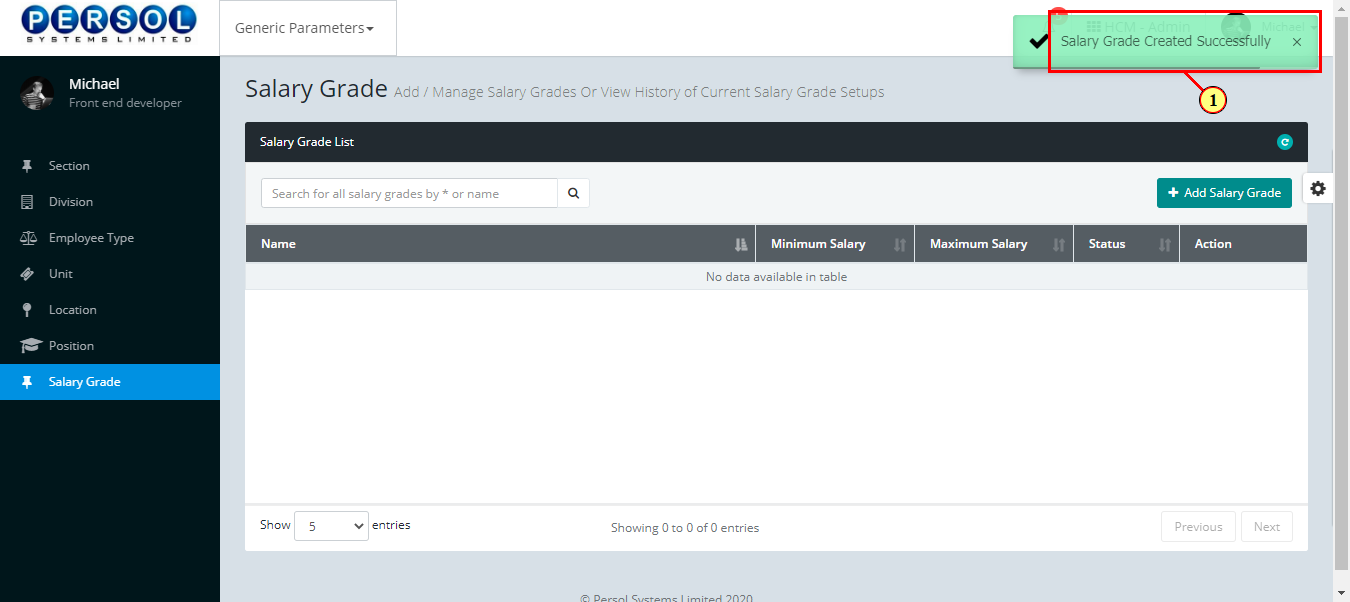
| Step | Action |
|---|---|
| (1) | A notification displays to indicate that the salary grade setup has been saved successfully |
| Step | Action |
|---|---|
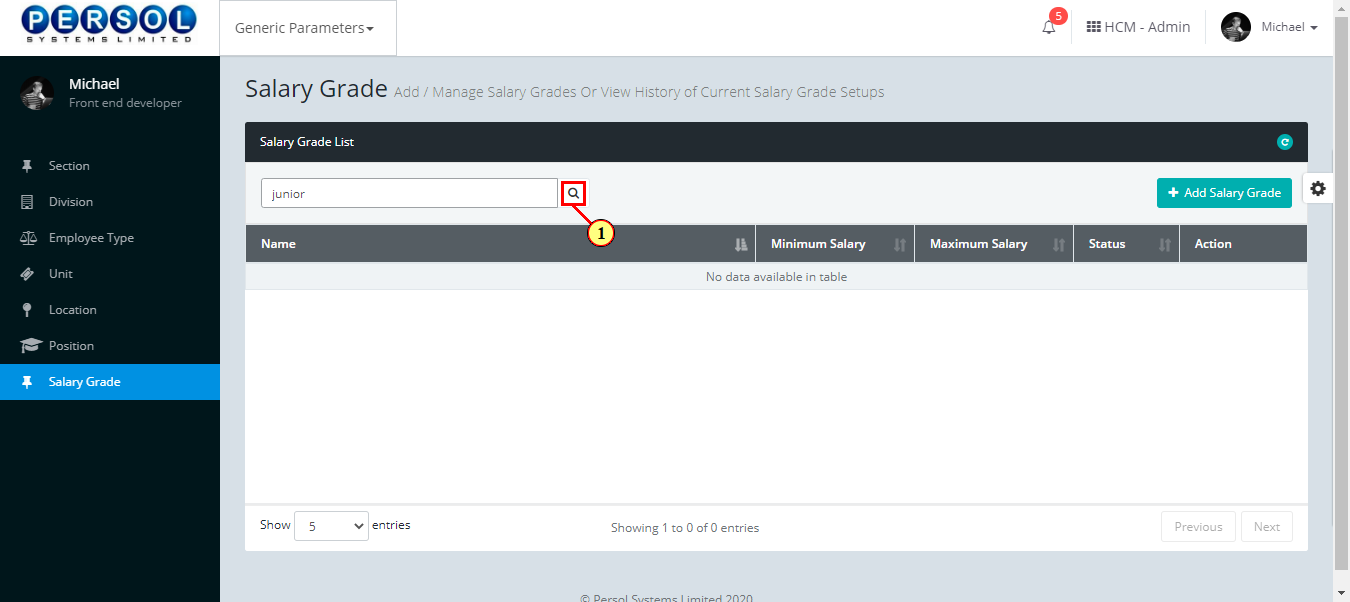
| (1) | To edit a salary grade, enter the salary grade name in the search box |
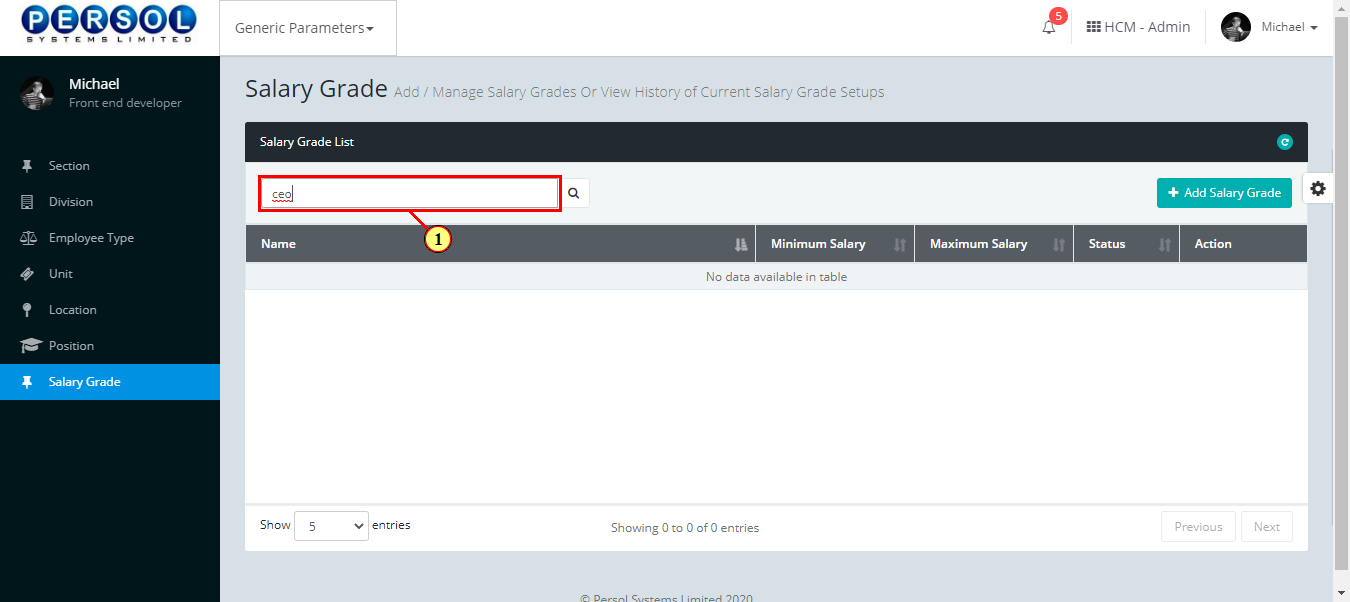
| Step | Action |
|---|---|
| (1) |
Click on the icon to search for salary grade
|
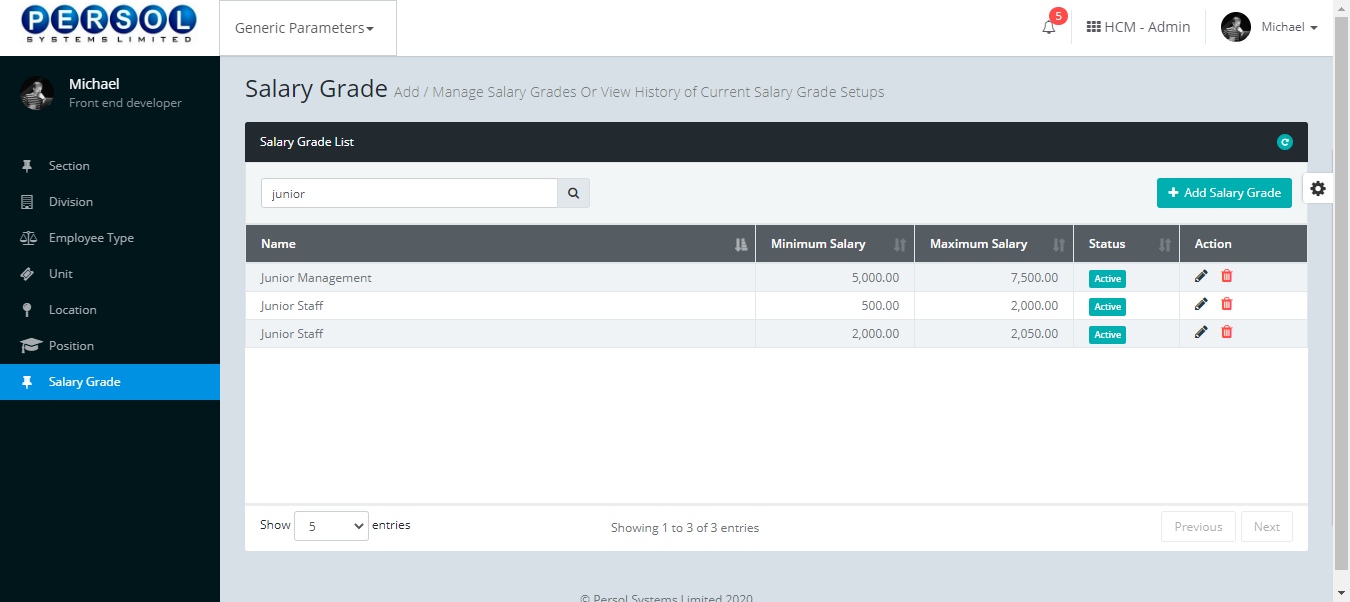
| Step | Action |
|---|---|
| (1) | The search result details display in the grid |
|
The Action column consists of the Edit and Delete action icons
|
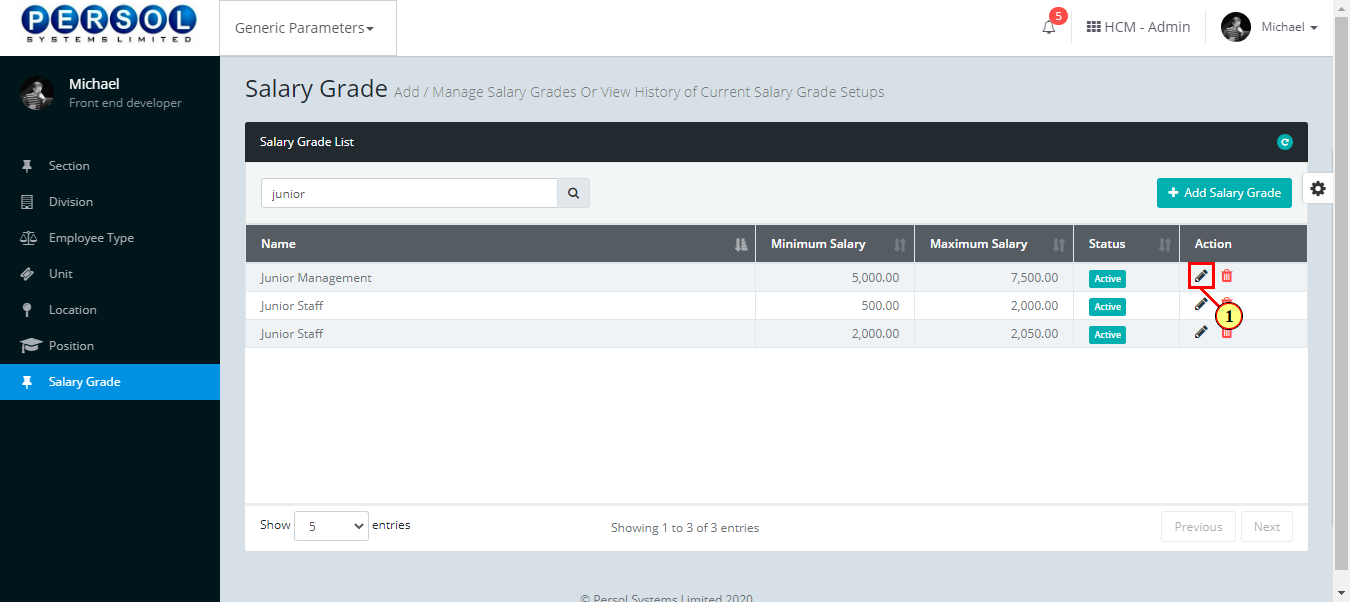
| Step | Action |
|---|---|
| (1) |
Click on the edit icon to edit the salary grade
|
|
You may click on the delete icon to delete salary grade
|
| Step | Action |
|---|---|
| The ‘Edit Salary Grade’ modal opens | |
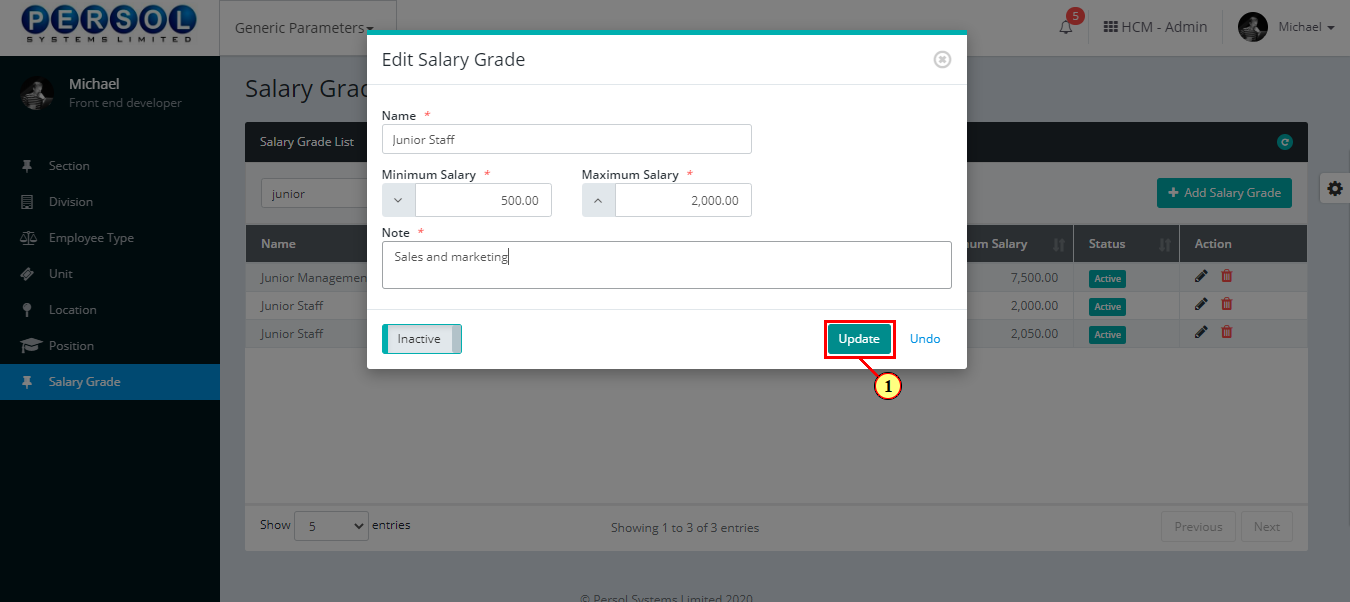
| Edit the details of the salary grade |
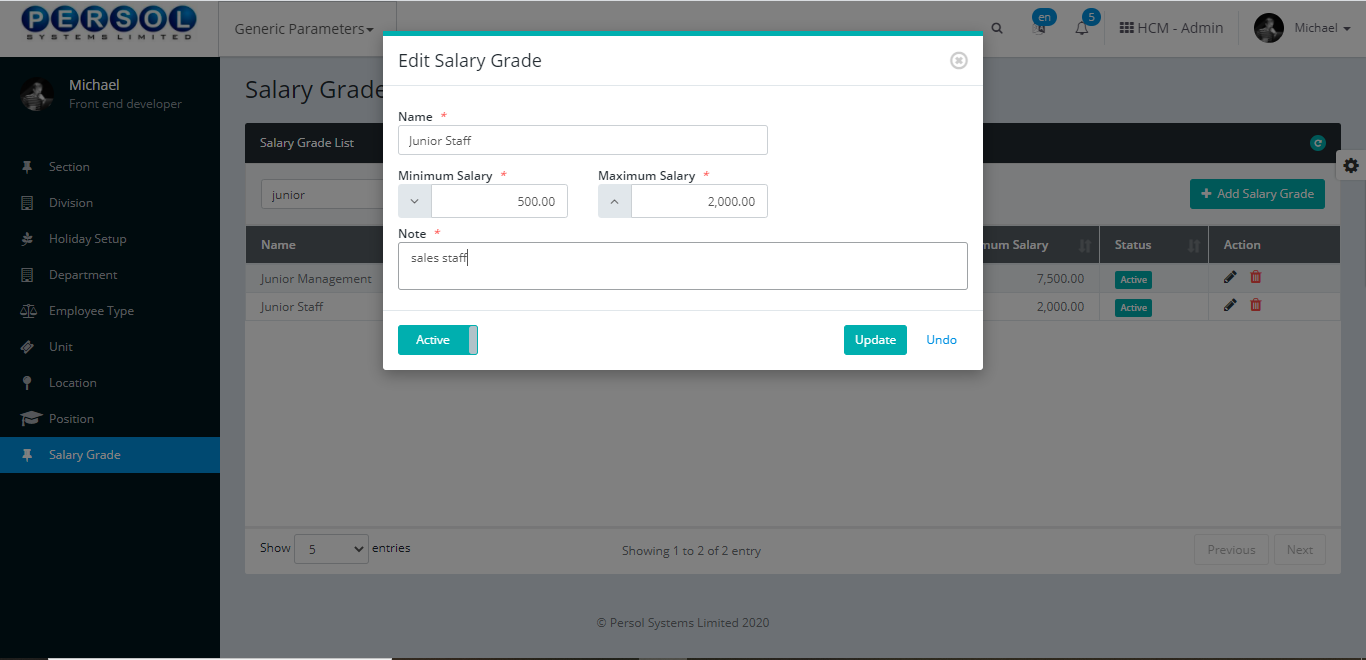
| Step | Action |
|---|---|
|
You may click on the button to revert changes made
|
| (1) |
Click on the button to save the changes made
|
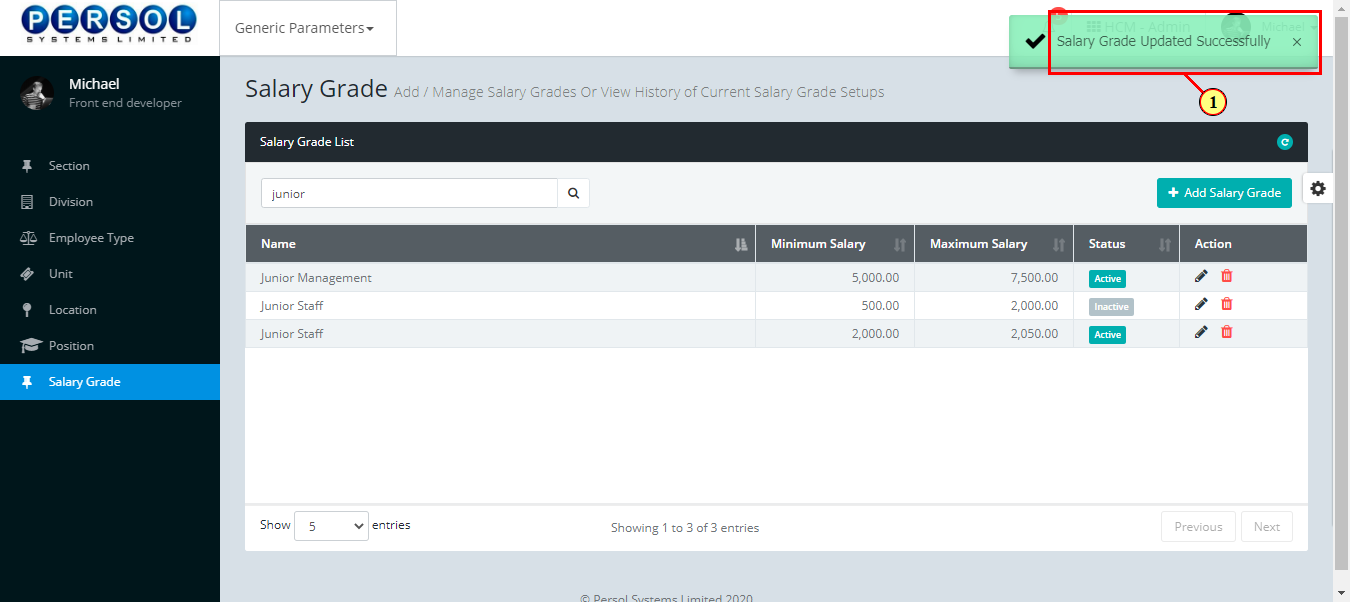
| Step | Action |
|---|---|
| (1) | A notification displays to indicate the update has been saved successfully |
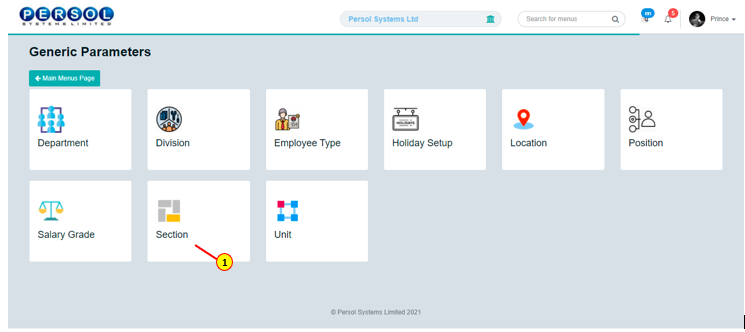
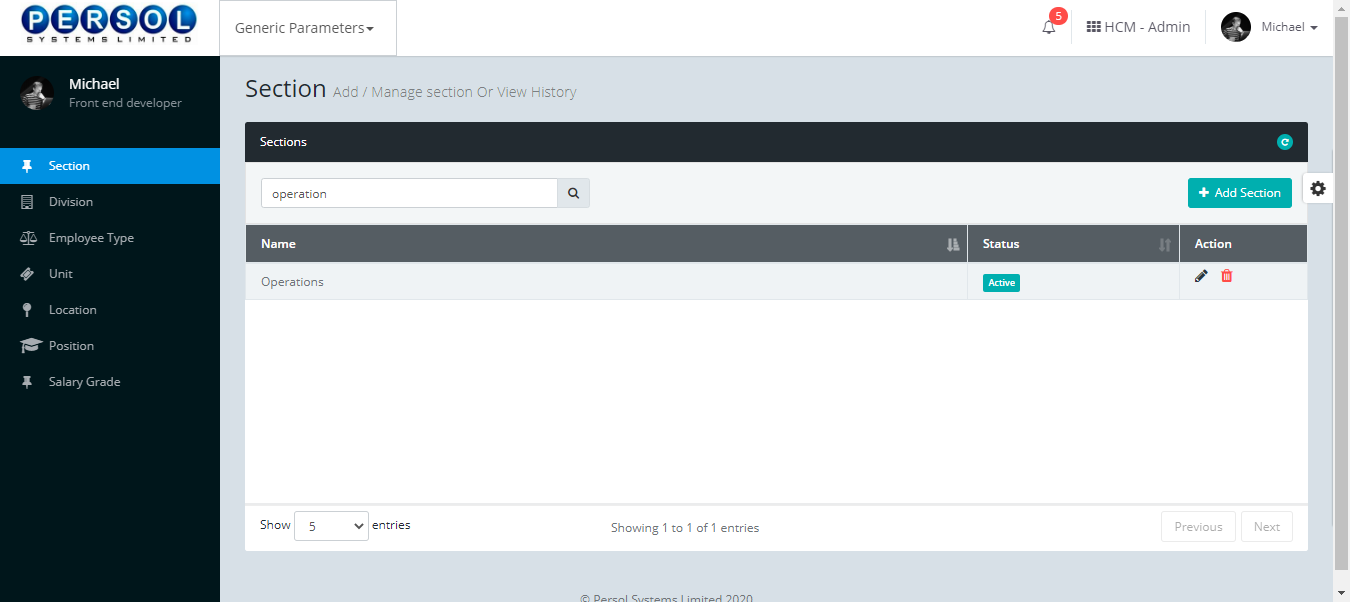
Section is a defined business segment provided by the company admin into the system eg: sales, operations etc.
| Step | Action |
|---|---|
| (1) | On the Personax Customer Admin homepage, select the ‘Generic Parameters’ tile |
| Step | Action |
|---|---|
| The ‘Generic Parameters’ submenus page opens | |
| (1) | Select the ‘Section’ tile |
| Step | Action |
|---|---|
| The ‘Section’ page opens | |
| (1) |
To setup a new Section, click on the  button button
|

| Step | Action |
|---|---|
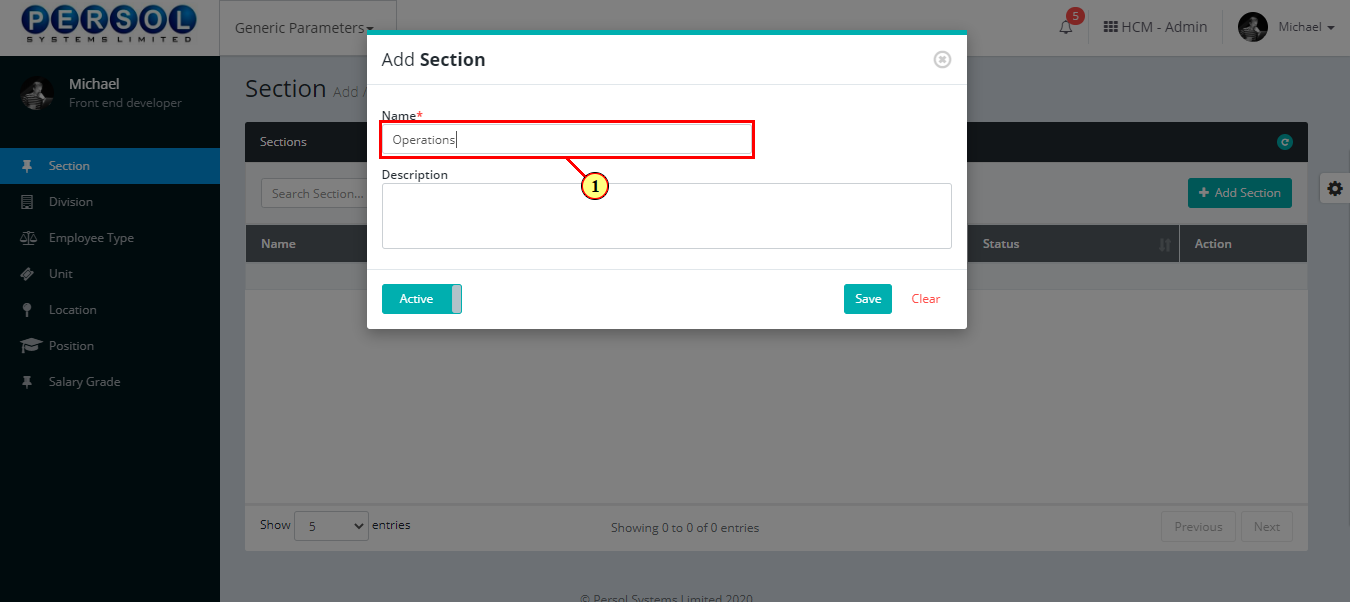
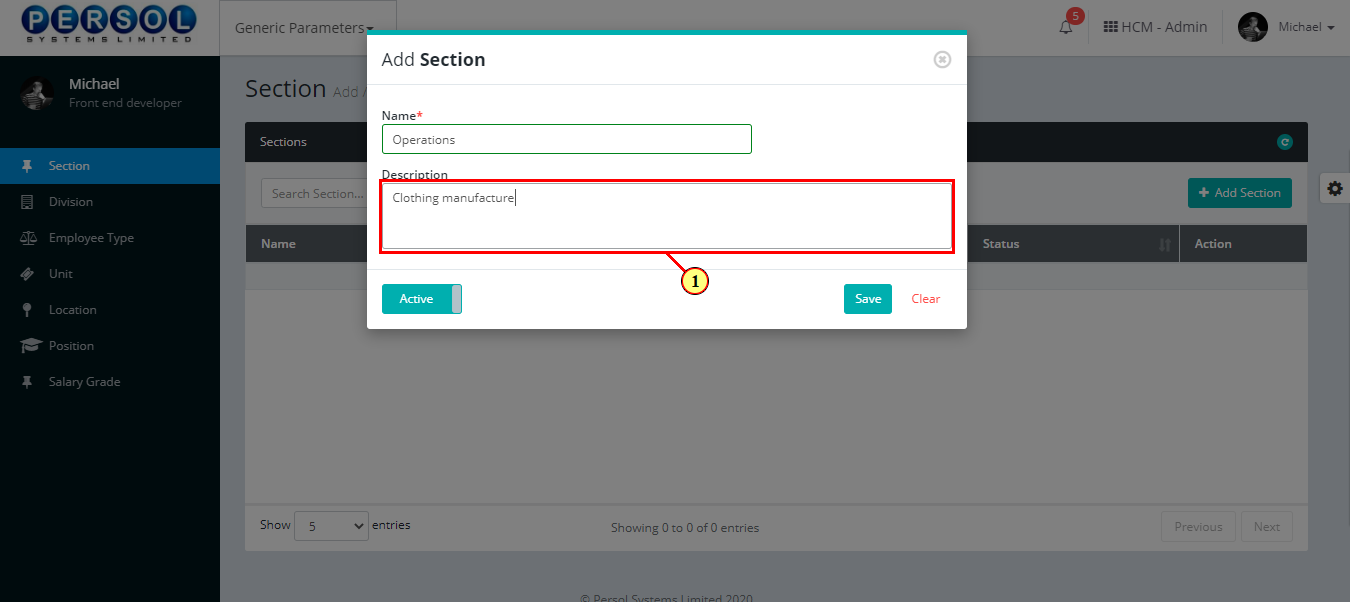
| The ‘Add Section’ modal opens | |
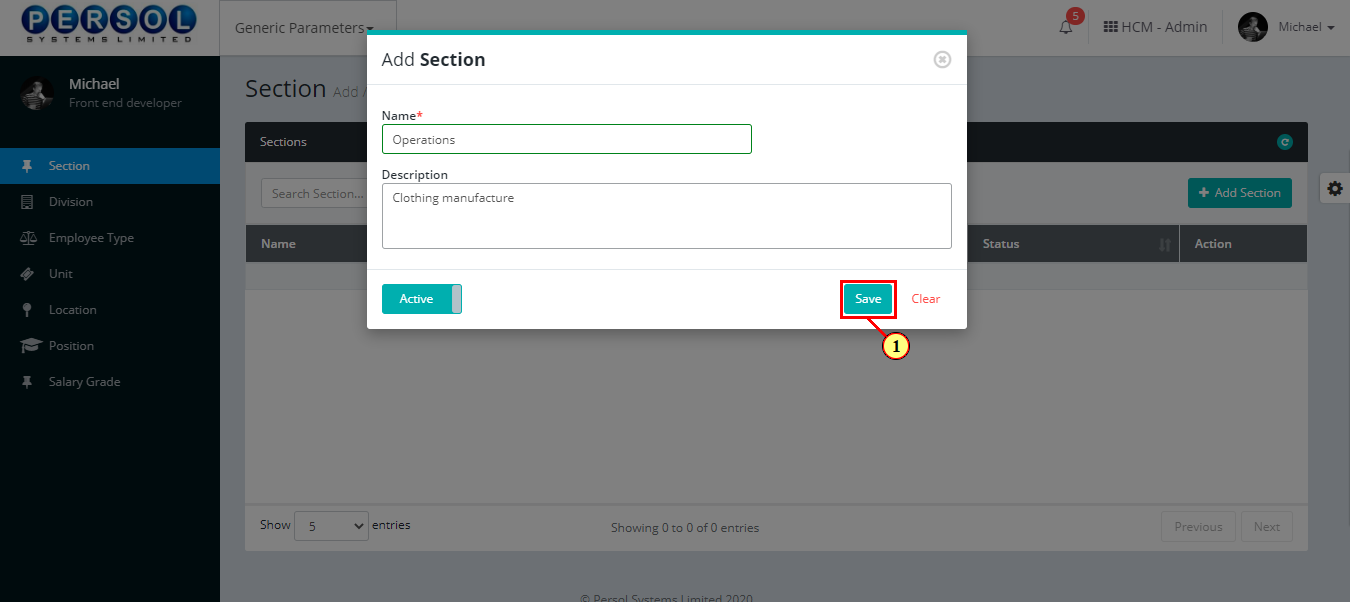
| (1) | Enter name of the new section |
|
This field is required * |
| Step | Action |
|---|---|
| (1) | Add a description to provide more details on the section |
| Step | Action |
|---|---|
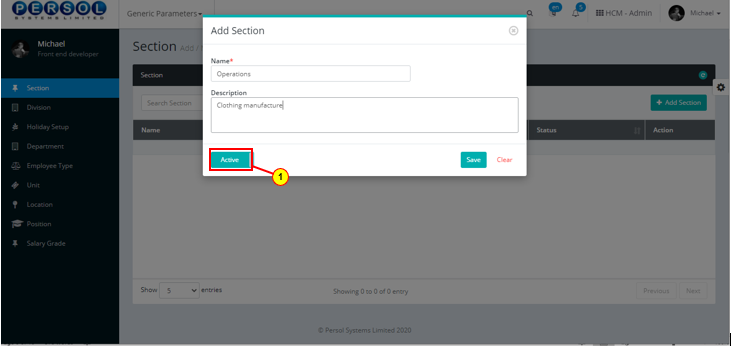
| (1) |
You may click on the  button to change status of section to inactive button to change status of section to inactive
|
|
- An active status means the section can be used in transactions on other pages - An inactive status means the section cannot be used in transactions on other pages |
| Step | Action |
|---|---|
|
You may click on the  button to clear all details entered button to clear all details entered
|
| (1) |
Click on the  button to save details of the newly added section button to save details of the newly added section
|

| Step | Action |
|---|---|
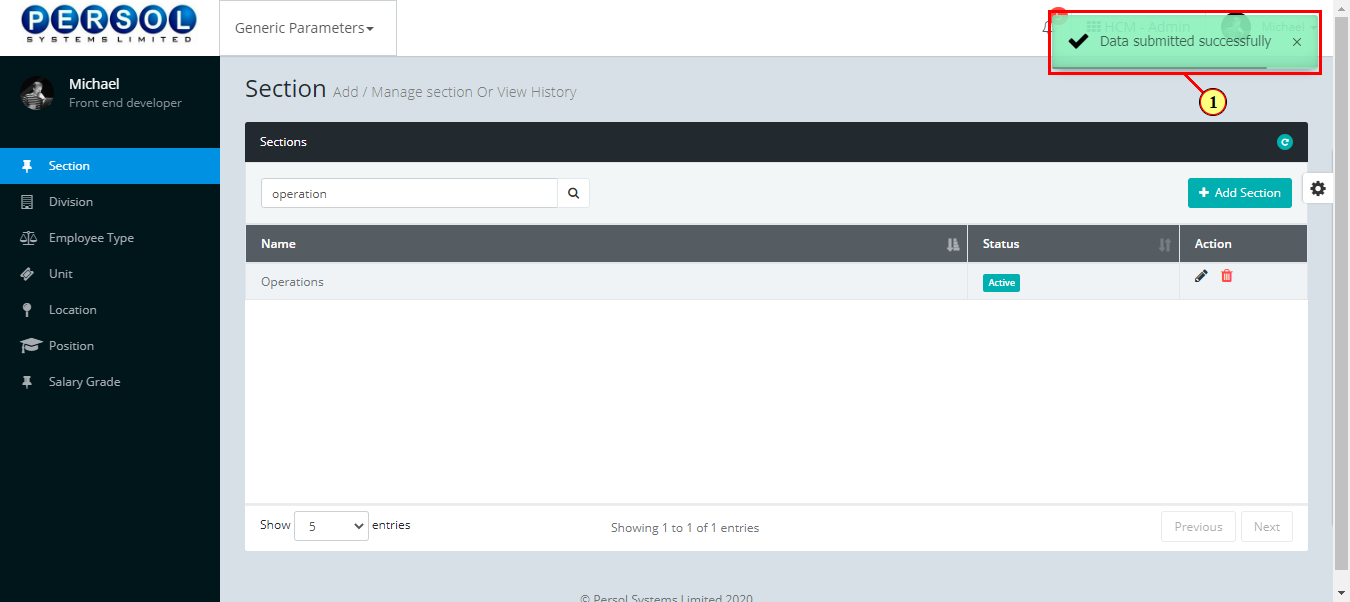
| (1) | A notification displays to indicate that the section setup has been saved successfully |

| Step | Action |
|---|---|
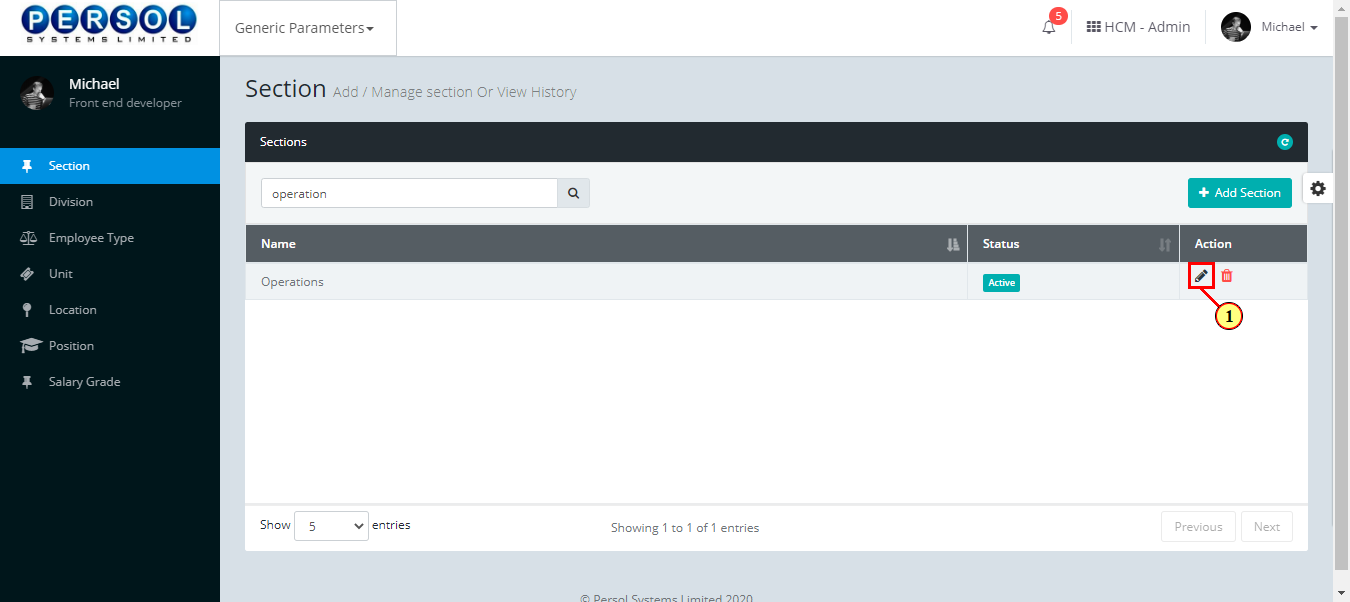
| (1) | To edit a section, enter the section name in the search box |
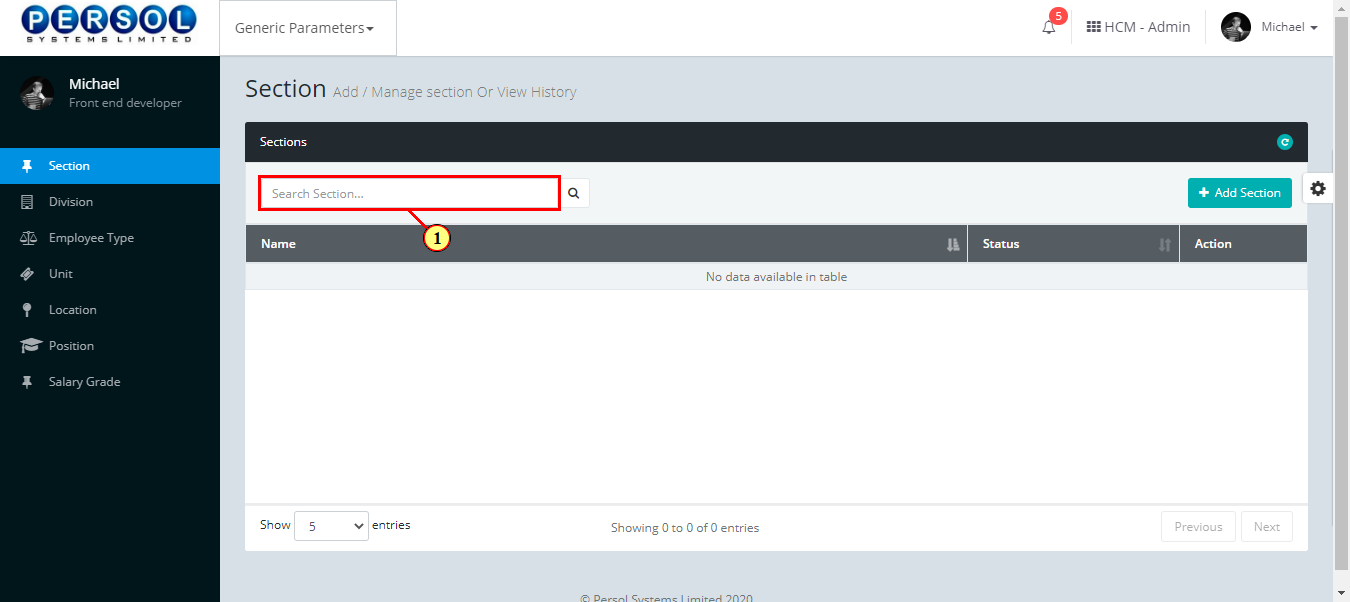
| Step | Action |
|---|---|
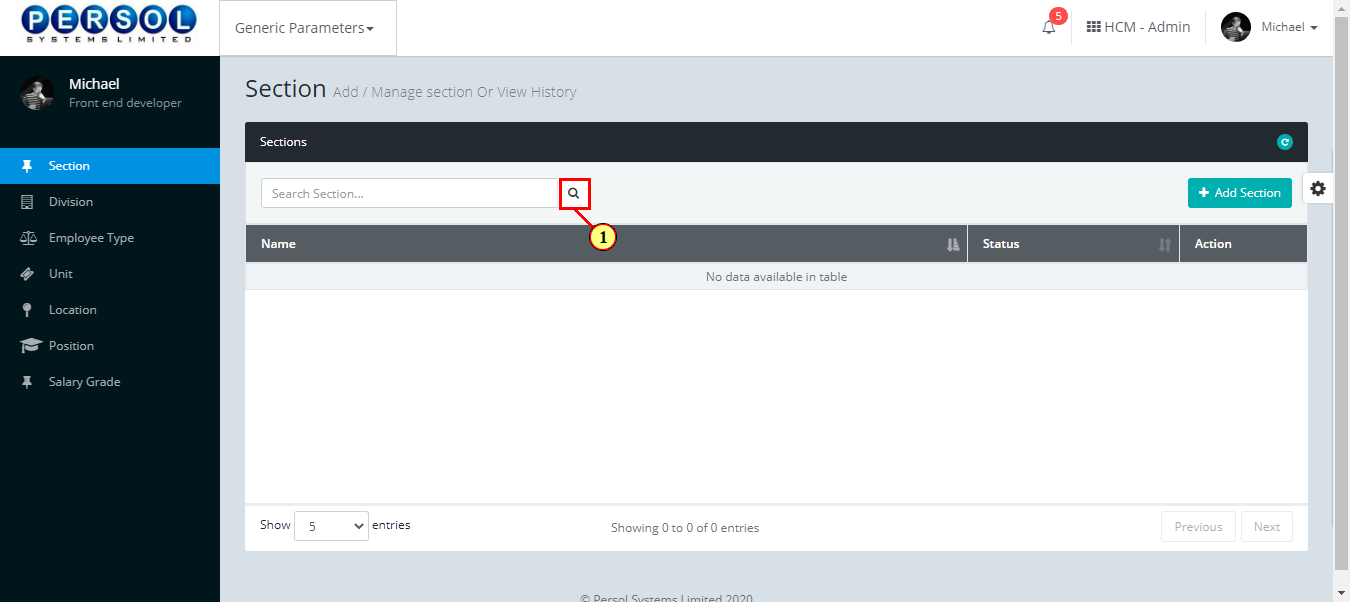
| (1) |
Click on the close button  icon to search for section icon to search for section
|
| Step | Action |
|---|---|
| The search result details display in the grid | |
| (1) |
The Action column consists of the Edit and Delete action icons
|
| Step | Action |
|---|---|
| (1) |
Click on the edit icon to edit the section
|
|
You may click on the delete icon to delete section
|
| Step | Action |
|---|---|
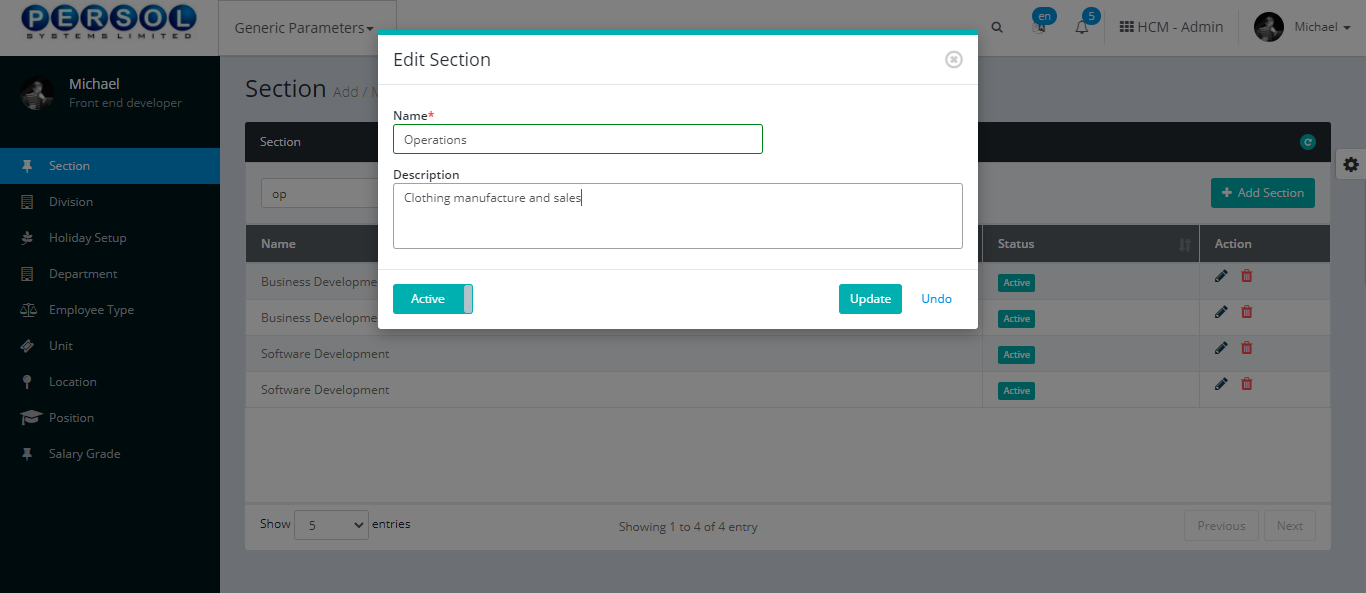
| The ‘Edit Section’ modal opens | |
| Edit the name, description or status of the section |
| Step | Action |
|---|---|
|
You may click on the  button to revert changes made button to revert changes made
|
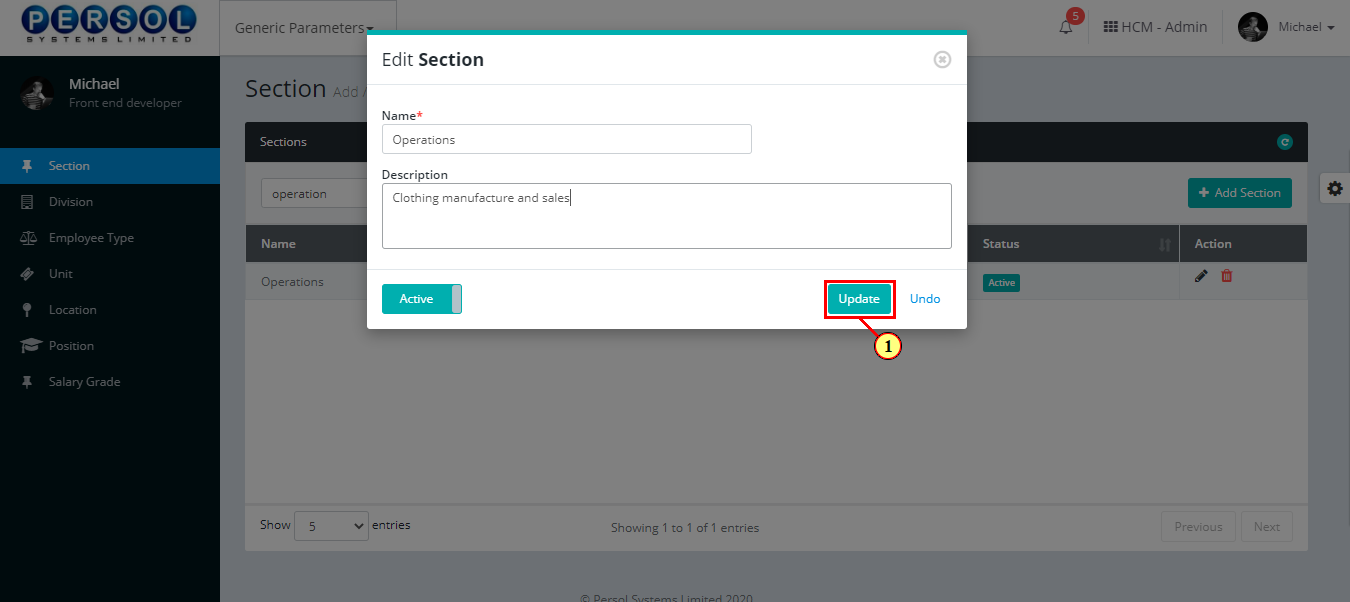
| (1) |
Click on the  button to save the changes made button to save the changes made
|
| Step | Action |
|---|---|
| (1) | A notification displays to indicate the update has been saved successfully |
Unit is a defined business segment provided by the company admin into the system eg: analysis, audit etc.
| Step | Action |
|---|---|
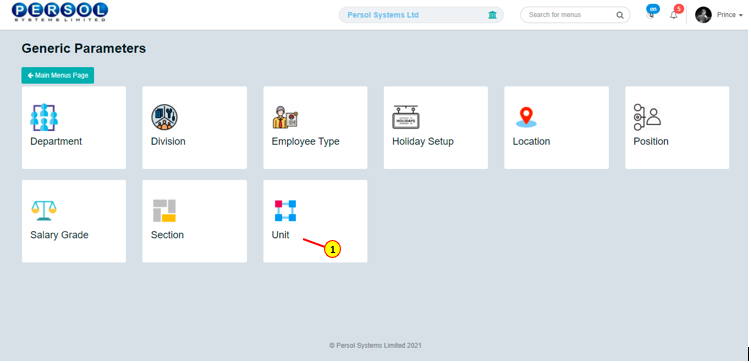
| (1) | On the Personax Customer Admin homepage, select the ‘Generic Parameters’ tile |
| Step | Action |
|---|---|
| The ‘Generic Parameters’ submenus page opens | |
| (1) | Select the ‘Unit’ tile |
| Step | Action |
|---|---|
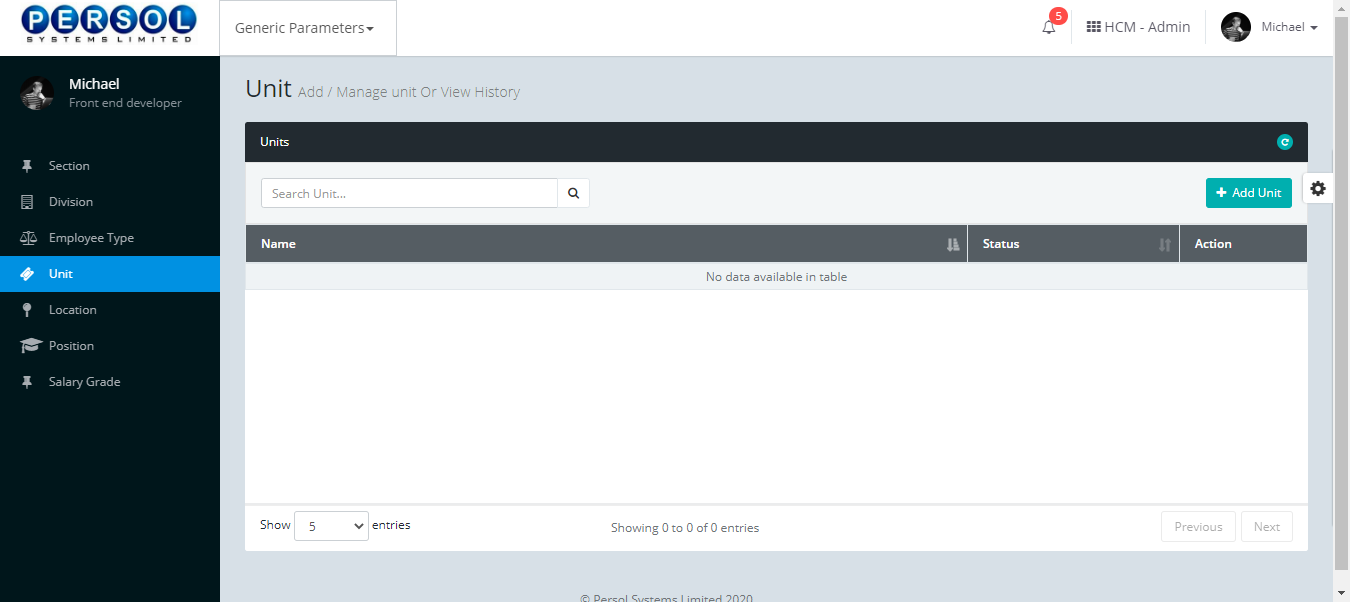
| The ‘Unit’ page opens |
| Step | Action |
|---|---|
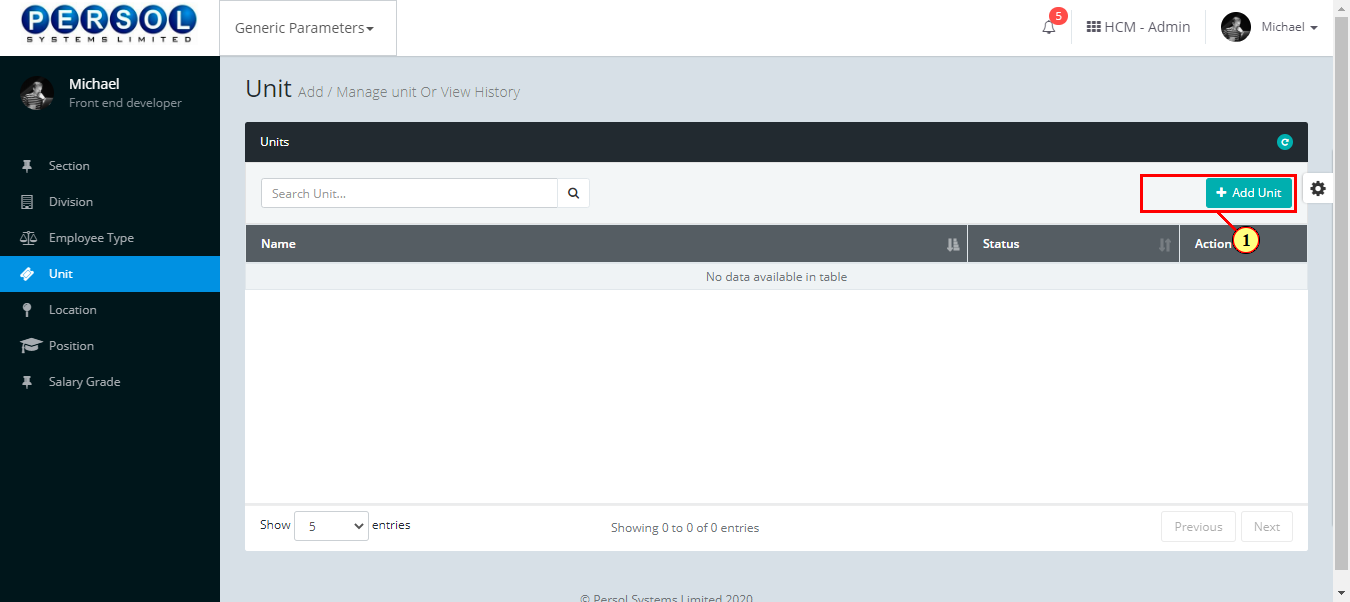
| (1) |
To setup a new Unit, click on the  button button
|
| Step | Action |
|---|---|
| The ‘Add Unit’ modal opens | |
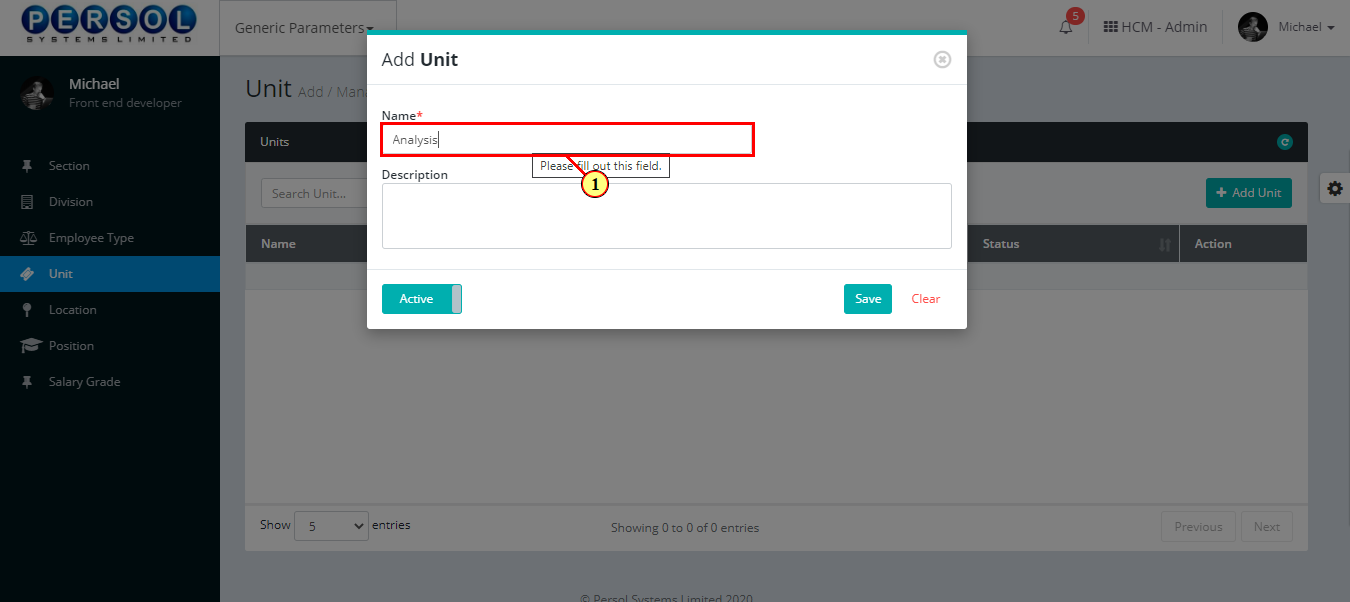
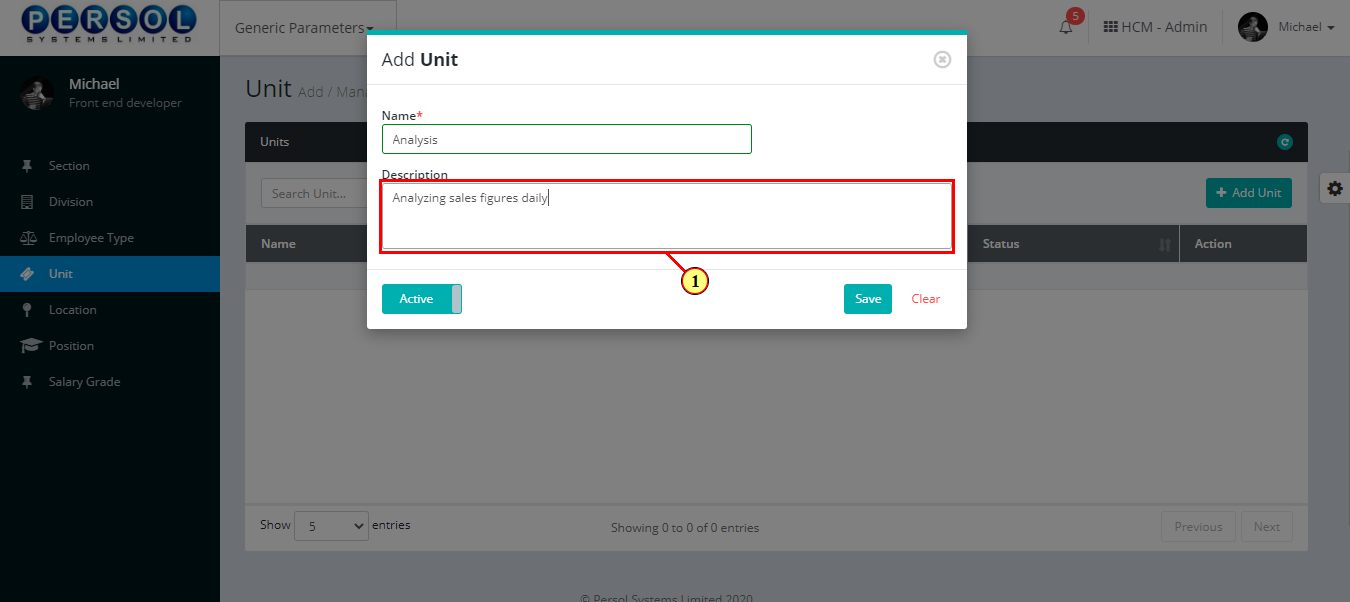
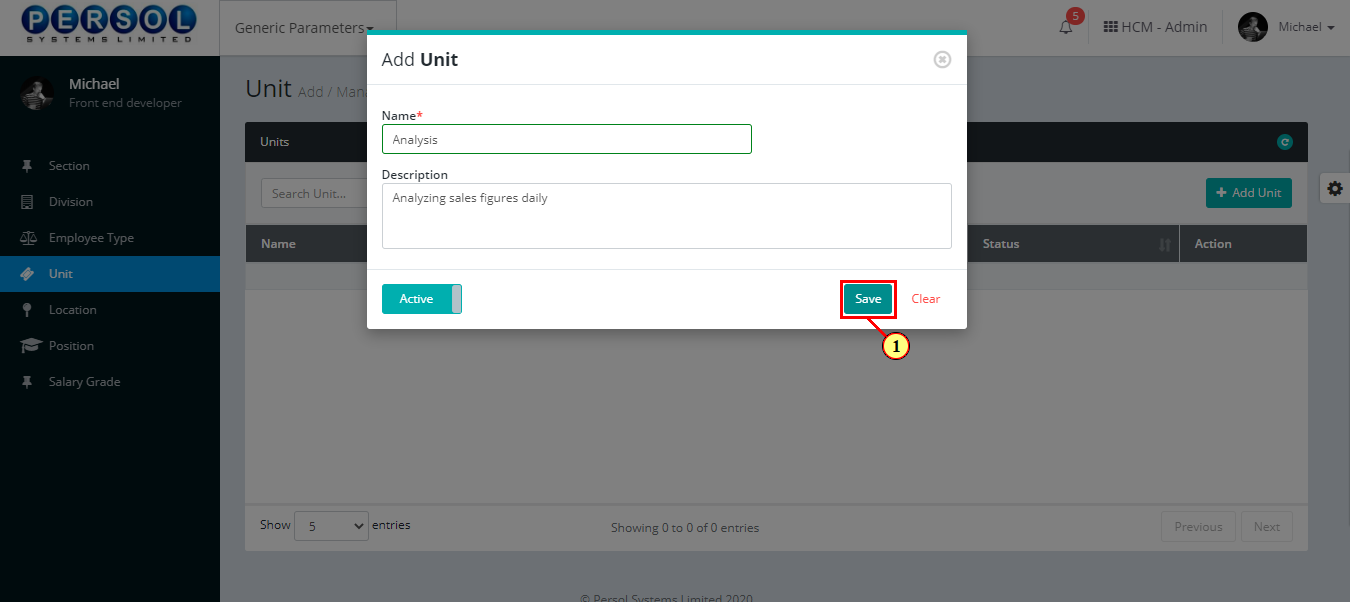
| (1) | Enter name of the new unit |
 |
This field is required * |
| Step | Action |
|---|---|
| (1) | Add description to provide more details on the unit |
| Step | Action |
|---|---|
| (1) |
You may click on the  button to change status of unit to inactive button to change status of unit to inactive
|
|
- An active status means the unit can be used in transactions on other pages - An inactive status means the unit cannot be used in transactions on other pages |
| Step | Action |
|---|---|
|
You may click on the  button to clear all details entered button to clear all details entered
|
| (1) |
Click on the button to save details of the newly added unit
|
| Step | Action |
|---|---|
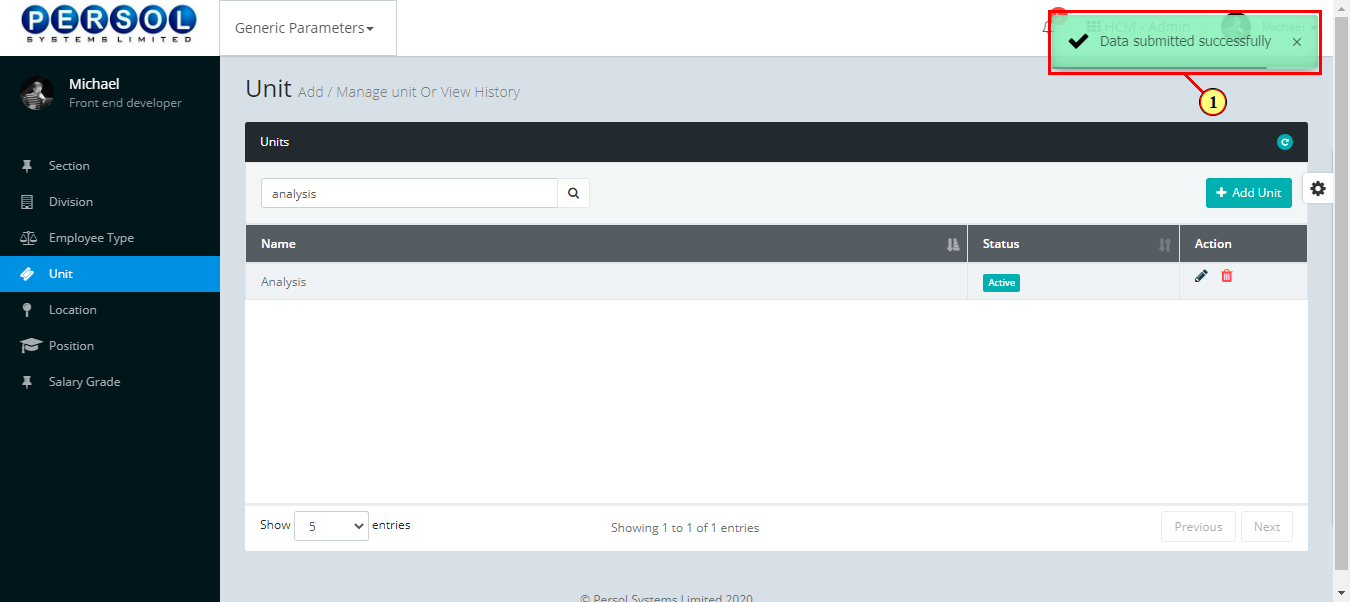
| (1) | A notification displays to indicate that the unit setup has been saved successfully |

| Step | Action |
|---|---|
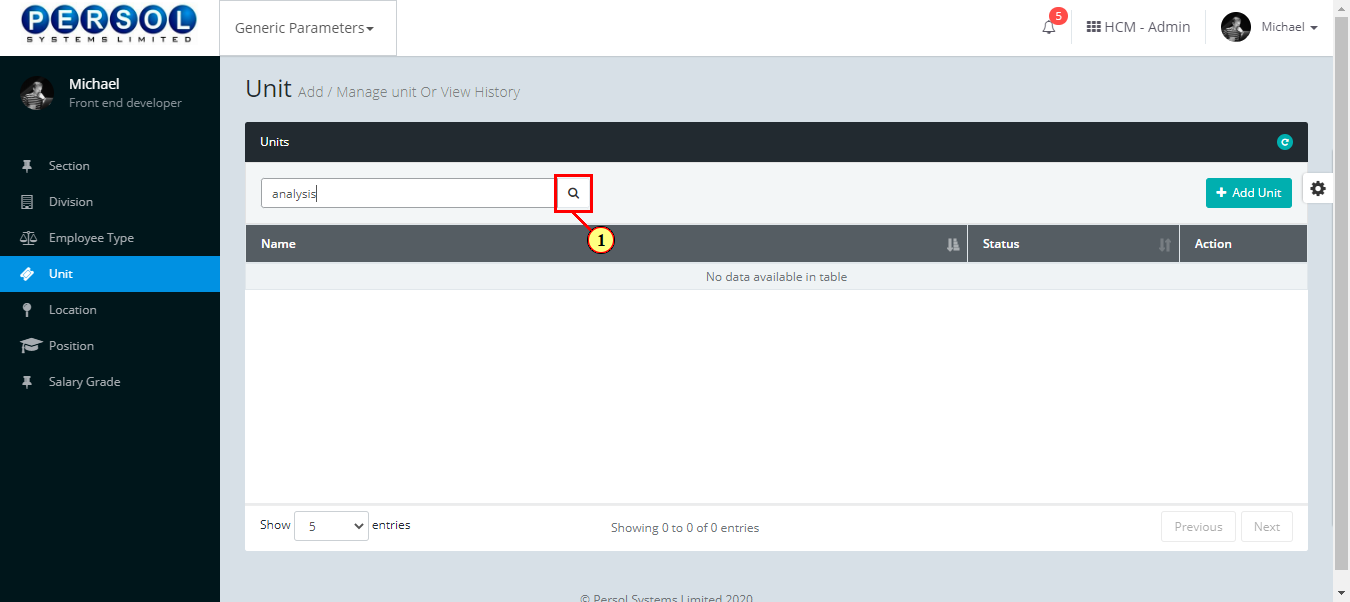
| (1) | To edit a unit, enter the unit name in the search box |

| Step | Action |
|---|---|
| (1) |
Click on the  icon to search for unit icon to search for unit
|
| Step | Action |
|---|---|
| The search result details display in the grid | |
| |
The Action column consists of the Edit  and Delete and Delete  action icons action icons
|
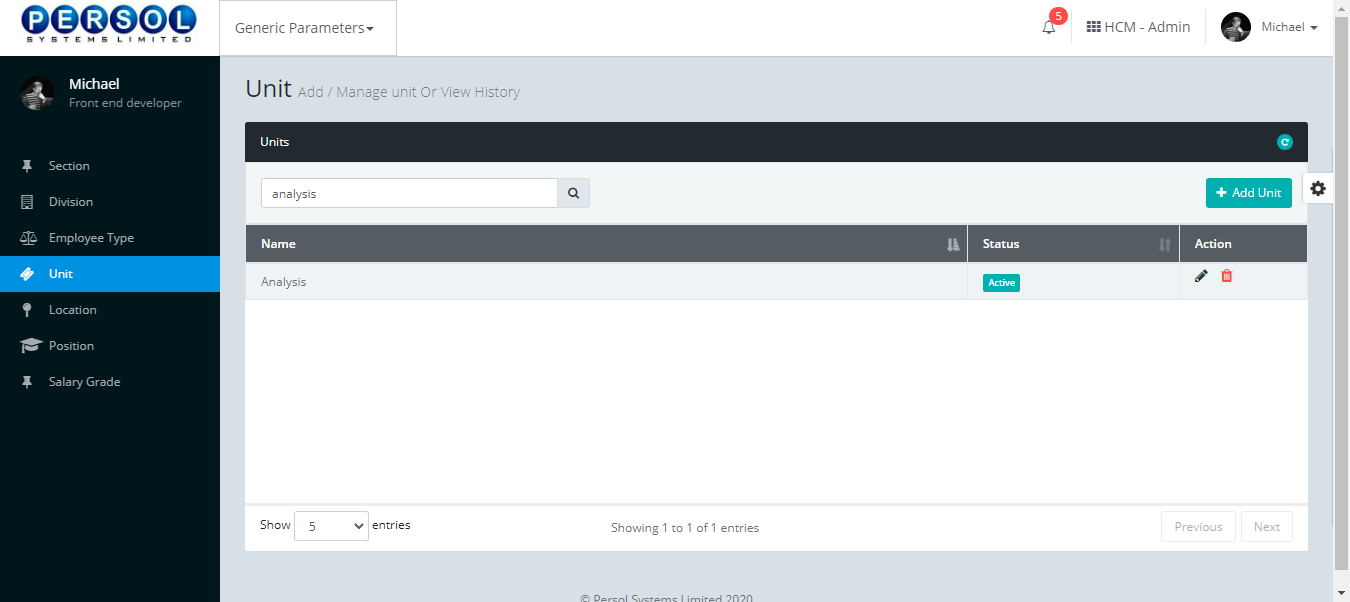
| Step | Action |
|---|---|
| (1) |
Click on the edit icon to edit the unit
|
|
You may click on the delete icon to delete the unit
|

| Step | Action |
|---|---|
| The ‘Edit Unit’ modal opens | |
| Edit the name, description or status of the unit |
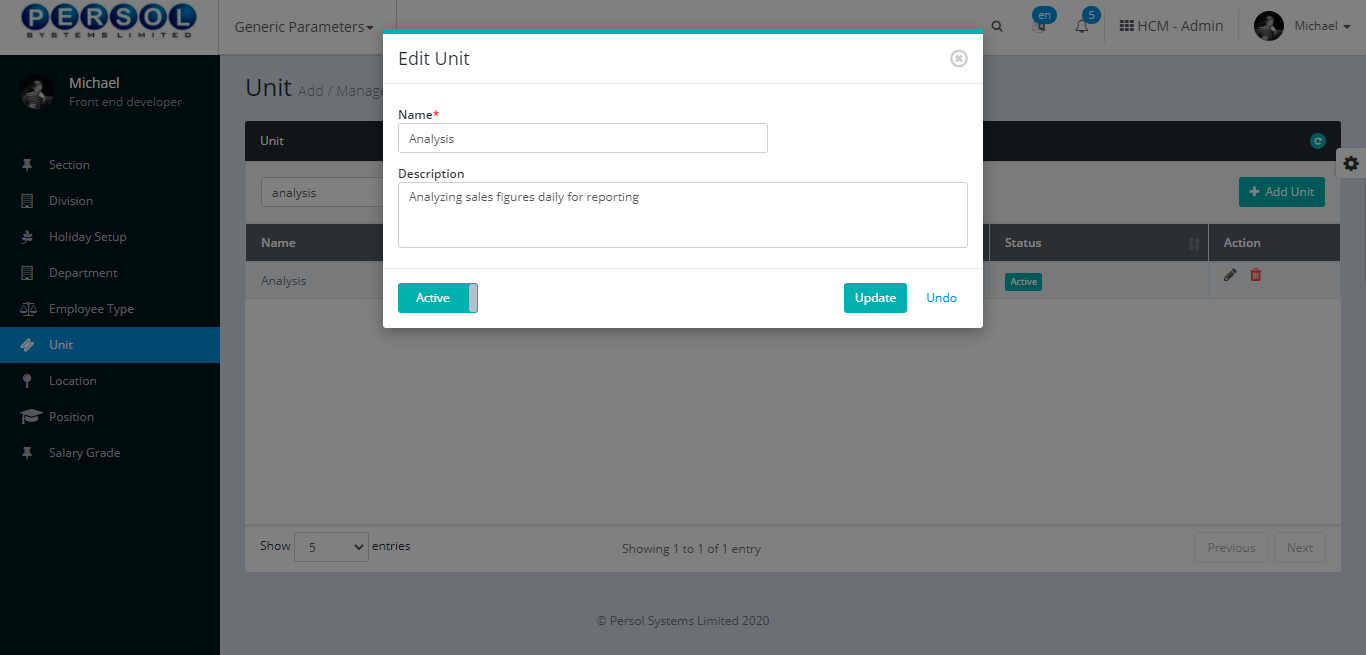
| Step | Action |
|---|---|
|
You may click on the  button to revert changes made button to revert changes made
|
| (1) |
click on the  button to save the changes made button to save the changes made
|
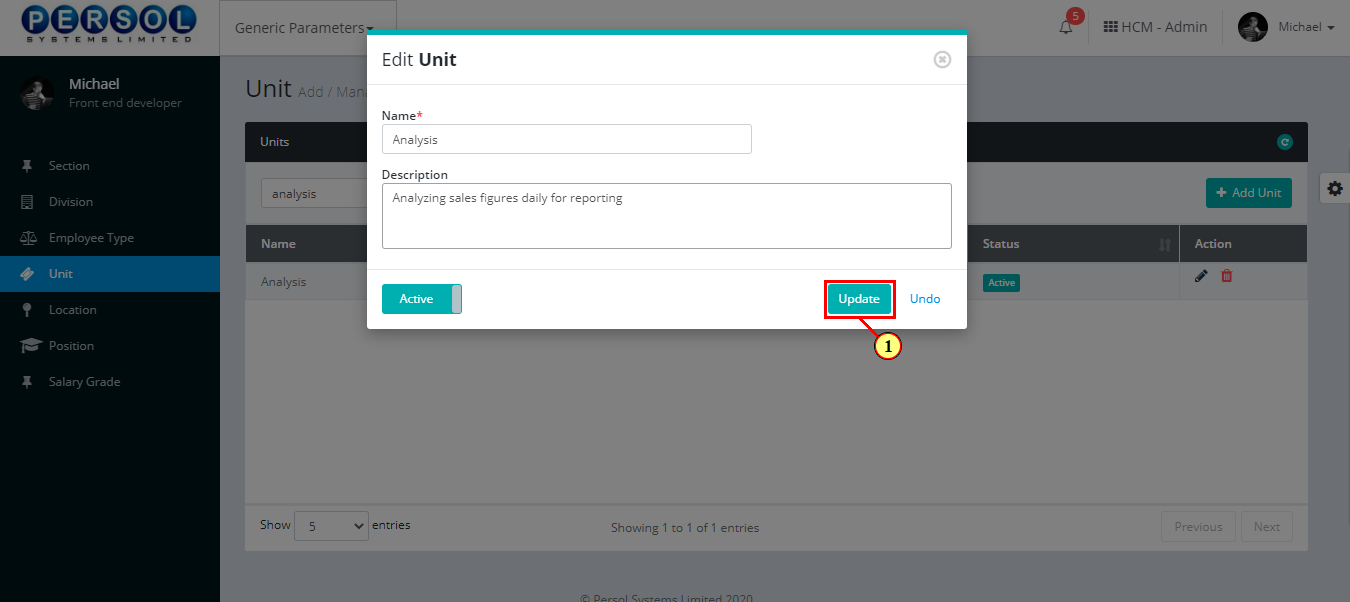
| Step | Action |
|---|---|
| (1) | A notification displays to indicate that the update has been saved successfully |
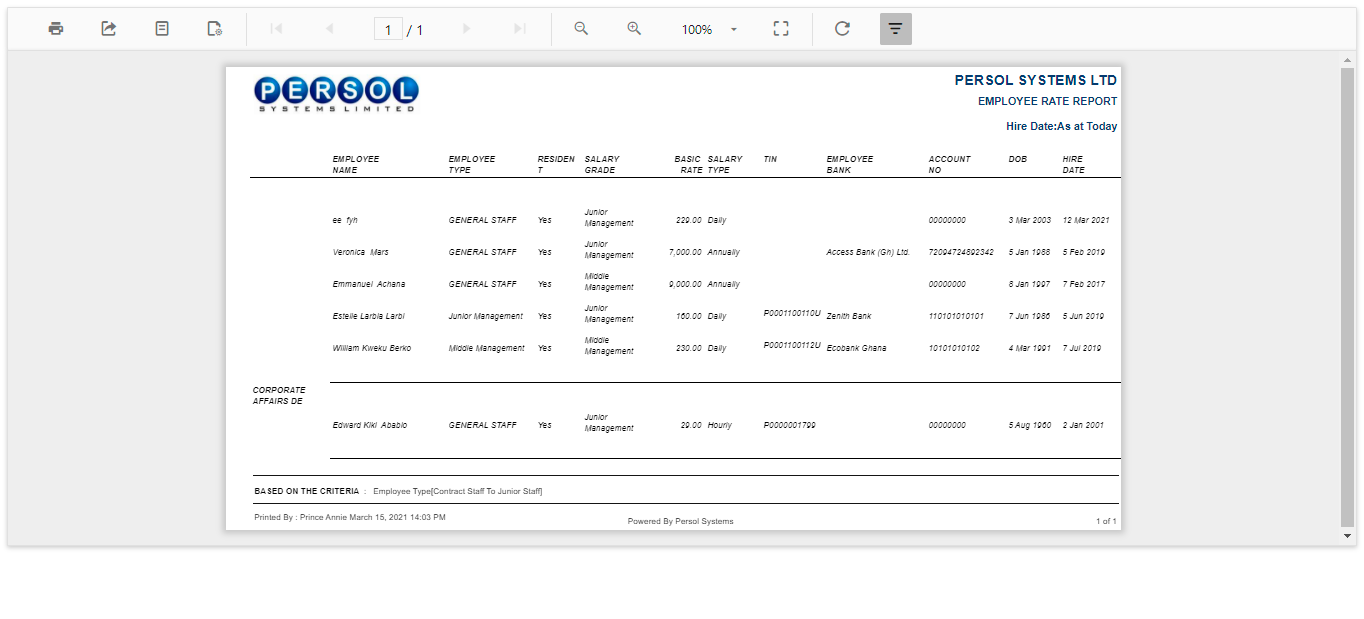
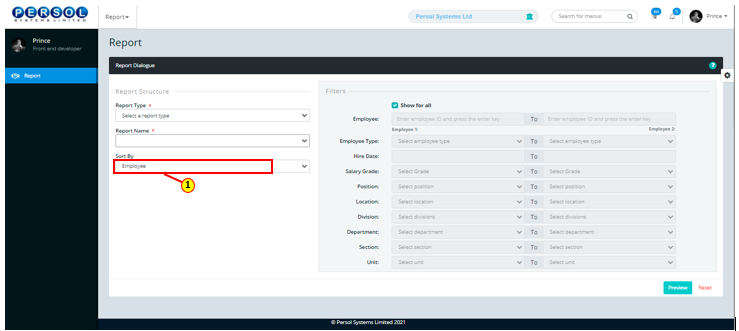
| Step | Action |
|---|---|
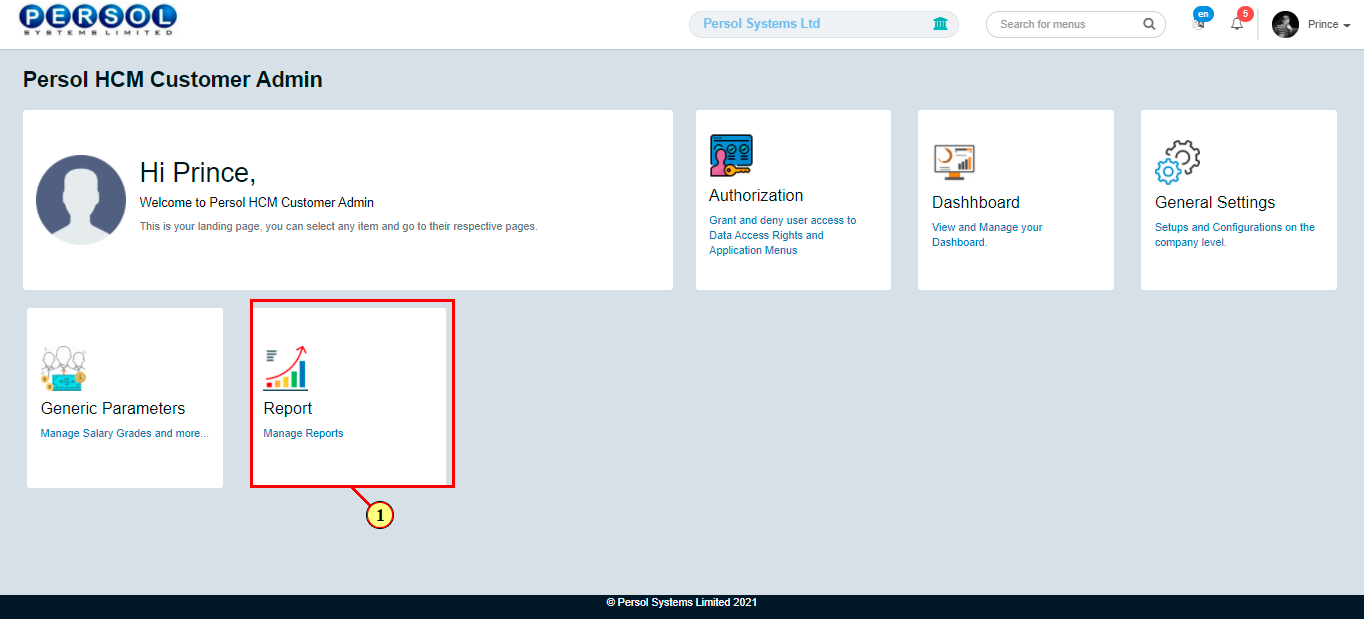
| (1) | On the Personax Customer Admin homepage, select the 'Report’ tile |
| Step | Action |
|---|---|
| The 'Report' page opens | |
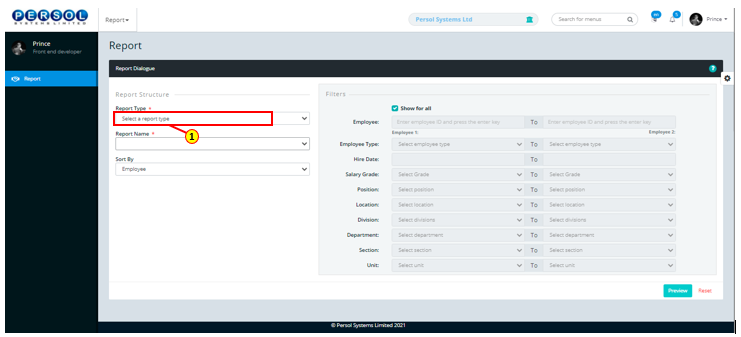
| (1) | To view a report, select the report type |
| Step | Action |
|---|---|
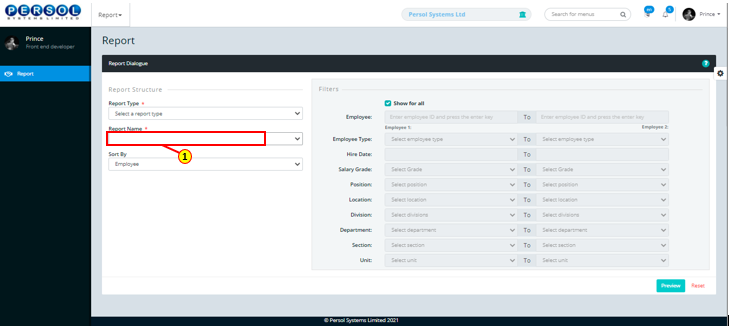
| (1) | Select the name of the report |
| Step | Action |
|---|---|
| (1) | Select the criteria by which the report should be sorted |
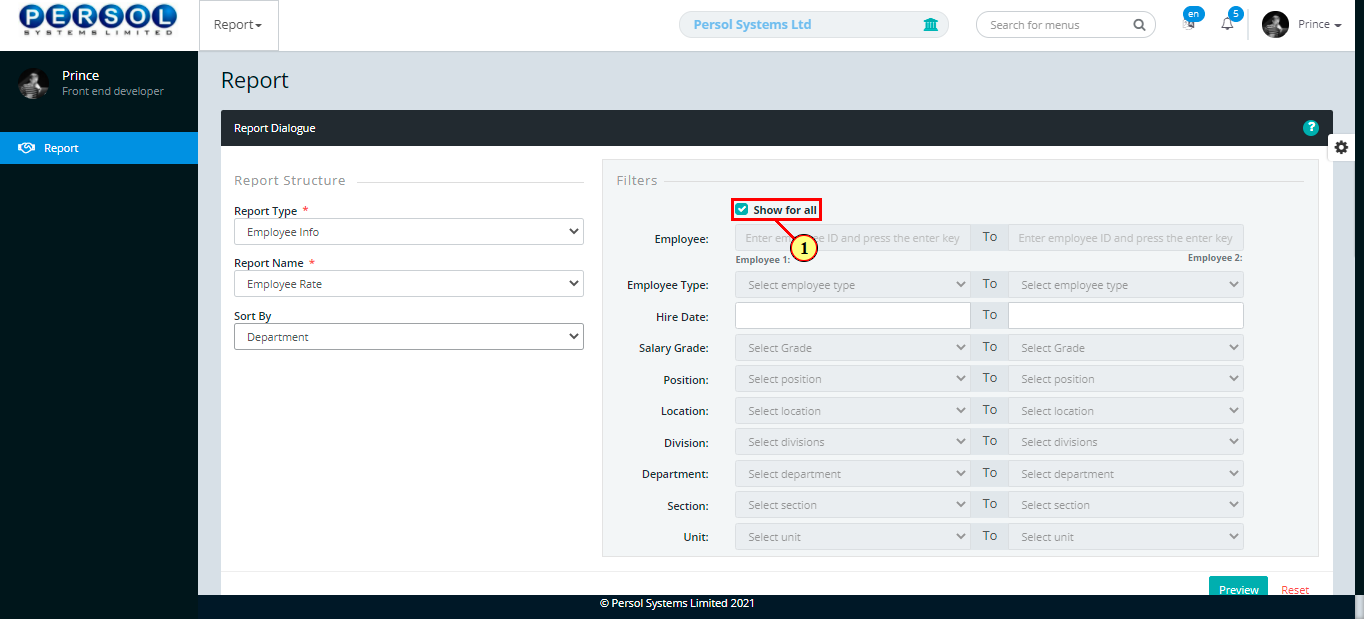
| Step | Action |
|---|---|
| (1) | Check box to view all available categories on the report |
|
OR: Click here to view alternative |
|
Click here to continue steps |
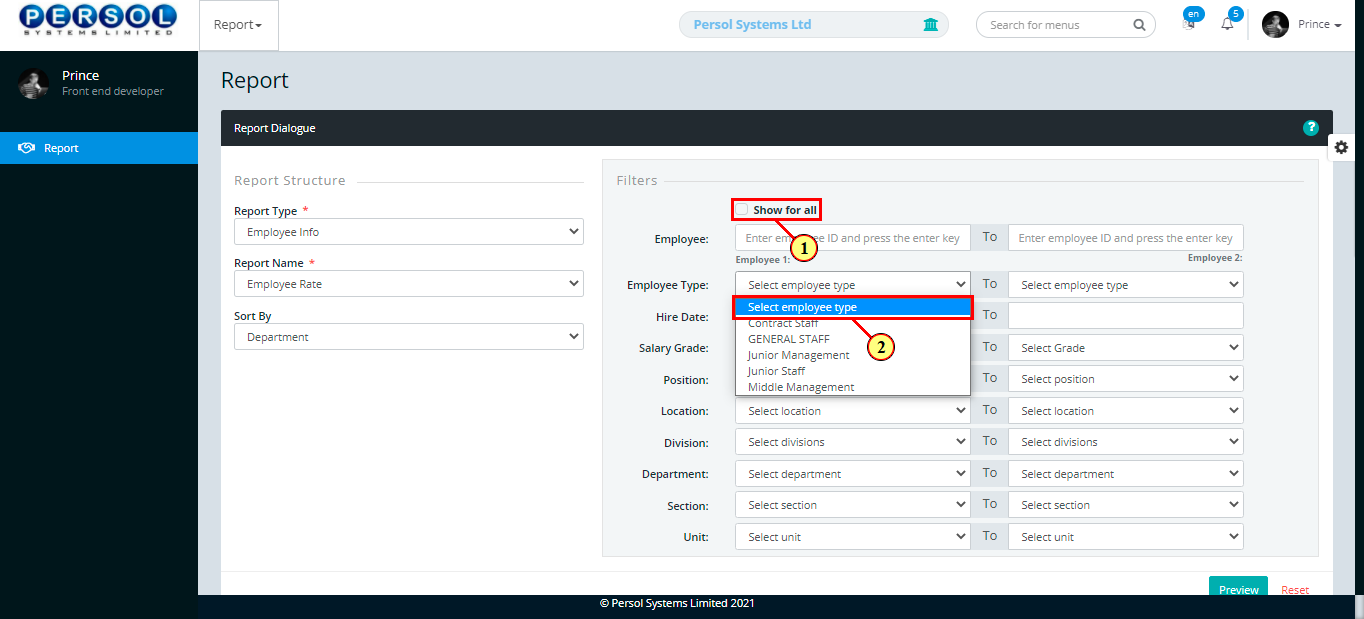
| Step | Action |
|---|---|
| (1) | Uncheck box to select the specific categories to show on report |
| (2) | Select the range (from & to) for each category that you want to show on the report |
| Step | Action |
|---|---|
| (1) |
Click on the  button to open report button to open report
|
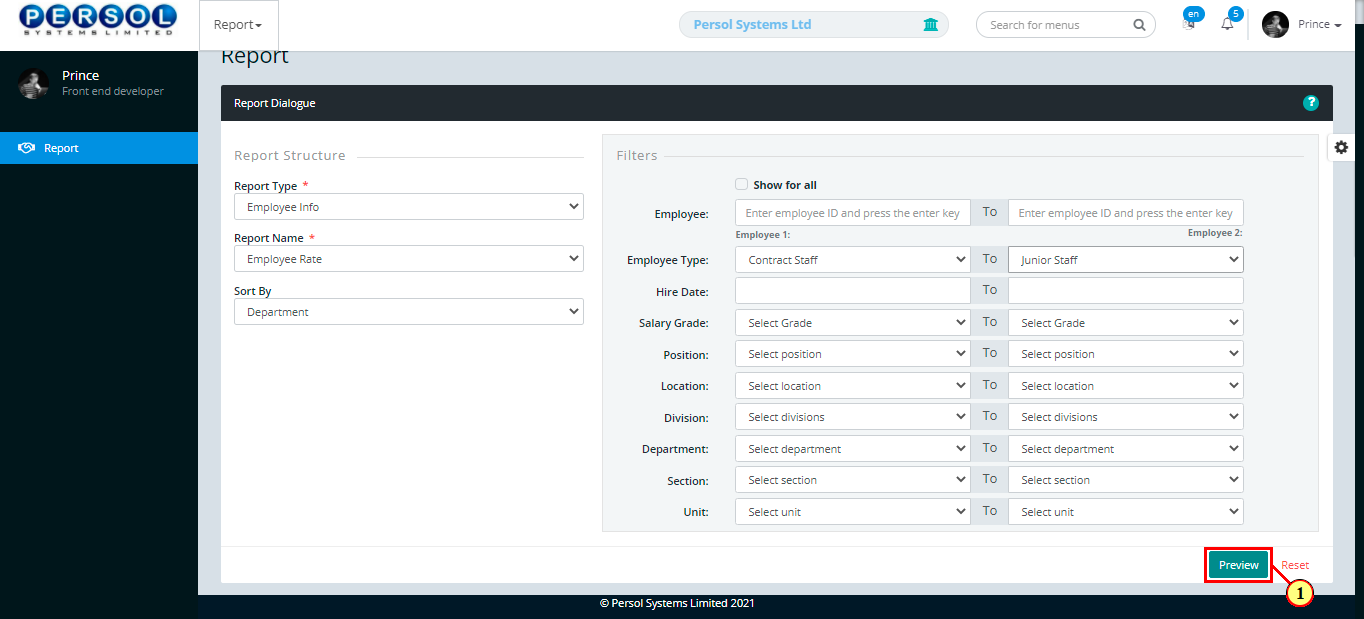
| Step | Action |
|---|---|
| The report opens in the browser |